2019 MERCEDES-BENZ GLE SUV wheel size
[x] Cancel search: wheel sizePage 24 of 398

Warning lamp ................................. 286
Warning message .......................... 360
Tire pressure table ............................355
TIREFIT kit
Important safety notes .................. 337
Storage location ............................ 335
Tire pressure not reached .............. 339
Tire pressure reached .................... 339
Using ............................................. 338
Tires
Aspect ratio (definition) ................. 370
Average weight of the vehicle
occupants (definition) .................... 369
Bar (definition) ............................... 369
Changing a wheel .......................... 371
Characteristics .............................. 369
Checking ........................................ 351
Curb weight (definition) ................. 370
Definition of terms ......................... 369
Direction of rotatio n...................... 372
Display message ............................ 268
Distribution of the vehicle occu-
pants (definition) ............................ 371
DOT (Department of Transporta-
tion) (definition) ............................. 369
DOT, Tire Identification Number
(TIN) ............................................... 368
GAWR (Gross Axle Weight Rating)
(definition) ..................................... 369
GTW (Gross Trailer Weight) (defi-
nition) ............................................ 370
GVW (Gross Vehicle Weight) (def-
inition) ........................................... 370
GVWR (Gross Vehicle Weight Rat-
ing) (definition) .............................. 370
Important safety notes .................. 351
Increased vehicle weight due to
optional equipment (definition) ...... 369
Information on driving .................... 351
Kilopascal (kPa) (definition) ........... 370
Labeling (overview) ........................ 366
Load bearing index (definition) ...... 371
Load index ..................................... 368
Load index (definition) ................... 370
M+S tire s....................................... 353
Maximum load on a tire (defini-
tion) ............................................... 370 Maximum loaded vehicle weight
(definition) ..................................... 370
Maximum permissible tire pres-
sure (definition) ............................. 370
Maximum tire load ......................... 368
Maximum tire load (definition) ....... 370
MOExtended tire s.......................... 353
Optional equipment weight (defi-
nition) ............................................ 371
PSI (pounds per square inch) (def-
inition) ........................................... 370
Replacing ....................................... 371
Service life ..................................... 352
Sidewall (definition) ....................... 371
Snow chains .................................. 353
Speed rating (definition) ................ 370
Storing ........................................... 372
Structure and characteristics
(definition) ..................................... 369
Summer tires in winter .................. 353
Temperature .................................. 365
TIN (Tire Identification Number)
(definition) ..................................... 371
Tire bead (definition) ...................... 370
Tire pressure (definition) ................ 370
Tire pressures (recommended) ...... 369
Tire size (data) ............................... 376
Tire size designation, load-bearing capacity, speed rating .................... 366
Tire tread ....................................... 352
Tire tread (definition) ..................... 370
Total load limit (definition) ............. 371
Traction ......................................... 365
Traction (definition) ....................... 371
Tread wear ..................................... 365
TWR (permissible trailer drawbar
noseweight) (definition) ................. 371
Uniform Tire Quality Grading
Standards ...................................... 364
Uniform Tire Quality Grading
Standards (definition) .................... 369
Wear indicator (definition) ............. 371
Wheel and tire combination ........... 376
Wheel rim (definition) .................... 369
see Flat tire
Top Tether ............................................ 62
Tow-starting
Emergency engine starting ............ 349 22
Index
Page 26 of 398

Data acquisition ............................... 32
Display message ............................ 270
Equipment ....................................... 28
Individual settings .......................... 239
Limited Warranty ............................. 32
Loading .......................................... 361
Locking (in an emergency) ............... 84
Locking (SmartKey) .......................... 77
Lowering ........................................ 375
Maintenance .................................... 29
Operating safety .............................. 30
Parking .......................................... 156
Parking for a long period ................ 159
Pulling away ................................... 138
Raising ........................................... 373
Reporting problems ........................ .31
Securing from rolling away ............ 372
Towing away .................................. 345
Transporting .................................. 348
Unlocking (in an emergency) ........... 84
Unlocking (SmartKey) ...................... 77
Vehicle data ................................... 390
Vehicle battery
see Battery (vehicle)
Vehicle data ....................................... 390
Vehicle data (off-road driving)
Approach/departure angle ............ 393
Fording depth ................................ 392
Maximum gradient climbing abil-
ity .................................................. 393
Vehicle dimensions ........................... 390
Vehicle emergency locking ................ 84
Vehicle identification number
see VIN
Vehicle identification plate .............. 382
Vehicle level
AIRMATIC ...................................... 185
Vehicle level (display message) ....... 261
Vehicle tool kit .................................. 335
Video
Operating the DVD ......................... 235
see also Digital Operator's Man-
ual .................................................. 287
VIN ...................................................... 382
Seat ............................................... 383
Type plate ...................................... 382 W
Warning and indicator lamps ABS ................................................ 277
Brake s........................................... 276
Coolant .......................................... 283
Distance warning ........................... 285
Engine diagnostics ......................... 283
ESP ®
.............................................. 279
ESP ®
OFF ....................................... 280
Fuel tank ........................................ 283
Overview .......................................... 37
Parking brake ................................ 282
PASSENGER AIR BAG ...................... 45
Reserve fuel ................................... 283
Restraint system ............................ 282
Seat belt ........................................ 274
Tire pressure monitor .................... 286
Warranty .............................................. 28
Washer fluid
Display message ............................ 272
Weather display (COMAND)
see also Digital Operator's Man-
ual .................................................. 287
Wheel and tire combinations
Tires ............................................... 376
Wheel bolt tightening torque ........... 375
Wheel chock ...................................... 372
Wheels
Changing a whee l.......................... 371
Checking ........................................ 351
Cleaning ......................................... 329
Emergency spare wheel ................. 376
Important safety notes .................. 351
Information on driving .................... 351
Interchanging/changing ................ 371
Mounting a new wheel ................... 374
Mounting a wheel .......................... 372
Overview ........................................ 351
Removing a whee l.......................... 374
Snow chains .................................. 353
Storing ........................................... 372
Tightening torque ........................... 375
Wheel size/tire size ....................... 376
Window curtain air bag
Display message ............................ 253
Operation ......................................... 51 24
Index
Page 72 of 398
ESP
®
(Electronic Stability Program)
General notes i
Observe the "Important safety notes" sec-
tion (Y page 66).
ESP ®
monitors driving stability and traction, i.e.
power transmission between the tires and the
road surface.
If ESP ®
detects that the vehicle is deviating from
the direction desired by the driver, one or more
wheels are braked to stabilize the vehicle. The
engine output is also modified to keep the vehi- cle on the desired course within physical limits.
ESP ®
assists the driver when pulling away on
wet or slippery roads. ESP ®
can also stabilize
the vehicle during braking.
ETS/4ETS (Electronic Traction System) ETS traction control is part of ESP
®
. On vehicles
with 4MATIC, 4ETS is part of ESP ®
.
Traction control brakes the drive wheels indi-
vidually if they spin. This enables you to pull
away and accelerate on slippery surfaces, for
example if the road surface is slippery on one
side. In addition, more drive torque is transfer-
red to the wheel or wheels with traction.
Traction control remains active, even if you
deactivate ESP ®
.
In appropriate driving situations, activate the
off-road program:
X Vehicles without the Offroad Engineering
package (Y page 215)
X Vehicles with the Off-Road Engineering pack-
age (Y page 216)
Off-road 4ETS (Electronic Traction Sys-
tem) An ETS system specifically suited to off-road
terrain is activated automatically once the off-
road program is activated:
R Vehicles without the Offroad Engineering
package (Y page 215)
R Vehicles with the Off-Road Engineering pack-
age (Y page 216) Important safety notes G
WARNING
If ESP ®
is malfunctioning, ESP ®
is unable to
stabilize the vehicle. Additionally, further driv- ing safety systems are deactivated. This
increases the risk of skidding and an accident.
Drive on carefully. Have ESP ®
checked at a
qualified specialist workshop.
! Vehicles with 4MATIC: only operate the
vehicle for a maximum of ten seconds on a
brake test dynamometer. Switch off the igni-
tion.
Application of the brakes by ESP ®
may oth-
erwise destroy the brake system.
! Vehicles with 4MATIC: function or perform-
ance tests may only be carried out on a 2-axle dynamometer. Before you operate the vehicle
on such a dynamometer, please consult a
qualified workshop. You could otherwise
damage the drive train or the brake system.
ESP ®
is only deactivated if the 00BBwarning
lamp is lit continuously.
If the 00E5 warning lamp and the 00BBwarning
lamp are lit continuously, ESP ®
is not available
due to a malfunction.
Observe the information on warning lamps
(Y page 279) and display messages which may
be shown in the instrument cluster
(Y page 245).
i Only use wheels with the recommended tire
sizes. Only then will ESP ®
function properly.
Characteristics of ESP ® General information
If the 00E5 ESP warning lamp goes out before
beginning the journey, ESP ®
is automatically
active.
If ESP ®
intervenes, the 00E5ESP®
warning lamp
flashes in the instrument cluster. 70
Driving safety systemsSafety
Page 108 of 398
G
WARNING
The exterior mirror on the front-passenger
side reduces the size of the image. Visible
objects are actually closer than they appear.
This means that you could misjudge the dis-
tance from road users traveling behind, e.g.
when changing lane. There is a risk of an acci-
dent.
For this reason, always make sure of the
actual distance from the road users traveling
behind by glancing over your shoulder. X
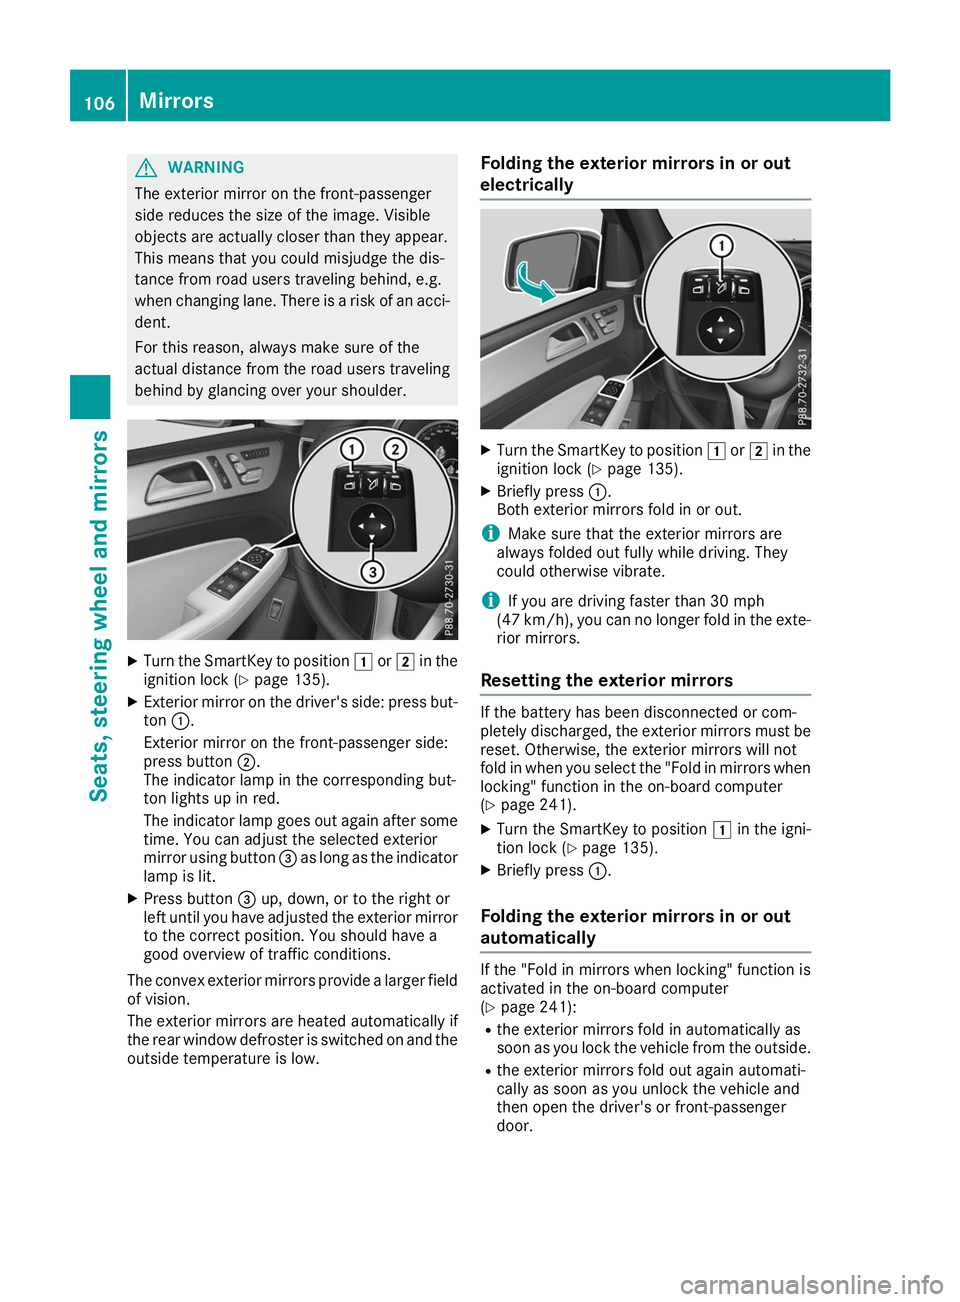
Turn the SmartKey to position 0047or0048 in the
ignition lock (Y page 135).
X Exterior mirror on the driver's side: press but-
ton 0043.
Exterior mirror on the front-passenger side:
press button 0044.
The indicator lamp in the corresponding but-
ton lights up in red.
The indicator lamp goes out again after some
time. You can adjust the selected exterior
mirror using button 0087as long as the indicator
lamp is lit.
X Press button 0087up, down, or to the right or
left until you have adjusted the exterior mirror
to the correct position. You should have a
good overview of traffic conditions.
The convex exterior mirrors provide a larger field of vision.
The exterior mirrors are heated automatically if
the rear window defroster is switched on and the
outside temperature is low. Folding the exterior mirrors in or out
electrically
X
Turn the SmartKey to position 0047or0048 in the
ignition lock (Y page 135).
X Briefly press 0043.
Both exterior mirrors fold in or out.
i Make sure that the exterior mirrors are
always folded out fully while driving. They
could otherwise vibrate.
i If you are driving faster than 30 mph
(47 km/h), you can no longer fold in the exte-
rior mirrors.
Resetting the exterior mirrors If the battery has been disconnected or com-
pletely discharged, the exterior mirrors must be reset. Otherwise, the exterior mirrors will not
fold in when you select the "Fold in mirrors whenlocking" function in the on-board computer
(Y page 241).
X Turn the SmartKey to position 0047in the igni-
tion lock (Y page 135).
X Briefly press 0043.
Folding the exterior mirrors in or out
automatically If the "Fold in mirrors when locking" function is
activated in the on-board computer
(Y
page 241):
R the exterior mirrors fold in automatically as
soon as you lock the vehicle from the outside.
R the exterior mirrors fold out again automati-
cally as soon as you unlock the vehicle and
then open the driver's or front-passenger
door. 106
MirrorsSeats, steering wheel and mirrors
Page 195 of 398
R
that are parallel to the direction of travel and
at least 39.5 in (1.0 m)longer than your vehi-
cle
R that are at right angles to the direction of
travel and at least 39.5 in (1.0 m) wider than
your vehicle
i Note that Active Parking Assist cannot
measure the size of a parking space if it is at
right angles to the direction of travel. You will
need to judge whether your vehicle will fit into the parking space.
When driving at speeds below 19 mph
(30 km/h), you will see parking symbol 0044as a
status indicator in the instrument cluster. When
a parking space has been detected, an arrow
towards the right or the left also appears. By
default, Active Parking Assist only displays park- ing spaces on the front-passenger side. Parking spaces on the driver's side are displayed as
soon as the turn signal on the driver's side is
activated. When parking on the driver's side,
this must remain activated until you confirm the
use of Active Parking Assist by pressing the
0076 button on the multifunction steering
wheel. The system automatically determines
whether the parking space is parallel or at right
angles to the direction of travel.
A parking space is displayed while you are driv- ing past it, and until you are approximately 50 ft
(15 m) away from it.
Parking G
WARNING
If you leave the driver's seat when the vehicle is being braked only by the Active Parking
Assist, it could roll away in the following sit-
uations:
R if there is a malfunction in the system or in
the voltage supply
R if the electrical system in the engine com-
partment, the battery or the fuses have
been tampered with
R if the battery is disconnected
R if the vehicle is accelerated, e.g. by a vehi-
cle occupant
There is a risk of an accident.
Before leaving the vehicle, always secure it
against rolling away. i
If Parking Assist PARKTRONIC detects
obstacles, Active Parking Assist will brake
automatically whilst the vehicle is parking.
You are responsible for braking in good time.
X Stop the vehicle when the parking space sym-
bol shows the desired parking space in the
instrument cluster.
X Shift the transmission to position 005E.
The Start
Start Parking Parking Assist?
Assist?Yes:
Yes:OK
OKNo:
No:
0038 message will appear on the multifunc-
tion display.
X To cancel the procedure: press the0038
button on the multifunction steering wheel or pull away.
or
X To park using Active Parking Assist: press
the 0076 button on the multifunction steering
wheel.
The Parking Parking Assist
Assist Active
ActiveAccelerate
Accelerate
and Brake Observe Surroundings
and Brake Observe Surroundings mes-
sage will appear on the multifunction display.
X Let go of the multifunction steering wheel.
X Back up the vehicle, being ready to brake at all
times. When backing up, drive at a speed
below approximately 6 mph (10 km/h). Oth-
erwise, Active Parking Assist will be canceled.
Active Parking Assist brakes the vehicle to a
standstill when the vehicle approaches the
rear border of the parking space.
Maneuvering may be required in tight parking
spaces.
The Parking Assist Active Select D
Parking Assist Active Select D
Observe Surroundings Observe Surroundings message will appear
on the multifunction display.
X Shift the transmission to position 005Bwhile
the vehicle is stationary.
Active Parking Assist immediately steers in
the other direction.
The Parking Parking Assist
AssistActive
ActiveAccelerate
Accelerate
and Brake Observe Surroundings
and Brake Observe Surroundings mes-
sage will appear on the multifunction display.
i You will achieve the best results by waiting
for the steering procedure to complete before
pulling away.
X Drive forwards and be ready to brake at all
times.
Active Parking Assist brakes the vehicle to a
standstill.
The Parking Assist Active Select R Parking Assist Active Select R
Observe Surroundings
Observe Surroundings message will appear
on the multifunction display. Driving systems
193Driving and parking Z
Page 297 of 398
Stowage areas
Loading guidelines
G
WARNING
If objects, luggage or loads are not secured or not secured sufficiently, they could slip, tip
over or be flung around and thereby hit vehicle
occupants. There is a risk of injury, particu-
larly in the event of sudden braking or a sud-
den change in direction.
Always store objects so that they cannot be
flung around. Secure objects, luggage or
loads against slipping or tipping before the
journey. G
WARNING
Combustion engines emit poisonous exhaust
gases such as carbon monoxide. If the tailgate is open when the engine is running, particu-
larly if the vehicle is moving, exhaust fumes
could enter the passenger compartment.
There is a risk of poisoning.
Turn off the engine before opening the tail-
gate. Never drive with the tailgate open. G
WARNING
The exhaust tail pipe and tail pipe trim can
become very hot. If you come into contact
with these parts of the vehicle, you could burn
yourself. There is a risk of injury.
Always be particularly careful around the
exhaust tail pipe and the tail pipe trim. Allow
these components to cool down before touch-
ing them.
The gross vehicle weight (GVW) is the vehicle
weight including fuel, vehicle tool kit, spare
wheel, installed accessories, vehicle occupants and luggage/cargo.
Do not exceed the load limit or permitted grossvehicle weight rating (GVWR) for your vehicle.
The gross load limit and the GVWR are specified
on the vehicle identification plate on the B-pillar
of the driver's door (Y page 361).
The load must also be distributed so that the
weight on each axle never exceeds the gross
axle weight rating (GAWR) for the front and rear
axles. The specifications for GVWR and GAWR are on the vehicle identification plate on the B-
pillar of the driver's door (Y
page 361).
Observe the notes on loading the vehicle
(Y page 361).
The handling characteristics of a laden vehicle
are dependent on the distribution of the load
within the vehicle. For this reason, you should
observe the following notes when transporting a
load:
R Never exceed the maximum permissible
gross vehicle mass or the gross axle weight
rating for the vehicle (including occupants).
R The cargo compartment is the preferred place
to carry objects.
R Position heavy loads as far forward as possi-
ble and as low down in the cargo compart-
ment as possible.
R The load must not protrude above the upper
edge of the seat backrests.
R Always place the load against the rear or front
seat backrests. Make sure that the seat
backrests are securely locked into place.
R Always place the load behind unoccupied
seats if possible.
R Use the cargo tie-down rings and the parcel
nets to transport loads and luggage.
R Use cargo tie-down rings and fastening mate-
rials appropriate for the weight and size of the load.
R Secure the load with sufficiently strong and
wear-resistant tie-downs. Pad sharp edges for
protection. Stowage spaces
Important safety notes G
WARNING
If you transport objects in the vehicle interior and these are not adequately secured, they
could slip or be flung around and thereby
strike vehicle occupants. In addition, cup
holders, open stowage spaces and mobile
phone brackets may not always be able to
hold the objects placed in them in the event of an accident. There is a risk of injury, particu-
larly in the event of sharp braking or sudden
changes of direction. Stowage areas
295Stowage and features
Z
Page 338 of 398
X
Secure the vehicle against rolling away
(Y page 156).
X If possible, bring the front wheels into the
straight-ahead position.
X Vehicles with the AIRMATIC package:
make sure that the normal vehicle level is
selected (Y page 185).
X Vehicles with the Off-Road Engineering
package:
make sure that the normal vehicle
level is selected (Y page 179).
X Switch off the engine.
X Vehicles without KEYLESS-GO: remove the
SmartKey from the ignition lock.
X Vehicles with KEYLESS-GO: open the driv-
er's door.
The vehicle electronics are now in position
0092. This means no SmartKey is in the ignition
lock.
X Vehicles with KEYLESS-GO: remove the
Start/Stop button from the ignition lock
(Y page 135).
X Make sure that the engine cannot be started
via your smartphone (Y page 137).
X Make sure that the passengers are not endan-
gered as they do so. Make sure that no one is
near the danger area while a wheel is being
changed. Anyone who is not directly assisting
in the wheel change should, for example,
stand behind the barrier.
X Get out of the vehicle. Pay attention to traffic
conditions when doing so.
X Close the driver's door.
X Unload heavy luggage.
i Only operate the tire inflation compressor
using a 12 V socket, even if the ignition is
turned off (Y page 308).
An emergency cut-out ensures that the on-
board voltage does not drop too low. If the on-
board voltage is too low, the power to the
sockets is automatically cut. This ensures
that there is sufficient power to start the
engine. MOExtended tires (tires with run-flat
properties)
General notes With MOExtended tires (tires with run flat char-
acteristics), you can continue to drive your vehi- cle even if there is a total loss of pressure in one
or more tires. The affected tire must not show
any clearly visible damage.
You can recognize a MOExtended tire by the
MOExtended marking which appears on the
sidewall of the tire. You will find this marking
next to the tire size designation, the load-bear-
ing capacity and the speed index (Y page 366).
MOExtended tires may only be used in conjunc-
tion with an active tire pressure loss warning
system or with an active tire pressure monitor.
If a pressure loss warning message appears in the multifunction display:
R observe the instructions in the display mes-
sages (Y page 268).
R check the tire for damage
R if driving on, observe the following notes
The driving distance possible in run-flat mode is approximately 50 miles (80 km) when the vehi-
cle is partially laden and approximately 18 miles
(30 km) when the vehicle is fully laden.
In addition to the vehicle load, the driving dis-
tance possible depends upon:
R Vehicle speed
R Road condition
R Outside temperature
The driving distance possible in run-flat mode
may be reduced by extreme driving conditions
or maneuvers, or it can be increased through a
moderate style of driving.
The driving distance possible in run-flat mode is counted from the moment the tire pressure loss warning appears in the multifunction display.
You must not exceed a maximum permissible
speed of 50 mph (80 km/h).
i When replacing one or all tires, please
observe the following specifications for your
vehicle's tires:
R size
R type and
R the "MOExtended" mark
If a tire has gone flat and cannot be replaced with a MOExtended tire, a standard tire may 336
Flat tireBreakdown assistance
Page 339 of 398

be used as a temporary measure. Make sure
that you use the proper size and type (sum-
mer or winter tire).
i Vehicles equipped with MOExtended tires
are not equipped with a TIREFIT kit at the fac- tory. It is therefore recommended that you
additionally equip your vehicle with a TIREFIT
kit if you mount tires that do not feature run- flat properties, e.g. winter tires. A TIREFIT kit
may be obtained from a qualified specialist
workshop.
Important safety notes G
WARNING
When driving in emergency mode, the driving characteristics deteriorate, e.g. when corner-
ing, accelerating quickly and when braking.
There is a risk of an accident.
Do not exceed the stated maximum speed.
Avoid abrupt steering and driving maneuvers,
and driving over obstacles (curbs, potholes,
off-road). This applies in particular to a laden
vehicle.
Stop driving in emergency mode if:
R you hear banging noises.
R the vehicle starts to shake.
R you see smoke and smell rubber.
R ESP ®
is intervening constantly.
R there are tears in the sidewalls of the tire.
After driving in emergency mode, have the
wheel rims checked at a qualified specialist
workshop with regard to their further use. The defective tire must be replaced in every case. TIREFIT kit
Important safety notes TIREFIT is a tire sealant.
You can use TIREFIT to seal punctures of up to
0.16 in (4 mm), particularly those in the tire
tread. You can use TIREFIT at outside tempera-
tures down to 00F84 ‡ (00F820 †). G
WARNING
In the following situations, the tire sealant is
unable to provide sufficient breakdown assis- tance, as it is unable to seal the tire properly:
R there are cuts or punctures in the tire larger
than those mentioned above.
R the wheel rim is damaged.
R you have driven at very low tire pressures or
on a flat tire.
There is a risk of an accident.
Do not drive the vehicle. Contact a qualified
specialist workshop. G
WARNING
The tire sealant is harmful and causes irrita-
tion. It must not come into contact with your
skin, eyes or clothing or be swallowed. Do not inhale TIREFIT fumes. Keep tire sealant away
from children. There is a risk of injury.
If you come into contact with the tire sealant,
observe the following:
R Rinse off the tire sealant from your skin
immediately with water.
R If the tire sealant comes into contact with
your eyes, immediately rinse them thor-
oughly with clean water.
R If tire sealant is swallowed, immediately
rinse your mouth out thoroughly and drink
plenty of water. Do not induce vomiting,
and seek medical attention immediately.
R Immediately change out of clothing which
has come into contact with tire sealant.
R If an allergic reaction occurs, seek medical
attention immediately.
! Do not operate the tire inflation compressor
for longer than eight minutes at a time without a break. It may otherwise overheat.
The tire inflation compressor can be operatedagain once it has cooled down.
Comply with the manufacturer’s safety instruc-
tions on the sticker on the tire inflation com-
pressor. Flat tire
337Breakdown assistance Z