2019 MERCEDES-BENZ GLE SUV warning light
[x] Cancel search: warning lightPage 117 of 398
The interior lighting automatically switches on if
you:
R Unlock the vehicle
R Open a door
R Remove the SmartKey from the ignition lock
The interior lighting is switched on for a set time when the SmartKey is removed from the ignition
lock. This delayed switch-off can be adjusted via
the multimedia system (see Digital Operator's
Manual). Crash-responsive emergency lighting
The interior lighting is activated automatically if
the vehicle is involved in an accident.
X To switch off the crash-responsive emer-
gency lighting:
press the hazard warning
lamp button.
or X Lock and then unlock the vehicle using the
SmartKey. Replacing bulbs (vehicles with LED
headlamps)
The front and rear light clusters of your vehicle
are equipped with light-emitting diodes. Do not
replace the vehicle's bulbs yourself. Contact a
qualified specialist workshop which has the nec-
essary specialist knowledge and tools to carry
out the work required.
Lamps are an important aspect of vehicle safety. You must therefore make sure that these func-
tion correctly at all times. Have the headlamp
setting checked regularly. Replacing bulbs (vehicles with halo-
gen headlamps)
Important safety notes
G
WARNING
Bulbs, lamps and connectors can get very hot when operating. If you change a bulb, you
could burn yourself on these components.
There is a risk of injury. Allow these components to cool down before
changing a bulb.
Do not use a bulb if it has been dropped or if its
glass tube has been scratched.
The bulb may explode if:
R you touch it
R it is hot
R you drop it
R you scratch it
Use bulbs only in closed lamps that have been
designed for this purpose. Only install spare
bulbs of the same type and the specified volt-
age.
Marks on the glass tube reduce the service life
of the bulbs. Do not touch the glass tube with
your bare hands. If necessary, clean the glass
tube when cold with alcohol or spirit and rub it
off with a lint-free cloth.
Protect bulbs from moisture during operation.
Do not allow bulbs to come into contact with
liquids.
Replace only the bulbs listed (Y page 115).
Have the bulbs that you cannot replace yourself
replaced at a qualified specialist workshop.
If you require assistance replacing bulbs, con-
sult a qualified specialist workshop.
If the new bulb still does not light up, consult a
qualified specialist workshop.
Headlamps and lights are an important aspect of
vehicle safety. You must therefore make sure
that these function correctly at all times. Have
the headlamp setting checked regularly. Overview of bulb replacement - bulb
types
You can replace the following bulbs. The bulb
type can be found in the legend. Replacing bulbs (vehicles with halogen headlamps)
115Lights and windshield wipers Z
Page 120 of 398

If the wiper blades are worn, the windshield will
no longer be wiped properly. This could preventyou from observing the traffic conditions. Switching the rear window wipers
on/off
Combination switch
0043
00C5 Rear window wiper switch
0048 008E Wipes with washer fluid
0049 ISwitches on intermittent wiping
004A 0Switches off intermittent wiping
004B 008E Wipes with washer fluid
X Turn the SmartKey to position 0047or0048
(Y page 135).
X Turn switch 0043on the combination switch to
the corresponding position.
When the rear window wiper is switched on,
the 00C5 symbol appears in the assistance
graphic in the instrument cluster. Further
information on the assistance graphic
(Y page 237). Replacing the wiper blades
Important safety notes G
WARNING
If the windshield wipers begin to move while
you are changing the wiper blades, you could be trapped by the wiper arm. There is a risk of
injury.
Always switch off the windshield wipers and
ignition before changing the wiper blades. !
To avoid damaging the wiper blades, make
sure that you touch only the wiper arm of the
wiper.
! Never open the hood/tailgate if a wiper arm
has been folded away from the windshield/
rear window.
Never fold a windshield wiper arm without a
wiper blade back onto the windshield/rear
window.
Hold the windshield wiper arm firmly when
you change the wiper blade. If you release the
wiper arm without a wiper blade and it falls
onto the windshield/rear window, the wind-
shield/rear window may be damaged by the
force of the impact.
Mercedes-Benz recommends that you have
the wiper blades changed at a qualified spe-
cialist workshop.
Changing the windshield wiper blades Moving the wiper arms to a vertical posi-
tion
On vehicles without KEYLESS-GO:
X Turn the SmartKey to position 0092in the igni-
tion lock (Y page 135).
X Set the windshield wiper to position 00AAon
the combination switch.
X Turn the SmartKey to position 0047in the igni-
tion lock (Y page 135).
X As soon as the wiper arms are vertical to the
hood, turn the SmartKey to position 0092in the
ignition lock (Y page 135).
X Remove the SmartKey.
X Fold the wiper arms away from the windshield
until you feel them snap into place.
On vehicles with KEYLESS-GO:
X Switch off the engine.
X Remove your foot from the brake pedal.
X Set the windshield wiper to the 00AAposition.
X Press the Start/Stop button repeatedly until
the windshield wiper starts.
X When the wiper arms are vertical to the hood,
press the Start/Stop button repeatedly until
the windshield wiper stops.
X Fold the wiper arms away from the windshield
until you feel them snap into place. 118
Windshield wipersLights and windshield wipers
Page 138 of 398
Do not keep the SmartKey:
R with electronic devices, e.g. a mobile phone
or another SmartKey
R with metallic objects, e.g. coins or metal foil
R inside metallic objects, e.g. a metal case
This can impair the functionality of the KEY-
LESS-GO key.
Do not keep the KEYLESS-GO key in the tem-
perature-controlled cup holder (Y page 305).
Otherwise, the KEYLESS-GO key will not be rec-
ognized.
If you lock the vehicle with the SmartKey remote
control or with KEYLESS-GO, after a short time:
R you will not be able to switch on the ignition
with the Start/Stop button
R you will not be able to start the engine with the
Start/Stop button until the vehicle is
unlocked again
If you lock the vehicle centrally using the button
on the front door (Y page 83), you can continue
to start the engine with the Start/Stop button.
The engine can be switched off while the vehicle
is in motion by pressing and holding the Start/
Stop button for three seconds. This function
operates independently of the ECO start/stop
automatic engine switch-off function.
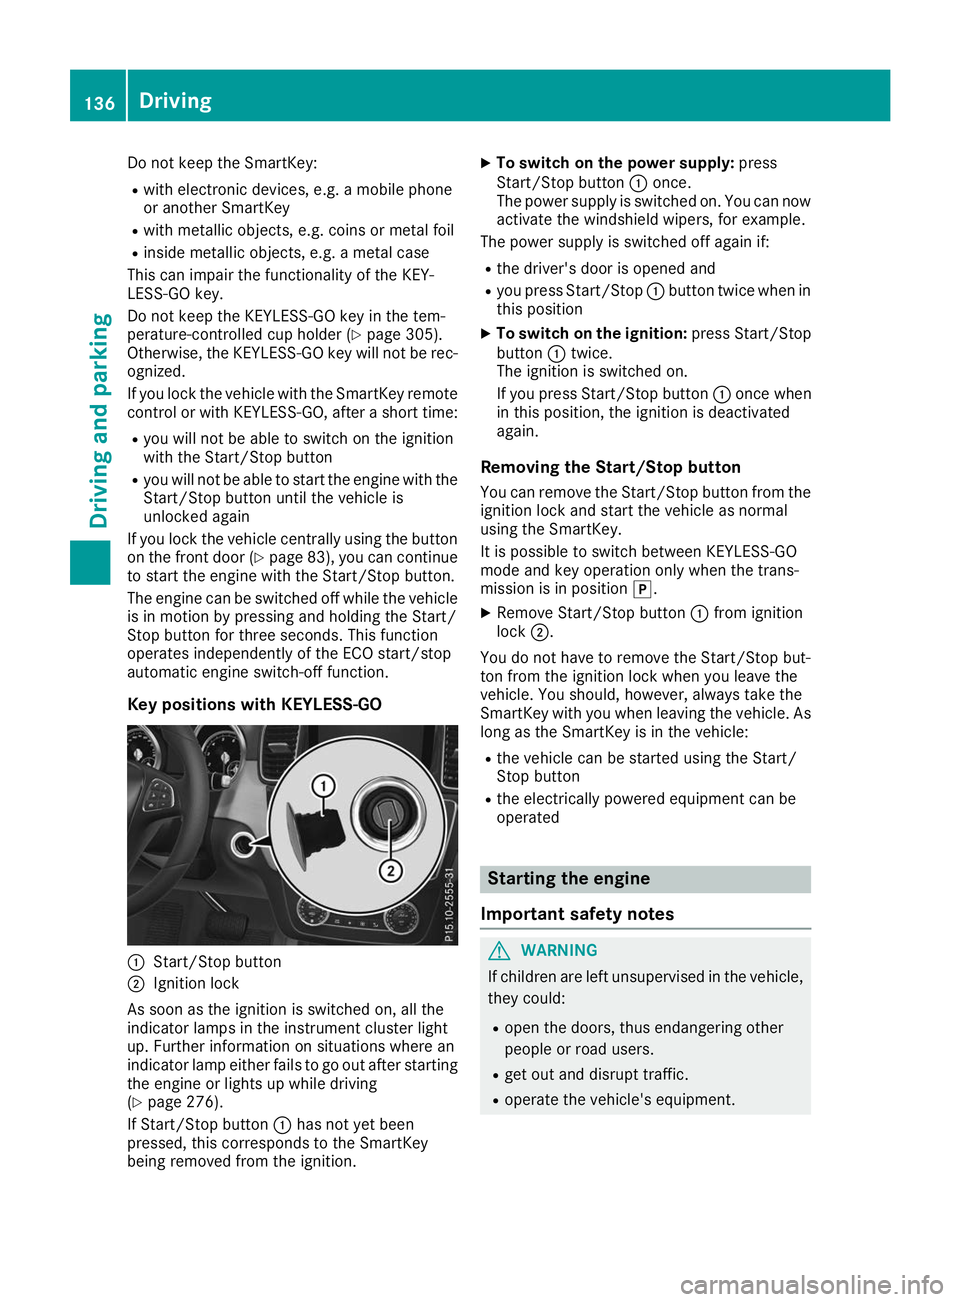
Key positions with KEYLESS-GO 0043
Start/Stop button
0044 Ignition lock
As soon as the ignition is switched on, all the
indicator lamps in the instrument cluster light
up. Further information on situations where an
indicator lamp either fails to go out after starting the engine or lights up while driving
(Y page 276).
If Start/Stop button 0043has not yet been
pressed, this corresponds to the SmartKey
being removed from the ignition. X
To switch on the power supply: press
Start/Stop button 0043once.
The power supply is switched on. You can now activate the windshield wipers, for example.
The power supply is switched off again if:
R the driver's door is opened and
R you press Start/Stop 0043button twice when in
this position
X To switch on the ignition: press Start/Stop
button 0043twice.
The ignition is switched on.
If you press Start/Stop button 0043once when
in this position, the ignition is deactivated
again.
Removing the Start/Stop button
You can remove the Start/Stop button from the
ignition lock and start the vehicle as normal
using the SmartKey.
It is possible to switch between KEYLESS-GO
mode and key operation only when the trans-
mission is in position 005D.
X Remove Start/Stop button 0043from ignition
lock 0044.
You do not have to remove the Start/Stop but-
ton from the ignition lock when you leave the
vehicle. You should, however, always take the
SmartKey with you when leaving the vehicle. As
long as the SmartKey is in the vehicle:
R the vehicle can be started using the Start/
Stop button
R the electrically powered equipment can be
operated Starting the engine
Important safety notes G
WARNING
If children are left unsupervised in the vehicle, they could:
R open the doors, thus endangering other
people or road users.
R get out and disrupt traffic.
R operate the vehicle's equipment. 136
DrivingDriving an
d parking
Page 139 of 398
Additionally, children could set the vehicle in
motion if, for example, they:
R release the parking brake.
R shifting the automatic transmission out of
park position P
R Start the engine.
There is a risk of an accident and injury.
When leaving the vehicle, always take the
SmartKey with you and lock the vehicle. Never
leave children or animals unattended in the
vehicle. Always keep the SmartKey out of
reach of children. G
WARNING
Combustion engines emit poisonous exhaust
gases such as carbon monoxide. Inhaling
these exhaust gases leads to poisoning. There is a risk of fatal injury. Therefore never leave
the engine running in enclosed spaces with-
out sufficient ventilation. G
WARNING
Flammable materials introduced through
environmental influence or by animals can
ignite if in contact with the exhaust system or parts of the engine that heat up. There is a risk
of fire.
Carry out regular checks to make sure that
there are no flammable foreign materials in
the engine compartment or in the exhaust
system.
General notes Vehicles with a gasoline engine:
the catalytic
converter is preheated for up to 30 seconds
after a cold start. The sound of the engine may
change during this time.
Automatic transmission X
Shift the transmission to position 005D
(Y page 144).
The transmission position indicator on the
multifunction display shows 005D
(Y page 145). i
You can start the engine in transmission
position 005Dand 005C.
Starting procedure with the SmartKey X
To start a diesel engine: turn the SmartKey
to position 0048in the ignition lock
(Y page 135).
The 0028 indicator lamp on the instrument
cluster lights up.
X Turn the SmartKey to position 0049in the igni-
tion lock (Y page 135) and release it as soon
as the engine is running.
i Vehicles with a diesel engine:
you can
start the engine without preglow if the engine
is warm.
Using KEYLESS-GO to start the engine The Start/Stop button can be used to start the
vehicle without inserting the SmartKey into the
ignition lock. The Start/Stop button must be
inserted in the ignition lock and the SmartKey
must be in the vehicle. This mode for starting the engine operates independently of the ECO
start/stop automatic engine start function.
X Depress the brake pedal and keep it
depressed.
X Press the Start/Stop button once
(Y page 135).
Vehicles with a gasoline engine: the engine
starts.
Vehicles with a diesel engine: preglow is
activated and the engine starts.
Starting procedure via smartphone Observe the important safety notes on starting
the engine (Y
page 136).
You can also start your engine via your smart-
phone from outside the vehicle. In this case, the previously selected climate control setting is
activated. In this way you can cool or heat the
interior of the vehicle before starting the jour-
ney.
Only start the engine via your smartphone if it is
safe to start and run the engine where your vehi-
cle is parked.
Observe the legal stipulations in the area where your vehicle is parked. Engine start via smart-
phone may be limited to certain countries or
regions. Driving
137Driving an d parking Z
Page 144 of 398

Problem
Possible causes/consequences and
0050
0050Solutions Vehicles with a gasoline
engine:
The engine is not running
smoothly and is misfir-
ing. There is a malfunction in the engine electronics or in a mechanical
component of the engine management system.
X Only depress the accelerator pedal slightly.
Otherwise, non-combusted fuel may get into the catalytic converter
and damage it.
X Have the cause rectified immediately at a qualified specialist work-
shop. The coolant temperature
gage shows a value
above 248 ‡ (120 †). The coolant level is too low. The coolant is too hot and the engine is no
longer being cooled sufficiently.
X Stop as soon as possible and allow the engine and the coolant to
cool down.
X Check the coolant level (Y page 324). Observe the warning notes
as you do so and add coolant if necessary. DYNAMIC SELECT controller
Plug-in hybrid: observe the notes on the
DYNAMIC SELECT controller in the separate
operating instructions.
Use the DYNAMIC SELECT controller to change the drive program. Depending on the drive pro-
gram selected the following vehicle character-
istics will change:
R the drive (engine and transmission manage-
ment)
R the transmission
R the suspension
R the steering
R the availability of the ECO start/stop function
Each time you start the engine with the Smart-
Key or the Start/Stop button, the Comfortdrive
program is activated. For further information
about starting the engine, see (Y page 136).
The Comfort drive program is recommended in
city traffic and stop/start traffic situations. X
All vehicles (except Mercedes-AMG vehi-
cles):
turn DYNAMIC SELECT controller 0043as
many times as necessary until the desired
drive program is selected.
The selected drive program appears in the
multifunction display. After five seconds, this information disappears from the display.
In addition, the current drive program settings
are displayed in the multimedia system dis-
play.
Drive programs available (all vehicles
except Mercedes-AMG vehicles): Individual
Individual settings
Sport
Sporty driving characteris-
tics
Comfort
Comfortable and economi-
cal driving characteristics 142
DYNAMIC SELECT controllerDriving and parking
Page 154 of 398
Preparing to refuel
X
Switch off the engine.
X Remove the SmartKey from the ignition lock.
or, on vehicles with KEYLESS‑GO:
X Open the driver's door.
The vehicle electronics now have status 005A.
This is the same as the SmartKey having been removed.
The driver’s door can be closed again.
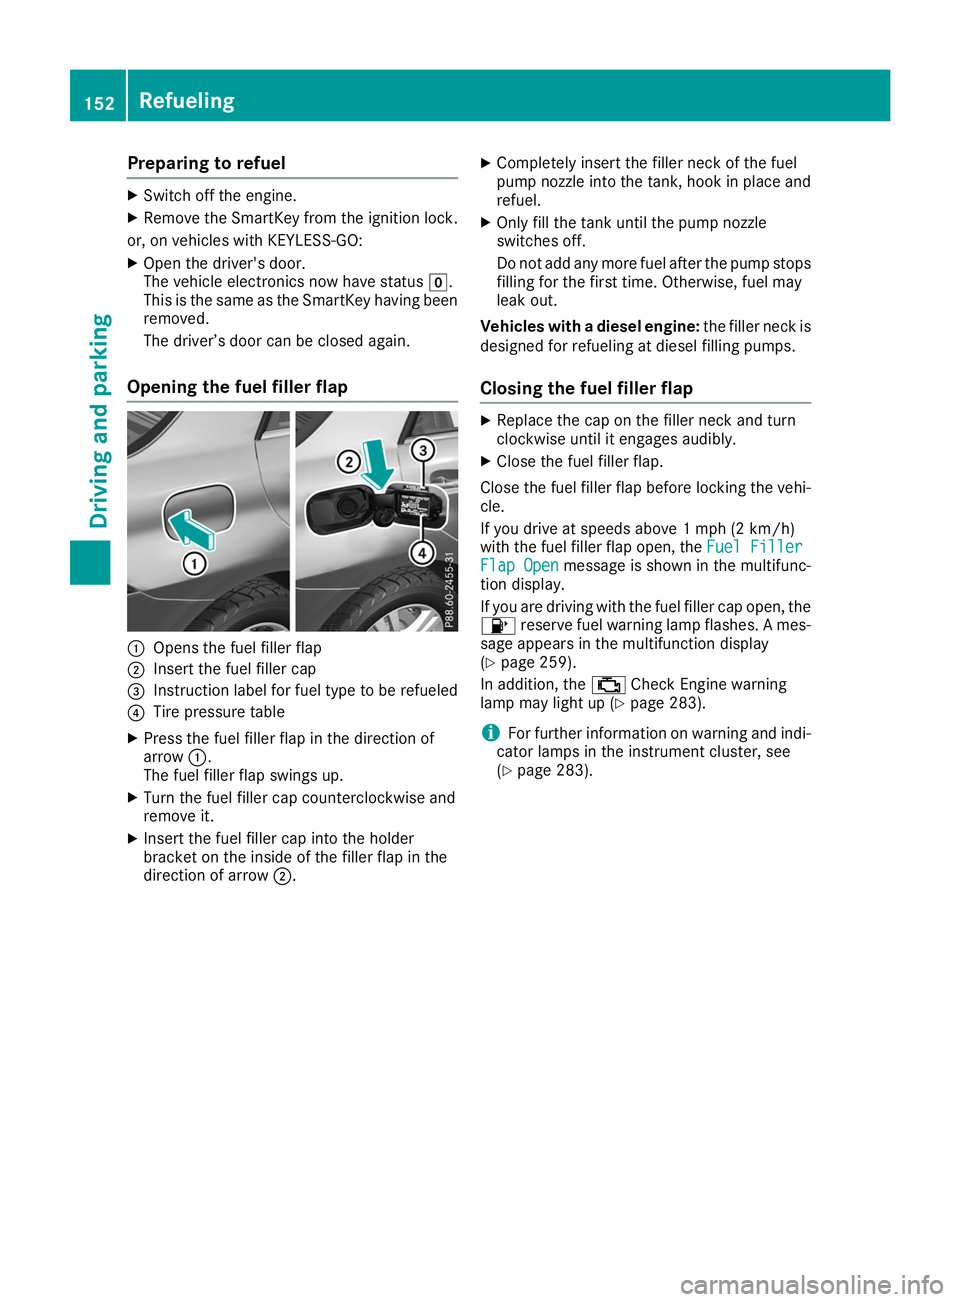
Opening the fuel filler flap 0043
Opens the fuel filler flap
0044 Insert the fuel filler cap
0087 Instruction label for fuel type to be refueled
0085 Tire pressure table
X Press the fuel filler flap in the direction of
arrow 0043.
The fuel filler flap swings up.
X Turn the fuel filler cap counterclockwise and
remove it.
X Insert the fuel filler cap into the holder
bracket on the inside of the filler flap in the
direction of arrow 0044. X
Completely insert the filler neck of the fuel
pump nozzle into the tank, hook in place and
refuel.
X Only fill the tank until the pump nozzle
switches off.
Do not add any more fuel after the pump stops
filling for the first time. Otherwise, fuel may
leak out.
Vehicles with a diesel engine: the filler neck is
designed for refueling at diesel filling pumps.
Closing the fuel filler flap X
Replace the cap on the filler neck and turn
clockwise until it engages audibly.
X Close the fuel filler flap.
Close the fuel filler flap before locking the vehi-
cle.
If you drive at speeds above 1 mph (2 km/h)
with the fuel filler flap open, the Fuel Filler Fuel Filler
Flap Open
Flap Open message is shown in the multifunc-
tion display.
If you are driving with the fuel filler cap open, the
00B6 reserve fuel warning lamp flashes. A mes-
sage appears in the multifunction display
(Y page 259).
In addition, the 00B9Check Engine warning
lamp may light up (Y page 283).
i For further information on warning and indi-
cator lamps in the instrument cluster, see
(Y page 283). 152
RefuelingDriving and parking
Page 162 of 398
X
Avoid frequent acceleration or braking.
X Have all service and maintenance work car-
ried out at the specified intervals.
Fuel consumption also increases when driving in
cold weather, in stop-start traffic and in hilly ter- rain.
Drinking and driving G
WARNING
Drinking and driving and/or taking drugs and driving are very dangerous combinations.
Even a small amount of alcohol or drugs can
affect your reflexes, perceptions and judg-
ment.
The possibility of a serious or even fatal acci-
dent is greatly increased when you drink or
take drugs and drive.
Do not drink or take drugs and drive or allow
anyone to drive who has been drinking or tak-
ing drugs.
Emission control G
WARNING
Combustion engines emit poisonous exhaust
gases such as carbon monoxide. Inhaling
these exhaust gases leads to poisoning. There is a risk of fatal injury. Therefore never leave
the engine running in enclosed spaces with-
out sufficient ventilation.
Certain engine systems are designed to keep
the level of poisonous components in exhaust
fumes within legal limits.
These systems only work at peak efficiency if
they are serviced exactly in accordance with the
manufacturer's specifications. Always have
work on the engine carried out at a qualified
specialist workshop. Mercedes-Benz recom-
mends that you use an authorized Mercedes-
Benz Center for this purpose. In particular, work
relevant to safety or on safety-related systems
must be carried out at a qualified specialist
workshop.
The engine settings must not be changed under any circumstances. Furthermore, all specific
service work must be carried out at regular
intervals and in accordance with the Mercedes-
Benz service requirements. You can obtain current information concerning
the servicing of your vehicle at any time from a
qualified specialist workshop. This could be an
overview of the maintenance work or any addi-
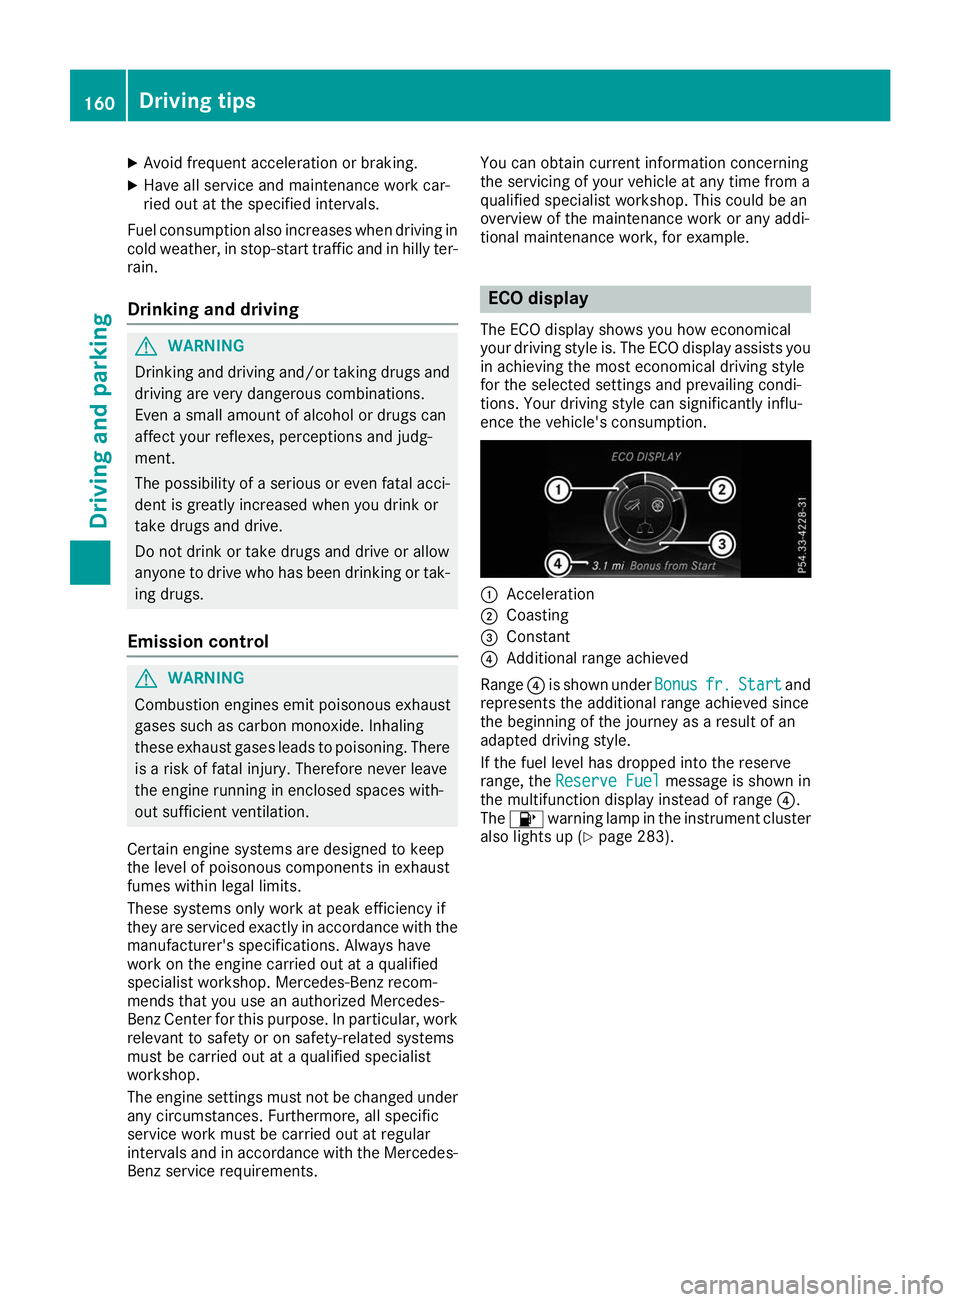
tional maintenance work, for example. ECO display
The ECO display shows you how economical
your driving style is. The ECO display assists you
in achieving the most economical driving style
for the selected settings and prevailing condi-
tions. Your driving style can significantly influ-
ence the vehicle's consumption. 0043
Acceleration
0044 Coasting
0087 Constant
0085 Additional range achieved
Range 0085is shown under Bonus
Bonus fr. fr.Start
Start and
represents the additional range achieved since
the beginning of the journey as a result of an
adapted driving style.
If the fuel level has dropped into the reserve
range, the Reserve Fuel
Reserve Fuel message is shown in
the multifunction display instead of range 0085.
The 00B6 warning lamp in the instrument cluster
also lights up (Y page 283).160
Driving tipsDriving an
d parking
Page 163 of 398

The ECO display consists of three sections, with
an inner and outer area. The sections corre-
spond to the following three categories: 0043
Acceleration
(evaluation of all accel-
eration processes):
R the outer area fills up and the inner
area lights up green: moderate
acceleration, especially at higher
speeds
R the outer area empties and the
inner area is gray: sporty acceler-
ation 0044
Coasting
(evaluation of all decelera-
tion processes):
R the outer area fills up and the inner
area lights up green: anticipatory
driving, keeping your distance and
early release of the accelerator.
The vehicle can coast without use
of the brakes.
R the outer area empties and the
inner area is gray: frequent heavy
braking 0087
Constant
(continuous evaluation
over the entire journey):
R the outer area fills up and the inner
area lights up green: constant
speed and avoidance of unneces-
sary acceleration and deceleration
R the outer area empties and the
inner area is gray: fluctuations in
speed The three inner areas display the current driving
style and light up green as a result of a particu-
larly economical driving style. Depending on the driving situation, up to two areas may light up
simultaneously.
At the beginning of the journey, the three outer
areas are empty and fill up as a result of eco-
nomical driving. A higher level indicates a more
economical driving style. If the three outer areas
are completely filled at the same time, the driver
has adopted the most economical driving style
for the selected settings and prevailing condi-
tions. The ECO display border lights up.
The ECO display does not indicate the actual fuel consumption. The additionally achieved range
displayed under Bonus fr. Start
Bonus fr. Start does not
indicate a fixed consumption reduction. In addition to driving style, the actual consump-
tion is affected by other factors, such as:
R load
R tire pressure
R cold start
R choice of route
R electrical consumers switched on
These factors are not included in the ECO dis-
play.
An economical driving style specially requires
driving at moderate engine speeds.
Achieving a higher value in the categories
"Acceleration" and "Constant":
R observe the gearshift recommendations.
R drive the vehicle in the Comfortdrive pro-
gram.
On long journeys at a constant speed, e.g. on the highway, only the outer area for "constant" will
change.
The ECO display summarizes the driving style
from the start of the journey to its completion.
Therefore, there are more marked changes in
the outer areas at the start of a journey. On lon- ger journeys, there are fewer changes. For more
marked changes, perform a manual rest
(Y page 233).
For further information on the ECO display, see (Y page 233). Braking
Important safety notes G
WARNING
If you shift down on a slippery road surface in an attempt to increase the engine's braking
effect, the drive wheels could lose their grip.
There is an increased danger of skidding and
accidents.
Do not shift down for additional engine brak-
ing on a slippery road surface.
Downhill gradients !
On long and steep gradients, you must
reduce the load on the brakes by shifting to a
lower gear in good time. This allows you to
take advantage of the engine's braking effect. Driving tips
161Driving and parking Z