2019 MERCEDES-BENZ GLE SUV belt
[x] Cancel search: beltPage 100 of 398

G
WARNING
You could lose control of your vehicle if you do the following while driving:
R adjust the driver's seat, head restraint,
steering wheel or mirrors
R fasten the seat belt
There is a risk of an accident.
Adjust the driver's seat, head restraint, steer-
ing wheel and mirror and fasten your seat belt before starting the engine. G
WARNING
If you adjust the seat height carelessly, you or other vehicle occupants could be trapped andthereby injured. Children in particular could
accidentally press the electrical seat adjust-
ment buttons and become trapped. There is a
risk of injury.
While moving the seats, make sure that your
hands or other body parts do not get under the
lever assembly of the seat adjustment sys-
tem. G
WARNING
If the head restraints are not installed or not
adjusted correctly, they cannot provide pro-
tection as intended. There is an increased risk
of injury in the head and neck area, e.g. in the event of an accident or when braking.
Always drive with the head restraints instal-
led. Before driving off, make sure for every
vehicle occupant that the center of the head
restraint supports the back of the head at
about eye level. G
WARNING
The seat belt does not offer the intended level of protection if you have not moved the back-
rest to an almost vertical position. When brak-
ing or in the event of an accident, you could
slide underneath the seat belt and sustain
abdomen or neck injuries, for example. This
poses an increased risk of injury or even fatal injury. Adjust the seat properly before beginning
your journey. Always ensure that the backrest
is in an almost vertical position and that the
shoulder section of your seat belt is routed
across the center of your shoulder.
! To prevent damage to the seats and the seat
heating, observe the following notes:
R Do not spill liquids onto the seats. Dry the
seats as soon as possible if liquid does get
spilled on the seats.
R If the seat covers are damp or wet, do not
switch on the seat heating. Also, do not use
the seat heating to dry the seats.
R Clean the seat covers as recommended;
see keyword "Care".
R Do not transport heavy loads on the seats.
Do not place pointed objects on the seat
cushions such as knives, nails or tools.
Where possible, use the seats only for car-
rying passengers.
R When operating the seat heating, do not
cover the seats with insulating materials,
e.g. blankets, coats, bags, protective cov-
ers, child seats or booster seats.
! Make sure that there are no objects in the
footwell under or behind the seats when mov-
ing the seats back. There is a risk that the
seats and/or the objects could be damaged.
i Further related subjects:
R Cargo compartment enlargement (folding
down the rear bench seat) (Y page 298) Adjusting the seats electrically
0043
Head restraint height
0044 Seat cushion angle
0087 Seat height 98
SeatsSeats, steering wheel and mirrors
Page 101 of 398

0085
Seat fore-and-aft adjustment
0083 Backrest angle
i Vehicles with memory function: if PRE-
SAFE ®
has been triggered, the front-
passenger seat will be moved to a better posi- tion if it was previously in an unfavorable posi-
tion.
i Vehicles with memory function: when the
seat is moved forwards or backwards, the
headrest is moved up or down automatically. Adjusting the head restraints
Important safety notes G
WARNING
You could lose control of your vehicle if you do the following while driving:
R adjust the driver's seat, head restraint,
steering wheel or mirrors
R fasten the seat belt
There is a risk of an accident.
Adjust the driver's seat, head restraint, steer-
ing wheel and mirror and fasten your seat belt before starting the engine. G
WARNING
If the head restraints are not installed or not
adjusted correctly, they cannot provide pro-
tection as intended. There is an increased risk
of injury in the head and neck area, e.g. in the event of an accident or when braking.
Always drive with the head restraints instal-
led. Before driving off, make sure for every
vehicle occupant that the center of the head
restraint supports the back of the head at
about eye level.
Do not swap the head restraints of the front and
rear seats. Otherwise, you cannot adjust the
height and angle of the head restraints to the
correct position.
Using the fore-and-aft adjustment, adjust the
head restraint so that it is as close as possible to your head.
Observe the important safety notes regarding
the seats (Y page 97). Adjusting the head restraints manually Adjusting the head restraint height
X
To raise: pull the head restraint up to the
desired position.
X To lower: press release catch 0043in the direc-
tion of the arrow and push the head restraint down to the desired position.
Adjusting the fore/aft position of the
head restraint With this function you can adjust the distance
between the head restraint and the back of the
seat occupant's head.
X To move forwards: pull the head restraint
forwards in the direction of the arrow until it
engages.
There are several notches.
X To move backwards: press and hold release
button 0043and push the head restraint back-
wards.
X When the head restraint is in the desired posi-
tion, release the button and make sure that
the head restraint is engaged in position.
i Adjust the head restraint so that the back of
your head is as close to the head restraint as possible. Seats
99Seats, steering wheel and mirrors Z
Page 105 of 398
Problems with the seat heating or seat ventilation
Problem
Possible causes/consequences and
0050
0050Solutions The seat heating or seat
ventilation has switched
off prematurely or can-
not be switched on. The on-board voltage is too low because too many electrical consum-
ers are switched on.
X Switch off electrical consumers that you do not need, such as the
rear window defroster or interior lighting.
Once the battery is sufficiently charged, the seat heating or seat
ventilation will switch back on automatically. Steering wheel
Important safety notes
G
WARNING
You could lose control of your vehicle if you do the following while driving:
R adjust the driver's seat, head restraint,
steering wheel or mirrors
R fasten the seat belt
There is a risk of an accident.
Adjust the driver's seat, head restraint, steer-
ing wheel and mirror and fasten your seat belt before starting the engine. G
WARNING
Children could injure themselves if they
adjust the steering wheel. There is a risk of
injury.
When leaving the vehicle, always take the
SmartKey with you and lock the vehicle. Never leave children unsupervised in the vehicle.
The electrically adjustable steering wheel can
still be adjusted when there is no SmartKey in
the ignition lock. Adjusting the steering wheel man-
ually
G
WARNING
If the steering wheel is unlocked while the
vehicle is in motion, it could change position
unexpectedly. This could cause you to lose control of the vehicle. There is a risk of an
accident.
Before starting off, make sure the steering
wheel is locked. Never unlock the steering
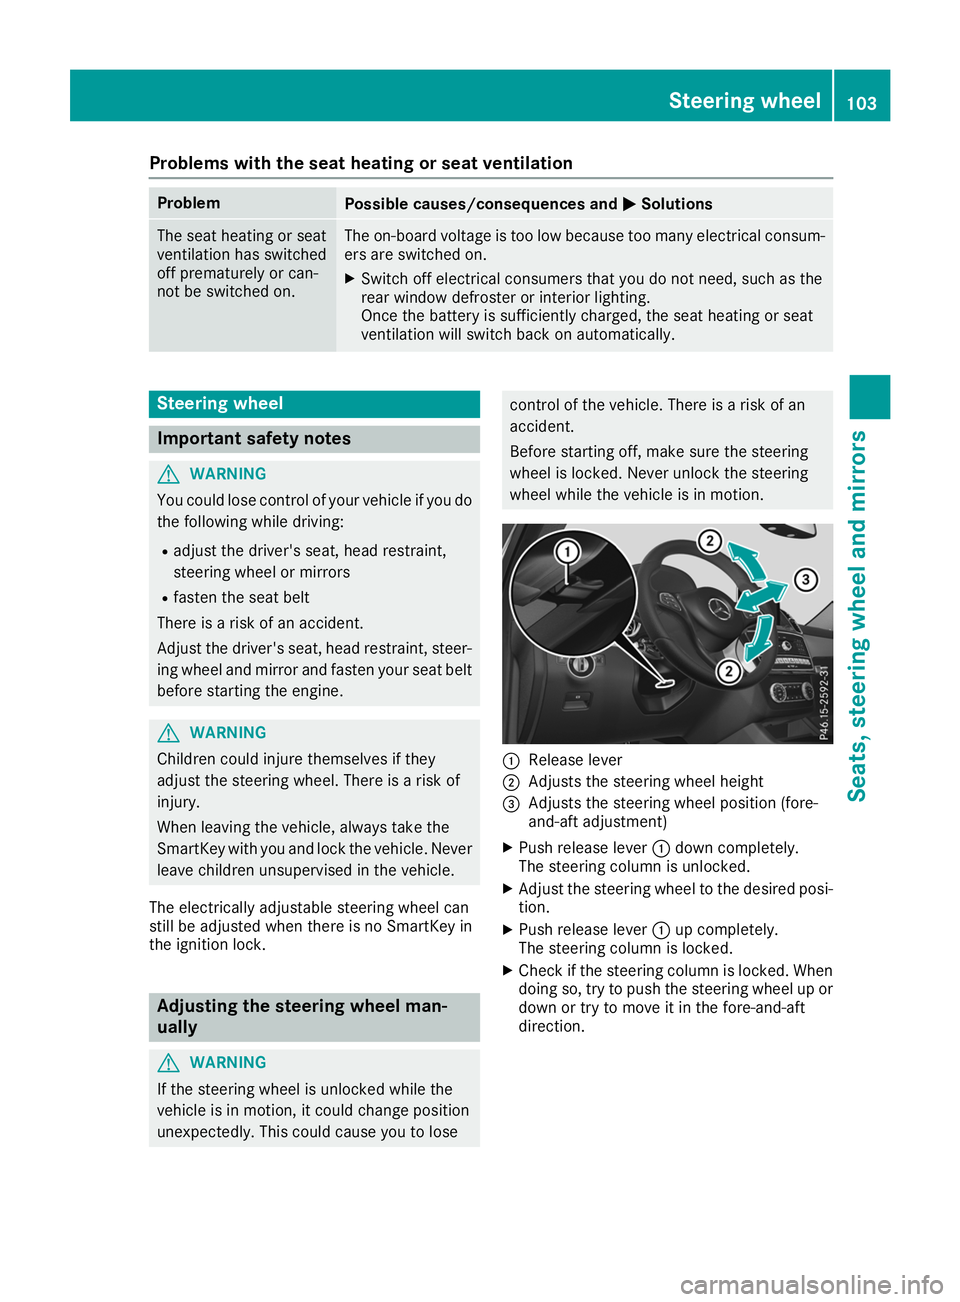
wheel while the vehicle is in motion. 0043
Release lever
0044 Adjusts the steering wheel height
0087 Adjusts the steering wheel position (fore-
and-aft adjustment)
X Push release lever 0043down completely.
The steering column is unlocked.
X Adjust the steering wheel to the desired posi-
tion.
X Push release lever 0043up completely.
The steering column is locked.
X Check if the steering column is locked. When
doing so, try to push the steering wheel up or down or try to move it in the fore-and-aft
direction. Steering wheel
103Seats, steering wheel and mirrors Z
Page 107 of 398
When leaving the vehicle, always take the
SmartKey with you and lock the vehicle. Never leave children unsupervised in the vehicle. G
WARNING
If you drive off while the EASY-ENTRY/EXIT
feature is making adjustments, you could lose
control of the vehicle. There is a risk of an
accident.
Always wait until the adjustment process is
complete before driving off.
The EASY-ENTRY/EXIT feature makes getting in
and out of your vehicle easier.
You can activate and deactivate the EASY-
ENTRY/EXIT feature in the on-board computer
(Y page 240).
Position of the steering wheel when the EASY-ENTRY/EXIT feature is active The steering wheel swings up when you:
R remove the SmartKey from the ignition lock.
R open the driver's door and KEYLESS-GO is in
position 0047.
R open the driver's door and the SmartKey is in
position 0092or0047 in the ignition lock.
i The steering wheel only moves up if it has
not already reached the upper stop.
Position of the steering wheel for driv-
ing The steering wheel is moved to the last selected
position when:
R the driver's door is closed
R you insert the SmartKey into the ignition lock
or
R you press the Start/Stop button once on vehi-
cles with KEYLESS-GO
When you close the driver's door with the igni-
tion switched on, the steering wheel is also
automatically moved to the previously set posi- tion.
The last position of the steering column is stored
when you:
R switch the ignition off
R save the setting with the memory function
(Y page 108). Crash-responsive EASY-EXIT feature If the crash-responsive EASY-EXIT feature is trig-
gered in an accident, the steering column will
move upwards when the driver's door is opened.
This occurs irrespective of the position of the
SmartKey in the ignition lock. This makes it eas- ier to exit the vehicle and rescue the occupants.
The crash-responsive EASY-EXIT feature is only
operational if the EASY-EXIT/ENTRY feature is
activated in the on-board computer
(Y page 240). Mirrors
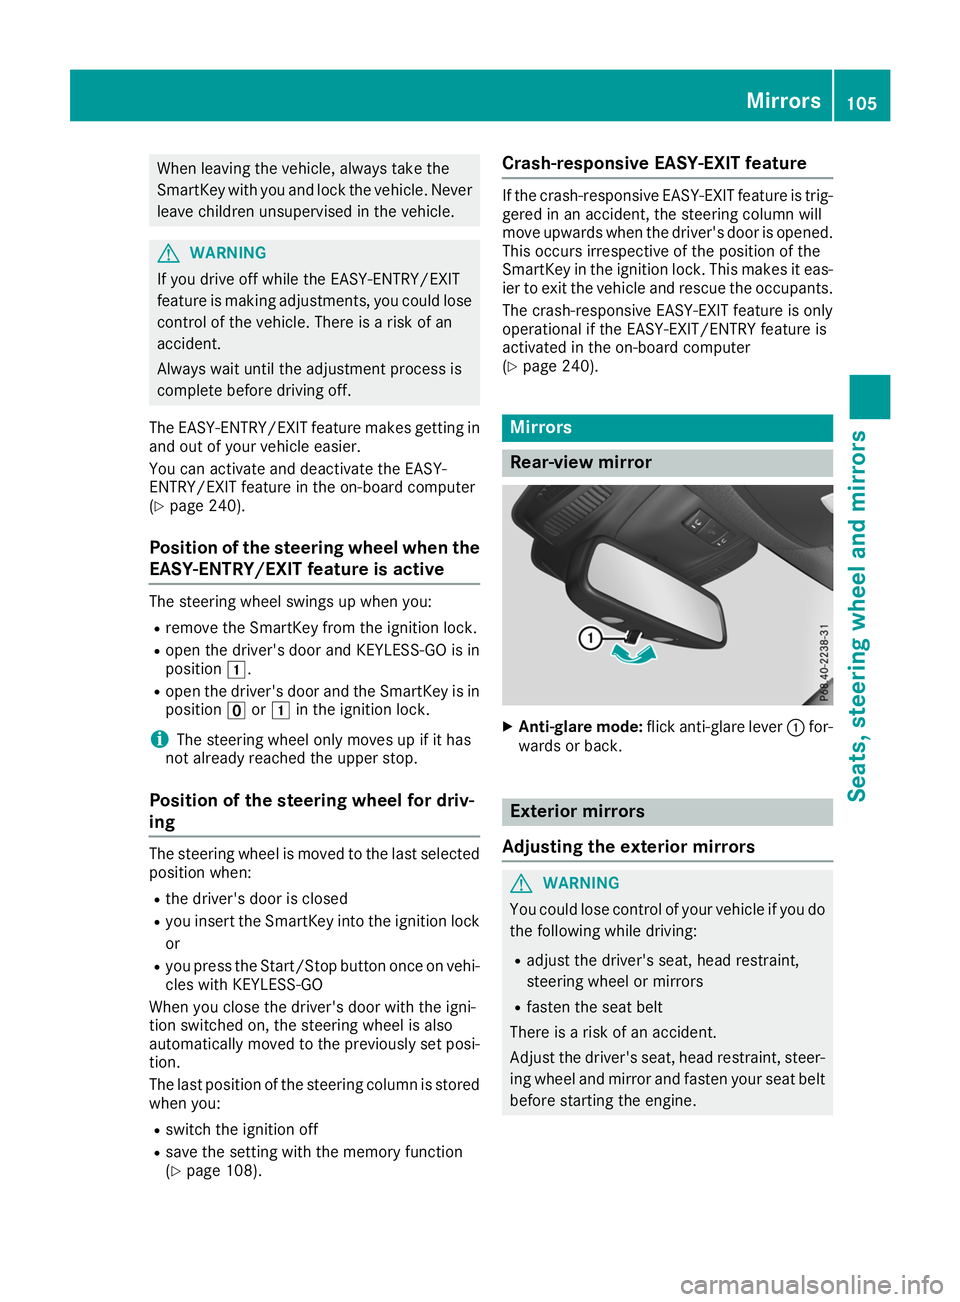
Rear-view mirror
X
Anti-glare mode: flick anti-glare lever 0043for-
wards or back. Exterior mirrors
Adjusting the exterior mirrors G
WARNING
You could lose control of your vehicle if you do the following while driving:
R adjust the driver's seat, head restraint,
steering wheel or mirrors
R fasten the seat belt
There is a risk of an accident.
Adjust the driver's seat, head restraint, steer-
ing wheel and mirror and fasten your seat belt before starting the engine. Mirrors
105Seats, steering wheel and mirrors Z
Page 142 of 398
R
the outside temperature and the atmospheric
air pressure is within the range that is suitablefor the system
R the engine is at normal operating temperature
R the set temperature for the vehicle interior
has been reached
R the battery is sufficiently charged
R the system detects that the windshield is not
fogged up when the air-conditioning system is
switched on
R the hood is closed
R the driver's door is closed and the driver's
seat belt is fastened
All of the vehicle's systems remain active when
the engine is stopped automatically.
The HOLD function can also be activated if the
engine has been switched off automatically. It is then not necessary to continue applying the
brakes during the automatic stop phase. When
you depress the accelerator pedal, the engine
starts automatically and the braking effect of
the HOLD function is deactivated.
All vehicles (except Mercedes-AMG vehi-
cles): automatic engine switch-off can take
place a maximum of four times in a row (initial
stop, then three subsequent stops).
Mercedes-AMG vehicles: the number of con-
secutive automatic engine switch-offs is unlimi- ted.
Automatic engine start The engine starts automatically if:
R you switch off the ECO start/stop function by
pressing the ECO button
R in transmission position 005Bor005C, the brake
pedal is released and the HOLD function is not
active
R you depress the accelerator pedal
R you engage reverse gear 005E
R you move the transmission out of position 005D
R you switch to the Sport Plusdrive program
(Mercedes-AMG GLE 43 4MATIC)
R you switch to the Sport PlusorSport drive
program (Mercedes-AMG vehicles)
R you activate manual gearshifting (Mercedes-
AMG vehicles)
R you switch to the Offroaddrive program
(vehicles without Off-road Engineering Pack-
age) R
you switch to the OffroadorOffroad Plus
drive program (vehicles with Off-road Engi-
neering Package)
R you unfasten your seat belt or open the driv-
er's door
R the vehicle starts to roll
R the brake system requires this
R the temperature in the vehicle interior devi-
ates from the set range
R the system detects moisture on the wind-
shield when the air-conditioning system is
switched on
R the battery's condition of charge is too low
Shifting the transmission to position 005Ddoes
not start the engine.
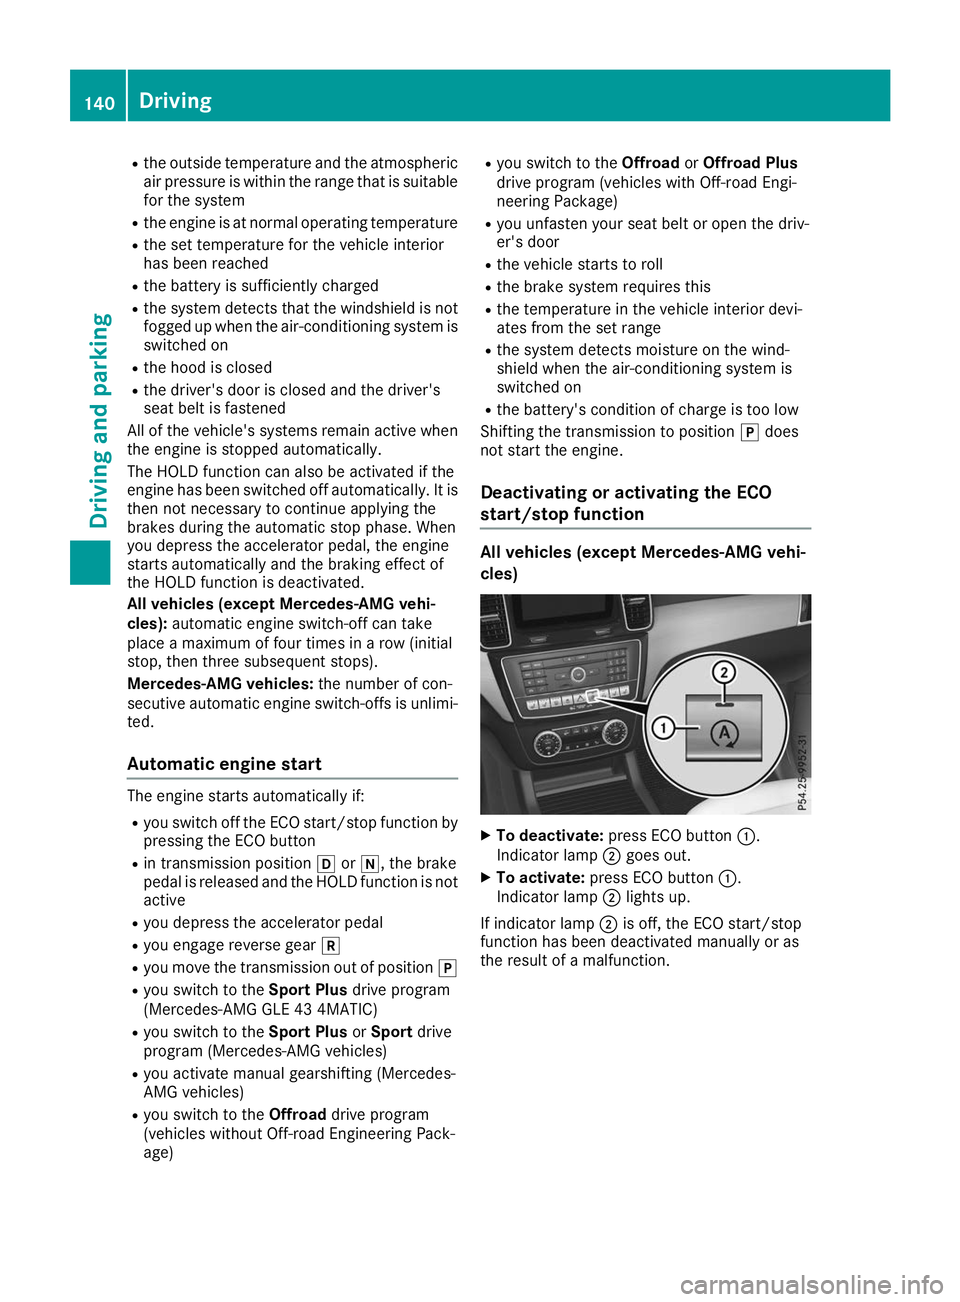
Deactivating or activating the ECO
start/stop function All vehicles (except Mercedes-AMG vehi-
cles)
X
To deactivate: press ECO button 0043.
Indicator lamp 0044goes out.
X To activate: press ECO button 0043.
Indicator lamp 0044lights up.
If indicator lamp 0044is off, the ECO start/stop
function has been deactivated manually or as
the result of a malfunction. 140
DrivingDriving an
d parking
Page 160 of 398
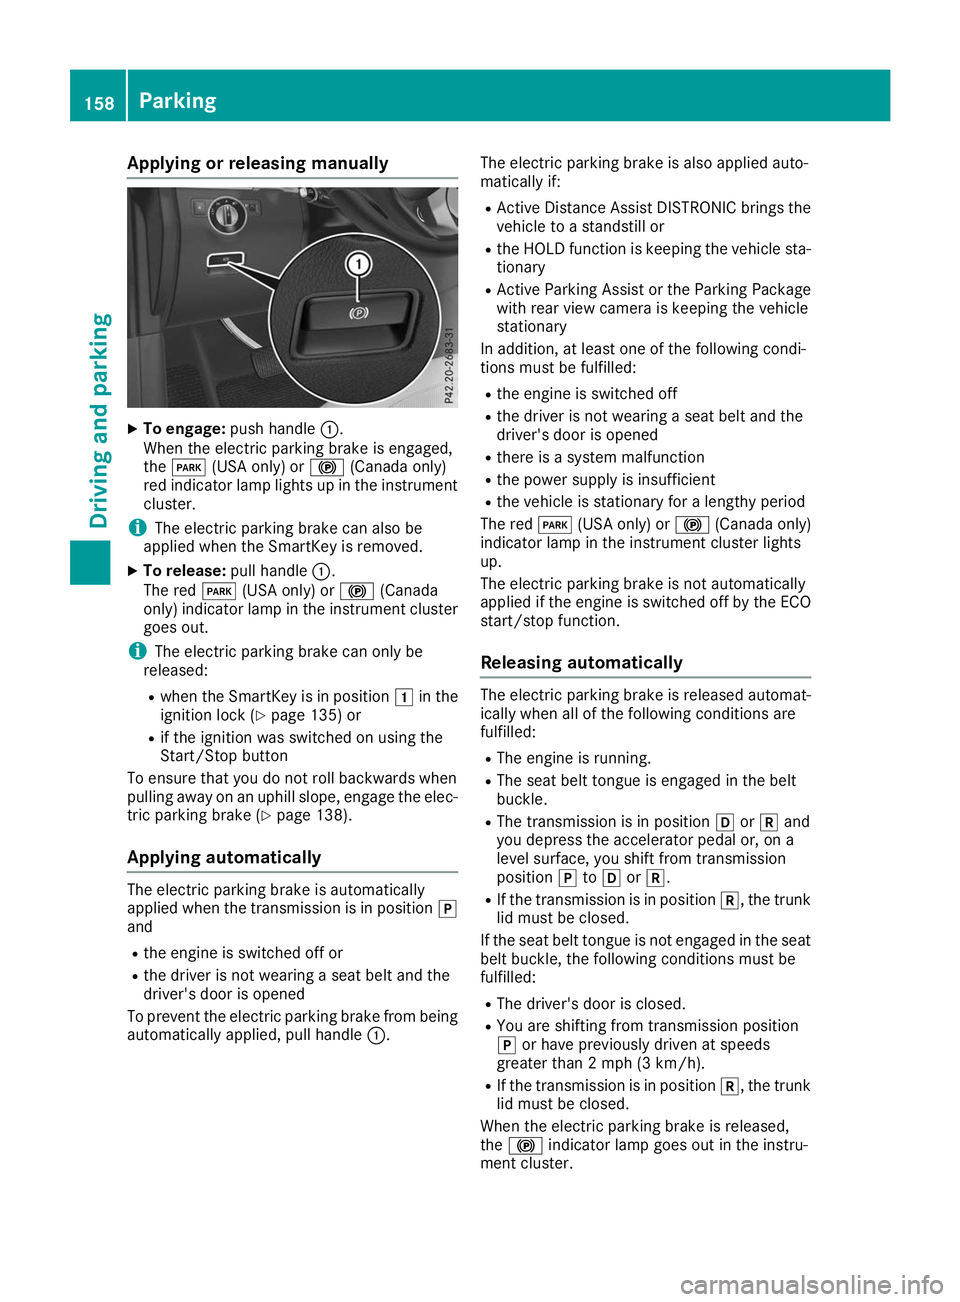
Applying or releasing manually
X
To engage: push handle 0043.
When the electric parking brake is engaged,
the 0049 (USA only) or 0024(Canada only)
red indicator lamp lights up in the instrument
cluster.
i The electric parking brake can also be
applied when the SmartKey is removed.
X To release: pull handle0043.
The red 0049(USA only) or 0024(Canada
only) indicator lamp in the instrument cluster goes out.
i The electric parking brake can only be
released:
R when the SmartKey is in position 0047in the
ignition lock (Y page 135) or
R if the ignition was switched on using the
Start/Stop button
To ensure that you do not roll backwards when
pulling away on an uphill slope, engage the elec-
tric parking brake (Y page 138).
Applying automatically The electric parking brake is automatically
applied when the transmission is in position 005D
and
R the engine is switched off or
R the driver is not wearing a seat belt and the
driver's door is opened
To prevent the electric parking brake from being automatically applied, pull handle 0043.The electric parking brake is also applied auto-
matically if:
R Active Distance Assist DISTRONIC brings the
vehicle to a standstill or
R the HOLD function is keeping the vehicle sta-
tionary
R Active Parking Assist or the Parking Package
with rear view camera is keeping the vehicle
stationary
In addition, at least one of the following condi-
tions must be fulfilled:
R the engine is switched off
R the driver is not wearing a seat belt and the
driver's door is opened
R there is a system malfunction
R the power supply is insufficient
R the vehicle is stationary for a lengthy period
The red 0049(USA only) or 0024(Canada only)
indicator lamp in the instrument cluster lights
up.
The electric parking brake is not automatically
applied if the engine is switched off by the ECO
start/stop function.
Releasing automatically The electric parking brake is released automat-
ically when all of the following conditions are
fulfilled:
R The engine is running.
R The seat belt tongue is engaged in the belt
buckle.
R The transmission is in position 005Bor005E and
you depress the accelerator pedal or, on a
level surface, you shift from transmission
position 005Dto005B or005E.
R If the transmission is in position 005E, the trunk
lid must be closed.
If the seat belt tongue is not engaged in the seat belt buckle, the following conditions must be
fulfilled:
R The driver's door is closed.
R You are shifting from transmission position
005D or have previously driven at speeds
greater than 2 mph (3 km/h).
R If the transmission is in position 005E, the trunk
lid must be closed.
When the electric parking brake is released,
the 0024 indicator lamp goes out in the instru-
ment cluster. 158
ParkingDriving and parking
Page 175 of 398

If there is a change of drivers, advise the new
driver of the speed stored.
Cruise control lever 0043
Activates or increases speed
0044 Activates or reduces speed
0087 Deactivates Active Distance Assist
DISTRONIC
0085 Activates at the current speed or last stored
speed
0083 Sets a specified minimum distance
Activating Active Distance Assist
DISTRONIC Activation conditions
To activate Active Distance Assist DISTRONIC,
the following conditions must be fulfilled:
R the engine must be started. It may take up to
two minutes of driving before Active Distance Assist DISTRONIC is ready for use.
R the electric parking brake must be released.
R ESP ®
must be active, but not intervening.
R the transmission must be in position 005B.
R the driver's door must be closed when you
shift from 005Dto005B or your seat belt must be
fastened.
R the front-passenger door and rear doors must
be closed.
R the Offroad Plus drive program must be deac-
tivated (vehicles with the Off-road Engineer-
ing Package).
R DSR must be deactivated.
R the vehicle must not skid. Activating
X Briefly pull the cruise control lever towards
you 0087, up 0043or down 0085.
Active Distance Assist DISTRONIC is activa-
ted.
X Remove your foot from the accelerator pedal.
Your vehicle adapts its speed to that of the
vehicle in front, but only up to the desired
stored speed.
i If you do not fully release the accelerator
pedal, the Act.
Act. Distance Distance Assist
AssistSuspen‐
Suspen‐
ded
ded message will appears on the multifunc-
tion display. The set distance to a slower-
moving vehicle in front will then not be main-
tained. You will be driving at the speed you
determine by the position of the accelerator
pedal.
You can also activate Active Distance Assist
DISTRONIC when stationary. The lowest speed
that can be set is 20 mph (30 km/h).
X Briefly pull the cruise control lever towards
you 0087, up 0043or down 0085.
Active Distance Assist DISTRONIC is activa-
ted.
Activating at the current speed or last
stored speed G
WARNING
If you call up the stored speed and it differs
from the current speed, the vehicle acceler-
ates or decelerates. If you do not know the
stored speed, the vehicle could accelerate or brake unexpectedly. There is a risk of an acci-
dent.
Pay attention to the road and traffic condi-
tions before calling up the stored speed. If you do not know the stored speed, store the
desired speed again.
X Briefly pull the cruise control lever towards
you 0087.
X Remove your foot from the accelerator pedal.
The first time Active Distance Assist
DISTRONIC is activated, it stores the current
speed or regulates the speed of the vehicle to the previously stored speed. Driving systems
173Driving and parking Z
Page 177 of 398
When Active Distance Assist DISTRONIC is acti-
vated and the vehicle is at a standstill, the trans-
mission will be shifted automatically to position
005D if:
R the driver's door is open and the driver's seat
belt is unfastened.
R the engine is switched off, unless it is auto-
matically switched off by the ECO start/stop
function.
When Active Distance Assist DISTRONIC is acti-
vated and the vehicle is at a standstill, the elec-
tric parking brake will secure the vehicle auto-
matically if:
R a system malfunction occurs
R the power supply is not sufficient
On steep uphill or downhill inclines or if there is a malfunction, the transmission may also be
automatically shifted into position 005D.
Setting a speed Keep in mind that it may take a brief moment
until the vehicle has accelerated or braked to
the speed set.
X Press the cruise control lever up 0043for a
higher speed or down 0083for a lower speed
X To adjust the set speed in 1 mph incre-
ments (1 km/h increments):
briefly press
the cruise control lever up 0043or down 0044to
the pressure point.
Every time the cruise control lever is pressed
up 0043 or down 0044the last speed stored is
increased or reduced.
X To adjust the set speed in 5 mph incre-
ments (10 km/h increments): briefly press
the cruise control lever up 0043or down 0044
beyond the pressure point.
Every time the cruise control lever is pressed
up 0043 or down 0044, the last speed stored is
increased or reduced.
i If you accelerate to overtake, Active Dis-
tance Assist DISTRONIC adjusts the vehicle's
speed to the last speed stored after you have
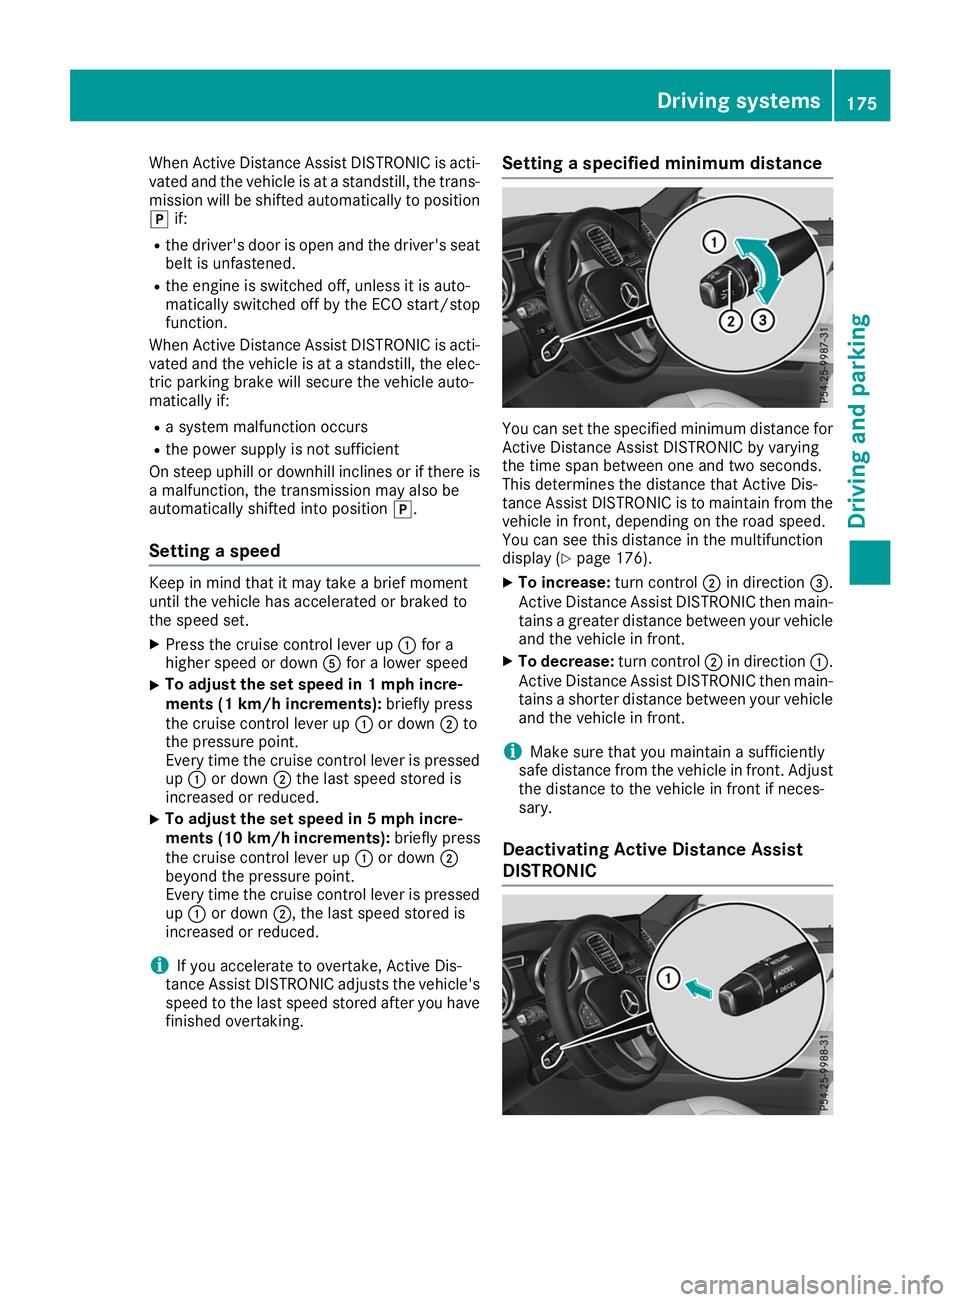
finished overtaking. Setting a specified minimum distance You can set the specified minimum distance for
Active Distance Assist DISTRONIC by varying
the time span between one and two seconds.
This determines the distance that Active Dis-
tance Assist DISTRONIC is to maintain from the
vehicle in front, depending on the road speed.
You can see this distance in the multifunction
display (Y page 176).
X To increase: turn control0044in direction 0087.
Active Distance Assist DISTRONIC then main-
tains a greater distance between your vehicle and the vehicle in front.
X To decrease: turn control0044in direction 0043.
Active Distance Assist DISTRONIC then main-
tains a shorter distance between your vehicle
and the vehicle in front.
i Make sure that you maintain a sufficiently
safe distance from the vehicle in front. Adjust
the distance to the vehicle in front if neces-
sary.
Deactivating Active Distance Assist
DISTRONIC Driving systems
175Driving and parking Z