2019 MERCEDES-BENZ GLE SUV sensor
[x] Cancel search: sensorPage 80 of 398

If activated in the multimedia system, the loca-
tor lighting also lights up in the dark (see the
Digital Operator's Manual).
X To open the tailgate automatically from
outside the vehicle:
press and hold the0054
button until the tailgate opens.
Vehicles with KEYLESS-GO: X To close the tailgate automatically from
outside the vehicle:
if the SmartKey is loca-
ted in the immediate vicinity of the vehicle,
press the 0054button on the SmartKey.
When the tailgate closes you can then release
the button. KEYLESS-GO
General notes Bear in mind that the engine can be started by
any of the vehicle occupants if there is a KEY-
LESS-GO key in the vehicle (Y page 137).
Locking/unlocking centrally You can start, lock or unlock the vehicle using
KEYLESS-GO. To do this, you only need carry the
SmartKey with you. You can combine the func-
tions of KEYLESS-GO with those of a conven-
tional SmartKey. Unlock the vehicle by using
KEYLESS-GO, for instance, and lock it using the 0037 button on the SmartKey.
The driver's door and the door at which the han- dle is used, must both be closed. The SmartKey
must be outside the vehicle. When locking or
unlocking with KEYLESS-GO, the distance
between the SmartKey and the corresponding
door handle must not be greater than 3 ft (1 m).
KEYLESS-GO checks whether a valid SmartKey
is in the vehicle by periodically establishing a
radio connection between the vehicle and the
SmartKey. This happens:
R when starting the engine
R while driving
R when the external door handles are touched
R during convenience closing X
To unlock the vehicle: touch the inner sur-
face of the door handle.
X To lock the vehicle: touch sensor surface 0043
or 0044.
Make sure that you do not touch the inner
surface of the door handle.
X Convenience closing feature: touch
recessed sensor surface 0044for an extended
period.
Further information on the convenience closing
feature (Y page 90).
If you pull on the handle of the tailgate, only the cargo compartment of the vehicle is unlocked.
Deactivating and activating If you do not intend to use a SmartKey for an
extended period of time, you can deactivate the
KEYLESS-GO function of the SmartKey. The
SmartKey will then use very little power, thereby conserving battery power. For the purposes of
activation/deactivation, the vehicle must not be
nearby.
X To deactivate: press the0037button on the
SmartKey twice in rapid succession.
The battery check lamp of the SmartKey
flashes twice briefly and lights up once, KEY-
LESS-GO is deactivated (Y page 80).
X To activate: press any button on the Smart-
Key.
or X Insert the SmartKey into the ignition lock.
KEYLESS-GO and all of its associated features are available again. 78
SmartKeyOpening and closing
Page 81 of 398
KEYLESS-GO start function
General notes Bear in mind that the engine can be started by
any of the vehicle occupants if there is a Smart-
Key in the vehicle (Y page 137). Changing the settings of the locking
system
You can change the settings of the locking sys-
tem. This means that only the driver's door and
the fuel filler flap are unlocked when the vehicle is unlocked. This is useful if you frequently travelalone.
X To change the setting: press and hold down
the 0036 and0037 buttons simultaneously
for about six seconds until the battery indica-
tor lamp flashes twice (Y page 80).
If the setting of the locking system is changed
within the signal range of the vehicle, pressing
the 0037 or0036 button:
R locks or
R unlocks the vehicle
The SmartKey now functions as follows:
X To unlock: press the0036button once.
X To unlock centrally: press the0036button
twice.
X To lock centrally: press the0037button.
The KEYLESS-GO function is changed as fol-
lows:
X To unlock the driver's door: touch the inner
surface of the door handle on the driver's
door.
X To unlock centrally: touch the inner surface
of the door handle on the front-passenger
door or the rear door.
X To lock centrally: touch the outer sensor
surface on one of the door handles
(Y page 78).
X To restore the factory settings: press and
hold down the 0036and0037 buttons simul-
taneously for approximately six seconds until
the battery check lamp flashes twice
(Y page 80). Mechanical key
General notes If the vehicle can no longer be locked or
unlocked with the SmartKey or with KEYLESS-
GO, use the mechanical key.
If you use the mechanical key to unlock and
open the driver's door, the anti-theft alarm sys-
tem will be triggered. Switch off the alarm
(Y page 75).
If you unlock the vehicle using the mechanical
key, the fuel filler flap will not be unlocked auto-
matically.
X To unlock the fuel filler flap: insert the
SmartKey into the ignition lock.
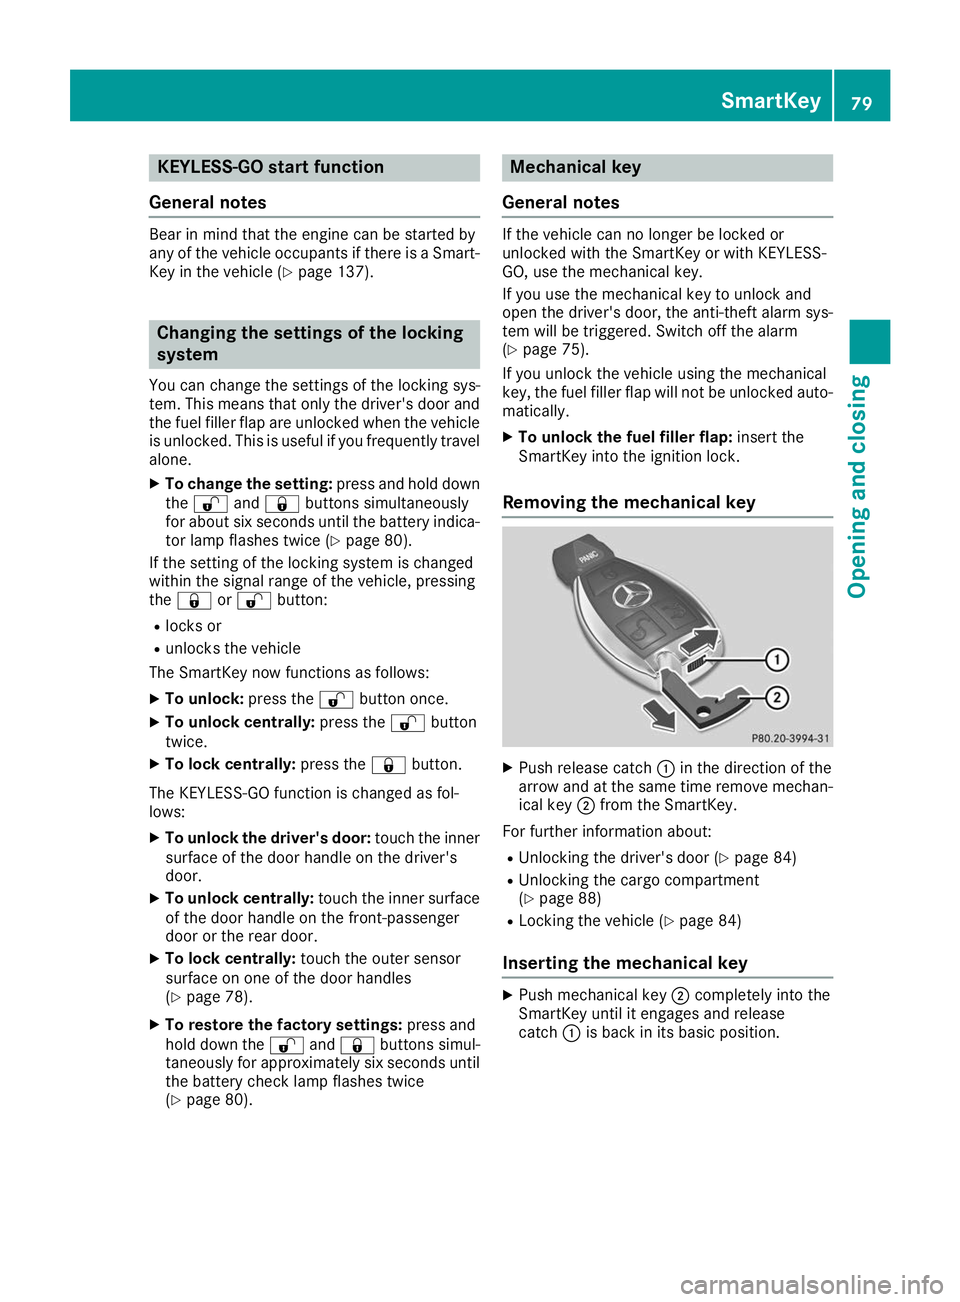
Removing the mechanical key X
Push release catch 0043in the direction of the
arrow and at the same time remove mechan- ical key 0044from the SmartKey.
For further information about:
R Unlocking the driver's door (Y page 84)
R Unlocking the cargo compartment
(Y page 88)
R Locking the vehicle (Y page 84)
Inserting the mechanical key X
Push mechanical key 0044completely into the
SmartKey until it engages and release
catch 0043is back in its basic position. SmartKey
79Opening and closing Z
Page 92 of 398
To do this, the SmartKey is used to carry out the
following functions simultaneously:
R unlock the vehicle
R open the side windows
R open the sliding sunroof or the panorama roof
with power tilt/sliding panel and the roller
sunblinds
R switch on the seat ventilation for the driver's
seat
The convenience opening feature can only be
operated using the SmartKey. The SmartKey
must be close to the vehicle. For vehicles with-
out KEYLESS-GO, the SmartKey must be near
the driver's door handle.
The "convenience opening" feature is also avail-
able when the vehicle is unlocked.
Convenience opening X
Vehicles without KEYLESS-GO: point the tip
of the SmartKey at the door handle on the
driver's door.
X Press and hold the 0036button until the side
windows and the sliding sunroof or panorama
roof with power tilt/sliding panel are in the
desired position.
If the roller sunblinds of the panorama roof
with power tilt/sliding panel are closed, the
roller sunblinds are opened first.
X Press and hold the 0036button again until the
panorama roof with power tilt/sliding panel is in the desired position.
X To interrupt convenience opening: release
the 0036 button. Convenience closing feature
Important safety notes G
WARNING
When the convenience closing feature is oper- ating, parts of the body could become trapped
in the closing area of the side window and the
sliding sunroof. There is a risk of injury.
Observe the complete closing procedure
when the convenience closing feature is oper-
ating. Make sure that no body parts are in
close proximity during the closing procedure. When you lock the vehicle, you can simultane-
ously:
R close the side windows
R close the sliding sunroof or the panorama roof
with power tilt/sliding panel
On vehicles with a panorama roof with power
tilt/sliding panel, you can then close the roller
sunblinds.
Proceed as follows if someone is trapped:
R Release the 0037button to interrupt the clos-
ing procedure.
R Press and hold the 0036button to open.
Vehicles with KEYLESS-GO:
R Release the sensor surfaces on the exterior
door handle to interrupt the closing proce-
dure.
R To open, pull the same door handle immedi-
ately and hold it firmly. The side windows and
the sliding sunroof will open for as long as the
door handle is held but the door is not
opened.
Notes on the automatic reversing feature for:
R The side window (Y page 89)
R The sliding sunroof (Y page 93)
R The panorama roof with power tilt/sliding
panel (Y page 93)
Using the SmartKey The SmartKey must be close to the vehicle. For
vehicles without KEYLESS-GO, the SmartKey
must be near the driver's door handle.
X Vehicles without KEYLESS-GO: point the tip
of the SmartKey at the door handle on the
driver's door.
X Press and hold the 0037button until the side
windows and the sliding sunroof or the pano-
rama roof with power tilt/sliding panel are
fully closed.
X Make sure that all the side windows and the
sliding sunroof or panorama roof with power
tilt/sliding panel are closed.
On vehicles with a panorama roof with power
tilt/sliding panel: X Press and hold the 0037button again until the
roller sunblinds of the panorama roof with
power tilt/sliding panel close.
X To interrupt convenience closing: release
the 0037 button. 90
Side windowsOpening and closing
Page 93 of 398
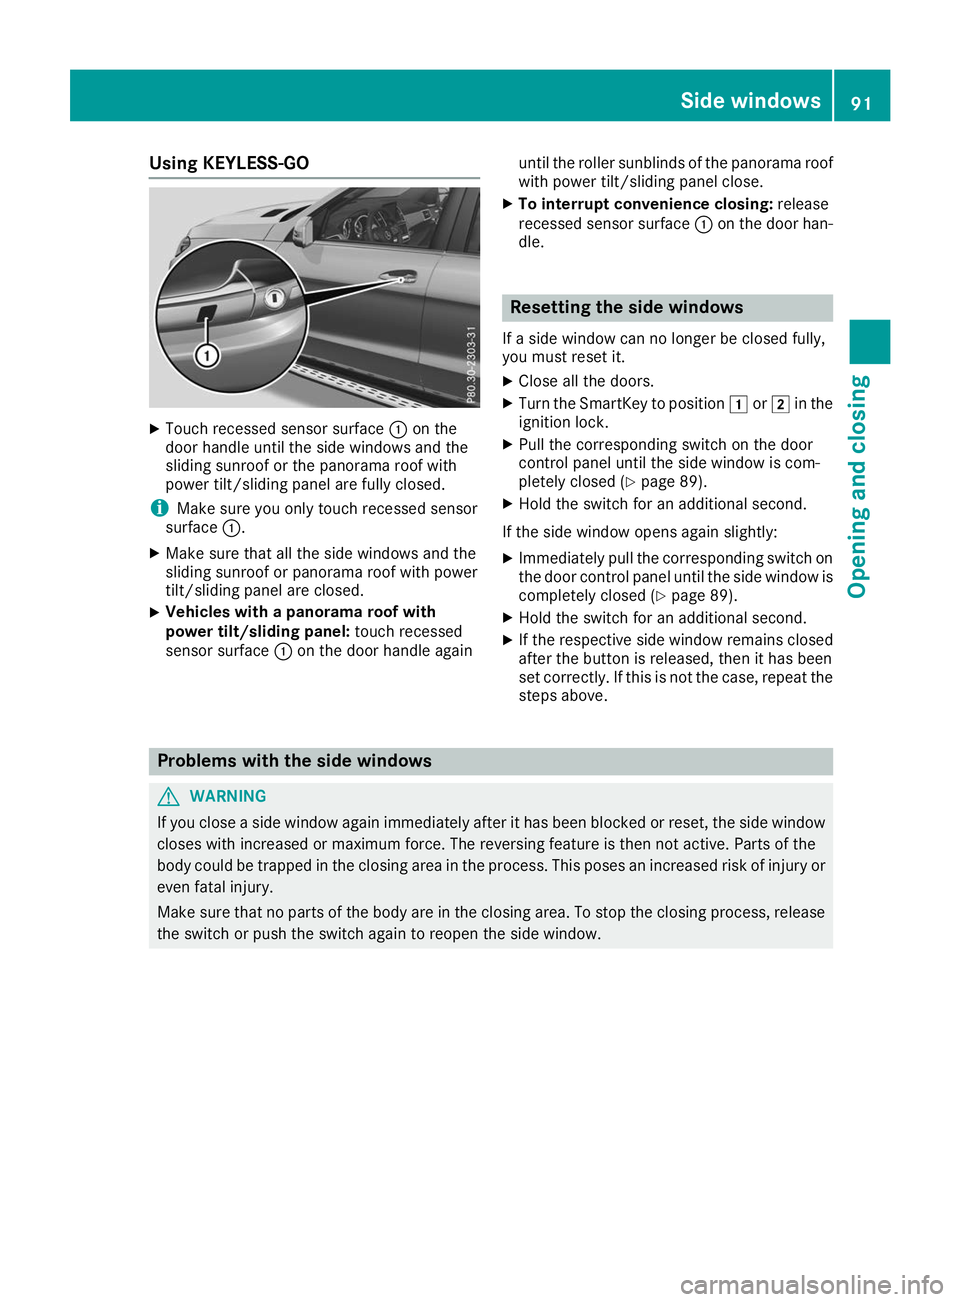
Using KEYLESS-GO
X
Touch recessed sensor surface 0043on the
door handle until the side windows and the
sliding sunroof or the panorama roof with
power tilt/sliding panel are fully closed.
i Make sure you only touch recessed sensor
surface 0043.
X Make sure that all the side windows and the
sliding sunroof or panorama roof with power
tilt/sliding panel are closed.
X Vehicles with a panorama roof with
power tilt/sliding panel:
touch recessed
sensor surface 0043on the door handle again until the roller sunblinds of the panorama roof
with power tilt/sliding panel close.
X To interrupt convenience closing: release
recessed sensor surface 0043on the door han-
dle. Resetting the side windows
If a side window can no longer be closed fully,
you must reset it.
X Close all the doors.
X Turn the SmartKey to position 0047or0048 in the
ignition lock.
X Pull the corresponding switch on the door
control panel until the side window is com-
pletely closed (Y page 89).
X Hold the switch for an additional second.
If the side window opens again slightly: X Immediately pull the corresponding switch on
the door control panel until the side window is completely closed (Y page 89).
X Hold the switch for an additional second.
X If the respective side window remains closed
after the button is released, then it has been
set correctly. If this is not the case, repeat the
steps above. Problems with the side windows
G
WARNING
If you close a side window again immediately after it has been blocked or reset, the side window
closes with increased or maximum force. The reversing feature is then not active. Parts of the
body could be trapped in the closing area in the process. This poses an increased risk of injury or even fatal injury.
Make sure that no parts of the body are in the closing area. To stop the closing process, releasethe switch or push the switch again to reopen the side window. Side windows
91Opening and closing Z
Page 112 of 398
Exterior lighting
General notes
For reasons of safety, Mercedes-Benz recom-
mends that you drive with the lights switched on even during the daytime. In some countries,
operation of the headlamps varies due to legal
requirements and self-imposed obligations. Setting the exterior lighting
Setting options Exterior lighting can be set using:
R the light switch
R the combination switch (Y page 111)
R the on-board computer (Y page 239)
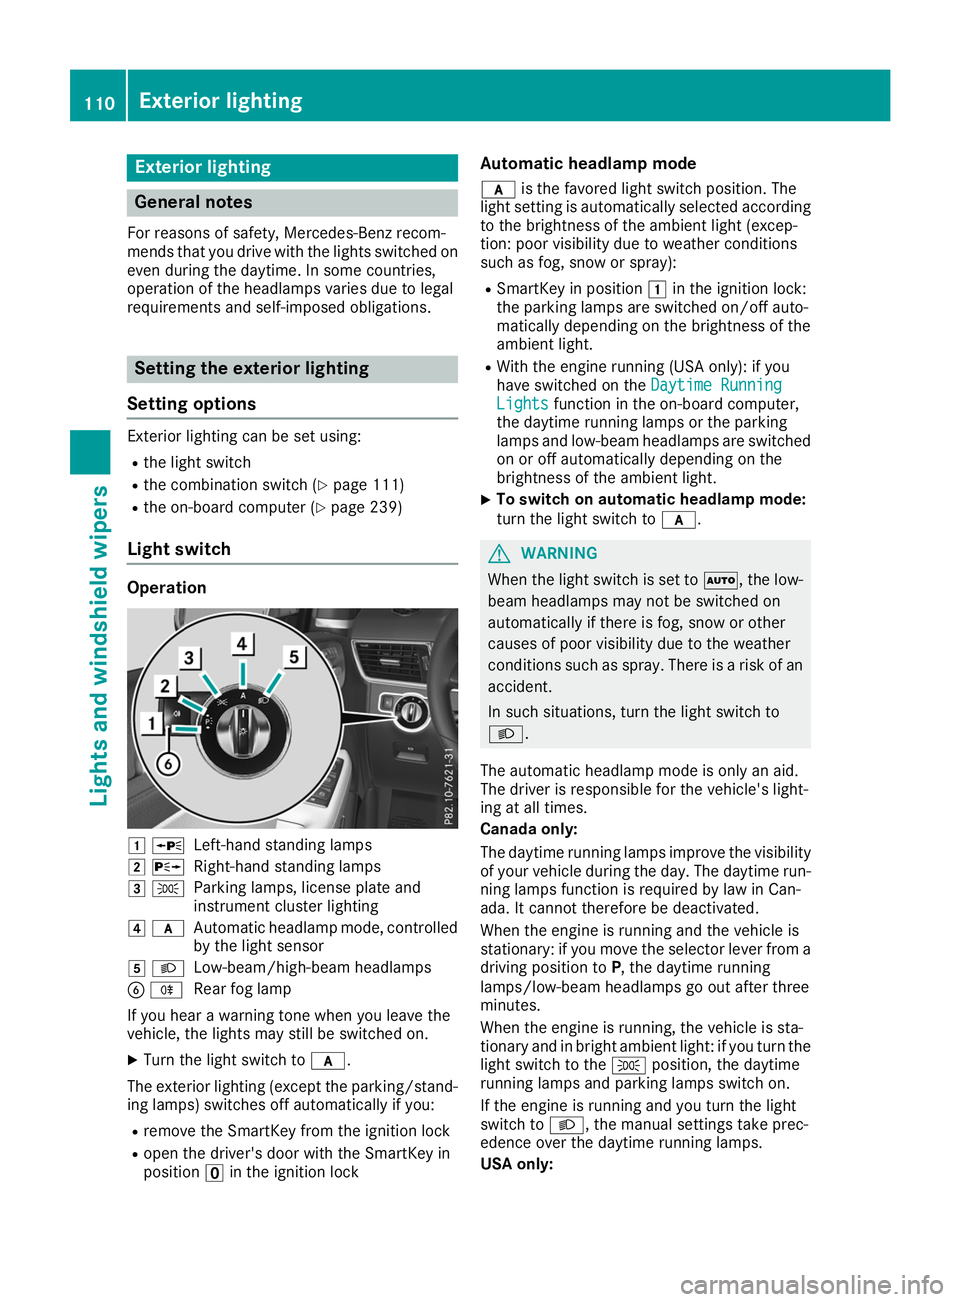
Light switch Operation
0047
0063
Left-hand standing lamps
0048 0064
Right-hand standing lamps
0049 0060
Parking lamps, license plate and
instrument cluster lighting
004A 0071
Automatic headlamp mode, controlled
by the light sensor
004B 0058
Low-beam/high-beam headlamps
0084 005E
Rear fog lamp
If you hear a warning tone when you leave the
vehicle, the lights may still be switched on.
X Turn the light switch to 0071.
The exterior lighting (except the parking/stand-
ing lamps) switches off automatically if you:
R remove the SmartKey from the ignition lock
R open the driver's door with the SmartKey in
position 0092in the ignition lock Automatic headlamp mode
0071 is the favored light switch position. The
light setting is automatically selected according
to the brightness of the ambient light (excep-
tion: poor visibility due to weather conditions
such as fog, snow or spray):
R SmartKey in position 0047in the ignition lock:
the parking lamps are switched on/off auto-
matically depending on the brightness of the
ambient light.
R With the engine running (USA only): if you
have switched on the Daytime Running
Daytime Running
Lights Lights function in the on-board computer,
the daytime running lamps or the parking
lamps and low-beam headlamps are switched on or off automatically depending on the
brightness of the ambient light.
X To switch on automatic headlamp mode:
turn the light switch to 0071. G
WARNING
When the light switch is set to 0058, the low-
beam headlamps may not be switched on
automatically if there is fog, snow or other
causes of poor visibility due to the weather
conditions such as spray. There is a risk of an
accident.
In such situations, turn the light switch to
0058.
The automatic headlamp mode is only an aid.
The driver is responsible for the vehicle's light-
ing at all times.
Canada only:
The daytime running lamps improve the visibility
of your vehicle during the day. The daytime run-
ning lamps function is required by law in Can-
ada. It cannot therefore be deactivated.
When the engine is running and the vehicle is
stationary: if you move the selector lever from a driving position to P, the daytime running
lamps/low-beam headlamps go out after three
minutes.
When the engine is running, the vehicle is sta-
tionary and in bright ambient light: if you turn the light switch to the 0060position, the daytime
running lamps and parking lamps switch on.
If the engine is running and you turn the light
switch to 0058, the manual settings take prec-
edence over the daytime running lamps.
USA only: 110
Exterior lightingLights and windshield wipers
Page 113 of 398
The daytime running lamps improve the visibility
of your vehicle during the day. To do this, the
daytime running lamps function must be
switched on using the on-board computer
(Y page 239).
If the engine is running and you turn the light
switch to 0060or0058, the manual settings
take precedence over the daytime running
lamps.
Low-beam headlamps
Even if the light sensor does not detect that it is dark, the parking lamps and low-beam head-
lamps switch on when the ignition is switched on and the light switch is set to the 0058position.
This is a particularly useful function in the event
of rain and fog.
X To switch on the low-beam headlamps:
turn the SmartKey to position
0048in the igni-
tion lock or start the engine.
X Turn the light switch to 0058.
The green 0058indicator lamp in the instru-
ment cluster lights up.
Rear fog lamp
The rear fog lamp improves visibility of your
vehicle for the traffic behind in the event of thick fog. Please take note of the country-specific
regulations for the use of rear fog lamps.
X To switch on the rear fog lamp: turn the
SmartKey to position 0048in the ignition lock or
start the engine.
X Turn the light switch to 0058or0071.
X Press the 005Ebutton.
The yellow 005Eindicator lamp in the instru-
ment cluster lights up.
X To switch off the rear fog lamp: press the
005E button.
The yellow 005Eindicator lamp in the instru-
ment cluster goes out.
Parking lamps ! If the battery charge is very low, the parking
lamps or standing lamps are automatically
switched off to enable the next engine start.
Always park your vehicle safely and in a well lit area, in accordance with the relevant legal
stipulations. Avoid using the 0060parking
lamps over a period of several hours. If pos-
sible, switch on the right-hand 0064or left-
hand 0063 standing lamps. X
To switch on: turn the light switch to 0060.
The green 0060indicator lamp in the instru-
ment cluster lights up.
Standing lamps Switching on the standing lamps ensures the
corresponding side of the vehicle is illuminated.
X To switch on the standing lamps: the
SmartKey should not be in the ignition lock or in key position 0092in the ignition lock.
X Turn the light switch to 0063(left-hand side of
the vehicle) or 0064(right-hand side of the
vehicle).
Vehicles towing a trailer: both the right-hand
and left-hand standing lamps (tail lamps) are
always illuminated on the trailer. Combination switch
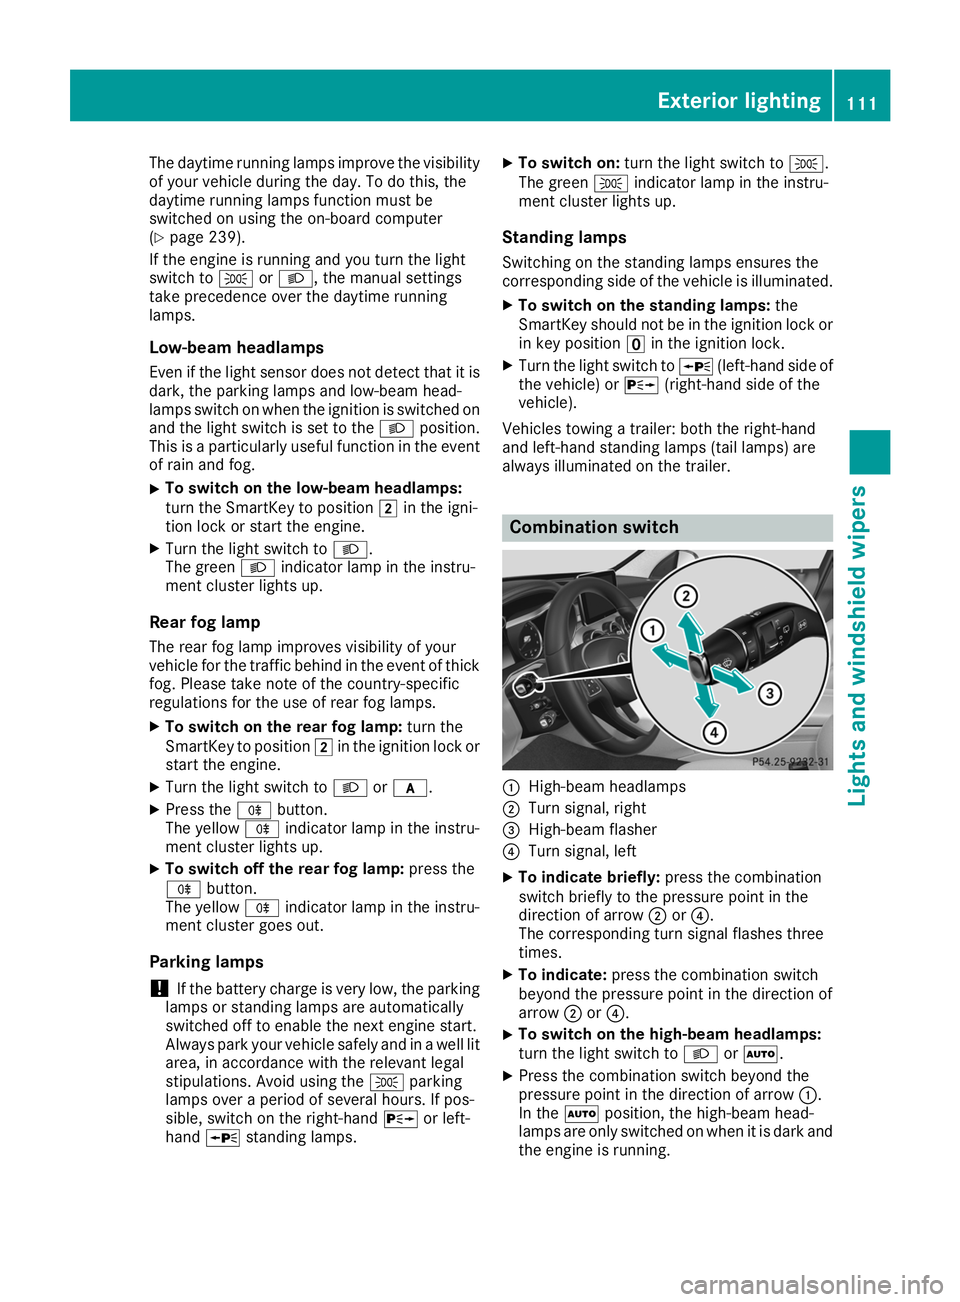
0043
High-beam headlamps
0044 Turn signal, right
0087 High-beam flasher
0085 Turn signal, left
X To indicate briefly: press the combination
switch briefly to the pressure point in the
direction of arrow 0044or0085.
The corresponding turn signal flashes three
times.
X To indicate: press the combination switch
beyond the pressure point in the direction of
arrow 0044or0085.
X To switch on the high-beam headlamps:
turn the light switch to 0058or0058.
X Press the combination switch beyond the
pressure point in the direction of arrow 0043.
In the 0058position, the high-beam head-
lamps are only switched on when it is dark and
the engine is running. Exterior lighting
111Lights and windshield wipers Z
Page 115 of 398
The cornering light function is activated on both
sides before entering a traffic circle through an
evaluation of the current GPS position of the
vehicle. It remains active until after the vehicle
has left the traffic circle. In this way, pedestrians
crossing the road, for example, are illuminated
by your vehicle in good time.
Highway mode Highway mode increases the range of the beam.
Active: if you are driving at a speed above
110 km/h and do not make any large steering
movements for at least 1,000 m or if you are
driving at a speed above 130 km/h.
Not active: if you are driving at speeds below
80 km/h following activation.
Extended range fog lamps The extended range fog lamps reduce the glare
experienced by the driver and improve the illu-
mination of the edge of the road.
Active: if you are driving at speeds below
40 mph (70 km/ h)and you switch on the rear
fog lamp.
Not active: if, following activation, you are driv-
ing at speeds above 60 mph (100 km/h)or if you
switch off the rear fog lamp
Off-road lights The off-road lights facilitate the early recogni-
tion of objects/obstacles when driving off-road thanks to a symmetrical, wider and brighter dis-
tribution of light from the low-beam headlamps.
Active: when driving at speeds no faster than
30 mph (50 km/h) and the off-road program
selector wheel is in position 1 or 2.
Not active: when driving at speeds above
30 mph (50 km/h).
When the off-road lights are switched on, the
cornering light function is permanently activa-
ted, the active light function is deactivated and
the headlamp range control is set to static
mode. Adaptive Highbeam Assist
General notes You can use this function to set the headlamps
to change between low beam and high beam
automatically. The system recognizes vehicles
with their lights on, either approaching from the
opposite direction or traveling in front of your
vehicle, and consequently switches the head-
lamps from high beam to low beam.
The system automatically adapts the low-beam
headlamp range depending on the distance to
the other vehicle. Once the system no longer
detects any other vehicles, it reactivates the
high-beam headlamps.
The system's optical sensor is located behind
the windshield near the overhead control panel.
Important safety notes G
WARNING
Adaptive Highbeam Assist does not recognize road users:
R who have no lights, e.g. pedestrians
R who have poor lighting, e.g. cyclists
R whose lighting is blocked, e.g. by a barrier
On very rare occasions, Adaptive Highbeam
Assist may fail to recognize other road users
that have lights, or may recognize them too
late. In this, or in similar situations, the auto-
matic high-beam headlamps will not be deac-
tivated or will be activated regardless. There is a risk of an accident.
Always carefully observe the traffic conditionsand switch off the high-beam headlamps in
good time.
Adaptive Highbeam Assist cannot take into
account road, weather or traffic conditions.
Adaptive Highbeam Assist is only an aid. You are responsible for adjusting the vehicle's lighting
to the prevailing light, visibility and traffic con-
ditions.
In particular, the detection of obstacles can be
impaired if:
R poor visibility, e.g. due to fog, heavy rain or
snow
R dirt on the sensors or the sensors are
obscured Exterior lighting
113Lights and windshield wipers Z
Page 116 of 398
Switching Adaptive Highbeam Assist
on/off X
To switch on: turn the light switch to 0058.
X Press the combination switch beyond the
pressure point in the direction of arrow 0043.
The 00CE indicator lamp in the multifunction
display lights up when it is dark and the light
sensor activates the low-beam headlamps.
If you are driving at speeds above approx-
imately 16 mph (25 km/h):
The headlamp range is set automatically
depending on the distance between the vehi-
cle and other road users.
If you are driving at speeds above approx-
imately 19 mph (30 km/h) and no other road users have been detected:
The high-beam headlamps are switched on
automatically. The 0057indicator lamp in the
instrument cluster also lights up.
If you are driving at speeds below approx-
imately 16 mph (25 km/h) or other road users have been detected or the roads are ade-
quately lit:
The high-beam headlamps are switched off
automatically. The 0057indicator lamp in the
instrument cluster goes out. The 00CEindi-
cator lamp in the multifunction display
remains lit.
X To switch off: move the combination switch
back to its normal position or move the light
switch to another position.
The 00CE indicator lamp in the multifunction
display goes out. Headlamps fogged up on the inside
Certain climatic and physical conditions may
cause moisture to form in the headlamp. This
moisture does not affect the functionality of the headlamp. Interior lighting
Overview of interior lighting
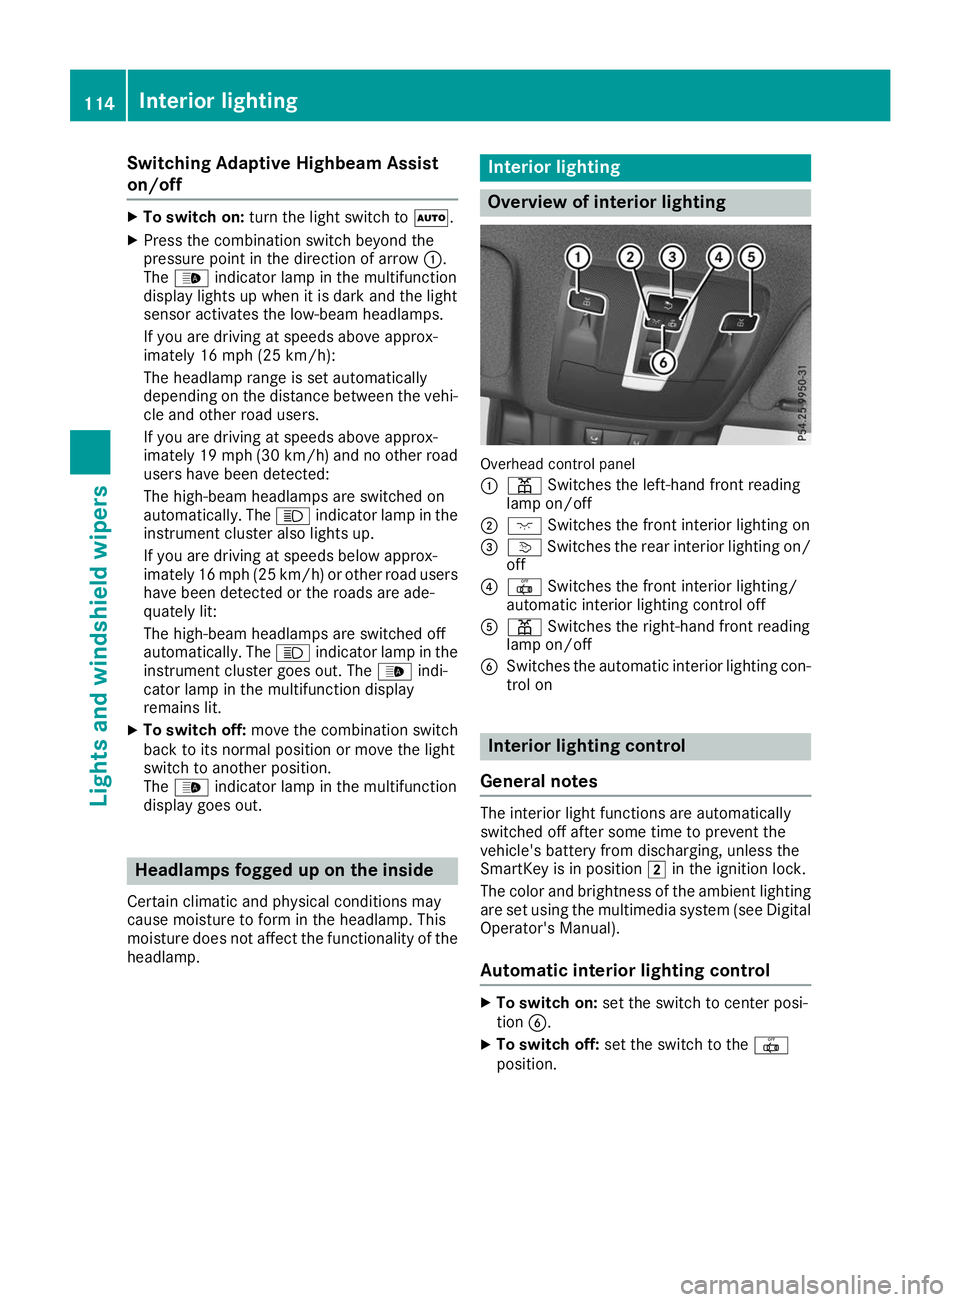
Overhead control panel
0043
003D Switches the left-hand front reading
lamp on/off
0044 004A Switches the front interior lighting on
0087 0043 Switches the rear interior lighting on/
off
0085 0033 Switches the front interior lighting/
automatic interior lighting control off
0083 003D Switches the right-hand front reading
lamp on/off
0084 Switches the automatic interior lighting con-
trol on Interior lighting control
General notes The interior light functions are automatically
switched off after some time to prevent the
vehicle's battery from discharging, unless the
SmartKey is in position
0048in the ignition lock.
The color and brightness of the ambient lighting
are set using the multimedia system (see Digital Operator's Manual).
Automatic interior lighting control X
To switch on: set the switch to center posi-
tion 0084.
X To switch off: set the switch to the 0033
position. 114
Interior lightingLights and windshield wipers