2019 MERCEDES-BENZ GLE SUV windshield wipers
[x] Cancel search: windshield wipersPage 118 of 398

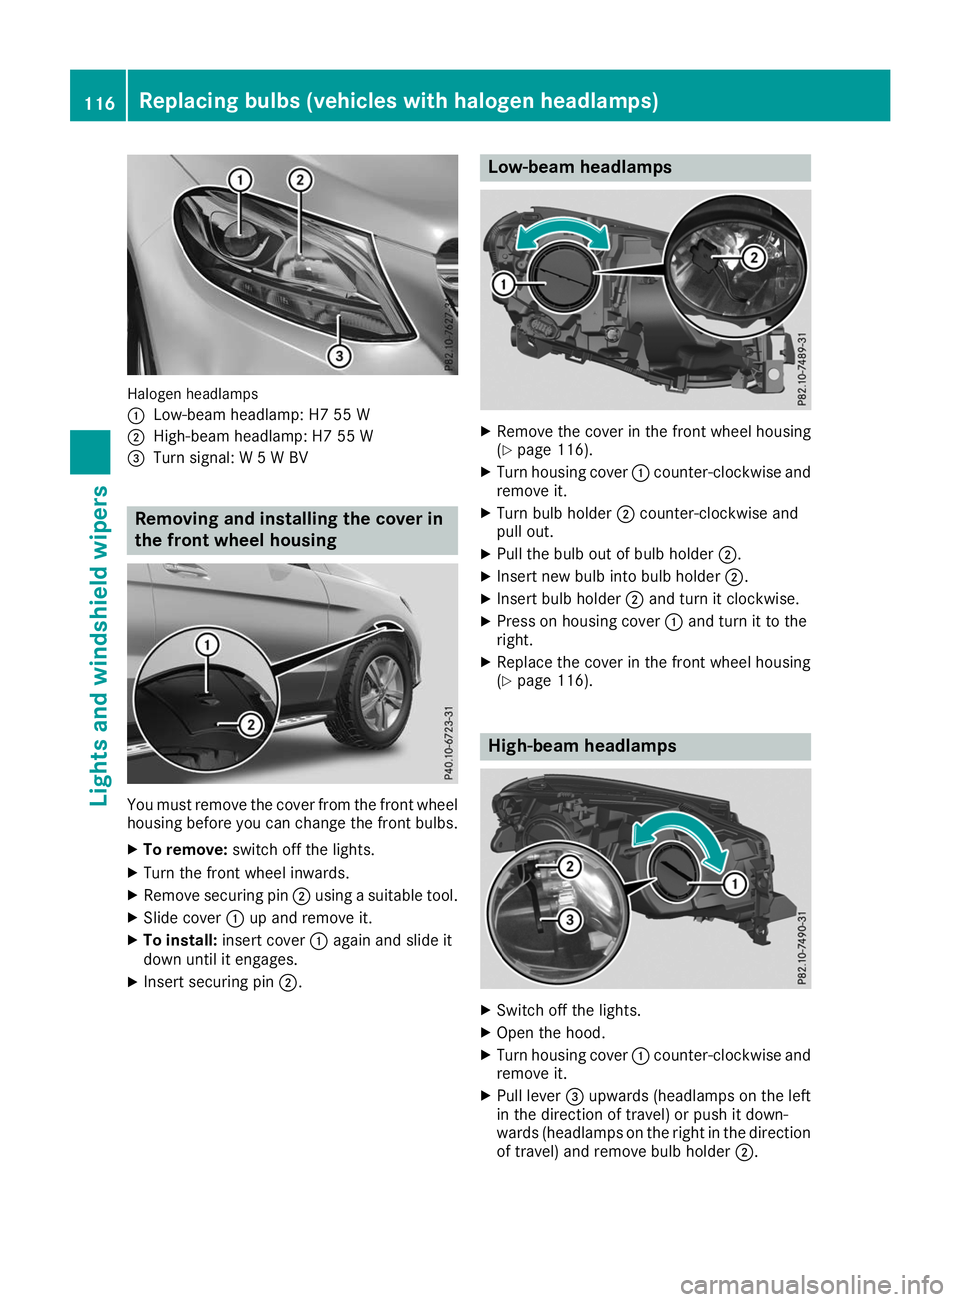
Halogen headlamps
0043
Low-beam headlamp: H7 55 W
0044 High-beam headlamp: H7 55 W
0087 Turn signal: W 5 W BV Removing and installing the cover in
the front wheel housing You must remove the cover from the front wheel
housing before you can change the front bulbs.
X To remove: switch off the lights.
X Turn the front wheel inwards.
X Remove securing pin 0044using a suitable tool.
X Slide cover 0043up and remove it.
X To install: insert cover 0043again and slide it
down until it engages.
X Insert securing pin 0044. Low-beam headlamps
X
Remove the cover in the front wheel housing
(Y page 116).
X Turn housing cover 0043counter-clockwise and
remove it.
X Turn bulb holder 0044counter-clockwise and
pull out.
X Pull the bulb out of bulb holder 0044.
X Insert new bulb into bulb holder 0044.
X Insert bulb holder 0044and turn it clockwise.
X Press on housing cover 0043and turn it to the
right.
X Replace the cover in the front wheel housing
(Y page 116). High-beam headlamps
X
Switch off the lights.
X Open the hood.
X Turn housing cover 0043counter-clockwise and
remove it.
X Pull lever 0087upwards (headlamps on the left
in the direction of travel) or push it down-
wards (headlamps on the right in the direction
of travel) and remove bulb holder 0044.116
Replacing bulbs (vehicles with halogen headlamps)Lights and windshield wipers
Page 119 of 398

X
Remove the bulb from bulb holder 0044.
X Insert the new bulb into bulb holder 0044.
X Simultaneously push down on bulb holder 0044
and push lever 0087downwards (headlamps on
the left in the direction of travel) or pull
upwards (headlamps on the right in the direc-
tion of travel).
X Press on housing cover 0043and turn it clock-
wise. Turn signals
X
Switch off the lights.
X Open the hood.
X Turn housing cover 0043counter-clockwise and
remove it.
X Turn bulb holder 0044counter-clockwise and
pull out.
X Pull the bulb out of bulb holder 0044.
X Insert new bulb into bulb holder 0044.
X Insert bulb holder 0044and turn it clockwise.
X Press on housing cover 0043and turn it to the
right. Windshield wipers
Switching the windshield wipers
on/off
! Do not operate the windshield wipers when
the windshield is dry, as this could damage
the wiper blades. Moreover, dust that has col-
lected on the windshield can scratch the glass
if wiping takes place when the windshield is
dry.
If it is necessary to switch on the windshield
wipers in dry weather conditions, always use washer fluid when operating the windshield
wipers.
! If the windshield wipers leave smears on the
windshield after the vehicle has been washed
in an automatic car wash, wax or other resi-
dues may be the reason for this. Clean the
windshield using washer fluid after washing
the vehicle in an automatic car wash.
! Intermittent wiping with rain sensor: due to
optical influences and the windshield becom- ing dirty in dry weather conditions, the wind-
shield wipers may be activated inadvertently. This could then damage the windshield wiper
blades or scratch the windshield.
For this reason, you should always switch off the windshield wipers in dry weather. Combination switch
0047
003F Windshield wiper off
0048 0062 Intermittent wipe, low (rain sensor set
to low sensitivity)
0049 0063 Intermittent wipe, high (rain sensor
set to high sensitivity)
004A 00AA Continuous wipe, slow
004B 00A9 Continuous wipe, fast
0084 00D3 Single wipe
006B 00D4 To wipe with washer fluid
X Switch on the ignition.
X Turn the combination switch to the corre-
sponding position.
In the 0062or0063 position, the appropriate
wiping frequency is set automatically according
to the intensity of the rain. In the 0063position,
the rain sensor is more sensitive than in
the 0062 position, causing the windshield wiper
to wipe more frequently.
Vehicles with MAGIC VISION CONTROL: the
washer fluid is fed through the wiper blades and when wiping with washer fluid 00D4the washer
fluid is emitted directly from the blades. Windshield wipers
117Lights and windshield wipers Z
Page 120 of 398

If the wiper blades are worn, the windshield will
no longer be wiped properly. This could preventyou from observing the traffic conditions. Switching the rear window wipers
on/off
Combination switch
0043
00C5 Rear window wiper switch
0048 008E Wipes with washer fluid
0049 ISwitches on intermittent wiping
004A 0Switches off intermittent wiping
004B 008E Wipes with washer fluid
X Turn the SmartKey to position 0047or0048
(Y page 135).
X Turn switch 0043on the combination switch to
the corresponding position.
When the rear window wiper is switched on,
the 00C5 symbol appears in the assistance
graphic in the instrument cluster. Further
information on the assistance graphic
(Y page 237). Replacing the wiper blades
Important safety notes G
WARNING
If the windshield wipers begin to move while
you are changing the wiper blades, you could be trapped by the wiper arm. There is a risk of
injury.
Always switch off the windshield wipers and
ignition before changing the wiper blades. !
To avoid damaging the wiper blades, make
sure that you touch only the wiper arm of the
wiper.
! Never open the hood/tailgate if a wiper arm
has been folded away from the windshield/
rear window.
Never fold a windshield wiper arm without a
wiper blade back onto the windshield/rear
window.
Hold the windshield wiper arm firmly when
you change the wiper blade. If you release the
wiper arm without a wiper blade and it falls
onto the windshield/rear window, the wind-
shield/rear window may be damaged by the
force of the impact.
Mercedes-Benz recommends that you have
the wiper blades changed at a qualified spe-
cialist workshop.
Changing the windshield wiper blades Moving the wiper arms to a vertical posi-
tion
On vehicles without KEYLESS-GO:
X Turn the SmartKey to position 0092in the igni-
tion lock (Y page 135).
X Set the windshield wiper to position 00AAon
the combination switch.
X Turn the SmartKey to position 0047in the igni-
tion lock (Y page 135).
X As soon as the wiper arms are vertical to the
hood, turn the SmartKey to position 0092in the
ignition lock (Y page 135).
X Remove the SmartKey.
X Fold the wiper arms away from the windshield
until you feel them snap into place.
On vehicles with KEYLESS-GO:
X Switch off the engine.
X Remove your foot from the brake pedal.
X Set the windshield wiper to the 00AAposition.
X Press the Start/Stop button repeatedly until
the windshield wiper starts.
X When the wiper arms are vertical to the hood,
press the Start/Stop button repeatedly until
the windshield wiper stops.
X Fold the wiper arms away from the windshield
until you feel them snap into place. 118
Windshield wipersLights and windshield wipers
Page 121 of 398

Removing the wiper blades
X Remove the SmartKey from the ignition lock.
X Fold the wiper arm away from the windshield. X
Firmly press release knob 0043and pull wiper
blade 0044upwards from the wiper arm in the
direction of the arrow.
Installing the wiper blades X
Position new wiper blade 0043in the retainer on
the wiper arm and slide it into place in the
direction of the arrow.
The wiper blade audibly engages.
X Make sure that the wiper blade is seated cor-
rectly.
X Fold the wiper arm back onto the windshield.
Replacing the wiper blades (MAGIC
VISION CONTROL) Moving the wiper arms to a vertical posi-
tion
On vehicles without KEYLESS-GO:
X Turn the SmartKey to position 0092in the igni-
tion lock (Y page 135).
X Set the windshield wiper to position 00AAon
the combination switch. X
Turn the SmartKey to position 0047in the igni-
tion lock (Y page 135).
X As soon as the wiper arms are vertical to the
hood, turn the SmartKey to position 0092in the
ignition lock (Y page 135).
X Remove the SmartKey.
X Fold the wiper arms away from the windshield
until you feel them snap into place.
On vehicles with KEYLESS-GO:
X Switch off the engine.
X Remove your foot from the brake pedal.
X Set the windshield wiper to the 00AAposition.
X Press the Start/Stop button repeatedly until
the windshield wiper starts.
X When the wiper arms are vertical to the hood,
press the Start/Stop button repeatedly until
the windshield wiper stops.
X Fold the wiper arms away from the windshield
until you feel them snap into place.
Removing a wiper blade X
To bring the wiper blade into position to
be removed:
hold the wiper arm firmly with
one hand. With the other hand, turn the wiper blade in the direction of arrow 0043beyond the
point of resistance.
The wiper blade engages in the removal posi-
tion with an audible click.
X To remove a wiper blade: firmly press
release knob 0044and pull the wiper blade
upwards 0087. Windshield wipers
119Lights and windshield wipers Z
Page 122 of 398

Installing the wiper blades
X
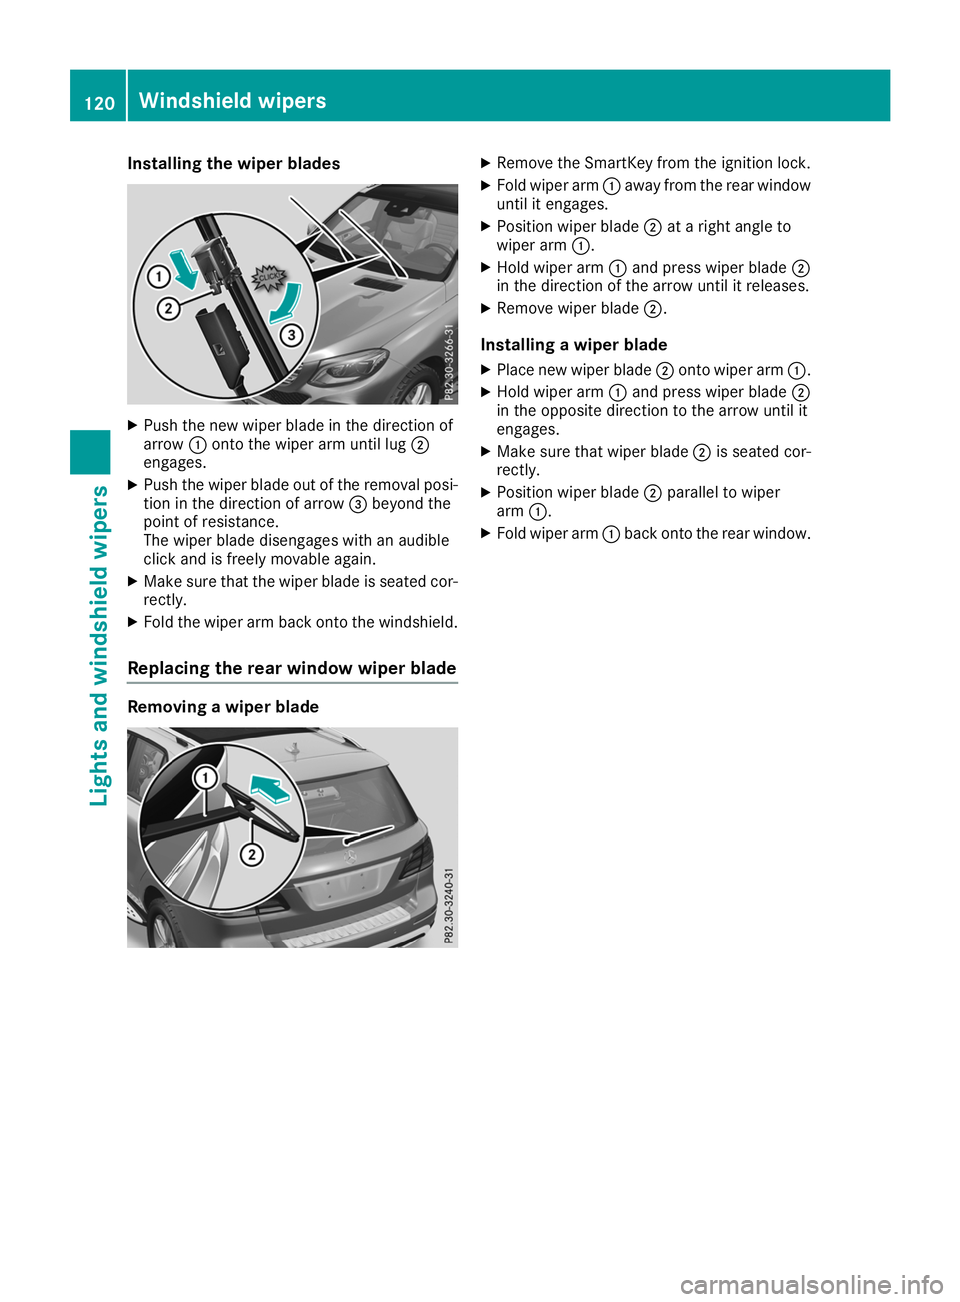
Push the new wiper blade in the direction of
arrow 0043onto the wiper arm until lug 0044
engages.
X Push the wiper blade out of the removal posi-
tion in the direction of arrow 0087beyond the
point of resistance.
The wiper blade disengages with an audible
click and is freely movable again.
X Make sure that the wiper blade is seated cor-
rectly.
X Fold the wiper arm back onto the windshield.
Replacing the rear window wiper blade Removing a wiper blade X
Remove the SmartKey from the ignition lock.
X Fold wiper arm 0043away from the rear window
until it engages.
X Position wiper blade 0044at a right angle to
wiper arm 0043.
X Hold wiper arm 0043and press wiper blade 0044
in the direction of the arrow until it releases.
X Remove wiper blade 0044.
Installing a wiper blade
X Place new wiper blade 0044onto wiper arm 0043.
X Hold wiper arm 0043and press wiper blade 0044
in the opposite direction to the arrow until it
engages.
X Make sure that wiper blade 0044is seated cor-
rectly.
X Position wiper blade 0044parallel to wiper
arm 0043.
X Fold wiper arm 0043back onto the rear window. 120
Windshield wipersLights and windshield wipers
Page 123 of 398

Problems with the windshield wipers
Problem
Possible causes/consequences and
0050
0050Solutions The windshield wipers
are jammed. Leaves or snow, for example, may be obstructing the windshield wiper
movement. The wiper motor has been deactivated.
X For safety reasons, you should remove the SmartKey from the igni-
tion lock.
or X Switch off the engine using the Start/Stop button and open the
driver's door.
X Remove the cause of the obstruction.
X Switch the windshield wipers back on. The windshield wipers
fail completely. The windshield wiper drive is malfunctioning.
X Select another wiper speed on the combination switch.
X Have the windshield wipers checked at a qualified specialist work-
shop. Windshield wipers
121Lights and windshield wipers Z
Page 132 of 398

Activating/deactivating
X
Turn the SmartKey to position 0048in the igni-
tion lock (Y page 135).
X To activate: press the0064button.
The indicator lamp in the 0064button lights
up.
The climate control system switches to the
following settings:
R high airflow
R high temperature
R air distribution to the windshield and front
side windows
R air-recirculation mode off
X To deactivate: press the0064button.
The indicator lamp in the 0064button goes
out. The previously selected settings are
restored. Air-recirculation mode remains
deactivated. MAX COOL maximum cooling
The MAX COOL function is only available in vehi-
cles for the USA.
MAX COOL is only operational when the engine is running.
X To activate: press the00C9button.
The indicator lamp in the 00C9button lights
up.
X To deactivate: press the00C9button.
The indicator lamp in the 00C9button goes
out. The previously selected settings are
restored.
When you activate MAX COOL, climate control
switches to the following functions: R maximum cooling
R maximum airflow
R air-recirculation mode on Removing condensation from the win-
dows
Windows fogged up on the inside X
Activate the 005Aor0056 cooling with air
dehumidification function.
X Activate automatic mode 0058.
X If the windows continue to fog up, activate the
"windshield defrosting" function
(Y page 129).
i You should only select this setting until the
windshield is clear again.
Windows fogged up on the outside X
Activate the windshield wipers.
X Press the 008Fbutton repeatedly until the
009C or009B symbol appears in the display.
i You should only select this setting until the
windshield is clear again.
i If you clean the windows regularly, they do
not fog up so quickly. Rear window defroster
General notes The rear window defroster has a high current
draw. You should therefore switch it off as soon
as the rear window is clear. Otherwise, the rear
window defroster switches off automatically
after several minutes.
If the battery voltage is too low, the rear window defroster may switch off.
Activating/deactivating X
Turn the SmartKey to position 0048in the igni-
tion lock (Y page 135).
X Press the 006Cbutton.
The indicator lamp in the 006Cbutton lights
up or goes out. 130
Operating the climate control systemsClimate cont
rol
Page 137 of 398

!
Do not warm up the engine while stationary.
Pull away immediately. Avoid high engine
speeds and full throttle until the engine has
reached its operating temperature.
In vehicles with automatic transmission,
engage positions P and R only when the vehi-
cle is stationary.
Where possible, avoid spinning the drive
wheels when pulling away on slippery roads.
You could otherwise damage the drive train.
! Mercedes-AMG vehicles:
at low engine oil
temperatures below 68 ‡ (+20 †), the max-
imum engine speed is restricted in order to
protect the engine. To protect the engine and
maintain smooth engine operation, avoid driv-
ing at full throttle when the engine is cold.
Plug-in hybrid: be sure to read the separate
Operator's Manual. Otherwise, you may not rec-
ognize dangers. Key positions
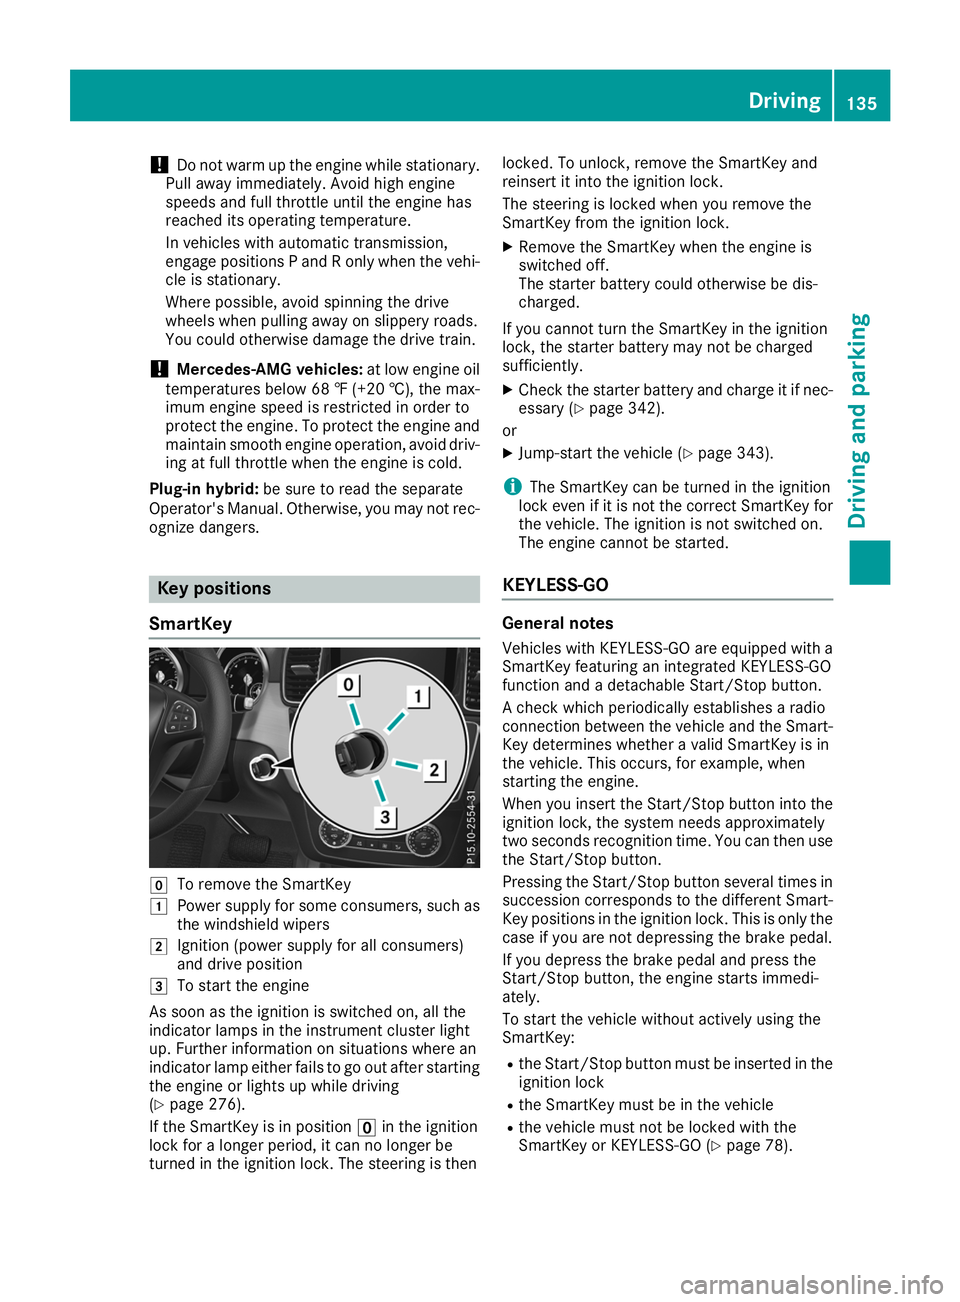
SmartKey 005A
To remove the SmartKey
0047 Power supply for some consumers, such as
the windshield wipers
0048 Ignition (power supply for all consumers)
and drive position
0049 To start the engine
As soon as the ignition is switched on, all the
indicator lamps in the instrument cluster light
up. Further information on situations where an
indicator lamp either fails to go out after starting the engine or lights up while driving
(Y page 276).
If the SmartKey is in position 0092in the ignition
lock for a longer period, it can no longer be
turned in the ignition lock. The steering is then locked. To unlock, remove the SmartKey and
reinsert it into the ignition lock.
The steering is locked when you remove the
SmartKey from the ignition lock.
X Remove the SmartKey when the engine is
switched off.
The starter battery could otherwise be dis-
charged.
If you cannot turn the SmartKey in the ignition
lock, the starter battery may not be charged
sufficiently.
X Check the starter battery and charge it if nec-
essary (Y page 342).
or
X Jump-start the vehicle (Y page 343).
i The SmartKey can be turned in the ignition
lock even if it is not the correct SmartKey for
the vehicle. The ignition is not switched on.
The engine cannot be started.
KEYLESS-GO General notes
Vehicles with KEYLESS-GO are equipped with a
SmartKey featuring an integrated KEYLESS-GO
function and a detachable Start/Stop button.
A check which periodically establishes a radio
connection between the vehicle and the Smart-
Key determines whether a valid SmartKey is in
the vehicle. This occurs, for example, when
starting the engine.
When you insert the Start/Stop button into the ignition lock, the system needs approximately
two seconds recognition time. You can then usethe Start/Stop button.
Pressing the Start/Stop button several times in
succession corresponds to the different Smart-
Key positions in the ignition lock. This is only the
case if you are not depressing the brake pedal.
If you depress the brake pedal and press the
Start/Stop button, the engine starts immedi-
ately.
To start the vehicle without actively using the
SmartKey:
R the Start/Stop button must be inserted in the
ignition lock
R the SmartKey must be in the vehicle
R the vehicle must not be locked with the
SmartKey or KEYLESS-GO (Y page 78). Driving
135Driving and parking Z