2019 MERCEDES-BENZ GLE SUV seat adjustment
[x] Cancel search: seat adjustmentPage 105 of 398

Problems with the seat heating or seat ventilation
Problem
Possible causes/consequences and
0050
0050Solutions The seat heating or seat
ventilation has switched
off prematurely or can-
not be switched on. The on-board voltage is too low because too many electrical consum-
ers are switched on.
X Switch off electrical consumers that you do not need, such as the
rear window defroster or interior lighting.
Once the battery is sufficiently charged, the seat heating or seat
ventilation will switch back on automatically. Steering wheel
Important safety notes
G
WARNING
You could lose control of your vehicle if you do the following while driving:
R adjust the driver's seat, head restraint,
steering wheel or mirrors
R fasten the seat belt
There is a risk of an accident.
Adjust the driver's seat, head restraint, steer-
ing wheel and mirror and fasten your seat belt before starting the engine. G
WARNING
Children could injure themselves if they
adjust the steering wheel. There is a risk of
injury.
When leaving the vehicle, always take the
SmartKey with you and lock the vehicle. Never leave children unsupervised in the vehicle.
The electrically adjustable steering wheel can
still be adjusted when there is no SmartKey in
the ignition lock. Adjusting the steering wheel man-
ually
G
WARNING
If the steering wheel is unlocked while the
vehicle is in motion, it could change position
unexpectedly. This could cause you to lose control of the vehicle. There is a risk of an
accident.
Before starting off, make sure the steering
wheel is locked. Never unlock the steering
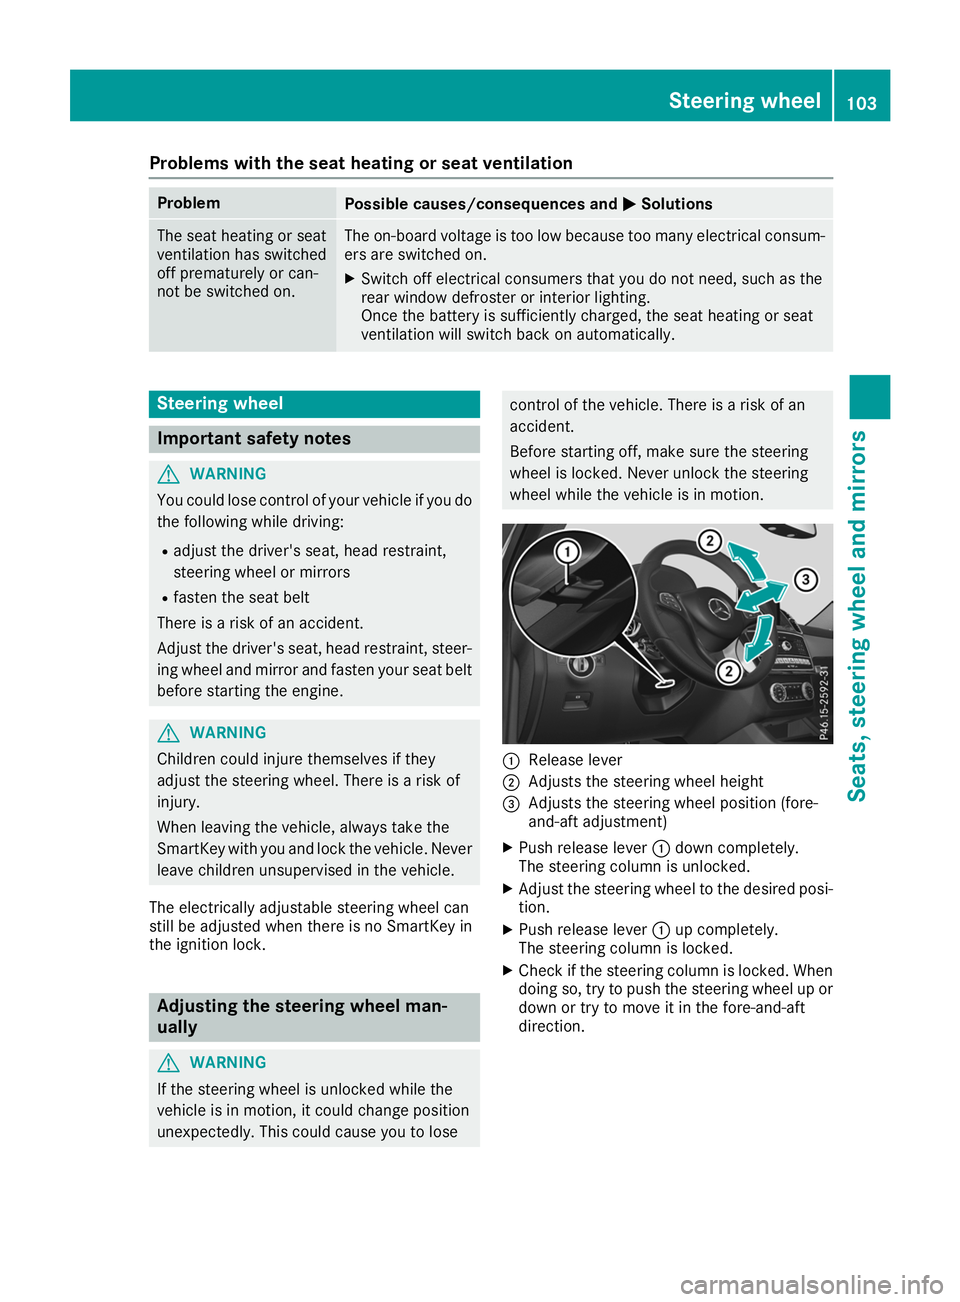
wheel while the vehicle is in motion. 0043
Release lever
0044 Adjusts the steering wheel height
0087 Adjusts the steering wheel position (fore-
and-aft adjustment)
X Push release lever 0043down completely.
The steering column is unlocked.
X Adjust the steering wheel to the desired posi-
tion.
X Push release lever 0043up completely.
The steering column is locked.
X Check if the steering column is locked. When
doing so, try to push the steering wheel up or down or try to move it in the fore-and-aft
direction. Steering wheel
103Seats, steering wheel and mirrors Z
Page 106 of 398

Adjusting the steering wheel electri-
cally 0043
Adjusts the steering wheel height
0044 Adjusts the steering wheel position (fore-
and-aft adjustment)
The steering wheel can also be adjusted when
the SmartKey is removed from the ignition lock.
i Further related subjects:
R EASY-ENTRY/EXIT feature (Y page 104)
R Storing settings (Y page 108) Steering wheel heating
Switching on/off X
Turn the SmartKey to position 0048in the igni-
tion lock (Y page 135).
X To switch on/off: turn the lever in the direc-
tion of arrow 0043or0044.
Indicator lamp 0087lights up or goes out.
Vehicles with KEYLESS-GO: when you switch off the ignition and open the driver's door, the
steering wheel heating is deactivated.
Vehicles without KEYLESS-GO: when you
remove the SmartKey from the ignition lock, the
steering wheel heating is deactivated.
Problems with the steering wheel heating Problem
Possible causes/consequences and
0050 0050Solutions The steering wheel heat-
ing has switched off pre-
maturely or cannot be
switched on. The on-board voltage is too low because too many electrical consum-
ers are switched on.
X Switch off electrical consumers that you do not need, such as the
rear window defroster or interior lighting. EASY-ENTRY/EXIT feature
Important safety notes G
WARNING
When the EASY-ENTRY/EXIT feature adjusts
the steering wheel, you and other vehicle
occupants – particularly children – could
become trapped. There is a risk of injury.
While the EASY-ENTRY/EXIT feature is mak-
ing adjustments, make sure that no one has
any body parts in the sweep of the steering
wheel. Move the steering wheel adjustment lever if
there is a risk of entrapment by the steering
wheel. The adjustment process is stopped.
Press one of the memory function position but-
tons. This function is only available on vehicles
with memory function. G
WARNING
If children activate the EASY-ENTRY/EXIT fea- ture, they can become trapped, particularly
when unattended. There is a risk of injury. 104
Steering wheelSeats
, steering wheel and mirrors
Page 107 of 398

When leaving the vehicle, always take the
SmartKey with you and lock the vehicle. Never leave children unsupervised in the vehicle. G
WARNING
If you drive off while the EASY-ENTRY/EXIT
feature is making adjustments, you could lose
control of the vehicle. There is a risk of an
accident.
Always wait until the adjustment process is
complete before driving off.
The EASY-ENTRY/EXIT feature makes getting in
and out of your vehicle easier.
You can activate and deactivate the EASY-
ENTRY/EXIT feature in the on-board computer
(Y page 240).
Position of the steering wheel when the EASY-ENTRY/EXIT feature is active The steering wheel swings up when you:
R remove the SmartKey from the ignition lock.
R open the driver's door and KEYLESS-GO is in
position 0047.
R open the driver's door and the SmartKey is in
position 0092or0047 in the ignition lock.
i The steering wheel only moves up if it has
not already reached the upper stop.
Position of the steering wheel for driv-
ing The steering wheel is moved to the last selected
position when:
R the driver's door is closed
R you insert the SmartKey into the ignition lock
or
R you press the Start/Stop button once on vehi-
cles with KEYLESS-GO
When you close the driver's door with the igni-
tion switched on, the steering wheel is also
automatically moved to the previously set posi- tion.
The last position of the steering column is stored
when you:
R switch the ignition off
R save the setting with the memory function
(Y page 108). Crash-responsive EASY-EXIT feature If the crash-responsive EASY-EXIT feature is trig-
gered in an accident, the steering column will
move upwards when the driver's door is opened.
This occurs irrespective of the position of the
SmartKey in the ignition lock. This makes it eas- ier to exit the vehicle and rescue the occupants.
The crash-responsive EASY-EXIT feature is only
operational if the EASY-EXIT/ENTRY feature is
activated in the on-board computer
(Y page 240). Mirrors
Rear-view mirror
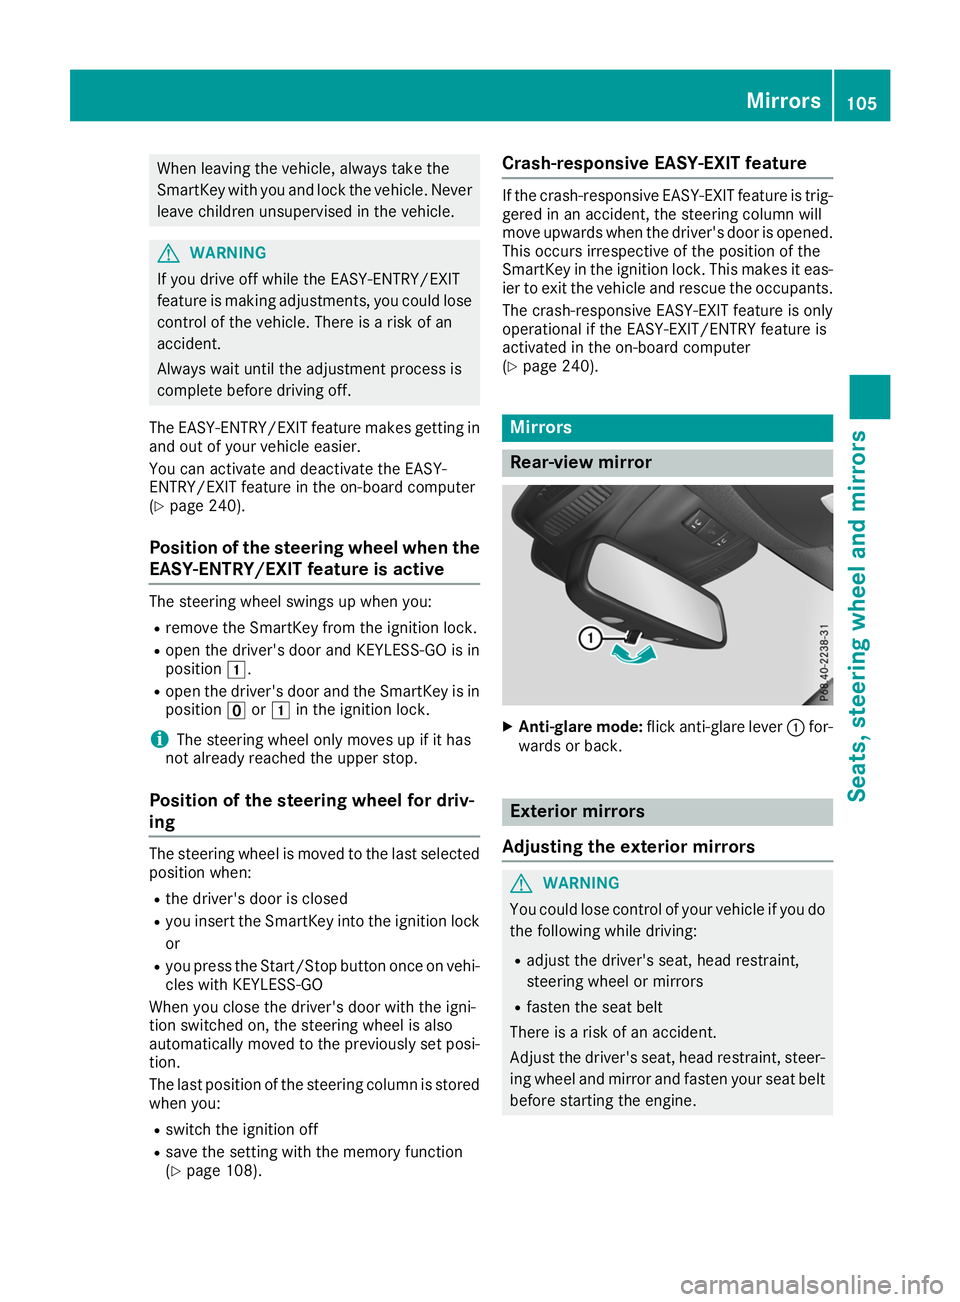
X
Anti-glare mode: flick anti-glare lever 0043for-
wards or back. Exterior mirrors
Adjusting the exterior mirrors G
WARNING
You could lose control of your vehicle if you do the following while driving:
R adjust the driver's seat, head restraint,
steering wheel or mirrors
R fasten the seat belt
There is a risk of an accident.
Adjust the driver's seat, head restraint, steer-
ing wheel and mirror and fasten your seat belt before starting the engine. Mirrors
105Seats, steering wheel and mirrors Z
Page 110 of 398

X
Engage reverse gear.
The exterior mirror on the front-passenger
side moves to the default setting parking posi-
tion.
X Use button 0087to adjust the exterior mirror to
a position that allows you to see the rear
wheel and the curb.
The parking position is stored.
i If you shift the transmission to another posi-
tion, the exterior mirror on the front-
passenger side returns to the driving position.
Using the memory button You can store the parking position of the exte-
rior mirror on the front-passenger side using
memory button
M0085. The reverse gear must not
be engaged during the process.
X Turn the SmartKey to position 0048in the igni-
tion lock (Y page 135).
X Press button 0044.
X Use button 0087to adjust the exterior mirror to
a position that allows you to see the rear
wheel and the curb.
X Press memory button M0085 and one of the
arrows on button 0087within three seconds.
The parking position is stored if the exterior
mirror does not move.
X If the mirror moves out of position, repeat the
steps.
Calling up a stored parking position set- ting X
Turn the SmartKey to position 0048in the igni-
tion lock (Y page 135).
X Adjust the exterior mirror on the front-
passenger side using button 0044.
X Engage reverse gear.
The exterior mirror on the front-passenger
side moves to the stored parking position.
The exterior mirror on the front-passenger side
moves back to its original position:
R as soon as you exceed a speed of 9 mph
(15 km/h)
R when you use button 0043to select the exterior
mirror on the driver's side Memory function
Storing settings
G
WARNING
If you use the memory function on the driver's side while driving, you could lose control of
the vehicle as a result of the adjustments
being made. There is a risk of an accident.
Only use the memory function on the driver's
side when the vehicle is stationary. G
WARNING
When the memory function adjusts the seat or steering wheel, you and other vehicle occu-
pants – particularly children – could become
trapped. There is a risk of injury.
While the memory function is making adjust-
ments, make sure that no one has any body
parts in the sweep of the seat or steering
wheel. If somebody becomes trapped, imme-
diately release the memory function position
button. The adjustment process is stopped. G
WARNING
Children could become trapped if they acti-
vate the memory function, particularly when
unattended. There is a risk of injury.
When leaving the vehicle, always take the
SmartKey with you and lock the vehicle. Never leave children unsupervised in the vehicle.
The memory function can be used at any time,
e.g. even when the SmartKey isn't in the ignition
lock.
With the memory function, you can store up to
three different settings, e.g. for three different
people.
The following settings are stored as a single
memory preset:
R position of the seat, backrest and head
restraint
R driver's side: steering wheel position
R driver's side: position of the exterior mirrors
on the driver's and front-passenger sides 108
Memory functionSeats, steering
wheel and mirrors
Page 182 of 398

R
Utility vehicles have a significantly higher roll-
over rate than other types of vehicles.
Failure to operate this vehicle safely may
result in an accident, rollover of the vehicle,
and severe or fatal injury.
R In a rollover crash, an unbelted person is sig-
nificantly more likely to die than a person
wearing a seat belt.
You and all vehicle occupants should always
wear your seat belts.
Basic settings The extent to which the vehicle is raised or low-
ered depends on the basic setting selected.
Select:
R the Comfort orSport drive program for driv-
ing on normal roads
R the Offroad drive program for driving on eas-
ily negotiable off-road terrain
R the Offroad Plus drive program for off-road
driving
R offroad level 1 for driving on easily negotiable
off-road terrain
R offroad level 2 for driving on normal off-road
terrain
R offroad level 3 for freeing the vehicle in par-
ticularly rough terrain at low speeds only
The individual vehicle levels differ from the nor- mal level as follows:
R –0.6 in (–15 mm) in the Sportdrive program
R +/–0 in (+/–0 mm) in the Comfortdrive pro-
gram
R + 1.2 in (+ 30 mm) in the Offroaddrive pro-
gram
R + 2.4 in (+ 60 mm) in the Offroad Plusdrive
program
R + 1.2 in (+ 30 mm) in offroad level 1
R + 2.4 in (+ 60 mm) in offroad level 2
R + 3.5 in (+ 90 mm) in offroad level 3
Setting the vehicle level !
Make sure that there is enough ground
clearance when the vehicle is being lowered.
It could otherwise hit the ground, damaging
the underbody. Set the vehicle level using the selector wheel.
X Start the engine.
X Press selector wheel 0043.
Selector wheel 0043extends.
X To raise the vehicle: turn selector wheel 0043
clockwise 0044.
The vehicle is raised.
X To lower the vehicle: turn selector wheel 0043
counter-clockwise 0085.
The vehicle is lowered.
During the adjustment, the Lowering LoweringorVehi‐
Vehi‐
cle
cle Rising
Rising message appears in the multifunc-
tion display.
If you press the 0038or0076 button on the
multifunction steering wheel, the message will
disappear. Once normal level has been reached, all indicator lamps 0087go out.
The vehicle automatically selects normal level if
you:
R drive at speeds above 70 mph (112 km/h) or
R drive at speeds between 65 mph (105 km/h)
and 70 mph (112 km/h) for approximately
20 seconds
The vehicle is lowered to low level if you are
traveling at higher speeds.
Normal level 180
Driving systemsDriving and parking
Page 242 of 398

X
Press the 0064or0063 button to select the
Intell. Light System
Intell. Light System function.
If the Intell. Light System
Intell. Light System function has
been switched on, the cone of light and the
0058 symbol in the multifunction display are
shown in orange.
X Press the 0076button to save the setting.
When you activate Intell. Light System Intell. Light System,
you activate the following functions:
R Highway mode
R Active light function
R Cornering light function
R Extended range fog lamps
R Off-road lights
Further information on the Intelligent Light Sys-
tem (Y page 112).
Vehicle submenu Activating/deactivating the automatic
door locking mechanism
If you activate the Automatic AutomaticDoor
DoorLock
Lockfunc-
tion, the vehicle is centrally locked above a
speed of approximately 9 mph (15 km/h).
X Press the 0059or0065 button on the steering
wheel to select the Sett.
Sett.menu.
X Press the 0064or0063 button to select the
Vehicle
Vehicle submenu.
X Press 0076to confirm.
X Press the 0064or0063 button to select the
Automatic Door Lock
Automatic Door Lock function.
When the Automatic Door Lock
Automatic Door Lock function is
activated, the vehicle doors are displayed in
orange in the multifunction display.
X Press the 0076button to save the setting.
For further information on the automatic locking
feature, see (Y page 84).
Activating/deactivating the acoustic
locking verification signal
If you switch on the Acoustic
Acoustic Lock Lockfunction, an
acoustic signal sounds when you lock the vehi-
cle.
X Press the 0059or0065 button on the steering
wheel to select the Settings
Settings menu.
X Press the 0064or0063 button to select the
Vehicle
Vehicle submenu.
X Press 0076to confirm. X
Press the 0064or0063 button to select the
Acoustic Lock Acoustic Lock function.
If the Acoustic Lock Acoustic Lock function is activated,
the 0037 symbol in the multifunction display
lights up orange.
X Press the 0076button to save the setting.
Convenience submenu Activating/deactivating the EASY-
ENTRY/EXIT feature
G
WARNING
When the EASY-ENTRY/EXIT feature adjusts
the steering wheel, you and other vehicle
occupants – particularly children – could
become trapped. There is a risk of injury.
While the EASY-ENTRY/EXIT feature is mak-
ing adjustments, make sure that no one has
any body parts in the sweep of the steering
wheel.
If somebody becomes trapped:
R press one of the memory function position
buttons, or
R move the switch for steering wheel adjust-
ment in the opposite direction to that in
which the steering wheel is moving.
The adjustment process is stopped.
X Press the 0059or0065 button on the steering
wheel to select the Sett. Sett.menu.
X Press the 0064or0063 button to select the
Convenience
Convenience submenu.
X Press 0076to confirm.
X Using 0064or0063, select the Easy
EasyEntry/
Entry/
Exit
Exit function.
If the Easy
Easy Entry/Exit
Entry/Exit function is activated,
the vehicle steering wheel is displayed in
orange in the multifunction display.
X Press the 0076button to save the setting.
Further information on the EASY-ENTRY/EXIT
feature (Y page 104).
Switching the seat belt adjustment on/off X Press the 0059or0065 button on the steering
wheel to select the Settings Settingsmenu.
X Press the 0064or0063 button to select the
Convenience
Convenience submenu.
X Press 0076to confirm. 240
Menus and submenusOn-board computer and displays
Page 243 of 398

X
Press the 0064or0063 button to select the
Belt Adjustment
Belt Adjustment function.
If the Belt
Belt Adjustment
Adjustment function is activated,
the vehicle seat belt is shown in orange in the
multifunction display.
X Press the 0076button to save the setting.
For further information on belt adjustment, see
(Y page 48).
Switching the fold-in mirrors when lock-
ing feature on/off
This function is only available when the vehicle is
equipped with the electrical fold-in function.
When you activate the Auto.
Auto. Mirror
Mirror Folding
Folding
function, the exterior mirrors are folded in when the vehicle is locked. The exterior mirrors fold
out automatically again as soon as you unlock
the vehicle.
X Press the 0059or0065 button on the steering
wheel to select the Sett.
Sett. menu.
X Press the 0064or0063 button to select the
Convenience Convenience submenu.
X Press 0076to confirm.
X Press the 0064or0063 button to select the
Auto. Mirror Folding
Auto. Mirror Folding function.
If the Auto. Mirror Folding
Auto. Mirror Folding function is
switched on, the multifunction display shows the exterior mirror in orange.
X Press the 0076button to save the setting. If you have switched the
Auto. Mirror Fold‐
Auto. Mirror Fold‐
ing
ing on and you fold the exterior mirrors in using
button 0043, they will not fold out automatically
(Y page 106).
You can then only fold out the exterior mirrors
using button 0043. Restoring the factory settings X
Press the 0059or0065 button on the steering
wheel to select the Sett.
Sett.menu.
X Press the 0064or0063 button to select the
Factory Setting
Factory Setting submenu.
X Press 0076to confirm.
The Reset All Settings?
Reset All Settings? message
appears.
X Press the 0064or0063 button to select No
Noor
Yes
Yes.
X Press 0076to confirm the selection.
If you select Yes
Yes, the multifunction display
shows a confirmation message.
If you want to reset the Daytime Running
Daytime Running
Lights
Lights function in the Light
Lightsubmenu, you
must turn the SmartKey to position 0047in the
ignition lock. ON&OFFROAD menu
X Press the 0059or0065 button on the steering
wheel to select the ON&OFFROAD
ON&OFFROADmenu.
You can view the current off-road program set-
tings in the ON&OFFROAD ON&OFFROAD menu:
R Vehicles with the Off-Road Engineering pack-
age (Y page 216)
R Vehicles without the Offroad Engineering
package (Y page 215) AMG menu (Mercedes-AMG vehicles)
Warm-up 0043
Digital speedometer
0044 Gear indicator
0087 Upshift indicator
0085 Engine oil temperature
0083 Coolant temperature
0084 Transmission oil temperature Menus and submenus
241On-board computer and displays Z