2019 MERCEDES-BENZ GLE SUV fuel flap
[x] Cancel search: fuel flapPage 153 of 398

G
WARNING
Fuel is poisonous and hazardous to health.
There is a risk of injury.
You must make sure that fuel does not come into contact with your skin, eyes or clothing
and that it is not swallowed. Do not inhale fuel
vapors. Keep fuel away from children.
If you or others come into contact with fuel,
observe the following:
R Wash away fuel from skin immediately
using soap and water.
R If fuel comes into contact with your eyes,
immediately rinse them thoroughly with
clean water. Seek medical assistance with-
out delay.
R If fuel is swallowed, seek medical assis-
tance without delay. Do not induce vomit-
ing.
R Immediately change out of clothing which
has come into contact with fuel. G
WARNING
Electrostatic charge can cause sparks and
thereby ignite fuel vapors. There is a risk of
fire and explosion.
Before you open the fuel filler cap or take hold of the pump nozzle, touch the metallic vehicle
body. This discharges any electrostatic
charge that may have built up.
Do not get into the vehicle again during the
refueling process. Otherwise, electrostatic
charge could build up again. G
WARNING
Vehicles with a diesel engine:
If you mix diesel fuel with gasoline, the flash
point is lower than that of pure diesel fuel.
When the engine is running, exhaust system
components could overheat without being
noticed. There is a risk of fire.
Never refuel with gasoline. Never mix gasoline with diesel fuel.
! Do not use gasoline to refuel vehicles with a
diesel engine. Do not switch on the ignition if you accidentally refuel with the wrong fuel.
Otherwise, the fuel will enter the fuel system.
Even small amounts of the wrong fuel could
result in damage to the fuel system and the
engine. The repair costs are high. Notify a
qualified specialist workshop and have the
fuel tank and fuel lines drained completely.
! Do not use diesel to refuel vehicles with a
gasoline engine. Do not switch on the ignition if you accidentally refuel with the wrong fuel.
Otherwise, the fuel will enter the fuel system. Even small amounts of the wrong fuel could
result in damage to the fuel system and the
engine. Notify a qualified specialist workshop
and have the fuel tank and fuel lines drained
completely.
! Overfilling the fuel tank could damage the
fuel system.
! Take care not to spill any fuel on painted
surfaces. You could otherwise damage the
paintwork.
! Use a filter when adding fuel from a fuel can.
The fuel lines and/or the fuel injection system could otherwise be blocked by particles fromthe fuel can.
Do not get into the vehicle again during the refu-
eling process. Otherwise, electrostatic charge
could build up again.
If you overfill the fuel tank, fuel could spray out
when the fuel pump nozzle is removed.
i Flexible Fuel vehicles can be recognized by
the Ethanol up to E85 sticker on the inside of
the fuel filler flap. Please note that the warn-
ings about the risk of fire, explosion or injury
also refer to Flexible Fuel vehicles.
For further information on fuel and fuel quality
(Y page 384). Refueling
General information Pay attention to the important safety notes
(Y
page 150).
If you unlock/lock the vehicle from the outside,
the fuel filler flap also unlocks/locks.
The position of the fuel filler cap is displayed in
the instrument cluster 00B6. The arrow next to
the filling pump indicates the side of the vehicle. Refueling
151Driving and parking Z
Page 154 of 398

Preparing to refuel
X
Switch off the engine.
X Remove the SmartKey from the ignition lock.
or, on vehicles with KEYLESS‑GO:
X Open the driver's door.
The vehicle electronics now have status 005A.
This is the same as the SmartKey having been removed.
The driver’s door can be closed again.
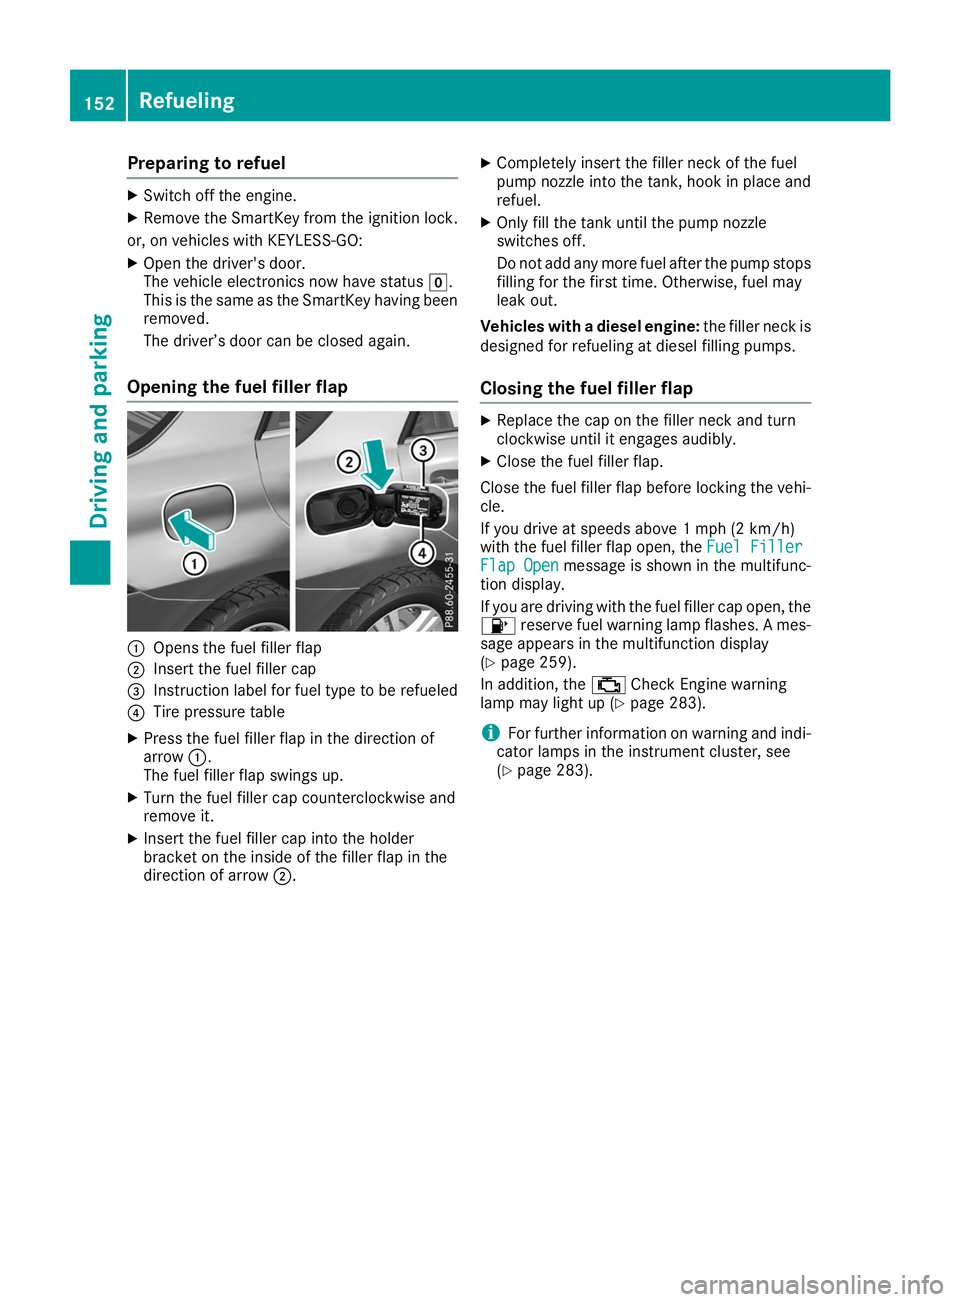
Opening the fuel filler flap 0043
Opens the fuel filler flap
0044 Insert the fuel filler cap
0087 Instruction label for fuel type to be refueled
0085 Tire pressure table
X Press the fuel filler flap in the direction of
arrow 0043.
The fuel filler flap swings up.
X Turn the fuel filler cap counterclockwise and
remove it.
X Insert the fuel filler cap into the holder
bracket on the inside of the filler flap in the
direction of arrow 0044. X
Completely insert the filler neck of the fuel
pump nozzle into the tank, hook in place and
refuel.
X Only fill the tank until the pump nozzle
switches off.
Do not add any more fuel after the pump stops
filling for the first time. Otherwise, fuel may
leak out.
Vehicles with a diesel engine: the filler neck is
designed for refueling at diesel filling pumps.
Closing the fuel filler flap X
Replace the cap on the filler neck and turn
clockwise until it engages audibly.
X Close the fuel filler flap.
Close the fuel filler flap before locking the vehi-
cle.
If you drive at speeds above 1 mph (2 km/h)
with the fuel filler flap open, the Fuel Filler Fuel Filler
Flap Open
Flap Open message is shown in the multifunc-
tion display.
If you are driving with the fuel filler cap open, the
00B6 reserve fuel warning lamp flashes. A mes-
sage appears in the multifunction display
(Y page 259).
In addition, the 00B9Check Engine warning
lamp may light up (Y page 283).
i For further information on warning and indi-
cator lamps in the instrument cluster, see
(Y page 283). 152
RefuelingDriving and parking
Page 155 of 398

Problems with fuel and the fuel tank
Problem
Possible causes/consequences and
0050
0050Solutions Fuel is leaking from the
vehicle.
G
WARNING
The fuel line or the fuel tank is faulty.
Risk of explosion or fire. X Apply the electric parking brake.
X Switch off the engine.
X Remove the SmartKey from the ignition lock.
or, in vehicles with KEYLESS-GO start-function or KEYLESS ‑GO
X Open the driver's door.
The vehicle electronics are now in key position 0092. This is the same
as the SmartKey having been removed.
X Do not restart the engine under any circumstances.
X Consult a qualified specialist workshop. The engine does not
start. The fuel tank of a vehicle with a diesel engine has been run completely
dry.
X Refuel the vehicle with at least 5.3 US qt (5 liters) of diesel.
X Turn the ignition on for approximately ten seconds (Y page 135).
X Start the engine continuously for up to ten seconds until it runs
smoothly.
If the engine does not start:
X Turn the ignition on again for approximately ten seconds
(Y page 135).
X Start the engine again continuously for up to ten seconds until it
runs smoothly.
If the engine does not start after three attempts:
X Consult a qualified specialist workshop. The fuel filler flap cannot
be opened. The fuel filler flap is not unlocked.
X Unlock the vehicle (Y page 77). The SmartKey battery is discharged or nearly discharged.
X Unlock the vehicle using the mechanical key (Y page 79). The fuel filler flap is unlocked, but the opening mechanism is jammed.
X Consult a qualified specialist workshop. DEF (BlueTEC vehicles only)
General notes To function properly, BlueTEC exhaust gas after-
treatment must be operated with the reducing
agent DEF. Adding DEF is one of the tasks per-
formed during maintenance. When the supply of DEF is almost used up, the
Check Additive See Operator's Manual
Check Additive See Operator's Manual
message is shown in the multifunction display.
If you drive the vehicle faster than 10 mph
(16 km/h), the Check Additive See Opera‐ Check Additive See Opera‐
tor's Manual
tor's Manual message goes out after approx-
imately one minute. Refueling
153Driving and parking Z
Page 157 of 398

Opening/closing the DEF filler cap
The fuel filler flap is unlocked or locked auto-
matically when you open or close the vehicle
with the SmartKey or with KEYLESS-GO.
X To open: switch the ignition off.
X Press the fuel filler flap in the direction of
arrow 0043.
The fuel filler flap swings up.
X Turn blue DEF fuel filler cap 0044counter-clock-
wise and remove it.
DEF filler cap 0044is secured with a plastic
strip.
X To close: place DEF filler cap 0044on the filler
neck and turn it clockwise.
X To close the fuel filler flap, press it in the
direction of arrow 0043.
X Drive faster than 10 mph (16 km/h).
The Check Additive See Operator's
Check Additive See Operator's
Manual Manual message disappears after approx-
imately one minute.
i If the
Check Additive See Operator's
Check Additive See Operator's
Manual
Manual message continues to be shown on
the multifunction display, you must add more
DEF.
DEF refill canisters !
Do not screw the disposable hose on too
tight. The disposable hose could otherwise be damaged and DEF may leak out. X
Unscrew the cap from the opening on top of
DEF refill canister 0044.
X Place disposable hose 0043on the opening of
DEF refill canister 0044and screw it on clock-
wise until hand-tight.
Disposable hose 0043remains closed until you
fasten disposable hose 0043to the DEF filler
neck of the vehicle. X
Place disposable hose 0043on the filler neck on
the vehicle and screw it on clockwise until
hand-tight. When you feel resistance, dispos- able hose 0043is sufficiently secured.
X Lift up and tip DEF refill canister 0044.
Filling stops when the DEF tank is completely
filled. Do not fill the DEF tank any further. DEF
refill canister 0044can be removed when it has
been only partially emptied.
X Turn disposable hose 0043on the filler neck of
the vehicle counter-clockwise and remove it.
X Turn disposable hose 0043on the opening of
DEF refill canister 0044counter-clockwise and
remove it.
X Reseal DEF refill canister 0044with the cap.
DEF refill canisters are available at many gas
stations or at a qualified specialist workshop.
DEF refill canisters are often sold with a filler
hose. A filler hose that does not exactly fill the
vehicle's DEF tank offers no protection against Refueling
155Driving and parking Z
Page 223 of 398

R
is affected more by strong crosswinds
R demands more sensitive steering
R has a larger turning circle
This could impair the handling characteristics.
When towing a trailer, always adjust your speed to the current road and weather conditions. Do
not exceed the maximum permissible speed for
your vehicle/trailer combination. Notes on towing a trailer
General notes !
If you have a trailer tow hitch retrofitted,
changes to the cooling system and drive train may be necessary, depending on the vehicle
type.
If you have a trailer tow hitch retrofitted,
observe the anchorage points on the chassis
frame.
R Do not exceed the legally prescribed maxi-
mum speed for vehicle/trailer combinations
in the relevant country.
This lowers the risk of an accident.
R Only install an approved trailer coupling on
your vehicle.
More information on availability and installa-
tion can be obtained at any qualified special-
ist workshop.
R The bumpers of your vehicle are not suitable
for installing detachable trailer couplings.
R Do not install hired trailer couplings or other
detachable trailer couplings on the bumpers
of your vehicle.
R If you no longer need the ball coupling,
remove it from the ball coupling recess. This
will reduce the risk of damage to the ball cou-
pling.
When towing a trailer, set the tire pressure on
the rear axle of the towing vehicle for the max-
imum load. You will find the values in the tire
pressure table in the fuel filler flap of the vehicle (Y page 369).
Please note that when towing a trailer, the fol-
lowing driving systems have limited availability
or are not available at all:
R Parking Assist PARKTRONIC (Y page 188)
R Blind Spot Assist (Y page 206)
R Active Lane Keeping Assist (Y page 211)On vehicles without level control, the height of
the ball coupling will alter according to the load
placed on the vehicle. If necessary, use a trailer
with a height-adjustable drawbar.
You will find installing dimensions and loads
under "Technical data" (Y page 394).
Driving tips Also observe the notes on pulling away with a
trailer (Y
page 138).
The maximum permissible speed for vehicle/
trailer combinations depends on the type of
trailer. Before beginning the journey, check the
trailer's documents to see what the maximum
permissible speed is for your trailer. Observe the
legally permissible maximum speed in the rele-
vant country.
For certain Mercedes-Benz vehicles, the maxi-
mum permissible rear axle load is increased
when towing a trailer. See "Technical data" to
find out whether this applies to your vehicle
(Y page 394). If you utilize any of the added
maximum rear axle load when towing a trailer,
the vehicle/trailer combination may not exceed
a maximum speed of 60 mph (100 km/h) for
reasons concerning the operating permit. This
also applies in countries in which the maximum
permissible speed for car/trailer combinations
is greater than 60 mph (100 km/h).
When towing a trailer, your vehicle's handling
characteristics will be different in comparison
with when driving without a trailer.
Use the left-hand steering wheel paddle shifter
to shift into a lower gear in good time on long
and steep downhill gradients.
This also applies if you have activated cruise
control or Active Distance Assist DISTRONIC.
This will use the braking effect of the engine, so that less braking will be required to maintain the
speed. This relieves the load on the brake sys-
tem and prevents the brakes from overheating
and wearing too quickly. If you need additional
braking, depress the brake pedal repeatedly
rather than continuously.
Driving tips If the trailer swings from side to side:
X Do not accelerate.
X Do not counter-steer.
X Brake if necessary. Towing a trailer
221Driving and parking Z
Page 341 of 398

Tire pressure not reached
If a pressure of 180 kPa (1.8 bar/26 psi) has not
been attained after five minutes:
X Switch off the tire inflation compressor.
X Unscrew the filler hose from the valve of the
faulty tire.
Note that tire sealant may escape when you
unscrew the filler hose.
X Very slowly drive forwards or reverse approx-
imately 30 ft (10 m).
X Pump up the tire again.
After a maximum of five minutes the tire pres-
sure must be at least 180 kPa (1.8 bar/
26 psi). G
WARNING
If the required tire pressure is not reached
after the specified time, the tire is too badly
damaged. The tire sealant cannot repair the
tire in this instance. Damaged tires and a tire pressure that is too low can significantly
impair the vehicle's braking and driving char-
acteristics. There is a risk of accident.
Do not continue driving. Contact a qualified
specialist workshop.
Tire pressure reached G
WARNING
A tire temporarily sealed with tire sealant
impairs the driving characteristics and is not
suitable for higher speeds. There is a risk of
accident.
You should therefore adapt your driving style
accordingly and drive carefully. Do not exceed the specified maximum speed with a tire that
has been repaired using tire sealant.
The maximum permissible speed for a tire
sealed with tire sealant is 50 mph (80 km/h).
The upper part of the TIREFIT sticker must be
affixed to the instrument cluster in the driver's
field of vision.
! Residue from the tire sealant may come out
of the filler hose after use. This could cause
stains.
Therefore, place the filler hose in the plastic
bag which contained the TIREFIT kit. H
Environmental note
Have the used tire sealant bottle disposed of
professionally, e.g. at a qualified specialist
workshop.
If a tire pressure of 180 kPa (1.8 ba r/26 psi) has
been attained after five minutes:
X Switch off the tire inflation compressor.
X Unscrew the filler hose from the valve of the
faulty tire.
X Stow the tire sealant bottle and the tire infla-
tion compressor.
X Pull away immediately.
X Stop after driving for approximately ten
minutes and check the tire pressure with the tire inflation compressor.
The tire pressure must now be at least
130 kPa (1.3 bar/19 psi). G
WARNING
If the required tire pressure is not reached
after driving for a short period, the tire is too
badly damaged. The tire sealant cannot repair the tire in this instance. Damaged tires and a
tire pressure that is too low can significantly
impair the vehicle's braking and driving char-
acteristics. There is a risk of accident.
Do not continue driving. Contact a qualified
specialist workshop.
i In cases such as the one mentioned above,
contact an authorized Mercedes-Benz Cen-
ter. Or call 1-800 FOR-MERCEDES (in the
USA) or 1-800-387-0100 (in Canada).
X Correct the tire pressure if it is still at least
130 kPa (1.3 bar/19 psi). See the Tire and
Loading Information placard on the driver's
side B-pillar or the tire pressure table in the
fuel filler flap for values.
X To increase the tire pressure: switch on the
tire inflation compressor. Flat tire
339Breakdown assistance Z
Page 353 of 398

Important safety notes
G
WARNING
If wheels and tires of the wrong size are used, the wheel brakes or suspension components
may be damaged. There is a risk of an acci-
dent.
Always replace wheels and tires with those
that fulfill the specifications of the original
part.
When replacing wheels, make sure to use the
correct:
R designation
R model
When replacing tires, make sure to use the
correct:
R designation
R manufacturer
R model G
WARNING
A flat tire severely impairs the driving, steer-
ing and braking characteristics of the vehicle.
There is a risk of accident.
Tires without run-flat characteristics:
R do not drive with a flat tire.
R immediately replace the flat tire with your
emergency spare wheel or spare wheel, or
consult a qualified specialist workshop.
Tires with run-flat characteristics:
R pay attention to the information and warn-
ing notices on MOExtended tires (tires with
run-flat characteristics).
Accessories that are not approved for your vehi-
cle by Mercedes-Benz or are not being used cor- rectly can impair the operating safety.
Before purchasing and using non-approved
accessories, visit a qualified specialist work-
shop and inquire about:
R suitability
R legal stipulations
R factory recommendations Further information regarding wheels and tires
can be found under "Wheel/tire combinations"
(Y page 376).
You can ask for information regarding permitted
wheel-tire combinations at an authorized
Mercedes-Benz Center.
Tire pressure information can be found:
R on the Tire and Loading Information placard
on the B-pillar on the driver's side
R in the tire pressure table in the fuel filler flap
R in the "Tire pressure" section Operation
Information on driving
Check the tire pressure when the vehicle is
heavily laden and adjust prior to a trip.
While driving, pay attention to vibrations, noises and unusual handling characteristics, e.g. pull-
ing to one side. This may indicate that the
wheels or tires are damaged. If you suspect thata tire is defective, reduce your speed immedi-
ately. Stop the vehicle as soon as possible to
check the wheels and tires for damage. Hidden
tire damage could also be causing the unusual
handling characteristics. If you find no signs of
damage, have the tires and wheels checked at a
qualified specialist workshop.
When parking your vehicle, make sure that the
tires do not get deformed by the curb or other
obstacles. If it is necessary to drive over curbs,
speed humps or similar elevations, try to do so
slowly and at an obtuse angle. Otherwise, the
tires, particularly the sidewalls, may be dam-
aged. Regular checking of wheels and tires
G
WARNING
Damaged tires can cause tire inflation pres-
sure loss. As a result, you could lose control of your vehicle. There is a risk of accident.
Check the tires regularly for signs of damage
and replace any damaged tires immediately.
Check wheels and tires for damage at least once a month. Check wheels and tires after driving
off-road or on rough roads. Damaged wheels
can cause a loss of tire pressure. Operation
351Wheels and ti res Z
Page 356 of 398

To avoid hazardous situations:
R never install snow chains to the front
wheels
R always install snow chains in pairs to the
rear wheels.
! Check the snow chains for damage before
mounting them. Damaged or worn snow
chains may snap and damage the following
components:
R wheel
R wheel housing
R wheel suspension
For this reason, you must use only snow
chains that are free of defects. Observe the
manufacturer's mounting instructions.
! You must drive at raised vehicle level (height
1) if snow chains have been installed. The
vehicle may otherwise be damaged.
! Vehicles with ADS (Adaptive Damping
System): do not use the sport mode when
driving with snow chains mounted. The vehi-
cle may otherwise be damaged.
For safety reasons, Mercedes-Benz recom-
mends that you only use snow chains that have been specially approved for your vehicle by
Mercedes-Benz, or are of a corresponding
standard of quality. For more information,
please contact a qualified specialist workshop.
Install the snow chains on all driven wheels for
maximum tractive power and driving stability. If
you own snow chains for two driven wheels only, install the snow chains to the wheels on the rear
axle. The vehicle then remains more stable
under braking.
If you intend to mount snow chains, please bear
the following points in mind:
R Snow chains may not be mounted on all
wheel/tire combinations. Permissible
wheel/tire combinations (Y page 376).
R Only use snow chains when driving on roads
completely covered by snow. Remove the
snow chains as soon as possible when you
come to a road that is not snow-covered.
R Local regulations may restrict the use of snow
chains. Observe the appropriate regulations if
you wish to mount snow chains. R
Do not exceed the maximum permissible
speed of 30 mph (50 km/h).
R When snow chains are installed, never use
Active Parking Assist (Y page 191) or the
Parking Package with rear view camera.
You may wish to deactivate ESP ®
(Y page 71)
when pulling away with snow chains mounted.
You can thereby allow the wheels to spin in a
controlled manner, achieving an increased driv-
ing force (cutting action).
Information about driving with an emergency
spare wheel (Y page 376). Tire pressure
Tire pressure specifications
Important safety notes G
WARNING
Underinflated or overinflated tires pose the
following risks:
R the tires may burst, especially as the load
and vehicle speed increase.
R the tires may wear excessively and/or
unevenly, which may greatly impair tire
traction.
R the driving characteristics, as well as steer-
ing and braking, may be greatly impaired.
There is a risk of an accident.
Follow recommended tire inflation pressures
and check the pressure of all the tires includ-
ing the spare wheel:
R monthly, at least
R if the load changes
R before beginning a long journey
R under different operating conditions, e.g.
off-road driving
If necessary, correct the tire pressure.
Details on tire pressure can be found at the fol-
lowing positions in the vehicle:
R Tire and Loading Information placard on the
B-pillar on the driver's side
R Table for tire pressure on the inside of the fuel
filler flap
The tire pressure monitor does not warn you of: 354
Tire pressureWheels and tires