2019 MERCEDES-BENZ GLE stop start
[x] Cancel search: stop startPage 183 of 398
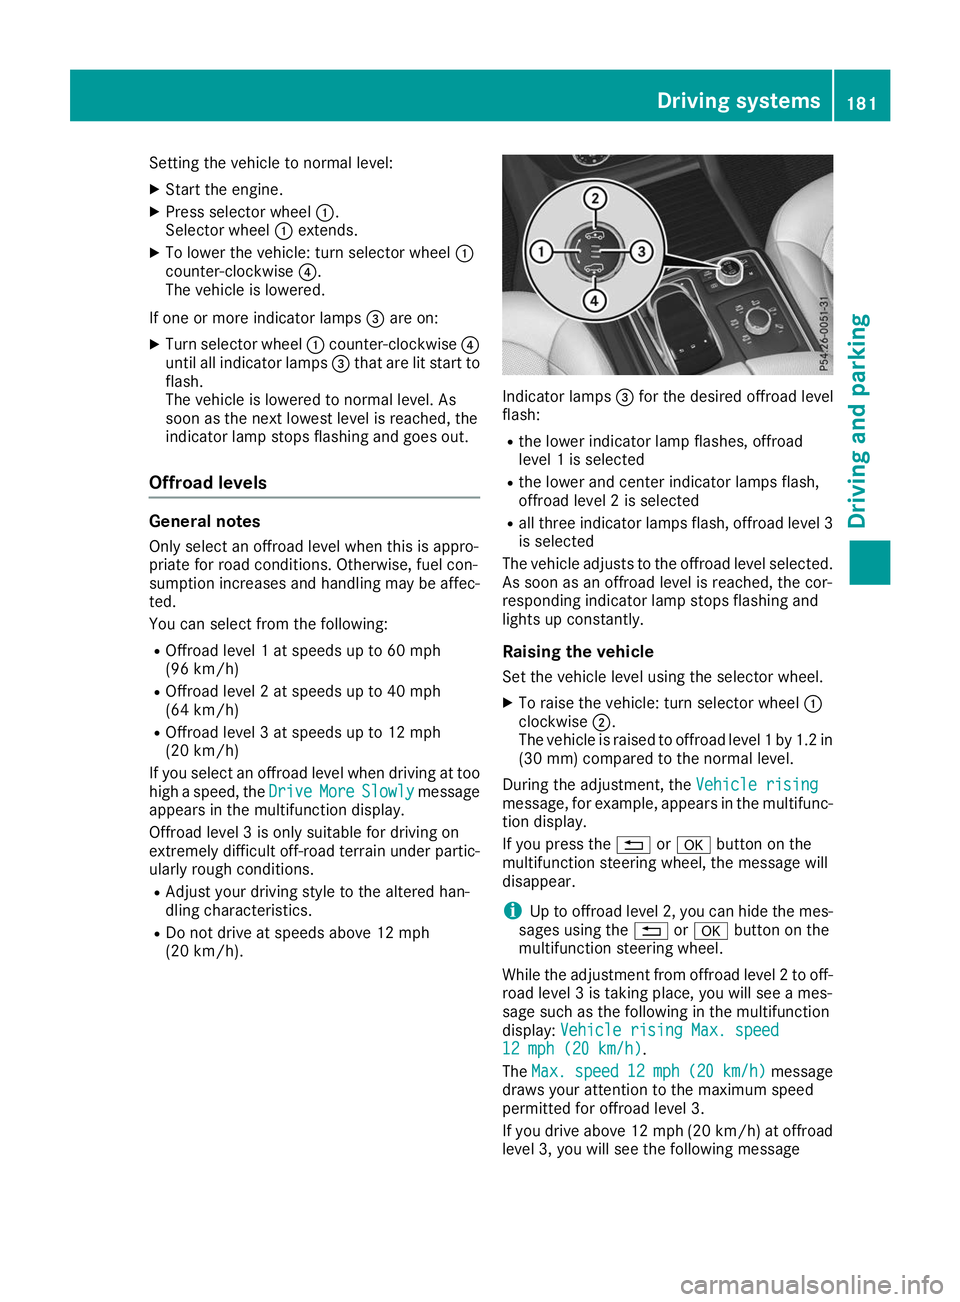
Setting the vehicle to normal level:
X Start the engine.
X Press selector wheel 0043.
Selector wheel 0043extends.
X To lower the vehicle: turn selector wheel 0043
counter-clockwise 0085.
The vehicle is lowered.
If one or more indicator lamps 0087are on:
X Turn selector wheel 0043counter-clockwise 0085
until all indicator lamps 0087that are lit start to
flash.
The vehicle is lowered to normal level. As
soon as the next lowest level is reached, the
indicator lamp stops flashing and goes out.
Offroad levels General notes
Only select an offroad level when this is appro-
priate for road conditions. Otherwise, fuel con-
sumption increases and handling may be affec- ted.
You can select from the following:
R Offroad level 1 at speeds up to 60 mph
(96 km/h)
R Offroad level 2 at speeds up to 40 mph
(64 km/h)
R Offroad level 3 at speeds up to 12 mph
(20 km/h)
If you select an offroad level when driving at too high a speed, the Drive DriveMore
MoreSlowly
Slowly message
appears in the multifunction display.
Offroad level 3 is only suitable for driving on
extremely difficult off-road terrain under partic- ularly rough conditions.
R Adjust your driving style to the altered han-
dling characteristics.
R Do not drive at speeds above 12 mph
(20 km/h). Indicator lamps
0087for the desired offroad level
flash:
R the lower indicator lamp flashes, offroad
level 1 is selected
R the lower and center indicator lamps flash,
offroad level 2 is selected
R all three indicator lamps flash, offroad level 3
is selected
The vehicle adjusts to the offroad level selected.
As soon as an offroad level is reached, the cor-
responding indicator lamp stops flashing and
lights up constantly.
Raising the vehicle
Set the vehicle level using the selector wheel.
X To raise the vehicle: turn selector wheel 0043
clockwise 0044.
The vehicle is raised to offroad level 1 by 1.2 in
(30 mm) compared to the normal level.
During the adjustment, the Vehicle rising
Vehicle rising
message, for example, appears in the multifunc-
tion display.
If you press the 0038or0076 button on the
multifunction steering wheel, the message will
disappear.
i Up to offroad level 2, you can hide the mes-
sages using the 0038or0076 button on the
multifunction steering wheel.
While the adjustment from offroad level 2 to off-
road level 3 is taking place, you will see a mes-
sage such as the following in the multifunction
display: Vehicle rising Max. speed Vehicle rising Max. speed
12 mph (20 km/h)
12 mph (20 km/h).
The Max. Max. speed
speed 12 mph
12 mph (20 km/h)
(20 km/h) message
draws your attention to the maximum speed
permitted for offroad level 3.
If you drive above 12 mph (20 km/h) at offroad
level 3, you will see the following message Driving systems
181Driving and parking Z
Page 184 of 398
shown in red in the multifunction display:
Low‐
Low‐
ering Max. speed 12 mph (20 km/h)
ering Max. speed 12 mph (20 km/h).
i You cannot clear these messages.
You also hear a warning. The vehicle is lowered and offroad level 3 is canceled.
If you continue to increase your speed, the red
message continues to be shown in the multi-
function display. The newly set level is not dis-
played until the vehicle has been set to a level
suitable for the current speed.
Lowering the vehicle If you drive faster than 12 mph (20 km/h) while
the vehicle level is being lowered, you will see
the following message shown in white in the
multifunction display: Lowering Max. speed Lowering Max. speed
20 km/h
20 km/h.
The vehicle is lowered to offroad level 2.
You will see a message in the multifunction dis- play, for example: Lowering
Lowering.
Offroad level 2 is canceled and the vehicle is
lowered to offroad level 1 if you:
R drive at speeds above 50 mph (80 km/h) or
R drive at speeds between 40 mph (64 km/h)
and 50 mph (80 km/h) for longer than
20 seconds
Offroad level 1 is canceled. Depending on the
vehicle's speed and the selected drive program,
the vehicle is automatically lowered to normal
level or low level if you:
R drive at speeds above 70 mph (112 km/h) or
R drive at speeds between 65 mph (105 km/h)
and 70 mph (112 km/h) for longer than
20 seconds HOLD function
General notes The HOLD function can assist the driver in the
following situations:
R when pulling away, especially on steep slopes
R when maneuvering on steep slopes
R when waiting in traffic
The vehicle is kept stationary without the driver
having to depress the brake pedal.
The braking effect is canceled and the HOLD
function deactivated when you depress the
accelerator pedal to pull away. i
Do not use the HOLD function when driving
off-road, on steep uphill or downhill gradients or on slippery or loose surfaces. The HOLD
function cannot hold the vehicle on such sur-faces.
Important safety notes G
WARNING
If the vehicle is only braked using the HOLD
function, the vehicle may roll away in the fol-
lowing situations when you leave the vehicle:
R if there is a malfunction in the system or in
the voltage supply
R if the HOLD function is deactivated by
depressing the accelerator pedal or brake
pedal, e.g. by a vehicle occupant
R if the electrical system in the engine com-
partment, the battery or the fuses are tam-
pered with or the battery is disconnected
There is a risk of an accident.
Always deactivate the HOLD function and
secure the vehicle against rolling away before
you leave it.
! When Active Distance Assist DISTRONIC or
the HOLD function is activated, the vehicle
brakes automatically in certain situations.
To avoid damage to the vehicle, deactivate
Active Distance Assist DISTRONIC and the
HOLD function in the following or similar sit-
uations:
R when towing the vehicle
R in the car wash
Deactivate the HOLD function (Y page 183).
Activation conditions You can activate the HOLD function if:
R
the vehicle is stationary
R the engine is running or if it has been auto-
matically switched off by the ECO start/stop
function
R the driver's door is closed or your seat belt is
fastened
R the electric parking brake is released 182
Driving systemsDriving and parking
Page 185 of 398
R
the transmission is in position 005B,005Eor005C
R Active Distance Assist DISTRONIC is deacti-
vated
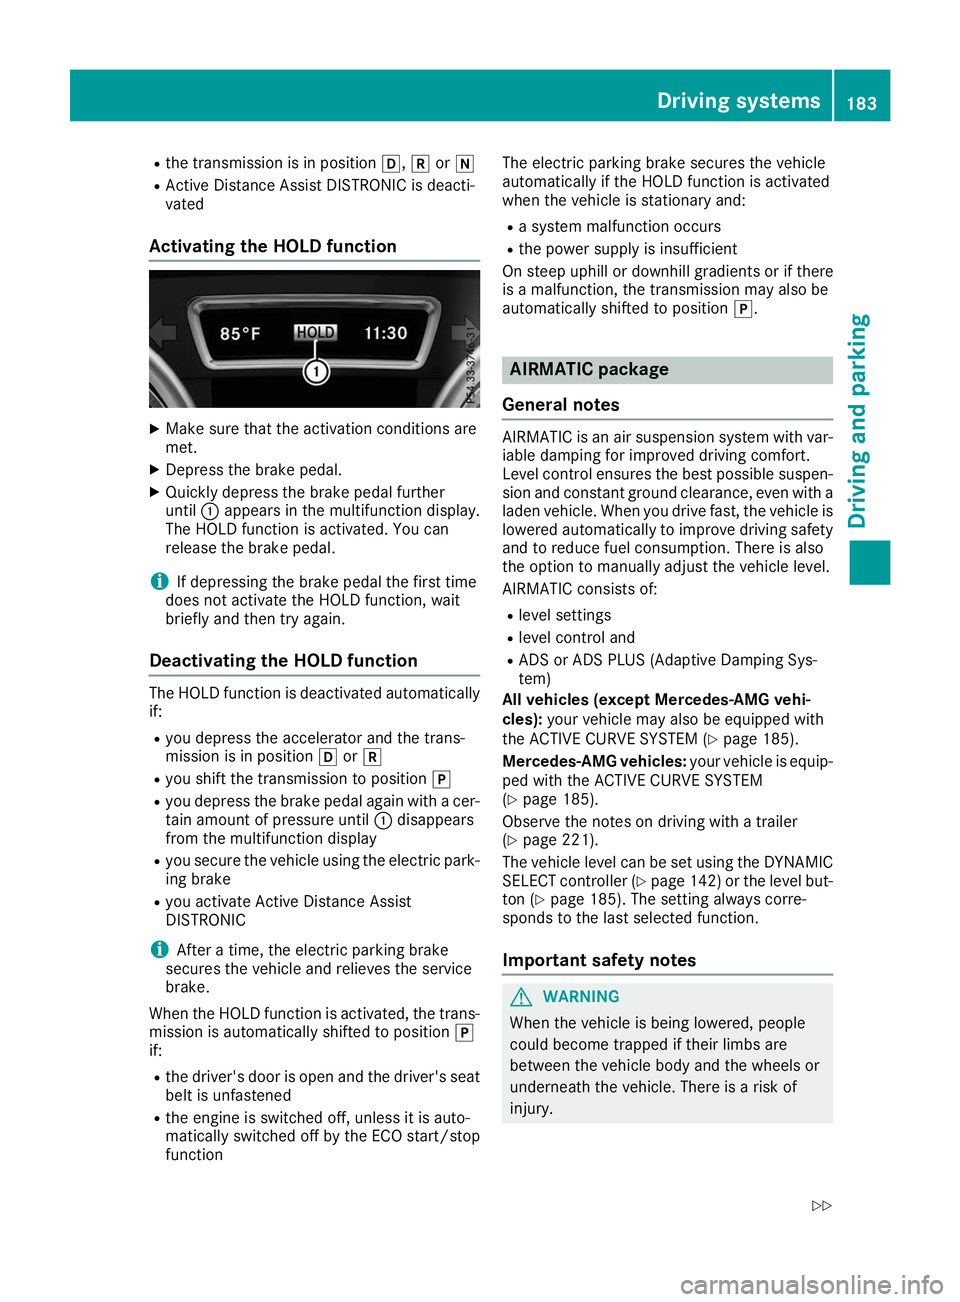
Activating the HOLD function X
Make sure that the activation conditions are
met.
X Depress the brake pedal.
X Quickly depress the brake pedal further
until 0043appears in the multifunction display.
The HOLD function is activated. You can
release the brake pedal.
i If depressing the brake pedal the first time
does not activate the HOLD function, wait
briefly and then try again.
Deactivating the HOLD function The HOLD function is deactivated automatically
if:
R you depress the accelerator and the trans-
mission is in position 005Bor005E
R you shift the transmission to position 005D
R you depress the brake pedal again with a cer-
tain amount of pressure until 0043disappears
from the multifunction display
R you secure the vehicle using the electric park-
ing brake
R you activate Active Distance Assist
DISTRONIC
i After a time, the electric parking brake
secures the vehicle and relieves the service
brake.
When the HOLD function is activated, the trans-
mission is automatically shifted to position 005D
if:
R the driver's door is open and the driver's seat
belt is unfastened
R the engine is switched off, unless it is auto-
matically switched off by the ECO start/stop
function The electric parking brake secures the vehicle
automatically if the HOLD function is activated
when the vehicle is stationary and:
R a system malfunction occurs
R the power supply is insufficient
On steep uphill or downhill gradients or if there
is a malfunction, the transmission may also be
automatically shifted to position 005D. AIRMATIC package
General notes AIRMATIC is an air suspension system with var-
iable damping for improved driving comfort.
Level control ensures the best possible suspen- sion and constant ground clearance, even with a laden vehicle. When you drive fast, the vehicle islowered automatically to improve driving safety
and to reduce fuel consumption. There is also
the option to manually adjust the vehicle level.
AIRMATIC consists of:
R level settings
R level control and
R ADS or ADS PLUS (Adaptive Damping Sys-
tem)
All vehicles (except Mercedes-AMG vehi-
cles): your vehicle may also be equipped with
the ACTIVE CURVE SYSTEM (Y page 185).
Mercedes-AMG vehicles: your vehicle is equip-
ped with the ACTIVE CURVE SYSTEM
(Y page 185).
Observe the notes on driving with a trailer
(Y page 221).
The vehicle level can be set using the DYNAMIC
SELECT controller (Y page 142)or the level but-
ton (Y page 185). The setting always corre-
sponds to the last selected function.
Important safety notes G
WARNING
When the vehicle is being lowered, people
could become trapped if their limbs are
between the vehicle body and the wheels or
underneath the vehicle. There is a risk of
injury. Driving systems
183Driving and parking
Z
Page 189 of 398
The raised vehicle level remains saved when you
are not driving within these speed ranges.
Setting the normal vehicle level ! Make sure that there is enough ground
clearance when the vehicle is being lowered.
It could otherwise hit the ground, damaging
the underbody.
X Start the engine.
If indicator lamp 0044is lit:
X Press button 0043.
Indicator lamp 0044flashes while the vehicle is
being lowered, and goes out as soon as the
desired vehicle level is reached.
Vehicles with no trailer coupled: the vehi-
cle is adjusted to the height of the selected
drive program (Y page 142).
Vehicles with a trailer coupled: the vehicle
is adjusted to normal level regardless of the
drive program selected (Y page 142). The
vehicle remains at the normal level, even if the
drive program is changed.
During the adjustment, the Lowering Loweringmes-
sage appears in the multifunction display.
If you press the 0038or0076 button on the
multifunction steering wheel, the message will
disappear. AMG adaptive sport suspension sys-
tem
General notes i
The AMG adaptive sport suspension system
is available for Mercedes-AMG vehicles and
for the Mercedes-AMG GLE 43 4MATIC.
The electronically controlled damping system
works continuously. This improves driving
safety and ride comfort.
The damping is tuned individually to each wheel
and depends on:
R your driving style, e.g. sporty
R the road surface condition, e.g. bumps
R your individual selection of Sport, Sport+ or
Comfort
The suspension setting can be adjusted using
button 0043in the center console or the DYNAMIC
SELECT controller (Y page 142). Each time you start the engine with the ignition
SmartKey or the Start/Stop button, Comfort
mode is activated. For further information about starting the engine, see (Y page 136).
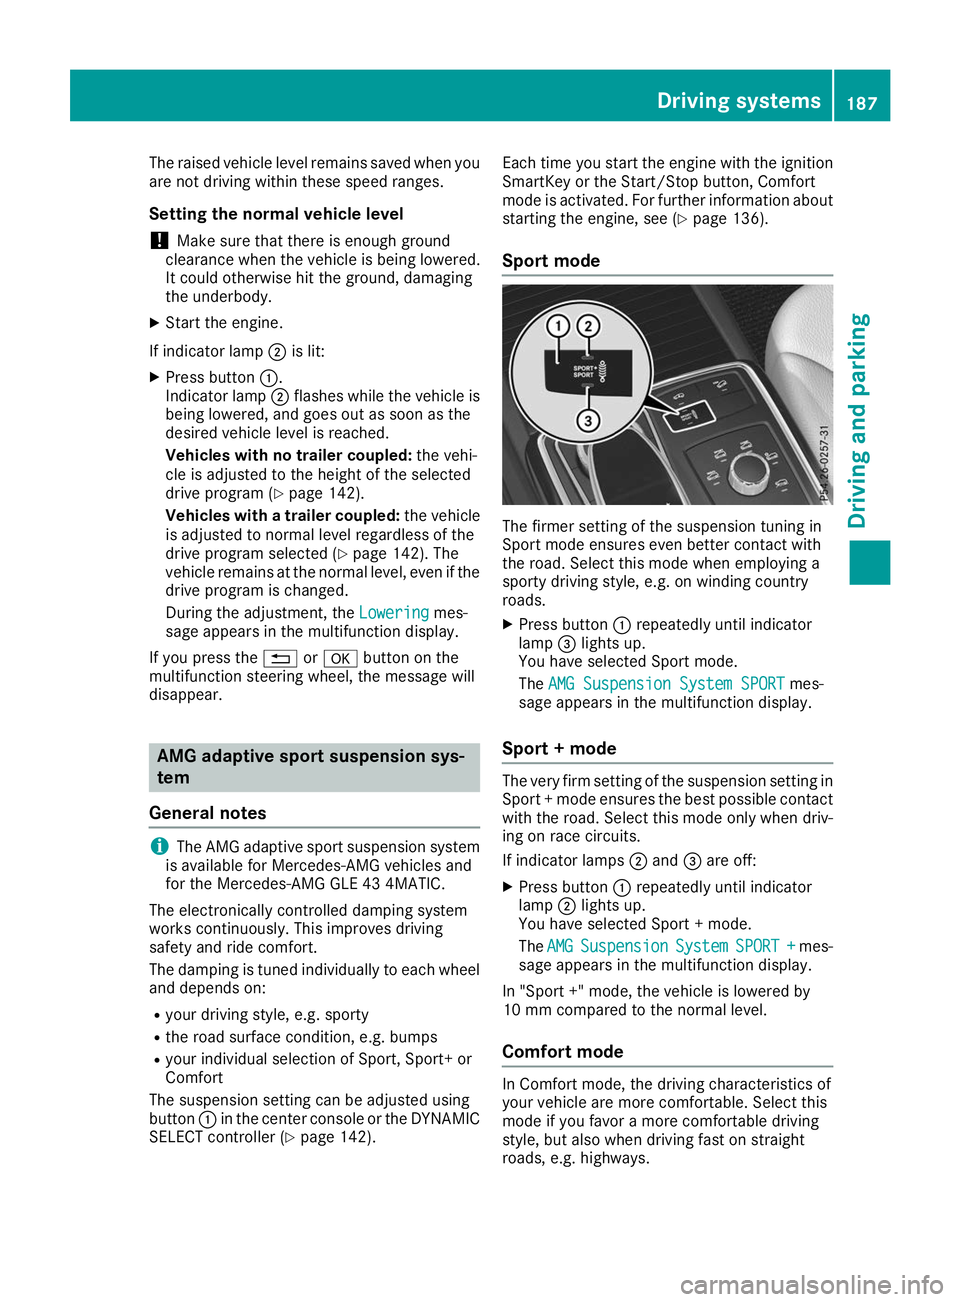
Sport mode The firmer setting of the suspension tuning in
Sport mode ensures even better contact with
the road. Select this mode when employing a
sporty driving style, e.g. on winding country
roads.
X Press button 0043repeatedly until indicator
lamp 0087lights up.
You have selected Sport mode.
The AMG Suspension System SPORT AMG Suspension System SPORT mes-
sage appears in the multifunction display.
Sport + mode The very firm setting of the suspension setting in
Sport + mode ensures the best possible contact
with the road. Select this mode only when driv-
ing on race circuits.
If indicator lamps 0044and 0087are off:
X Press button 0043repeatedly until indicator
lamp 0044lights up.
You have selected Sport + mode.
The AMG AMG Suspension
Suspension System
SystemSPORT +
SPORT + mes-
sage appears in the multifunction display.
In "Sport +" mode, the vehicle is lowered by
10 mm compared to the normal level.
Comfort mode In Comfort mode, the driving characteristics of
your vehicle are more comfortable. Select this
mode if you favor a more comfortable driving
style, but also when driving fast on straight
roads, e.g. highways. Driving systems
187Driving and parking Z
Page 195 of 398
R
that are parallel to the direction of travel and
at least 39.5 in (1.0 m)longer than your vehi-
cle
R that are at right angles to the direction of
travel and at least 39.5 in (1.0 m) wider than
your vehicle
i Note that Active Parking Assist cannot
measure the size of a parking space if it is at
right angles to the direction of travel. You will
need to judge whether your vehicle will fit into the parking space.
When driving at speeds below 19 mph
(30 km/h), you will see parking symbol 0044as a
status indicator in the instrument cluster. When
a parking space has been detected, an arrow
towards the right or the left also appears. By
default, Active Parking Assist only displays park- ing spaces on the front-passenger side. Parking spaces on the driver's side are displayed as
soon as the turn signal on the driver's side is
activated. When parking on the driver's side,
this must remain activated until you confirm the
use of Active Parking Assist by pressing the
0076 button on the multifunction steering
wheel. The system automatically determines
whether the parking space is parallel or at right
angles to the direction of travel.
A parking space is displayed while you are driv- ing past it, and until you are approximately 50 ft
(15 m) away from it.
Parking G
WARNING
If you leave the driver's seat when the vehicle is being braked only by the Active Parking
Assist, it could roll away in the following sit-
uations:
R if there is a malfunction in the system or in
the voltage supply
R if the electrical system in the engine com-
partment, the battery or the fuses have
been tampered with
R if the battery is disconnected
R if the vehicle is accelerated, e.g. by a vehi-
cle occupant
There is a risk of an accident.
Before leaving the vehicle, always secure it
against rolling away. i
If Parking Assist PARKTRONIC detects
obstacles, Active Parking Assist will brake
automatically whilst the vehicle is parking.
You are responsible for braking in good time.
X Stop the vehicle when the parking space sym-
bol shows the desired parking space in the
instrument cluster.
X Shift the transmission to position 005E.
The Start
Start Parking Parking Assist?
Assist?Yes:
Yes:OK
OKNo:
No:
0038 message will appear on the multifunc-
tion display.
X To cancel the procedure: press the0038
button on the multifunction steering wheel or pull away.
or
X To park using Active Parking Assist: press
the 0076 button on the multifunction steering
wheel.
The Parking Parking Assist
Assist Active
ActiveAccelerate
Accelerate
and Brake Observe Surroundings
and Brake Observe Surroundings mes-
sage will appear on the multifunction display.
X Let go of the multifunction steering wheel.
X Back up the vehicle, being ready to brake at all
times. When backing up, drive at a speed
below approximately 6 mph (10 km/h). Oth-
erwise, Active Parking Assist will be canceled.
Active Parking Assist brakes the vehicle to a
standstill when the vehicle approaches the
rear border of the parking space.
Maneuvering may be required in tight parking
spaces.
The Parking Assist Active Select D
Parking Assist Active Select D
Observe Surroundings Observe Surroundings message will appear
on the multifunction display.
X Shift the transmission to position 005Bwhile
the vehicle is stationary.
Active Parking Assist immediately steers in
the other direction.
The Parking Parking Assist
AssistActive
ActiveAccelerate
Accelerate
and Brake Observe Surroundings
and Brake Observe Surroundings mes-
sage will appear on the multifunction display.
i You will achieve the best results by waiting
for the steering procedure to complete before
pulling away.
X Drive forwards and be ready to brake at all
times.
Active Parking Assist brakes the vehicle to a
standstill.
The Parking Assist Active Select R Parking Assist Active Select R
Observe Surroundings
Observe Surroundings message will appear
on the multifunction display. Driving systems
193Driving and parking Z
Page 206 of 398
Important safety notes
ATTENTION ASSIST is only an aid to the driver. It
might not always recognize fatigue or increasing
inattentiveness in time or fail to recognize them at all. The system is not a substitute for a well-
rested and attentive driver.
The functionality of ATTENTION ASSIST is
restricted and warnings may be delayed or not
occur at all:
R if the length of the journey is less than approx-
imately 30 minutes
R if the road condition is poor, e.g. if the surface
is uneven or if there are potholes
R if there is a strong side wind
R if you have adopted a sporty driving style with
high cornering speeds or high rates of accel-
eration
R if you are predominantly driving slower than
37 mph (60 km/h) or faster than 125 mph
(200 km/h)
R if you are driving with the Active Steering
Assist of Active Distance Assist DISTRONIC
activated
R if the time has been set incorrectly
R in active driving situations, such as when you
change lanes or change your speed
The attention level evaluation is deleted and
restarts when the journey is continued, if:
R you switch off the engine
R you take off your seat belt and open the driv-
er's door, e.g. for a change of drivers or to
take a break
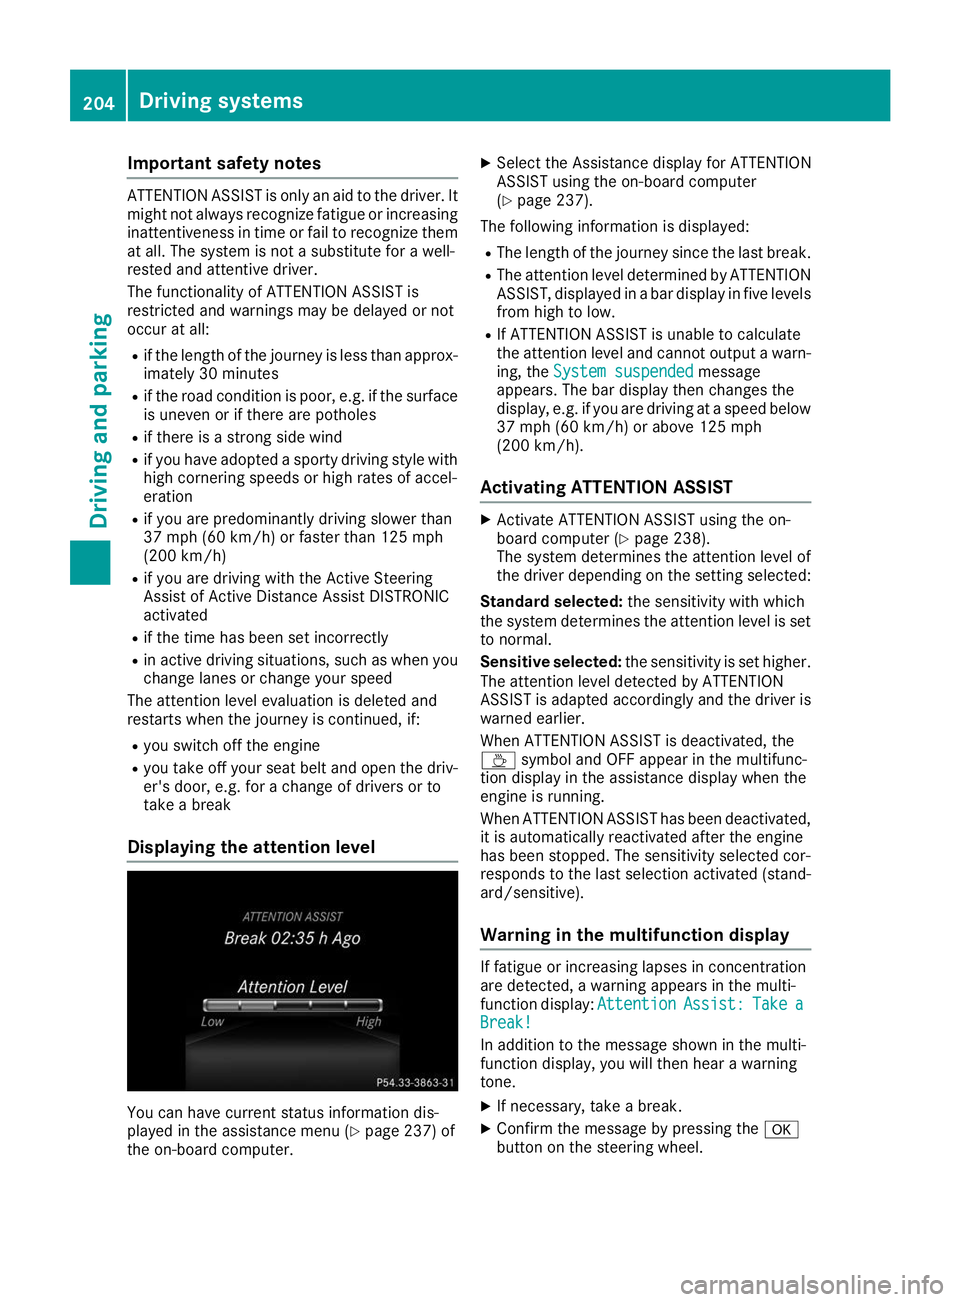
Displaying the attention level You can have current status information dis-
played in the assistance menu (Y page 237) of
the on-board computer. X
Select the Assistance display for ATTENTION
ASSIST using the on-board computer
(Y page 237).
The following information is displayed: R The length of the journey since the last break.
R The attention level determined by ATTENTION
ASSIST, displayed in a bar display in five levelsfrom high to low.
R If ATTENTION ASSIST is unable to calculate
the attention level and cannot output a warn-
ing, the System suspended
System suspended message
appears. The bar display then changes the
display, e.g. if you are driving at a speed below 37 mph (60 km/h) or above 125 mph
(200 km/h).
Activating ATTENTION ASSIST X
Activate ATTENTION ASSIST using the on-
board computer (Y page 238).
The system determines the attention level of
the driver depending on the setting selected:
Standard selected: the sensitivity with which
the system determines the attention level is set to normal.
Sensitive selected: the sensitivity is set higher.
The attention level detected by ATTENTION
ASSIST is adapted accordingly and the driver is
warned earlier.
When ATTENTION ASSIST is deactivated, the
00AD symbol and OFF appear in the multifunc-
tion display in the assistance display when the
engine is running.
When ATTENTION ASSIST has been deactivated, it is automatically reactivated after the engine
has been stopped. The sensitivity selected cor-
responds to the last selection activated (stand-
ard/sensitive).
Warning in the multifunction display If fatigue or increasing lapses in concentration
are detected, a warning appears in the multi-
function display: Attention AttentionAssist:
Assist:Take
Takea
a
Break!
Break!
In addition to the message shown in the multi-
function display, you will then hear a warning
tone.
X If necessary, take a break.
X Confirm the message by pressing the 0076
button on the steering wheel. 204
Driving systemsDriving and pa
rking
Page 225 of 398
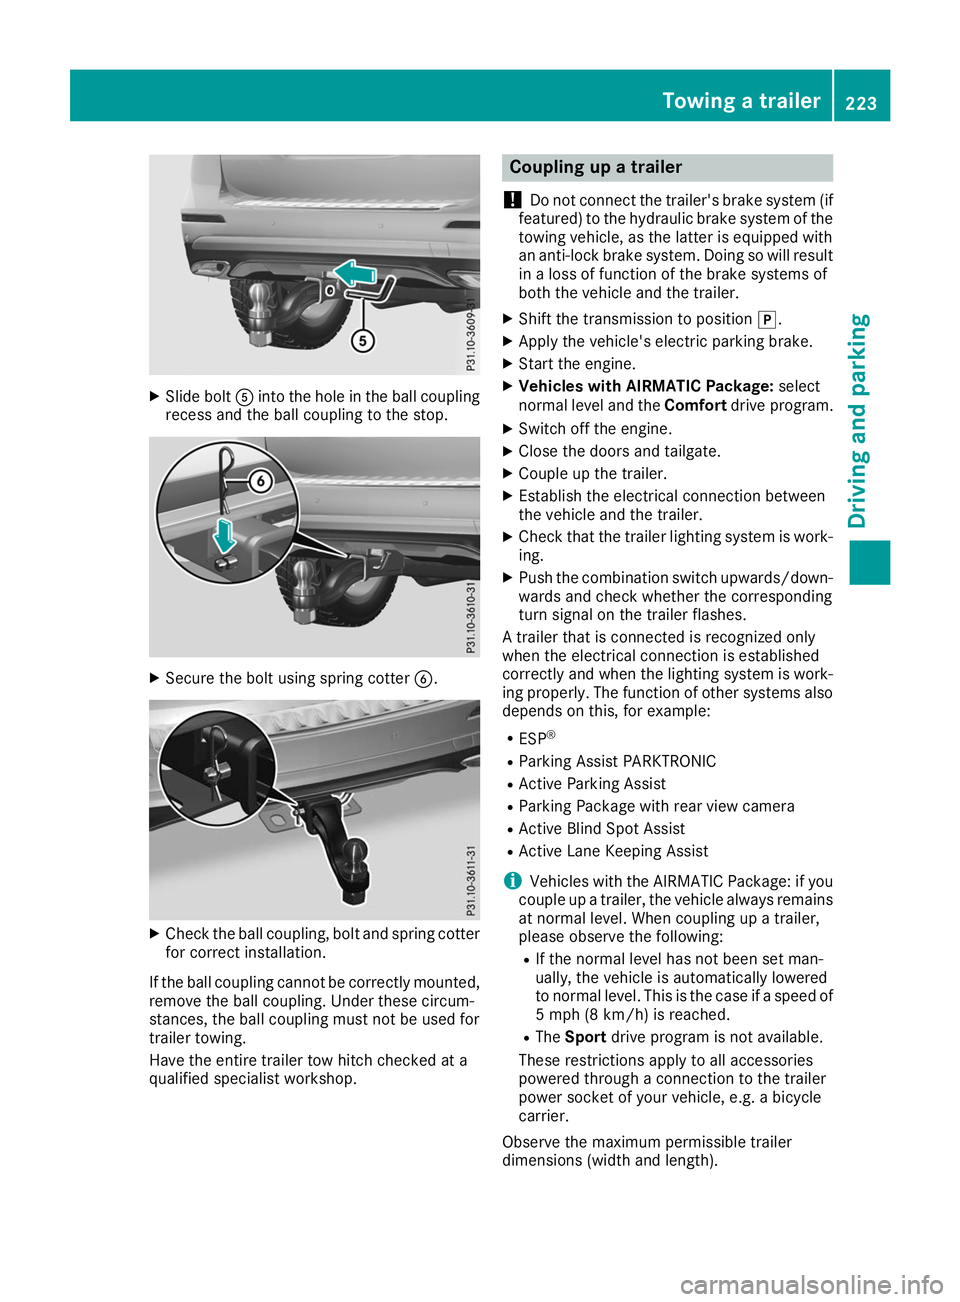
X
Slide bolt 0083into the hole in the ball coupling
recess and the ball coupling to the stop. X
Secure the bolt using spring cotter 0084.X
Check the ball coupling, bolt and spring cotter
for correct installation.
If the ball coupling cannot be correctly mounted,
remove the ball coupling. Under these circum-
stances, the ball coupling must not be used for
trailer towing.
Have the entire trailer tow hitch checked at a
qualified specialist workshop. Coupling up a trailer
! Do not connect the trailer's brake system (if
featured) to the hydraulic brake system of the towing vehicle, as the latter is equipped with
an anti-lock brake system. Doing so will result
in a loss of function of the brake systems of
both the vehicle and the trailer.
X Shift the transmission to position 005D.
X Apply the vehicle's electric parking brake.
X Start the engine.
X Vehicles with AIRMATIC Package: select
normal level and the Comfortdrive program.
X Switch off the engine.
X Close the doors and tailgate.
X Couple up the trailer.
X Establish the electrical connection between
the vehicle and the trailer.
X Check that the trailer lighting system is work-
ing.
X Push the combination switch upwards/down-
wards and check whether the corresponding
turn signal on the trailer flashes.
A trailer that is connected is recognized only
when the electrical connection is established
correctly and when the lighting system is work-
ing properly. The function of other systems also depends on this, for example:
R ESP ®
R Parking Assist PARKTRONIC
R Active Parking Assist
R Parking Package with rear view camera
R Active Blind Spot Assist
R Active Lane Keeping Assist
i Vehicles with the AIRMATIC Package: if you
couple up a trailer, the vehicle always remains
at normal level. When coupling up a trailer,
please observe the following:
R If the normal level has not been set man-
ually, the vehicle is automatically lowered
to normal level. This is the case if a speed of
5 mph (8 km/h) is reached.
R The Sport drive program is not available.
These restrictions apply to all accessories
powered through a connection to the trailer
power socket of your vehicle, e.g. a bicycle
carrier.
Observe the maximum permissible trailer
dimensions (width and length). Towing a trailer
223Driving and parking Z
Page 234 of 398
i
Set the time using the multimedia system;
see the Digital Operator's Manual.
Possible displays in the multifunction dis-
play:
R 0097Gearshift recommendation, when shifting
manually (Y page 147)
R 005D Active Parking Assist (Y page 191)
R CRUISE
CRUISE Cruise control (Y page 169)
R 00CE Adaptive Highbeam Assist
(Y page 114)
R 00D6 ECO start/stop function (Y page 139)
R 00D9 HOLD function (Y page 182)
R 004F Active Distance Assist DISTRONIC
Active Steering Assist (Y page 237)
R DSR
DSR Downhill Speed Regulation
(Y page 214) Menus and submenus
Menu overview
Press the 0059or0065 button on the steering
wheel to call up the menu bar and select a menu.
Operating the on-board computer (Y page 230).
Depending on the equipment installed in the
vehicle, you can call up the following menus:
R Trip
Trip menu (Y page 232)
R Navi
Navi menu (navigation instructions)
(Y page 233)
R Audio
Audio menu (Y page 235)
R Tel
Tel menu (telephone) (Y page 236)
R DriveAssist
DriveAssist menu (assistance)
(Y page 237)
R Serv.
Serv. menu (Y page 238)
R Sett.
Sett. menu (settings) (Y page 239)
R ON&OFFROAD
ON&OFFROAD menu (Ypage 241)
R AMG
AMG menu (Mercedes-AMG vehicles)
(Y page 241) Trip menu
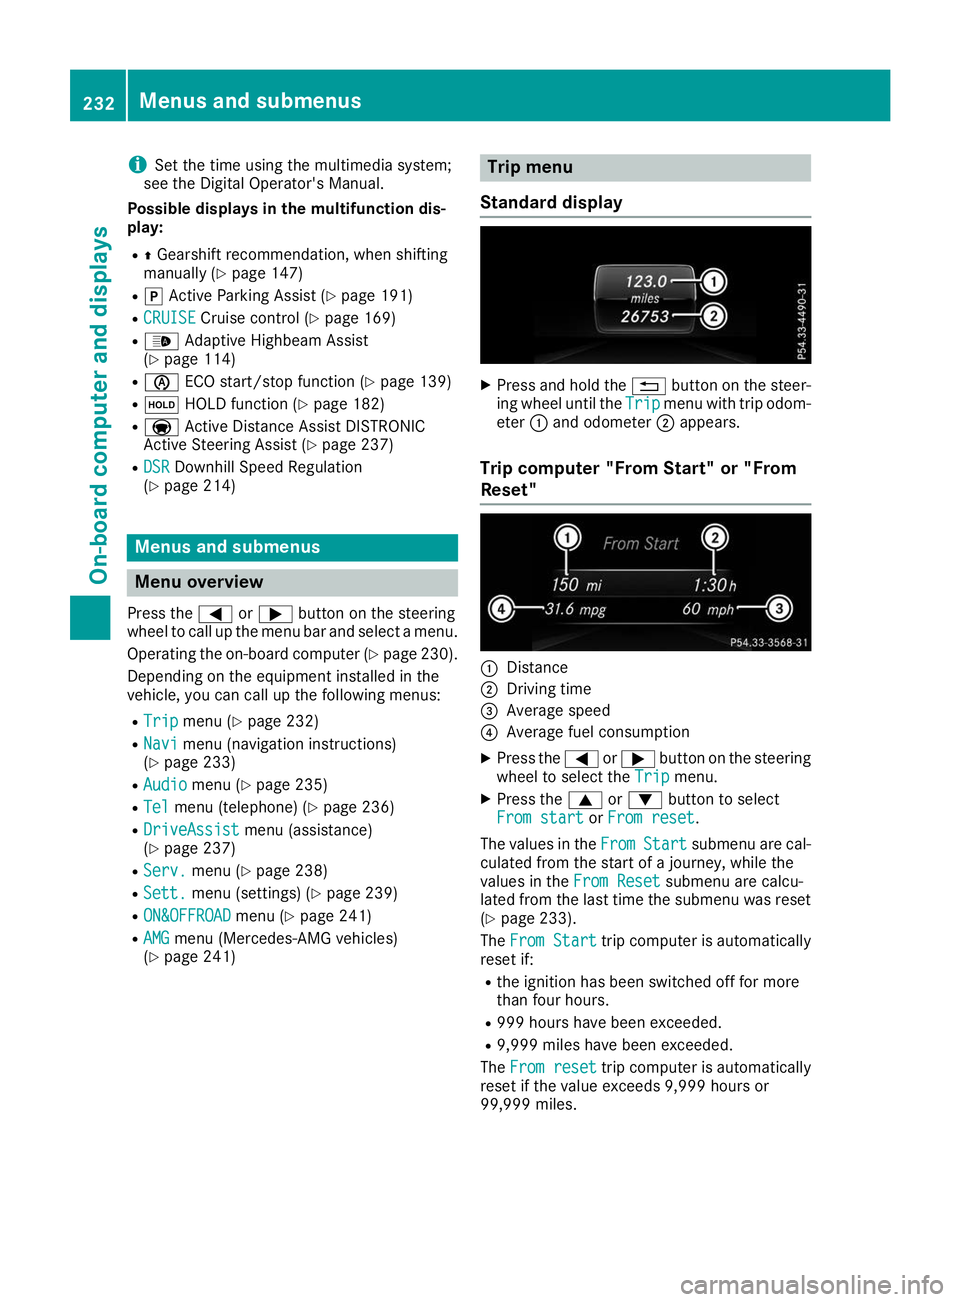
Standard display X
Press and hold the 0038button on the steer-
ing wheel until the Trip
Tripmenu with trip odom-
eter 0043and odometer 0044appears.
Trip computer "From Start" or "From
Reset" 0043
Distance
0044 Driving time
0087 Average speed
0085 Average fuel consumption
X Press the 0059or0065 button on the steering
wheel to select the Trip Tripmenu.
X Press the 0063or0064 button to select
From start
From start orFrom reset
From reset.
The values in the From
FromStart
Start submenu are cal-
culated from the start of a journey, while the
values in the From Reset
From Resetsubmenu are calcu-
lated from the last time the submenu was reset
(Y page 233).
The From Start
From Start trip computer is automatically
reset if:
R the ignition has been switched off for more
than four hours.
R 999 hours have been exceeded.
R 9,999 miles have been exceeded.
The From reset From reset trip computer is automatically
reset if the value exceeds 9,999 hours or
99,999 miles. 232
Menus and submenusOn-board computer and displays