2019 MERCEDES-BENZ GLE keyless
[x] Cancel search: keylessPage 154 of 398
Preparing to refuel
X
Switch off the engine.
X Remove the SmartKey from the ignition lock.
or, on vehicles with KEYLESS‑GO:
X Open the driver's door.
The vehicle electronics now have status 005A.
This is the same as the SmartKey having been removed.
The driver’s door can be closed again.
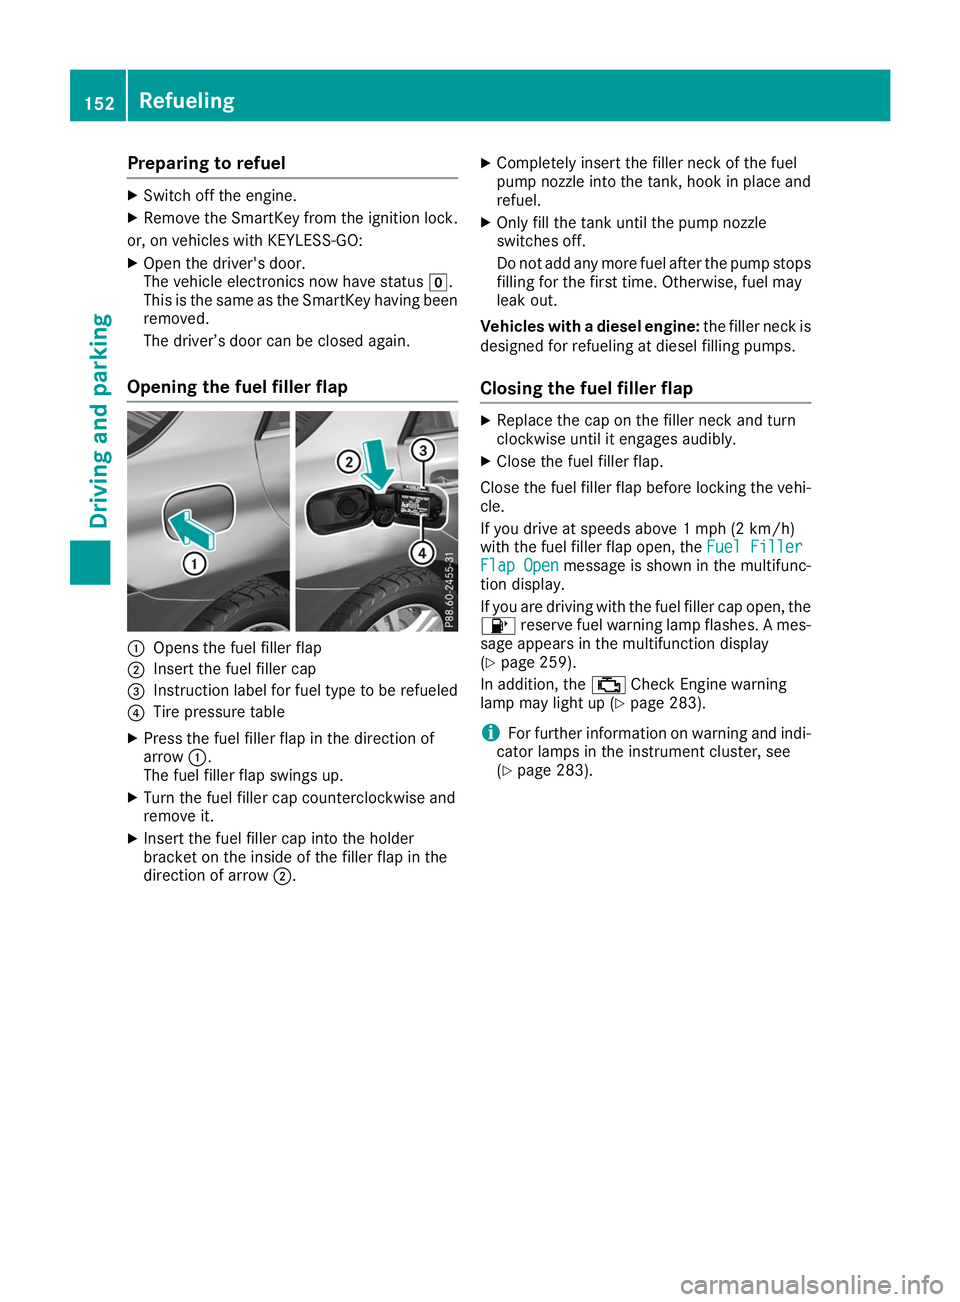
Opening the fuel filler flap 0043
Opens the fuel filler flap
0044 Insert the fuel filler cap
0087 Instruction label for fuel type to be refueled
0085 Tire pressure table
X Press the fuel filler flap in the direction of
arrow 0043.
The fuel filler flap swings up.
X Turn the fuel filler cap counterclockwise and
remove it.
X Insert the fuel filler cap into the holder
bracket on the inside of the filler flap in the
direction of arrow 0044. X
Completely insert the filler neck of the fuel
pump nozzle into the tank, hook in place and
refuel.
X Only fill the tank until the pump nozzle
switches off.
Do not add any more fuel after the pump stops
filling for the first time. Otherwise, fuel may
leak out.
Vehicles with a diesel engine: the filler neck is
designed for refueling at diesel filling pumps.
Closing the fuel filler flap X
Replace the cap on the filler neck and turn
clockwise until it engages audibly.
X Close the fuel filler flap.
Close the fuel filler flap before locking the vehi-
cle.
If you drive at speeds above 1 mph (2 km/h)
with the fuel filler flap open, the Fuel Filler Fuel Filler
Flap Open
Flap Open message is shown in the multifunc-
tion display.
If you are driving with the fuel filler cap open, the
00B6 reserve fuel warning lamp flashes. A mes-
sage appears in the multifunction display
(Y page 259).
In addition, the 00B9Check Engine warning
lamp may light up (Y page 283).
i For further information on warning and indi-
cator lamps in the instrument cluster, see
(Y page 283). 152
RefuelingDriving and parking
Page 155 of 398
Problems with fuel and the fuel tank
Problem
Possible causes/consequences and
0050
0050Solutions Fuel is leaking from the
vehicle.
G
WARNING
The fuel line or the fuel tank is faulty.
Risk of explosion or fire. X Apply the electric parking brake.
X Switch off the engine.
X Remove the SmartKey from the ignition lock.
or, in vehicles with KEYLESS-GO start-function or KEYLESS ‑GO
X Open the driver's door.
The vehicle electronics are now in key position 0092. This is the same
as the SmartKey having been removed.
X Do not restart the engine under any circumstances.
X Consult a qualified specialist workshop. The engine does not
start. The fuel tank of a vehicle with a diesel engine has been run completely
dry.
X Refuel the vehicle with at least 5.3 US qt (5 liters) of diesel.
X Turn the ignition on for approximately ten seconds (Y page 135).
X Start the engine continuously for up to ten seconds until it runs
smoothly.
If the engine does not start:
X Turn the ignition on again for approximately ten seconds
(Y page 135).
X Start the engine again continuously for up to ten seconds until it
runs smoothly.
If the engine does not start after three attempts:
X Consult a qualified specialist workshop. The fuel filler flap cannot
be opened. The fuel filler flap is not unlocked.
X Unlock the vehicle (Y page 77). The SmartKey battery is discharged or nearly discharged.
X Unlock the vehicle using the mechanical key (Y page 79). The fuel filler flap is unlocked, but the opening mechanism is jammed.
X Consult a qualified specialist workshop. DEF (BlueTEC vehicles only)
General notes To function properly, BlueTEC exhaust gas after-
treatment must be operated with the reducing
agent DEF. Adding DEF is one of the tasks per-
formed during maintenance. When the supply of DEF is almost used up, the
Check Additive See Operator's Manual
Check Additive See Operator's Manual
message is shown in the multifunction display.
If you drive the vehicle faster than 10 mph
(16 km/h), the Check Additive See Opera‐ Check Additive See Opera‐
tor's Manual
tor's Manual message goes out after approx-
imately one minute. Refueling
153Driving and parking Z
Page 157 of 398
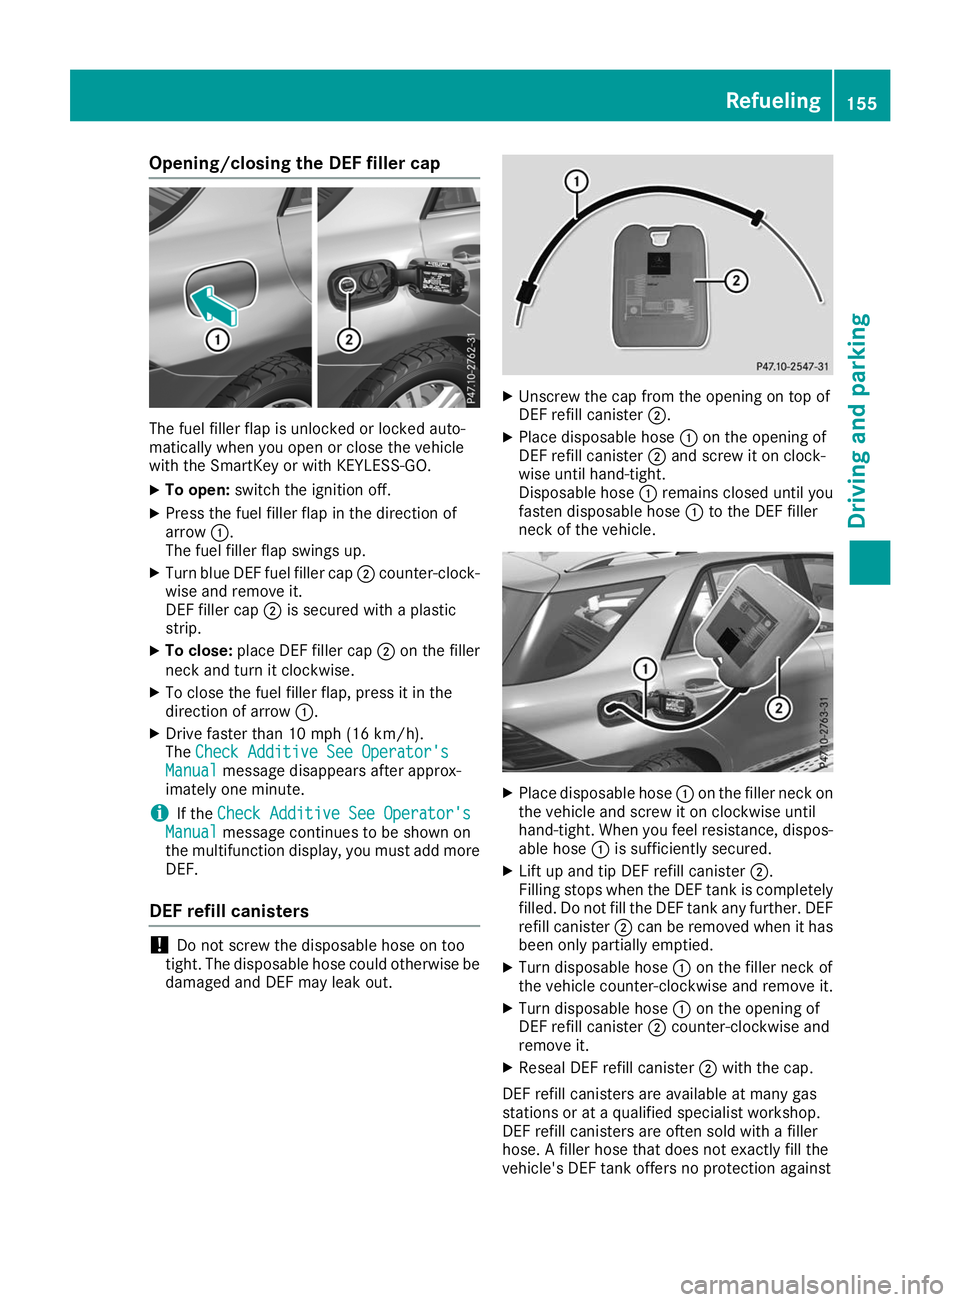
Opening/closing the DEF filler cap
The fuel filler flap is unlocked or locked auto-
matically when you open or close the vehicle
with the SmartKey or with KEYLESS-GO.
X To open: switch the ignition off.
X Press the fuel filler flap in the direction of
arrow 0043.
The fuel filler flap swings up.
X Turn blue DEF fuel filler cap 0044counter-clock-
wise and remove it.
DEF filler cap 0044is secured with a plastic
strip.
X To close: place DEF filler cap 0044on the filler
neck and turn it clockwise.
X To close the fuel filler flap, press it in the
direction of arrow 0043.
X Drive faster than 10 mph (16 km/h).
The Check Additive See Operator's
Check Additive See Operator's
Manual Manual message disappears after approx-
imately one minute.
i If the
Check Additive See Operator's
Check Additive See Operator's
Manual
Manual message continues to be shown on
the multifunction display, you must add more
DEF.
DEF refill canisters !
Do not screw the disposable hose on too
tight. The disposable hose could otherwise be damaged and DEF may leak out. X
Unscrew the cap from the opening on top of
DEF refill canister 0044.
X Place disposable hose 0043on the opening of
DEF refill canister 0044and screw it on clock-
wise until hand-tight.
Disposable hose 0043remains closed until you
fasten disposable hose 0043to the DEF filler
neck of the vehicle. X
Place disposable hose 0043on the filler neck on
the vehicle and screw it on clockwise until
hand-tight. When you feel resistance, dispos- able hose 0043is sufficiently secured.
X Lift up and tip DEF refill canister 0044.
Filling stops when the DEF tank is completely
filled. Do not fill the DEF tank any further. DEF
refill canister 0044can be removed when it has
been only partially emptied.
X Turn disposable hose 0043on the filler neck of
the vehicle counter-clockwise and remove it.
X Turn disposable hose 0043on the opening of
DEF refill canister 0044counter-clockwise and
remove it.
X Reseal DEF refill canister 0044with the cap.
DEF refill canisters are available at many gas
stations or at a qualified specialist workshop.
DEF refill canisters are often sold with a filler
hose. A filler hose that does not exactly fill the
vehicle's DEF tank offers no protection against Refueling
155Driving and parking Z
Page 159 of 398
Switching off the engine
G
WARNING
The automatic transmission switches to neu-
tral position Nwhen you switch off the engine.
The vehicle may roll away. There is a risk of an
accident.
After switching off the engine, always switch
to parking position P. Prevent the parked vehi-
cle from rolling away by applying the parking
brake.
X Apply the electric parking brake.
X Shift the transmission to position 005D.
X With the SmartKey: turn the SmartKey to
position 0092in the ignition lock and remove it.
The immobilizer is activated.
X With KEYLESS-GO:
Press the Start/Stop button (Y page 135)
The engine stops and all the indicator lamps in the instrument cluster go out.
If you switch the engine off with the transmis-
sion in position 005Eor005B, the automatic trans-
mission shifts to 005Cautomatically.
If you then open the driver's or front-passenger
door, the automatic transmission shifts to 005D
automatically.
If you want the automatic transmission to
remain in neutral 005C, e.g. when having the vehi-
cle cleaned in an automatic, tow-through car
wash:
X Vehicles with a SmartKey: switch on the
ignition.
X Vehicles with KEYLESS-GO: remove the
Start/Stop button from the ignition lock.
X Insert the SmartKey into the ignition lock.
X Switch on the ignition.
X All vehicles: depress the brake pedal and
keep it depressed.
X Engage neutral 005C.
X Release the brake pedal.
X Release the electric parking brake.
X Switch off the ignition and leave the SmartKey
in the ignition lock.
i The engine can be switched off in an emer-
gency while the vehicle is in motion by press-
ing and holding the Start/Stop button for
three seconds. Electric parking brake
General notes G
WARNING
If you leave children unsupervised in the vehi- cle, they could set it in motion by, for example:
R release the parking brake.
R shift the automatic transmission out of the
parking position P.
R start the engine.
In addition, they may operate vehicle equip-
ment and become trapped. There is a risk of
an accident and injury.
When leaving the vehicle, always take the
SmartKey with you and lock the vehicle. Never
leave children unsupervised in the vehicle.
The function of the electric parking brake is
dependent on the on-board voltage. If the on-
board voltage is low or there is a malfunction in
the system, it may not be possible to apply the
released parking brake.
X If this is the case, only park the vehicle on
level ground and secure it to prevent it rolling
away.
X Shift the automatic transmission to position
005D.
It may not be possible to release an applied
parking brake if the on-board voltage is low or
there is a malfunction in the system. Contact a
qualified specialist workshop.
i The electric parking brake performs a func-
tion test at regular intervals while the engine
is switched off. The sounds that can be heard while this is occurring are normal. Parking
157Driving and parking Z
Page 249 of 398
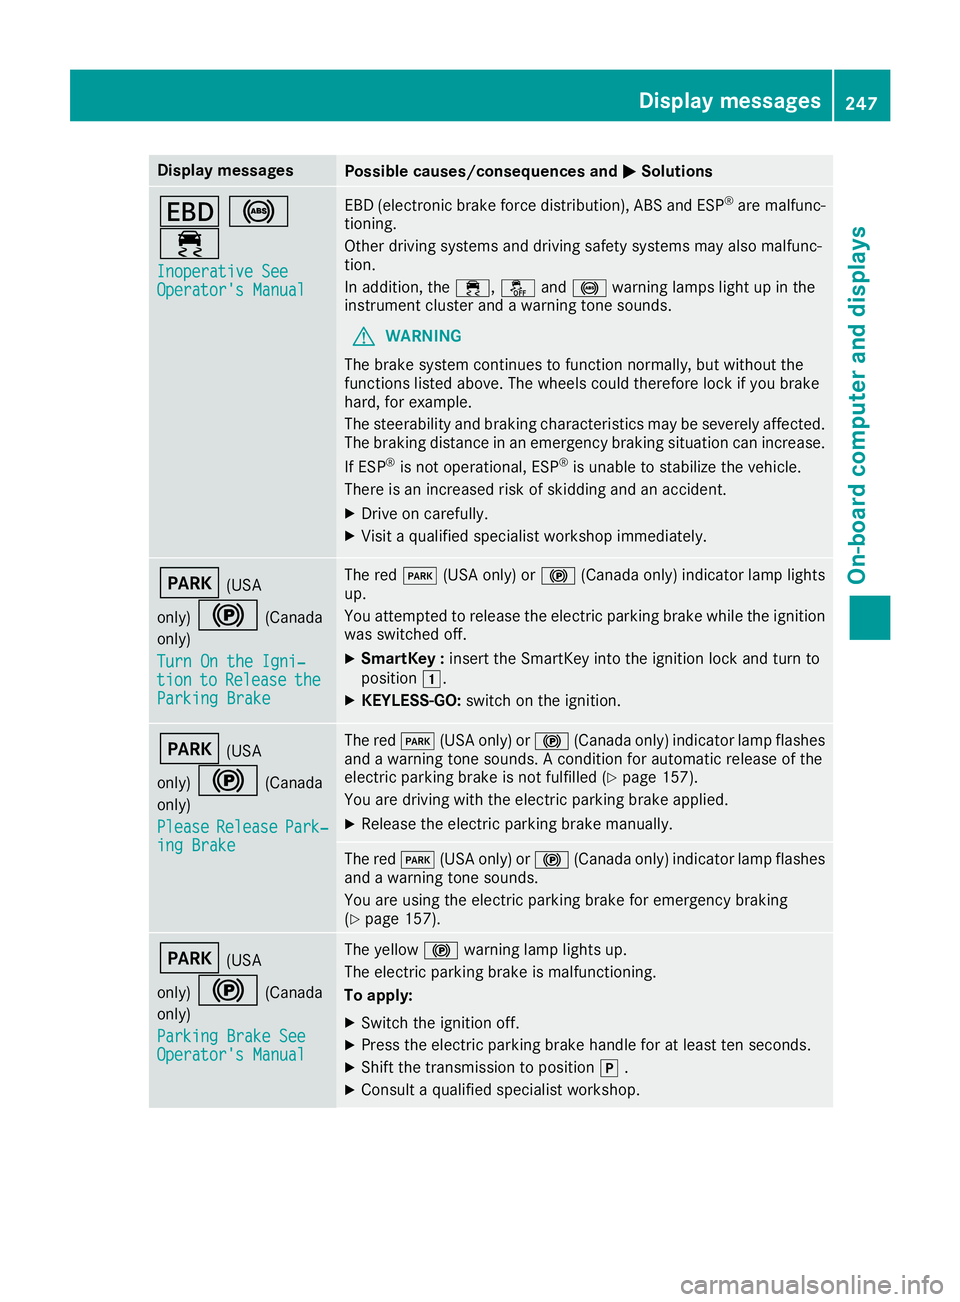
Display messages
Possible causes/consequences and
0050
0050Solutions 007A
0025
00E5 Inoperative See
Inoperative See
Operator's Manual Operator's Manual EBD (electronic brake force distribution), ABS and ESP
®
are malfunc-
tioning.
Other driving systems and driving safety systems may also malfunc-
tion.
In addition, the 00E5,00BBand0025 warning lamps light up in the
instrument cluster and a warning tone sounds.
G WARNING
The brake system continues to function normally, but without the
functions listed above. The wheels could therefore lock if you brake
hard, for example.
The steerability and braking characteristics may be severely affected. The braking distance in an emergency braking situation can increase.
If ESP ®
is not operational, ESP ®
is unable to stabilize the vehicle.
There is an increased risk of skidding and an accident.
X Drive on carefully.
X Visit a qualified specialist workshop immediately. 0049
(USA
only) 0024 (Canada
only)
Turn On the Igni‐ Turn On the Igni‐
tion tion to
toRelease
Release the
the
Parking Brake
Parking Brake The red
0049(USA only) or 0024(Canada only) indicator lamp lights
up.
You attempted to release the electric parking brake while the ignition
was switched off.
X SmartKey : insert the SmartKey into the ignition lock and turn to
position 0047.
X KEYLESS-GO: switch on the ignition. 0049
(USA
only) 0024 (Canada
only)
Please Please Release Release Park‐
Park‐
ing Brake
ing Brake The red
0049(USA only) or 0024(Canada only) indicator lamp flashes
and a warning tone sounds. A condition for automatic release of the
electric parking brake is not fulfilled (Y page 157).
You are driving with the electric parking brake applied.
X Release the electric parking brake manually. The red
0049(USA only) or 0024(Canada only) indicator lamp flashes
and a warning tone sounds.
You are using the electric parking brake for emergency braking
(Y page 157). 0049
(USA
only) 0024 (Canada
only)
Parking Brake See Parking Brake See
Operator's Manual Operator's Manual The yellow
0024warning lamp lights up.
The electric parking brake is malfunctioning.
To apply:
X Switch the ignition off.
X Press the electric parking brake handle for at least ten seconds.
X Shift the transmission to position 005D.
X Consult a qualified specialist workshop. Display
messages
247On-board computer and displays Z
Page 306 of 398
Roof carrier
Important safety notes G
WARNING
When you load the roof, the center of gravity
of the vehicle rises and the driving character- istics change. If you exceed the maximum roof
load, the driving characteristics, as well as
steering and braking, will be greatly impaired. There is a risk of an accident.
Never exceed the maximum roof load and
adjust your driving style.
! Mercedes-Benz recommends that you only
use roof carriers that have been tested and
approved for Mercedes-Benz vehicles. This
helps to prevent damage to the vehicle.
Position the load on the roof carrier in such a way that the vehicle will not sustain damage
even when it is in motion.
Depending on the vehicle equipment, ensure
that when the roof carrier is installed you can:
R raise the sliding sunroof fully
R open the panorama roof with power tilt/
sliding panel fully
R open the tailgate fully
You will find information on the maximum roof
load in the "Technical data" section
(Y page 390).
An incorrectly secured roof carrier or roof load
may become detached from the vehicle. You
must therefore ensure that you observe the roof
carrier manufacturer's installation instructions.
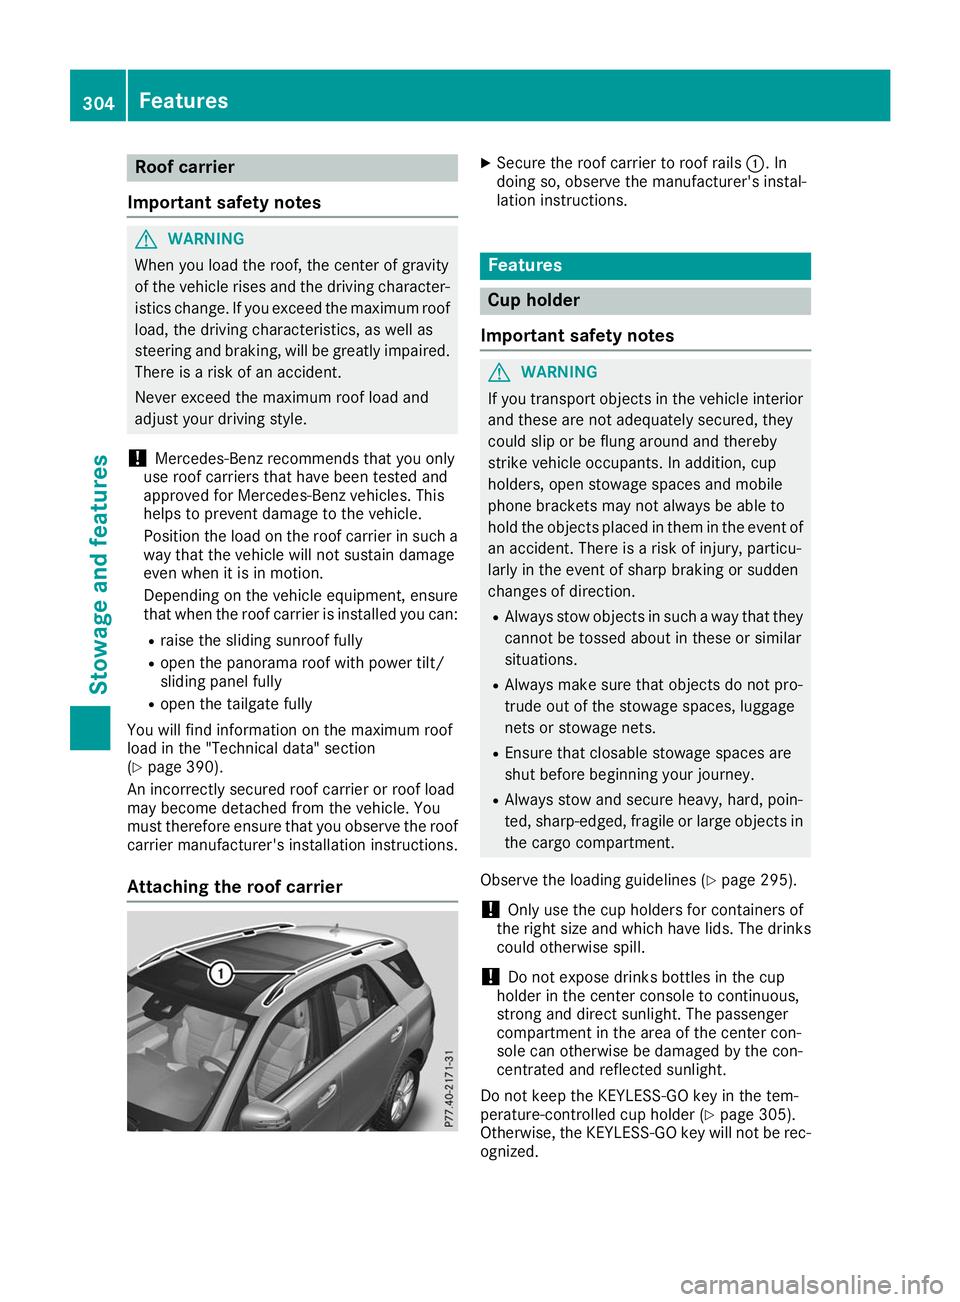
Attaching the roof carrier X
Secure the roof carrier to roof rails 0043. In
doing so, observe the manufacturer's instal-
lation instructions. Features
Cup holder
Important safety notes G
WARNING
If you transport objects in the vehicle interior and these are not adequately secured, they
could slip or be flung around and thereby
strike vehicle occupants. In addition, cup
holders, open stowage spaces and mobile
phone brackets may not always be able to
hold the objects placed in them in the event of an accident. There is a risk of injury, particu-
larly in the event of sharp braking or sudden
changes of direction.
R Always stow objects in such a way that they
cannot be tossed about in these or similar
situations.
R Always make sure that objects do not pro-
trude out of the stowage spaces, luggage
nets or stowage nets.
R Ensure that closable stowage spaces are
shut before beginning your journey.
R Always stow and secure heavy, hard, poin-
ted, sharp-edged, fragile or large objects in
the cargo compartment.
Observe the loading guidelines (Y page 295).
! Only use the cup holders for containers of
the right size and which have lids. The drinks
could otherwise spill.
! Do not expose drinks bottles in the cup
holder in the center console to continuous,
strong and direct sunlight. The passenger
compartment in the area of the center con-
sole can otherwise be damaged by the con-
centrated and reflected sunlight.
Do not keep the KEYLESS-GO key in the tem-
perature-controlled cup holder (Y page 305).
Otherwise, the KEYLESS-GO key will not be rec-
ognized. 304
FeaturesStowage and features
Page 326 of 398
Further information on engine oil (Y
page 387).Additional service products
Important safety notes G
WARNING
Certain components in the engine compart-
ment, such as the engine, radiator and parts
of the exhaust system, can become very hot.
Working in the engine compartment poses a
risk of injury.
Where possible, let the engine cool down and touch only the components described in the
following. G
WARNING
The cooling system is pressurized, particularly when the motor is warm. If you open the cap, you could be scalded if hot coolant sprays out.
There is a risk of injury.
Let the engine cool down before you open the
cap. Wear protective gloves and protective
eyewear when opening. Open the cap slowly
to release pressure.
The coolant level may only be checked and cool- ant refilled when the engine and engine coolingsystem have cooled down. G
WARNING
Windshield washer concentrate could ignite if it comes into contact with hot engine compo-
nents or the exhaust system. There is a risk of
fire and injury.
Make sure that no windshield washer con-
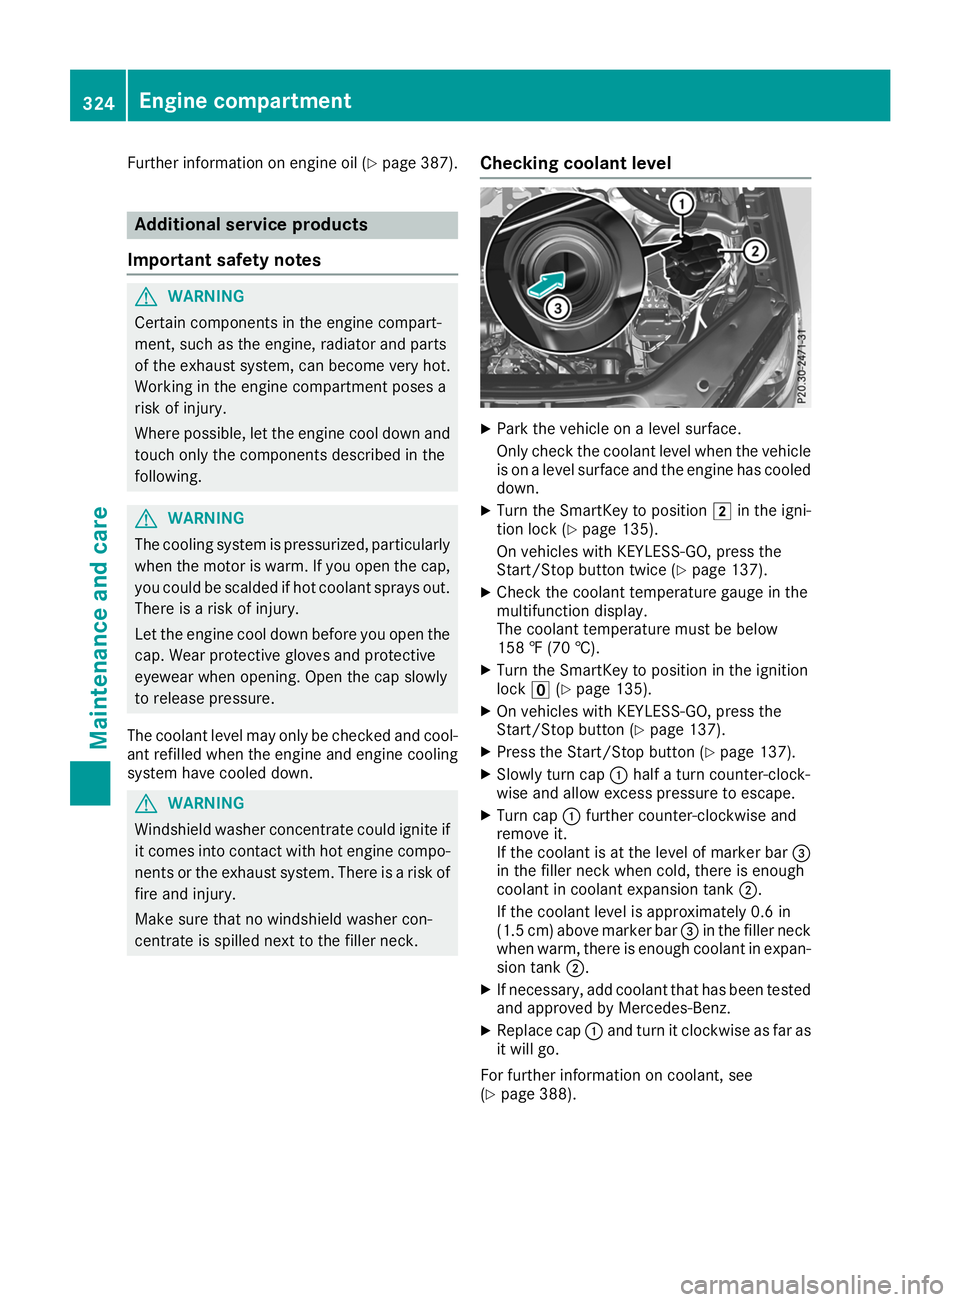
centrate is spilled next to the filler neck. Checking coolant level X
Park the vehicle on a level surface.
Only check the coolant level when the vehicle
is on a level surface and the engine has cooled
down.
X Turn the SmartKey to position 0048in the igni-
tion lock (Y page 135).
On vehicles with KEYLESS-GO, press the
Start/Stop button twice (Y page 137).
X Check the coolant temperature gauge in the
multifunction display.
The coolant temperature must be below
158 ‡ (70 †).
X Turn the SmartKey to position in the ignition
lock 0092(Ypage 135).
X On vehicles with KEYLESS-GO, press the
Start/Stop button (Y page 137).
X Press the Start/Stop button (Y page 137).
X Slowly turn cap 0043half a turn counter-clock-
wise and allow excess pressure to escape.
X Turn cap 0043further counter-clockwise and
remove it.
If the coolant is at the level of marker bar 0087
in the filler neck when cold, there is enough
coolant in coolant expansion tank 0044.
If the coolant level is approximately 0.6 in
(1.5 cm) above marker bar 0087in the filler neck
when warm, there is enough coolant in expan- sion tank 0044.
X If necessary, add coolant that has been tested
and approved by Mercedes-Benz.
X Replace cap 0043and turn it clockwise as far as
it will go.
For further information on coolant, see
(Y page 388). 324
Engine compartmentMaintenance and care
Page 329 of 398
To avoid damage to the vehicle, deactivate
Active Distance Assist DISTRONIC and the
HOLD function in the following or similar sit-
uations:
R when towing the vehicle
R in the car wash
! Never clean your vehicle in a Touchless
Automatic Car Wash as these use special
cleaning agents. These cleaning agents can
damage the paintwork or plastic parts.
! Make sure that:
R the side windows and the sliding sunroof
are fully closed.
R that the blower of the ventilation/heating
system is switched off (OFF button has
been pressed).
R the windshield wiper switch is at position
005A.
The vehicle may otherwise be damaged.
! In car washes with a towing mechanism,
make sure that the automatic transmission is
in transmission position 005C; otherwise, the
vehicle could be damaged.
R Vehicles with a SmartKey:
Do not remove the SmartKey from the igni-
tion lock. Do not open the driver's door or
front-passenger door when the engine is
switched off. Otherwise, the automatic
transmission selects park position 005Dauto-
matically and locks the wheels. You can
prevent this by shifting the automatic trans- mission to 005Cbeforehand.
R Vehicles with KEYLESS-GO:
Do not open the driver's door or front-
passenger door when the engine is
switched off. Otherwise, the automatic
transmission selects park position 005Dauto-
matically and locks the wheels.
Observe the following to make sure that the
automatic transmission stays in position 005C:
X Make sure the vehicle is stationary and the
ignition is switched off.
X Turn the SmartKey to position in the ignition
lock 0048(Ypage 135).
Use the SmartKey instead of the Start/Stop
button on vehicles with KEYLESS-GO.
X Depress and hold the brake pedal.
X Shift the automatic transmission to position
005C. X
Release the brake pedal.
X Release the electric parking brake.
X Switch off the ignition and leave the SmartKey
in the ignition lock.
You can wash the vehicle in an automatic car
wash from the very start.
If the vehicle is very dirty, pre-wash it before
cleaning it in an automatic car wash.
After using an automatic car wash, wipe off wax
from the windshield and the wiper blades. This
will prevent smears and reduce wiping noises
caused by residue on the windshield.
Washing by hand In some countries, washing by hand is only
allowed at specially equipped washing bays.
Observe the legal requirements in all countries
concerned.
X Do not use hot water and do not wash the
vehicle in direct sunlight.
X Use a soft sponge to clean.
X Use a mild cleaning agent, such as a car
shampoo approved by Mercedes-Benz.
X Thoroughly hose down the vehicle with a gen-
tle jet of water.
X Do not point the water jet directly towards the
air inlets.
X Use plenty of water and rinse out the sponge
frequently.
X Rinse the vehicle with clean water and dry
thoroughly with a chamois.
X Do not let the cleaning agent dry on the paint-
work.
When using the vehicle in winter, remove all
traces of road salt deposits carefully and as
soon as possible.
Power washers G
WARNING
The water jet from a circular jet nozzle (dirt
blasters) can cause invisible exterior damage to the tires or chassis components. Compo-
nents damaged in this way may fail unexpect-edly. There is a risk of an accident.
Do not use power washers with circular jet
nozzles to clean the vehicle. Have damaged Care
327Maintenance and care
Z