2019 MERCEDES-BENZ GLE brakes
[x] Cancel search: brakesPage 184 of 398
shown in red in the multifunction display:
Low‐
Low‐
ering Max. speed 12 mph (20 km/h)
ering Max. speed 12 mph (20 km/h).
i You cannot clear these messages.
You also hear a warning. The vehicle is lowered and offroad level 3 is canceled.
If you continue to increase your speed, the red
message continues to be shown in the multi-
function display. The newly set level is not dis-
played until the vehicle has been set to a level
suitable for the current speed.
Lowering the vehicle If you drive faster than 12 mph (20 km/h) while
the vehicle level is being lowered, you will see
the following message shown in white in the
multifunction display: Lowering Max. speed Lowering Max. speed
20 km/h
20 km/h.
The vehicle is lowered to offroad level 2.
You will see a message in the multifunction dis- play, for example: Lowering
Lowering.
Offroad level 2 is canceled and the vehicle is
lowered to offroad level 1 if you:
R drive at speeds above 50 mph (80 km/h) or
R drive at speeds between 40 mph (64 km/h)
and 50 mph (80 km/h) for longer than
20 seconds
Offroad level 1 is canceled. Depending on the
vehicle's speed and the selected drive program,
the vehicle is automatically lowered to normal
level or low level if you:
R drive at speeds above 70 mph (112 km/h) or
R drive at speeds between 65 mph (105 km/h)
and 70 mph (112 km/h) for longer than
20 seconds HOLD function
General notes The HOLD function can assist the driver in the
following situations:
R when pulling away, especially on steep slopes
R when maneuvering on steep slopes
R when waiting in traffic
The vehicle is kept stationary without the driver
having to depress the brake pedal.
The braking effect is canceled and the HOLD
function deactivated when you depress the
accelerator pedal to pull away. i
Do not use the HOLD function when driving
off-road, on steep uphill or downhill gradients or on slippery or loose surfaces. The HOLD
function cannot hold the vehicle on such sur-faces.
Important safety notes G
WARNING
If the vehicle is only braked using the HOLD
function, the vehicle may roll away in the fol-
lowing situations when you leave the vehicle:
R if there is a malfunction in the system or in
the voltage supply
R if the HOLD function is deactivated by
depressing the accelerator pedal or brake
pedal, e.g. by a vehicle occupant
R if the electrical system in the engine com-
partment, the battery or the fuses are tam-
pered with or the battery is disconnected
There is a risk of an accident.
Always deactivate the HOLD function and
secure the vehicle against rolling away before
you leave it.
! When Active Distance Assist DISTRONIC or
the HOLD function is activated, the vehicle
brakes automatically in certain situations.
To avoid damage to the vehicle, deactivate
Active Distance Assist DISTRONIC and the
HOLD function in the following or similar sit-
uations:
R when towing the vehicle
R in the car wash
Deactivate the HOLD function (Y page 183).
Activation conditions You can activate the HOLD function if:
R
the vehicle is stationary
R the engine is running or if it has been auto-
matically switched off by the ECO start/stop
function
R the driver's door is closed or your seat belt is
fastened
R the electric parking brake is released 182
Driving systemsDriving and parking
Page 190 of 398
X
Press button 0043repeatedly until indicator
lamps 0044and 0087go out.
You have selected Comfort mode.
The AMG
AMG Suspension Suspension System
SystemCOMFORT
COMFORT mes-
sage appears in the multifunction display. Parking Assist PARKTRONIC
Important safety notes Parking Assist PARKTRONIC is an electronic
parking aid with ultrasound. It monitors the area
around your vehicle using six sensors in the
front bumper and six sensors in the rear
bumper. Parking Assist PARKTRONIC visually
and audibly indicates the distance between your
vehicle and an object.
Parking Assist PARKTRONIC is only an aid. It is
not a replacement for your attention to your
immediate surroundings. You are always
responsible for safe maneuvering, parking and
exiting a parking space. Make sure that there
are no persons, animals or objects in the maneu- vering area while maneuvering and parking in/
leaving parking spaces.
! When parking, pay particular attention to
objects above or below the sensors, such as
flower pots or trailer drawbars. PARKTRONIC does not detect such objects when they are in
the immediate vicinity of the vehicle. You
could damage the vehicle or the objects.
The sensors may not detect snow and other
objects that absorb ultrasonic waves.
Ultrasonic sources such as an automatic car
wash, the compressed-air brakes on a truck
or a pneumatic drill could cause PARKTRONIC to malfunction.
PARKTRONIC may not function correctly on
uneven terrain.
! Fold in the ball coupling if the trailer tow
hitch is not required. PARKTRONIC measures
the minimum detection range to an obstacle
from the bumper, not the ball coupling.
Parking Assist PARKTRONIC is deactivated for
the rear area when you establish an electrical
connection between your vehicle and a trailer. Parking Assist PARKTRONIC is activated auto-
matically when you:
R switch on the ignition
R shift the transmission to position 005B,005Eor
005C
R release the electric parking brake.
Parking Assist PARKTRONIC is deactivated at
speeds above 11 mph (18 km/h) . It is reactiva-
ted at lower speeds.
Range of the sensors General notes
Parking Assist PARKTRONIC does not take into
account obstacles located:
R below the detection range, such as persons,
animals or objects
R above the detection range, such as overhang-
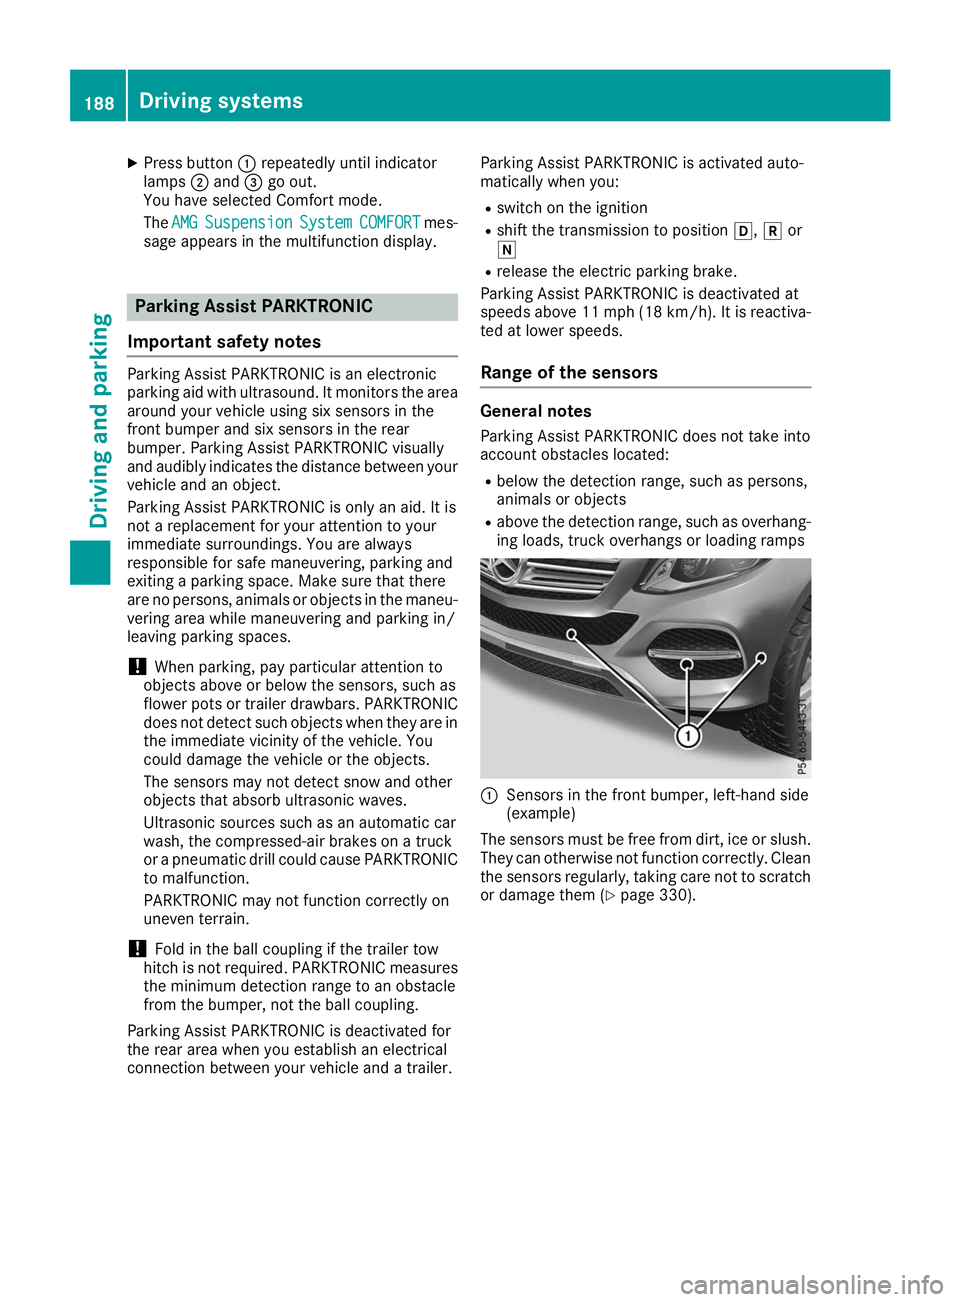
ing loads, truck overhangs or loading ramps 0043
Sensors in the front bumper, left-hand side
(example)
The sensors must be free from dirt, ice or slush. They can otherwise not function correctly. Clean
the sensors regularly, taking care not to scratch
or damage them (Y page 330).188
Driving systemsDriving and parking
Page 195 of 398
R
that are parallel to the direction of travel and
at least 39.5 in (1.0 m)longer than your vehi-
cle
R that are at right angles to the direction of
travel and at least 39.5 in (1.0 m) wider than
your vehicle
i Note that Active Parking Assist cannot
measure the size of a parking space if it is at
right angles to the direction of travel. You will
need to judge whether your vehicle will fit into the parking space.
When driving at speeds below 19 mph
(30 km/h), you will see parking symbol 0044as a
status indicator in the instrument cluster. When
a parking space has been detected, an arrow
towards the right or the left also appears. By
default, Active Parking Assist only displays park- ing spaces on the front-passenger side. Parking spaces on the driver's side are displayed as
soon as the turn signal on the driver's side is
activated. When parking on the driver's side,
this must remain activated until you confirm the
use of Active Parking Assist by pressing the
0076 button on the multifunction steering
wheel. The system automatically determines
whether the parking space is parallel or at right
angles to the direction of travel.
A parking space is displayed while you are driv- ing past it, and until you are approximately 50 ft
(15 m) away from it.
Parking G
WARNING
If you leave the driver's seat when the vehicle is being braked only by the Active Parking
Assist, it could roll away in the following sit-
uations:
R if there is a malfunction in the system or in
the voltage supply
R if the electrical system in the engine com-
partment, the battery or the fuses have
been tampered with
R if the battery is disconnected
R if the vehicle is accelerated, e.g. by a vehi-
cle occupant
There is a risk of an accident.
Before leaving the vehicle, always secure it
against rolling away. i
If Parking Assist PARKTRONIC detects
obstacles, Active Parking Assist will brake
automatically whilst the vehicle is parking.
You are responsible for braking in good time.
X Stop the vehicle when the parking space sym-
bol shows the desired parking space in the
instrument cluster.
X Shift the transmission to position 005E.
The Start
Start Parking Parking Assist?
Assist?Yes:
Yes:OK
OKNo:
No:
0038 message will appear on the multifunc-
tion display.
X To cancel the procedure: press the0038
button on the multifunction steering wheel or pull away.
or
X To park using Active Parking Assist: press
the 0076 button on the multifunction steering
wheel.
The Parking Parking Assist
Assist Active
ActiveAccelerate
Accelerate
and Brake Observe Surroundings
and Brake Observe Surroundings mes-
sage will appear on the multifunction display.
X Let go of the multifunction steering wheel.
X Back up the vehicle, being ready to brake at all
times. When backing up, drive at a speed
below approximately 6 mph (10 km/h). Oth-
erwise, Active Parking Assist will be canceled.
Active Parking Assist brakes the vehicle to a
standstill when the vehicle approaches the
rear border of the parking space.
Maneuvering may be required in tight parking
spaces.
The Parking Assist Active Select D
Parking Assist Active Select D
Observe Surroundings Observe Surroundings message will appear
on the multifunction display.
X Shift the transmission to position 005Bwhile
the vehicle is stationary.
Active Parking Assist immediately steers in
the other direction.
The Parking Parking Assist
AssistActive
ActiveAccelerate
Accelerate
and Brake Observe Surroundings
and Brake Observe Surroundings mes-
sage will appear on the multifunction display.
i You will achieve the best results by waiting
for the steering procedure to complete before
pulling away.
X Drive forwards and be ready to brake at all
times.
Active Parking Assist brakes the vehicle to a
standstill.
The Parking Assist Active Select R Parking Assist Active Select R
Observe Surroundings
Observe Surroundings message will appear
on the multifunction display. Driving systems
193Driving and parking Z
Page 196 of 398
As soon as the parking procedure is complete,
the Active Parking Assist Finished
Active Parking Assist Finished mes-
sage will appear on the multifunction display
and you will hear a tone. The vehicle is now
parked. The vehicle is kept stationary without
the driver having to depress the brake pedal.
The braking effect is canceled when you depress the accelerator pedal.
Active Parking Assist no longer supports you
with steering interventions and brake applica-
tions. When Active Parking Assist is finished,
you must steer and brake again yourself. Park-
ing Assist PARKTRONIC is still available.
Parking tips:
R The way your vehicle is positioned in the park-
ing space after parking is dependent on vari-
ous factors. These include the position and
shape of the vehicles parked in front and
behind it and the conditions of the location. It
may be the case that Active Parking Assist
guides you too far into a parking space, or not far enough into it. In some cases, it may also
lead you across or onto the curb. If necessary,
cancel the parking procedure with Active
Parking Assist.
R You can also preselect transmission position
005B. The vehicle redirects and does not drive
as far into the parking space. Should the
transmission change take place too early, the parking procedure will be canceled. A sensi-
ble parking position can no longer be ach-
ieved from this position.
Exiting a parking space In order that Active Parking Assist can support
you when exiting the parking space:
R the border of the parking space must be high
enough at the front and the rear. A curb is too small, for example.
R the border of the parking space must not be
too wide. Your vehicle can be maneuvered
into a position at a maximum of 45° to the
starting position in the parking space.
R a maneuvering distance of at least 3.3 ft
(1.0 m) must be available.
Active Parking Assist can only assist you with
exiting a parking space if you have parked the
vehicle parallel to the direction of travel using
Active Parking Assist.
i If Parking Assist PARKTRONIC detects
obstacles, Active Parking Assist brakes auto-
matically whilst the vehicle is exiting the park- ing space. You are responsible for braking in
good time.
X Start the engine.
X Release the electric parking brake.
X Switch on the turn signal in the direction you
will drive out of the parking space.
X Shift the transmission to position 005Bor005E.
The Start
Start Parking Parking Assist?
Assist?Yes:
Yes:OK
OKNo:
No:
0038 message will appear on the multifunc-
tion display.
X To cancel the procedure: press the0038
button on the multifunction steering wheel or pull away.
or
X To exit a parking space using Active Park-
ing Assist: press the0076button on the mul-
tifunction steering wheel.
The Parking Parking Assist AssistActive
ActiveAccelerate
Accelerate
and Brake Observe Surroundings
and Brake Observe Surroundings mes-
sage will appear on the multifunction display.
X Let go of the multifunction steering wheel.
X Pull away, being ready to brake at all times. Do
not exceed a maximum speed of approx-
imately 6 mph (10 km/h) when exiting a park-
ing space. Otherwise, Active Parking Assist
will be canceled.
X Depending on the message or as required,
shift the transmission to position 005Bor005E
when the vehicle is stationary.
Active Parking Assist immediately steers in
the other direction. The Parking Assist Parking Assist
Active
Active Accelerate
Accelerate and
andBrake
Brake Observe
Observe
Surroundings
Surroundings message will appear on the
multifunction display.
i You will achieve the best results by waiting
for the steering procedure to complete before
pulling away.
If you back up after activation, the steering
wheel is moved to the straight-ahead posi-
tion.
X Drive forwards and back up as prompted by
the Parking Assist PARKTRONIC warning dis-
plays, several times if necessary.
Once you have exited the parking space com-
pletely, the steering wheel is moved to the
straight-ahead position. You will hear a tone and
the Active Parking Assist Finished Active Parking Assist Finished mes-
sage will appear on the multifunction display.
You will then have to steer and merge into traffic
on your own. Parking Assist PARKTRONIC is still
available. You can take over the steering before 194
Driving systemsDriving an
d parking
Page 214 of 398
vehicle are also monitored with the aid of the
radar sensor system. Active Lane Keeping
Assist detects lane markings on the road and
can warn you before you leave your lane unin-
tentionally. If you do not react to the warning, a
lane-correcting application of the brakes can
bring the vehicle back into the original lane.
This function is available in a speed range
between 40 mph and 120 mph (60 km/h and
200 km/h).
For Active Lane Keeping Assist to assist you
when driving, the radar sensor system must be
operational.
Important safety notes
If you fail to adapt your driving style, Active Lane Keeping Assist can neither reduce the risk of
accident nor override the laws of physics. Active Lane Keeping Assist cannot take into account
road, weather or traffic conditions. Active Lane
Keeping Assist is only an aid. You are responsi-
ble for the distance to the vehicle in front, for
vehicle speed, for braking in good time and for
staying in your lane.
Active Lane Keeping Assist cannot continuously
keep your vehicle in its lane. G
WARNING
Active Lane Keeping Assist cannot always
clearly detect lane markings.
In such cases, Active Lane Keeping Assist
can:
R give an unnecessary warning and then
make a course-correcting brake application
R neither give a warning nor intervene
There is a risk of an accident.
Always pay particular attention to the traffic
situation and keep within the lane, especially
if Active Lane Keeping Assist alerts you. Ter-
minate the intervention in a non-critical driv-
ing situation.
The system may be impaired or may not function if:
R there is poor visibility, e.g. due to insufficient
illumination of the road, or due to snow, rain,fog or heavy spray
R there is glare, e.g. from oncoming traffic, the
sun or reflection from other vehicles (e.g. if
the road surface is wet) R
the windshield is dirty, fogged up, damaged or
covered, for instance by a sticker, in the vicin- ity of the camera
R there are no or several unclear lane markings
for one lane, e.g. roadworks
R the lane markings are worn away, dark or cov-
ered up, e.g. by dirt or snow
R the distance to the vehicle in front is too short
and thus the lane markings cannot be detec-
ted
R the lane markings change quickly, e.g. lanes
branch off, cross one another or merge
R the road is narrow and winding
R there are highly variable shade conditions on
the roadway
R no vehicle is detected in the adjacent lane and
there are broken lane markings
Warning vibration in the steering wheel
A warning may be given if a front wheel passes
over a lane marking. It will warn you by means of intermittent vibration in the steering wheel for
up to 1.5 seconds.
In order that you are warned only when neces-
sary and in good time if you cross the lane mark-
ing, the system detects certain conditions and
warns you accordingly.
The warning vibration occurs earlier if:
R you approach the outer lane marking on a
bend
R the road has very wide lanes, e.g. a freeway
R the system detects solid lane markings
The warning vibration occurs later if:
R the road has narrow lanes
R you cut the corner on a bend
Lane-correcting brake application G
WARNING
A lane-correcting brake application cannot
always bring the vehicle back into the original lane. There is a risk of an accident.
Always steer, brake or accelerate yourself,
especially if Active Lane Keeping Assist warns
you or makes a lane-correcting brake appli-
cation. G
WARNING
Active Lane Keeping Assist does not detect
traffic conditions or road users. In very rare 212
Driving systemsDriving and parking
Page 217 of 398
ing on road surface and tire conditions. Select a
set speed suitable for the prevailing conditions
and when necessary, apply the brakes manually.
Activating DSR X
Press button 0043.
Indicator lamp 0044lights up.
The 00C6 DSR symbol appears in the multi-
function display.
You can only activate DSR when driving at
speeds below 25 mph (40 km/h).
If the current vehicle speed is too high, the 00C6
DSR symbol appears in the multifunction display
with the Max. Speed 25 mph
Max. Speed 25 mph message (Can-
ada: 40 km/h 40 km/h ).
If you have activated DSR and you change the
drive program, DSR is deactivated. If you switch between the offroad and offroad plus drive pro-grams, DSR remains activated.
Deactivating DSR
X Press button 0043.
Indicator lamp 0044goes out.
The 00C6 DSR symbol appears in the multi-
function display with the Off
Offmessage.
On vehicles with the Off-road Engineering Pack-
age, if you select a different drive program, DSR is also deactivated. If you switch between the
Offroad programs, DSR remains activated.
DSR switches off automatically if you drive
faster than 28 mph (Canada: 45 km/h). The
00C6 DSR symbol appears in the multifunction
display with the Off Offmessage. The status indi-
cator in the multifunction display goes out. You
also hear a warning. On vehicles with the Off-
road Engineering Package, if you select a differ-
ent onroad/offroad program, DSR is also deac- tivated. Changing the set speed
X
To increase or reduce the set speed in
1 mp
hincrements (Canada: 1 km/h incre-
ments): briefly press the cruise control lever
up 0043 for a higher set speed or down 0044for a
lower set speed.
The set speed appears in the multifunction
display with the 00C6DSR symbol.
When DSR is activated, you can change the set
speed to a value between 1 mph and 11 mph
(Canada: between 2 km/h and 18 km/h).
i The DSR set speed is always changed in
1 mph increments (Canada: 1 km/h incre-
ments). This is regardless of whether you
press the cruise control lever to or beyond the
pressure point.
Off-road program (vehicles without the
Off-Road Engineering package) General notes
Select the Offroadprogram for easily negotia-
ble off-road terrain, e.g. dirt tracks, gravel or
sandy surfaces. The engine's torque is restric-
ted to a limited degree and the drive wheels can
spin. The spinning wheels produce a cutting
effect for better traction. ABS, ESP ®
and 4ETS
programs especially adapted to off-road driving are activated. A gentle accelerator pedal curve
is also selected, i.e. the accelerator pedal must
be depressed much further in order to acceler-
ate.
You can select the Offroaddrive program at
speeds below 60 mph (96 km/h). The Drive
Drive
program "Offroad" Max. Speed 60 mph program "Offroad" Max. Speed 60 mph
message appears in the multifunction display. If
you drive at speeds of more than 60 mph
(96 km/h) and select the Offroaddrive pro-
gram, the Drive More Slowly Drive More Slowly message Driving systems
215Driving and parking Z
Page 223 of 398
R
is affected more by strong crosswinds
R demands more sensitive steering
R has a larger turning circle
This could impair the handling characteristics.
When towing a trailer, always adjust your speed to the current road and weather conditions. Do
not exceed the maximum permissible speed for
your vehicle/trailer combination. Notes on towing a trailer
General notes !
If you have a trailer tow hitch retrofitted,
changes to the cooling system and drive train may be necessary, depending on the vehicle
type.
If you have a trailer tow hitch retrofitted,
observe the anchorage points on the chassis
frame.
R Do not exceed the legally prescribed maxi-
mum speed for vehicle/trailer combinations
in the relevant country.
This lowers the risk of an accident.
R Only install an approved trailer coupling on
your vehicle.
More information on availability and installa-
tion can be obtained at any qualified special-
ist workshop.
R The bumpers of your vehicle are not suitable
for installing detachable trailer couplings.
R Do not install hired trailer couplings or other
detachable trailer couplings on the bumpers
of your vehicle.
R If you no longer need the ball coupling,
remove it from the ball coupling recess. This
will reduce the risk of damage to the ball cou-
pling.
When towing a trailer, set the tire pressure on
the rear axle of the towing vehicle for the max-
imum load. You will find the values in the tire
pressure table in the fuel filler flap of the vehicle (Y page 369).
Please note that when towing a trailer, the fol-
lowing driving systems have limited availability
or are not available at all:
R Parking Assist PARKTRONIC (Y page 188)
R Blind Spot Assist (Y page 206)
R Active Lane Keeping Assist (Y page 211)On vehicles without level control, the height of
the ball coupling will alter according to the load
placed on the vehicle. If necessary, use a trailer
with a height-adjustable drawbar.
You will find installing dimensions and loads
under "Technical data" (Y page 394).
Driving tips Also observe the notes on pulling away with a
trailer (Y
page 138).
The maximum permissible speed for vehicle/
trailer combinations depends on the type of
trailer. Before beginning the journey, check the
trailer's documents to see what the maximum
permissible speed is for your trailer. Observe the
legally permissible maximum speed in the rele-
vant country.
For certain Mercedes-Benz vehicles, the maxi-
mum permissible rear axle load is increased
when towing a trailer. See "Technical data" to
find out whether this applies to your vehicle
(Y page 394). If you utilize any of the added
maximum rear axle load when towing a trailer,
the vehicle/trailer combination may not exceed
a maximum speed of 60 mph (100 km/h) for
reasons concerning the operating permit. This
also applies in countries in which the maximum
permissible speed for car/trailer combinations
is greater than 60 mph (100 km/h).
When towing a trailer, your vehicle's handling
characteristics will be different in comparison
with when driving without a trailer.
Use the left-hand steering wheel paddle shifter
to shift into a lower gear in good time on long
and steep downhill gradients.
This also applies if you have activated cruise
control or Active Distance Assist DISTRONIC.
This will use the braking effect of the engine, so that less braking will be required to maintain the
speed. This relieves the load on the brake sys-
tem and prevents the brakes from overheating
and wearing too quickly. If you need additional
braking, depress the brake pedal repeatedly
rather than continuously.
Driving tips If the trailer swings from side to side:
X Do not accelerate.
X Do not counter-steer.
X Brake if necessary. Towing a trailer
221Driving and parking Z
Page 226 of 398
Most U.S. states and all Canadian provinces
require by law:
R Safety chains between the towing vehicle and
the trailer. The chains should be cross-woundunder the trailer drawbar. They must be fas-
tened to the vehicle's trailer coupling, not to
the bumper or the axle.
Leave enough play in the chains to make tight
cornering possible.
R A separate brake system for certain types of
trailer.
R Safety switch for braked trailers. Check the
specific legal requirements applicable to your
state.
If the trailer becomes detached from the tow-
ing vehicle, the safety feature triggers the
trailer brakes. Towing a trailer
There are numerous legal requirements con-
cerning the towing of a trailer, e.g. speed restric-
tions. Make sure that your car/trailer combina- tion complies with the local regulations:
R in your place of residence
R in the location to which you are driving
The police and local authorities can provide reli-
able information.
Observe the following when towing a trailer:
R To gain driving experience and to become
accustomed to the new handling characteris-
tics, you should practice the following in a
traffic-free location:
- cornering
- stopping
- backing up
R Before driving, check:
- trailer tow hitch
- safety switch for braked trailers
- safety chains
- electrical connections
- lights
- wheels
R Adjust the exterior mirrors to provide an
unobstructed view of the rear section of the
trailer.
R If the trailer has electronically controlled
brakes, pull away carefully. Brake manually using the brake controller and check whether
the brakes function correctly.
R Secure any objects on the trailer to prevent
the cargo from slipping when the vehicle is in
motion.
R When you couple up a trailer, check at regular
intervals that the load is firmly secured. If the trailer is equipped with trailer lights and
brakes, check the trailer to ensure that these
are working.
R Bear in mind that the handling will be less
stable when towing a trailer than when driving
without one. Avoid sudden steering move-
ments.
R The vehicle/trailer combination is heavier,
accelerates more slowly, has a decreased
gradient climbing capability and a longer
braking distance.
It is more susceptible to side winds and
requires more careful steering.
R If possible, do not brake suddenly, but instead
depress the brake pedal moderately at first sothat the trailer can activate its brakes. Then
increase the pressure on the brake pedal.
R If the automatic transmission repeatedly
shifts between gears on uphill or downhill gra-
dients, shift to a lower gear using the left-hand
steering wheel paddle shifter.
A lower gear and lower speed reduce the risk of engine failure.
R When driving downhill, shift to a lower gear to
utilize the engine's braking effect.
Avoid continuous brake application as this
may overheat the vehicle brakes and, if instal- led, the trailer brakes.
R If the coolant temperature increases dramat-
ically while the air-conditioning system is
switched on, switch off the air-conditioning
system.
Coolant heat can also be dissipated by open-
ing the windows and switching the ventilation blower and the interior temperature to the
highest level.
R When overtaking, pay particular attention to
the extended length of your vehicle/trailer
combination.
Due to the length of the vehicle/trailer com-
bination, you require additional road space in
relation to the vehicle you are overtaking
before you can change back to the original
lane. 224
Towing a trailerDriving and parking