2019 MERCEDES-BENZ GLE suspension
[x] Cancel search: suspensionPage 187 of 398
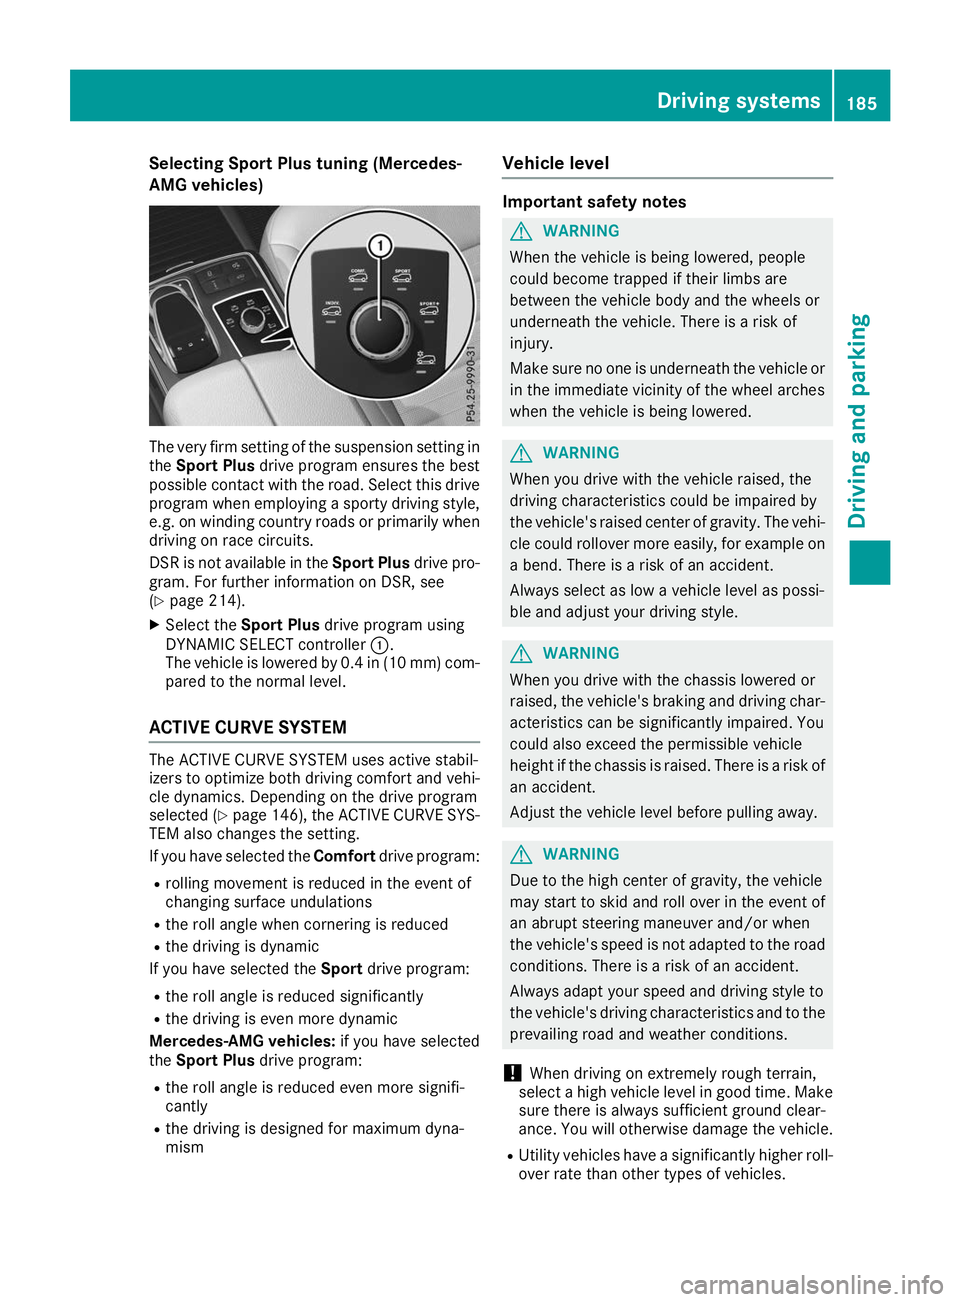
Selecting Sport Plus tuning (Mercedes-
AMG vehicles) The very firm setting of the suspension setting in
the Sport Plus drive program ensures the best
possible contact with the road. Select this drive
program when employing a sporty driving style, e.g. on winding country roads or primarily whendriving on race circuits.
DSR is not available in the Sport Plusdrive pro-
gram. For further information on DSR, see
(Y page 214).
X Select the Sport Plus drive program using
DYNAMIC SELECT controller 0043.
The vehicle is lowered by 0.4 in (10 mm) com-
pared to the normal level.
ACTIVE CURVE SYSTEM The ACTIVE CURVE SYSTEM uses active stabil-
izers to optimize both driving comfort and vehi- cle dynamics. Depending on the drive program
selected (Y page 146), the ACTIVE CURVE SYS-
TEM also changes the setting.
If you have selected the Comfortdrive program:
R rolling movement is reduced in the event of
changing surface undulations
R the roll angle when cornering is reduced
R the driving is dynamic
If you have selected the Sportdrive program:
R the roll angle is reduced significantly
R the driving is even more dynamic
Mercedes-AMG vehicles: if you have selected
the Sport Plus drive program:
R the roll angle is reduced even more signifi-
cantly
R the driving is designed for maximum dyna-
mism Vehicle level Important safety notes
G
WARNING
When the vehicle is being lowered, people
could become trapped if their limbs are
between the vehicle body and the wheels or
underneath the vehicle. There is a risk of
injury.
Make sure no one is underneath the vehicle or in the immediate vicinity of the wheel arches
when the vehicle is being lowered. G
WARNING
When you drive with the vehicle raised, the
driving characteristics could be impaired by
the vehicle's raised center of gravity. The vehi- cle could rollover more easily, for example on
a bend. There is a risk of an accident.
Always select as low a vehicle level as possi-
ble and adjust your driving style. G
WARNING
When you drive with the chassis lowered or
raised, the vehicle's braking and driving char-
acteristics can be significantly impaired. You
could also exceed the permissible vehicle
height if the chassis is raised. There is a risk of an accident.
Adjust the vehicle level before pulling away. G
WARNING
Due to the high center of gravity, the vehicle
may start to skid and roll over in the event of
an abrupt steering maneuver and/or when
the vehicle's speed is not adapted to the road conditions. There is a risk of an accident.
Always adapt your speed and driving style to
the vehicle's driving characteristics and to the prevailing road and weather conditions.
! When driving on extremely rough terrain,
select a high vehicle level in good time. Make
sure there is always sufficient ground clear-
ance. You will otherwise damage the vehicle.
R Utility vehicles have a significantly higher roll-
over rate than other types of vehicles. Driving systems
185Driving and parking Z
Page 189 of 398
The raised vehicle level remains saved when you
are not driving within these speed ranges.
Setting the normal vehicle level ! Make sure that there is enough ground
clearance when the vehicle is being lowered.
It could otherwise hit the ground, damaging
the underbody.
X Start the engine.
If indicator lamp 0044is lit:
X Press button 0043.
Indicator lamp 0044flashes while the vehicle is
being lowered, and goes out as soon as the
desired vehicle level is reached.
Vehicles with no trailer coupled: the vehi-
cle is adjusted to the height of the selected
drive program (Y page 142).
Vehicles with a trailer coupled: the vehicle
is adjusted to normal level regardless of the
drive program selected (Y page 142). The
vehicle remains at the normal level, even if the
drive program is changed.
During the adjustment, the Lowering Loweringmes-
sage appears in the multifunction display.
If you press the 0038or0076 button on the
multifunction steering wheel, the message will
disappear. AMG adaptive sport suspension sys-
tem
General notes i
The AMG adaptive sport suspension system
is available for Mercedes-AMG vehicles and
for the Mercedes-AMG GLE 43 4MATIC.
The electronically controlled damping system
works continuously. This improves driving
safety and ride comfort.
The damping is tuned individually to each wheel
and depends on:
R your driving style, e.g. sporty
R the road surface condition, e.g. bumps
R your individual selection of Sport, Sport+ or
Comfort
The suspension setting can be adjusted using
button 0043in the center console or the DYNAMIC
SELECT controller (Y page 142). Each time you start the engine with the ignition
SmartKey or the Start/Stop button, Comfort
mode is activated. For further information about starting the engine, see (Y page 136).
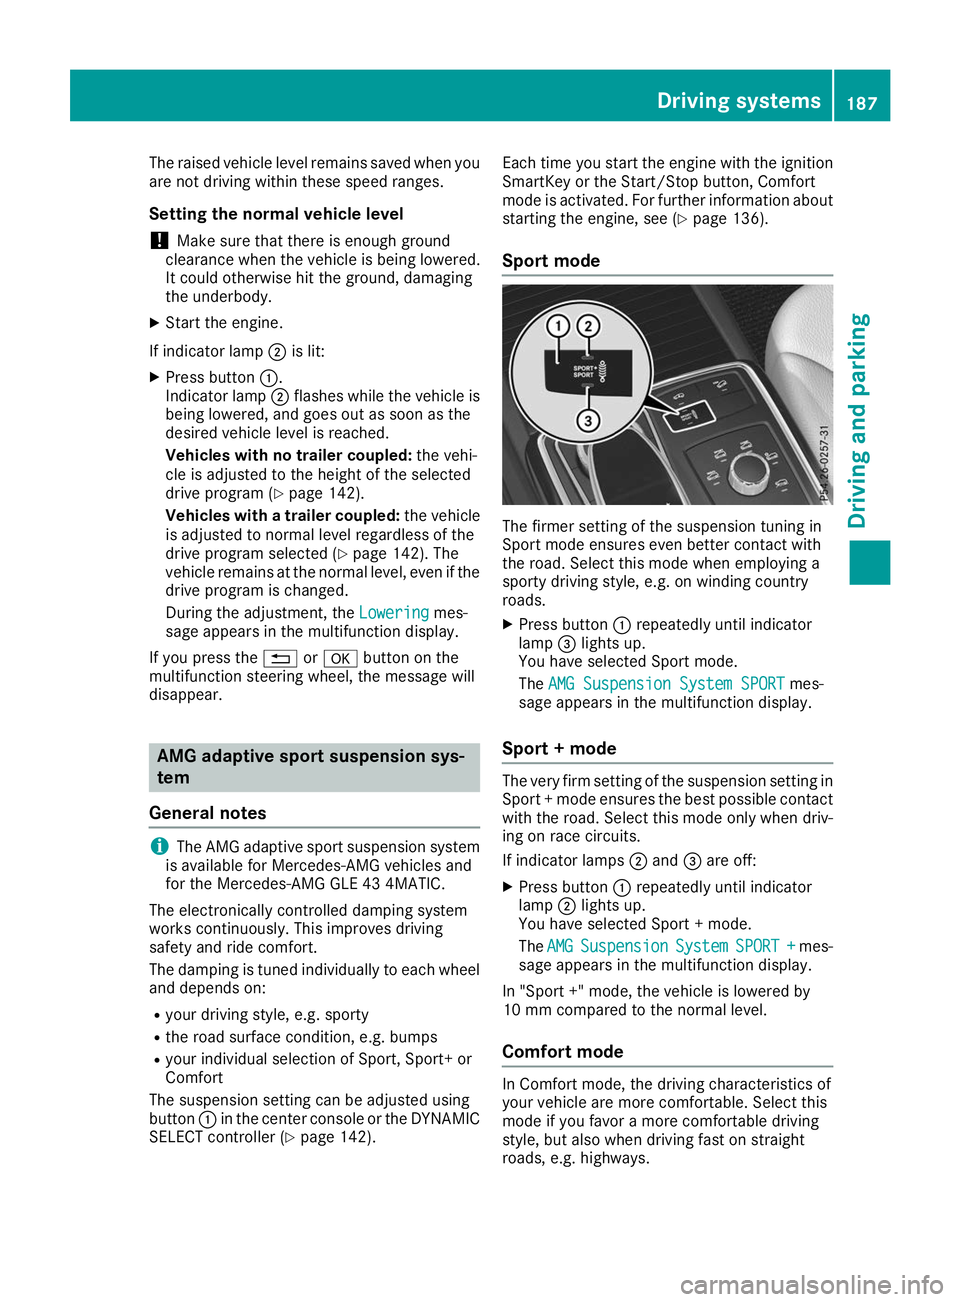
Sport mode The firmer setting of the suspension tuning in
Sport mode ensures even better contact with
the road. Select this mode when employing a
sporty driving style, e.g. on winding country
roads.
X Press button 0043repeatedly until indicator
lamp 0087lights up.
You have selected Sport mode.
The AMG Suspension System SPORT AMG Suspension System SPORT mes-
sage appears in the multifunction display.
Sport + mode The very firm setting of the suspension setting in
Sport + mode ensures the best possible contact
with the road. Select this mode only when driv-
ing on race circuits.
If indicator lamps 0044and 0087are off:
X Press button 0043repeatedly until indicator
lamp 0044lights up.
You have selected Sport + mode.
The AMG AMG Suspension
Suspension System
SystemSPORT +
SPORT + mes-
sage appears in the multifunction display.
In "Sport +" mode, the vehicle is lowered by
10 mm compared to the normal level.
Comfort mode In Comfort mode, the driving characteristics of
your vehicle are more comfortable. Select this
mode if you favor a more comfortable driving
style, but also when driving fast on straight
roads, e.g. highways. Driving systems
187Driving and parking Z
Page 190 of 398
X
Press button 0043repeatedly until indicator
lamps 0044and 0087go out.
You have selected Comfort mode.
The AMG
AMG Suspension Suspension System
SystemCOMFORT
COMFORT mes-
sage appears in the multifunction display. Parking Assist PARKTRONIC
Important safety notes Parking Assist PARKTRONIC is an electronic
parking aid with ultrasound. It monitors the area
around your vehicle using six sensors in the
front bumper and six sensors in the rear
bumper. Parking Assist PARKTRONIC visually
and audibly indicates the distance between your
vehicle and an object.
Parking Assist PARKTRONIC is only an aid. It is
not a replacement for your attention to your
immediate surroundings. You are always
responsible for safe maneuvering, parking and
exiting a parking space. Make sure that there
are no persons, animals or objects in the maneu- vering area while maneuvering and parking in/
leaving parking spaces.
! When parking, pay particular attention to
objects above or below the sensors, such as
flower pots or trailer drawbars. PARKTRONIC does not detect such objects when they are in
the immediate vicinity of the vehicle. You
could damage the vehicle or the objects.
The sensors may not detect snow and other
objects that absorb ultrasonic waves.
Ultrasonic sources such as an automatic car
wash, the compressed-air brakes on a truck
or a pneumatic drill could cause PARKTRONIC to malfunction.
PARKTRONIC may not function correctly on
uneven terrain.
! Fold in the ball coupling if the trailer tow
hitch is not required. PARKTRONIC measures
the minimum detection range to an obstacle
from the bumper, not the ball coupling.
Parking Assist PARKTRONIC is deactivated for
the rear area when you establish an electrical
connection between your vehicle and a trailer. Parking Assist PARKTRONIC is activated auto-
matically when you:
R switch on the ignition
R shift the transmission to position 005B,005Eor
005C
R release the electric parking brake.
Parking Assist PARKTRONIC is deactivated at
speeds above 11 mph (18 km/h) . It is reactiva-
ted at lower speeds.
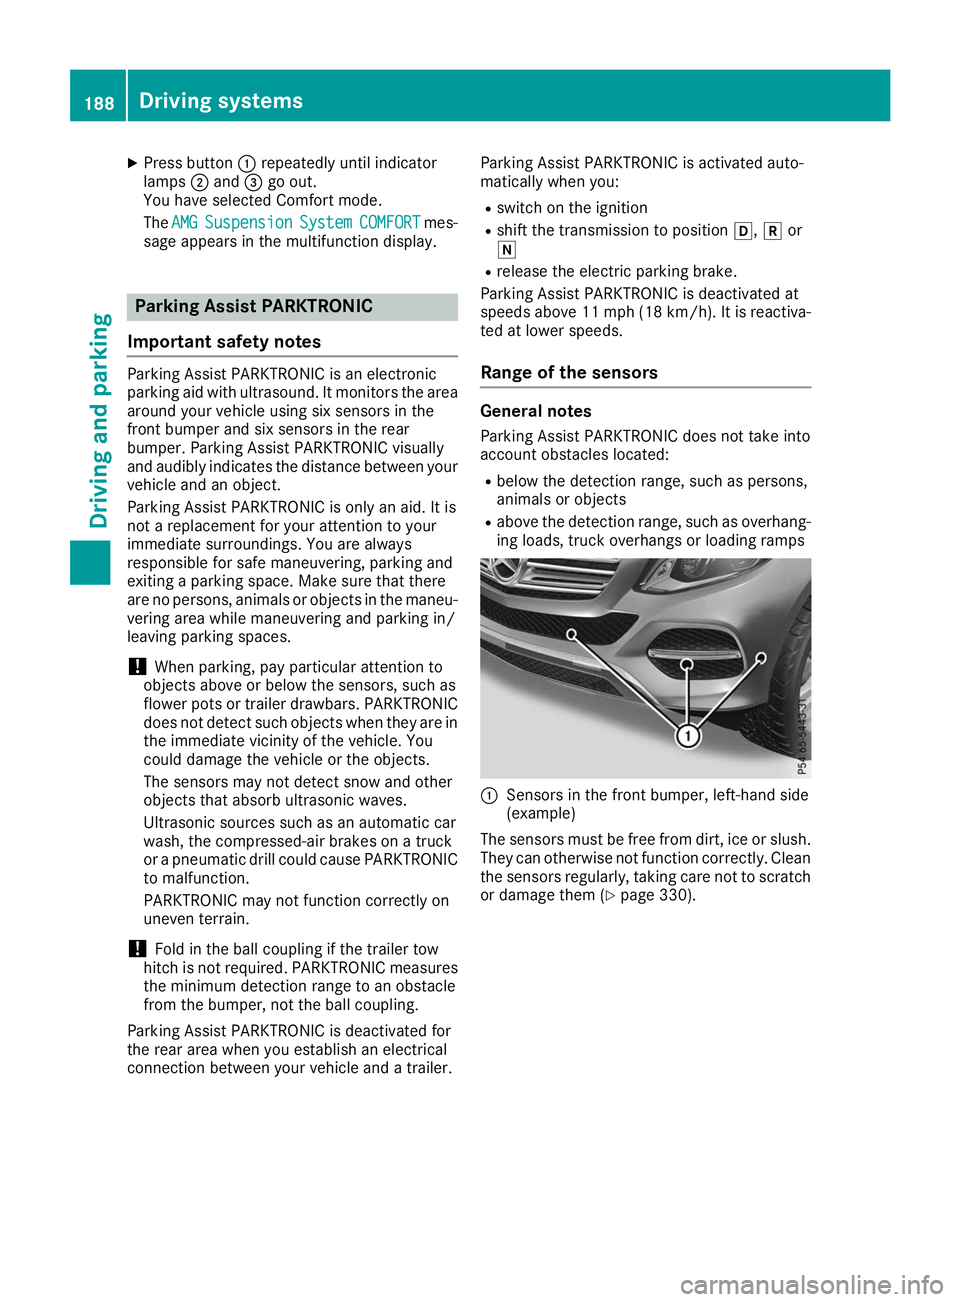
Range of the sensors General notes
Parking Assist PARKTRONIC does not take into
account obstacles located:
R below the detection range, such as persons,
animals or objects
R above the detection range, such as overhang-
ing loads, truck overhangs or loading ramps 0043
Sensors in the front bumper, left-hand side
(example)
The sensors must be free from dirt, ice or slush. They can otherwise not function correctly. Clean
the sensors regularly, taking care not to scratch
or damage them (Y page 330).188
Driving systemsDriving and parking
Page 244 of 398
X
Press the 0059or0065 button on the steering
wheel to select the AMG
AMG menu.
Upshift indicator: upshift indicatorUp
Up0087
indicates that the engine has reached the
overrevving range when in the manual drive
program.
Engine/transmission oil temperature:
when the engine and transmission are at nor- mal operating temperature, oil tempera-
ture 0085and 0084are displayed in white in the
multifunction display.
If the multifunction display shows oil temper- ature 0085or0084 in blue, the engine or the
transmission are not yet at normal operating
temperature. Avoid driving at full engine out-
put during this time.
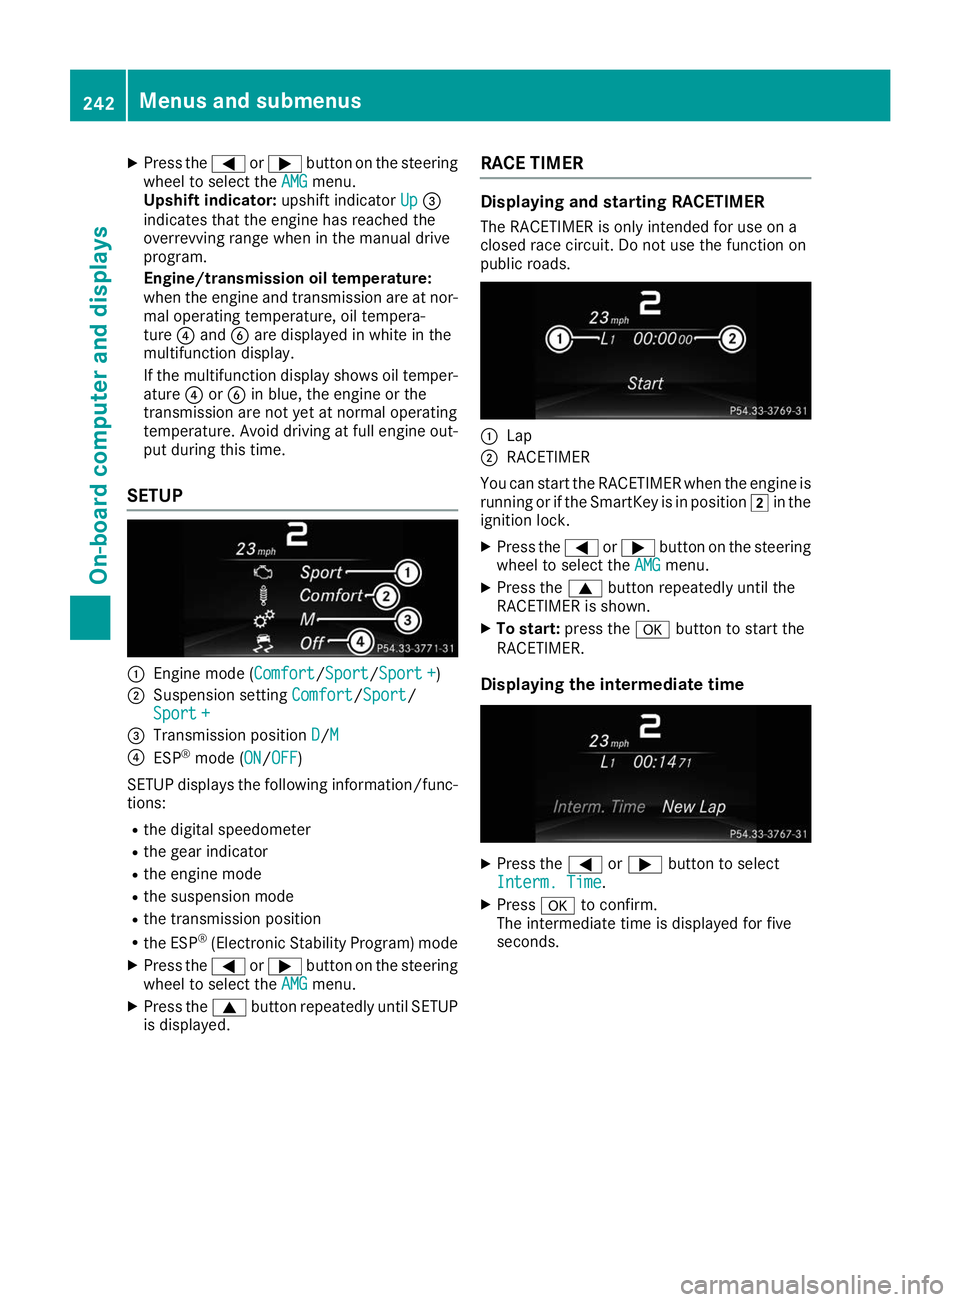
SETUP 0043
Engine mode (Comfort Comfort/SportSport/Sport +Sport +)
0044 Suspension setting Comfort Comfort/Sport
Sport/
Sport +
Sport +
0087 Transmission position D
D/MM
0085 ESP ®
mode (ON ON/OFFOFF)
SETUP displays the following information/func- tions:
R the digital speedometer
R the gear indicator
R the engine mode
R the suspension mode
R the transmission position
R the ESP ®
(Electronic Stability Program) mode
X Press the 0059or0065 button on the steering
wheel to select the AMG
AMG menu.
X Press the 0063button repeatedly until SETUP
is displayed. RACE TIMER Displaying and starting RACETIMER
The RACETIMER is only intended for use on a
closed race circuit. Do not use the function on
public roads. 0043
Lap
0044 RACETIMER
You can start the RACETIMER when the engine is running or if the SmartKey is in position 0048in the
ignition lock.
X Press the 0059or0065 button on the steering
wheel to select the AMG AMGmenu.
X Press the 0063button repeatedly until the
RACETIMER is shown.
X To start: press the 0076button to start the
RACETIMER.
Displaying the intermediate time X
Press the 0059or0065 button to select
Interm. Time
Interm. Time.
X Press 0076to confirm.
The intermediate time is displayed for five
seconds. 242
Menus and submenusOn-board computer and displays
Page 353 of 398
Important safety notes
G
WARNING
If wheels and tires of the wrong size are used, the wheel brakes or suspension components
may be damaged. There is a risk of an acci-
dent.
Always replace wheels and tires with those
that fulfill the specifications of the original
part.
When replacing wheels, make sure to use the
correct:
R designation
R model
When replacing tires, make sure to use the
correct:
R designation
R manufacturer
R model G
WARNING
A flat tire severely impairs the driving, steer-
ing and braking characteristics of the vehicle.
There is a risk of accident.
Tires without run-flat characteristics:
R do not drive with a flat tire.
R immediately replace the flat tire with your
emergency spare wheel or spare wheel, or
consult a qualified specialist workshop.
Tires with run-flat characteristics:
R pay attention to the information and warn-
ing notices on MOExtended tires (tires with
run-flat characteristics).
Accessories that are not approved for your vehi-
cle by Mercedes-Benz or are not being used cor- rectly can impair the operating safety.
Before purchasing and using non-approved
accessories, visit a qualified specialist work-
shop and inquire about:
R suitability
R legal stipulations
R factory recommendations Further information regarding wheels and tires
can be found under "Wheel/tire combinations"
(Y page 376).
You can ask for information regarding permitted
wheel-tire combinations at an authorized
Mercedes-Benz Center.
Tire pressure information can be found:
R on the Tire and Loading Information placard
on the B-pillar on the driver's side
R in the tire pressure table in the fuel filler flap
R in the "Tire pressure" section Operation
Information on driving
Check the tire pressure when the vehicle is
heavily laden and adjust prior to a trip.
While driving, pay attention to vibrations, noises and unusual handling characteristics, e.g. pull-
ing to one side. This may indicate that the
wheels or tires are damaged. If you suspect thata tire is defective, reduce your speed immedi-
ately. Stop the vehicle as soon as possible to
check the wheels and tires for damage. Hidden
tire damage could also be causing the unusual
handling characteristics. If you find no signs of
damage, have the tires and wheels checked at a
qualified specialist workshop.
When parking your vehicle, make sure that the
tires do not get deformed by the curb or other
obstacles. If it is necessary to drive over curbs,
speed humps or similar elevations, try to do so
slowly and at an obtuse angle. Otherwise, the
tires, particularly the sidewalls, may be dam-
aged. Regular checking of wheels and tires
G
WARNING
Damaged tires can cause tire inflation pres-
sure loss. As a result, you could lose control of your vehicle. There is a risk of accident.
Check the tires regularly for signs of damage
and replace any damaged tires immediately.
Check wheels and tires for damage at least once a month. Check wheels and tires after driving
off-road or on rough roads. Damaged wheels
can cause a loss of tire pressure. Operation
351Wheels and ti res Z
Page 356 of 398
To avoid hazardous situations:
R never install snow chains to the front
wheels
R always install snow chains in pairs to the
rear wheels.
! Check the snow chains for damage before
mounting them. Damaged or worn snow
chains may snap and damage the following
components:
R wheel
R wheel housing
R wheel suspension
For this reason, you must use only snow
chains that are free of defects. Observe the
manufacturer's mounting instructions.
! You must drive at raised vehicle level (height
1) if snow chains have been installed. The
vehicle may otherwise be damaged.
! Vehicles with ADS (Adaptive Damping
System): do not use the sport mode when
driving with snow chains mounted. The vehi-
cle may otherwise be damaged.
For safety reasons, Mercedes-Benz recom-
mends that you only use snow chains that have been specially approved for your vehicle by
Mercedes-Benz, or are of a corresponding
standard of quality. For more information,
please contact a qualified specialist workshop.
Install the snow chains on all driven wheels for
maximum tractive power and driving stability. If
you own snow chains for two driven wheels only, install the snow chains to the wheels on the rear
axle. The vehicle then remains more stable
under braking.
If you intend to mount snow chains, please bear
the following points in mind:
R Snow chains may not be mounted on all
wheel/tire combinations. Permissible
wheel/tire combinations (Y page 376).
R Only use snow chains when driving on roads
completely covered by snow. Remove the
snow chains as soon as possible when you
come to a road that is not snow-covered.
R Local regulations may restrict the use of snow
chains. Observe the appropriate regulations if
you wish to mount snow chains. R
Do not exceed the maximum permissible
speed of 30 mph (50 km/h).
R When snow chains are installed, never use
Active Parking Assist (Y page 191) or the
Parking Package with rear view camera.
You may wish to deactivate ESP ®
(Y page 71)
when pulling away with snow chains mounted.
You can thereby allow the wheels to spin in a
controlled manner, achieving an increased driv-
ing force (cutting action).
Information about driving with an emergency
spare wheel (Y page 376). Tire pressure
Tire pressure specifications
Important safety notes G
WARNING
Underinflated or overinflated tires pose the
following risks:
R the tires may burst, especially as the load
and vehicle speed increase.
R the tires may wear excessively and/or
unevenly, which may greatly impair tire
traction.
R the driving characteristics, as well as steer-
ing and braking, may be greatly impaired.
There is a risk of an accident.
Follow recommended tire inflation pressures
and check the pressure of all the tires includ-
ing the spare wheel:
R monthly, at least
R if the load changes
R before beginning a long journey
R under different operating conditions, e.g.
off-road driving
If necessary, correct the tire pressure.
Details on tire pressure can be found at the fol-
lowing positions in the vehicle:
R Tire and Loading Information placard on the
B-pillar on the driver's side
R Table for tire pressure on the inside of the fuel
filler flap
The tire pressure monitor does not warn you of: 354
Tire pressureWheels and tires
Page 373 of 398
Sidewall
The part of the tire between the tread and the
bead.
Weight of optional extras The combined weight of those optional extras
that weigh more than the replaced standard
parts and more than 2.3 kg (5 lbs). These
optional extras, such as high-performance
brakes, level control, a roof rack or a high-per-
formance battery, are not included in the curb
weight and the weight of the accessories.
TIN (Tire Identification Number) This is a unique identifier which can be used by
a tire manufacturer to identify tires, for example for a product recall, and thus identify the pur-
chasers. The TIN is made up of the manufactur-
er's identity code, tire size, tire type code and
the manufacturing date.
Load bearing index
The load bearing index (also load index) is a code that contains the maximum load bearing capa-
city of a tire.
Traction
Traction is the result of friction between the tires and the road surface.
TWR (Tongue Weight Rating)
The TWR specifies the maximum permissible
weight that the ball coupling of the trailer tow
hitch can support.
Treadwear indicators Narrow bars (tread wear bars) that are distrib-
uted over the tire tread. If the tire tread is level
with the bars, the wear limit of 00CDin (1.6 mm)
has been reached.
Occupant distribution
The distribution of occupants in a vehicle at their designated seating positions.
Total load limit Nominal load and luggage load plus 68 kg
(150 lbs) multiplied by the number of seats in
the vehicle. Changing a wheel
Flat tire
The "Breakdown assistance" section
(Y page 335) contains information and notes on
how to deal with a flat tire. Information on driv-
ing with MOExtended tires in the event of a flat
tire can be found under "MOExtended tires (tires with run-flat characteristics" (Y page 336).
Vehicles with an emergency spare wheel: in
the event of a flat tire, mount the emergency
spare wheel according to the description under "Mounting a wheel" (Y page 372). Rotating the wheels
G
WARNING
Interchanging the front and rear wheels may
severely impair the driving characteristics if
the wheels or tires have different dimensions. The wheel brakes or suspension components
may also be damaged. There is a risk of acci-
dent.
Rotate front and rear wheels only if the wheels and tires are of the same dimensions.
! On vehicles equipped with a tire pressure
monitor, electronic components are located
in the wheel.
Tire-mounting tools should not be used near
the valve. This could damage the electronic
components.
Only have tires changed at a qualified spe-
cialist workshop.
Always observe the instructions and safety
notes in the "Mounting a wheel" section
(Y page 372).
The wear patterns on the front and rear tires
differ, depending on the operating conditions.
Rotate the wheels before a clear wear pattern
has formed on the tires. Front tires typically
wear more on the shoulders and the rear tires in
the center.
On vehicles that have the same size front and
rear wheels, you can rotate the wheels accord-
ing to the intervals in the tire manufacturer's
warranty book in your vehicle documents. If no
warranty book is available, the tires should be
rotated every 3,000 to 6,000 miles (5,000 to
10,000 km). Depending on tire wear, this may Changing a wheel
371Wheels and tires Z
Page 392 of 398
R-134a refrigerant. Otherwise, the climate
control system may be damaged.
Service work, such as refilling with refrigerant or replacing component parts, may only be carried
out by a qualified specialist workshop. All appli- cable regulations, as well as SAE standard J639,
must be adhered to.
Always have work on the climate control system carried out at a qualified specialist workshop.
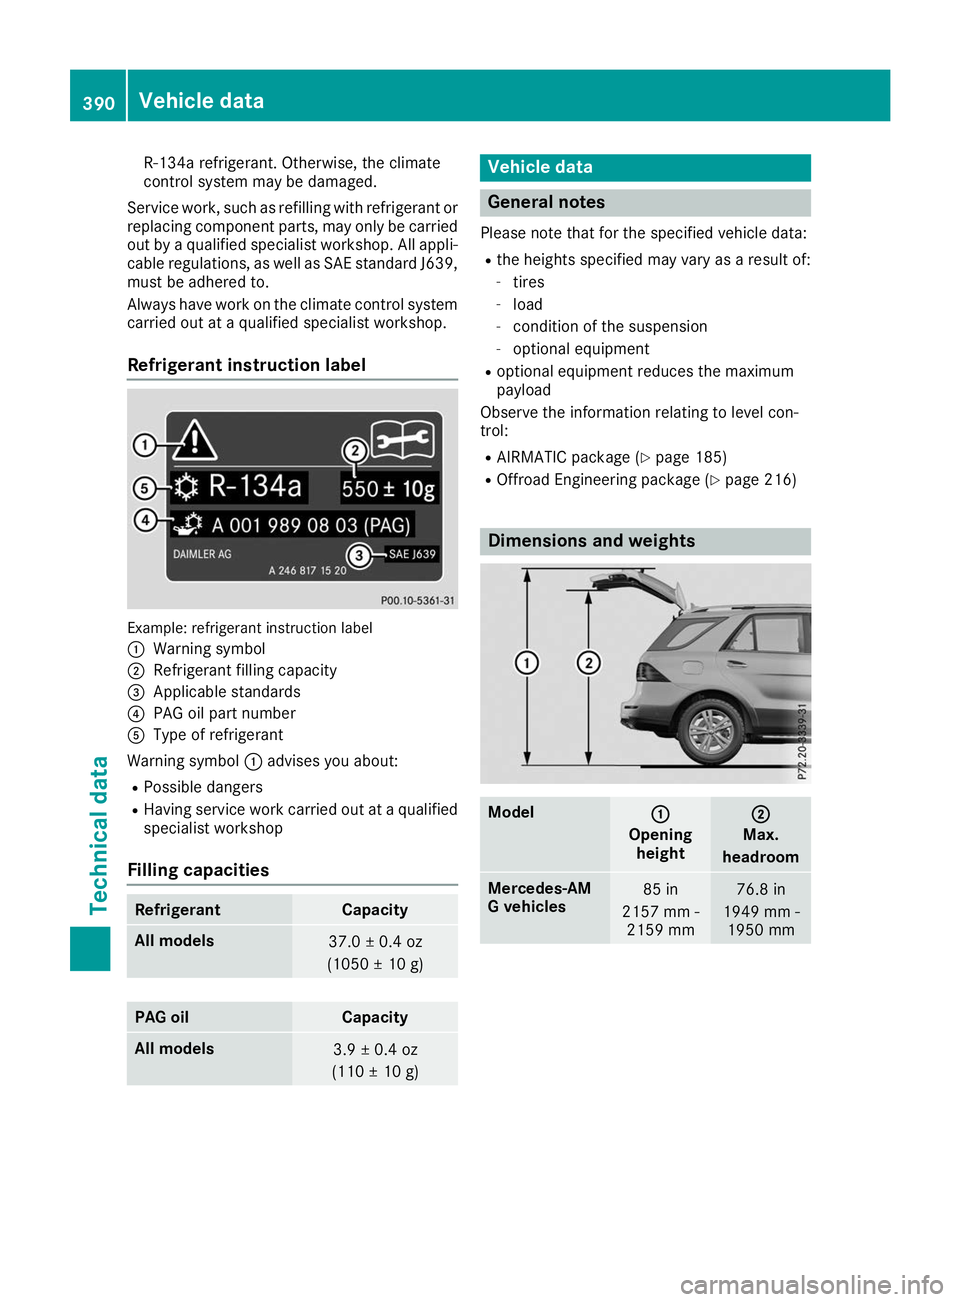
Refrigerant instruction label Example: refrigerant instruction label
0043 Warning symbol
0044 Refrigerant filling capacity
0087 Applicable standards
0085 PAG oil part number
0083 Type of refrigerant
Warning symbol 0043advises you about:
R Possible dangers
R Having service work carried out at a qualified
specialist workshop
Filling capacities Refrigerant Capacity
All models
37.0 ± 0.4 oz
(1050 ± 10 g) PAG oil Capacity
All models
3.9 ± 0.4 oz
(110 ± 10 g) Vehicle data
General notes
Please note that for the specified vehicle data: R the heights specified may vary as a result of:
- tires
- load
- condition of the suspension
- optional equipment
R optional equipment reduces the maximum
payload
Observe the information relating to level con-
trol:
R AIRMATIC package (Y page 185)
R Offroad Engineering package (Y page 216) Dimensions and weights
Model
0043 0043
Opening height 0044
0044
Max.
headroom Mercedes‑AM
G vehicles
85 in
2157 mm - 2159 mm 76.8 in
1949 mm - 1950 mm 390
Vehicle dataTechnical data