2019 MERCEDES-BENZ GLE check oil
[x] Cancel search: check oilPage 261 of 398
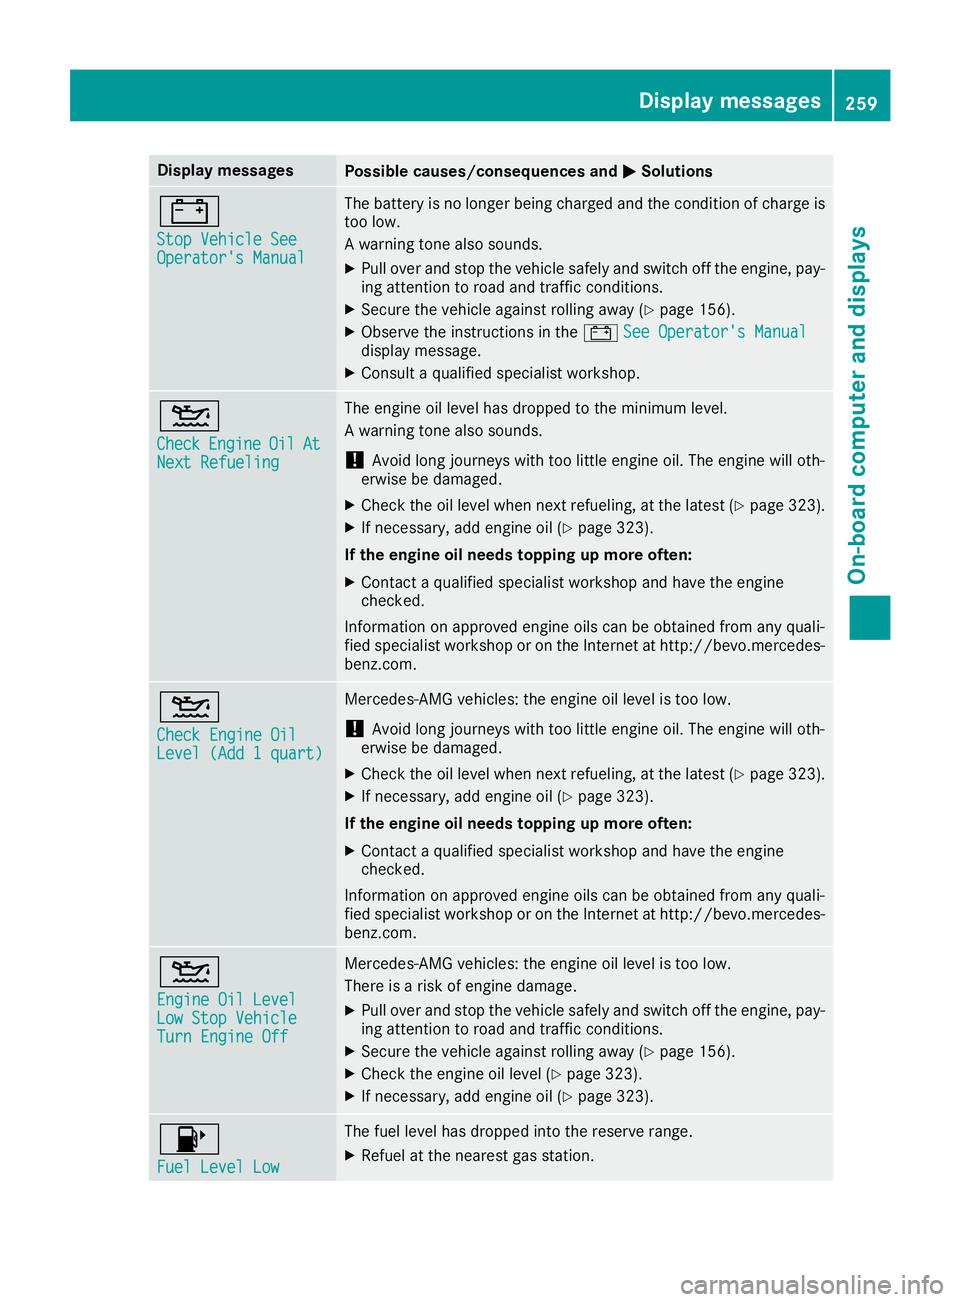
Display messages
Possible causes/consequences and
0050
0050Solutions 003D
Stop Vehicle See Stop Vehicle See
Operator's Manual Operator's Manual The battery is no longer being charged and the condition of charge is
too low.
A warning tone also sounds.
X Pull over and stop the vehicle safely and switch off the engine, pay-
ing attention to road and traffic conditions.
X Secure the vehicle against rolling away (Y page 156).
X Observe the instructions in the 003DSee Operator's Manual See Operator's Manual
display message.
X Consult a qualified specialist workshop. 00B2
Check Check
Engine
Engine Oil
OilAt
At
Next Refueling
Next Refueling The engine oil level has dropped to the minimum level.
A warning tone also sounds.
! Avoid long journeys with too little engine oil. The engine will oth-
erwise be damaged.
X Check the oil level when next refueling, at the latest (Y page 323).
X If necessary, add engine oil (Y page 323).
If the engine oil needs topping up more often: X Contact a qualified specialist workshop and have the engine
checked.
Information on approved engine oils can be obtained from any quali-
fied specialist workshop or on the Internet at http://bevo.mercedes- benz.com. 00B2
Check Engine Oil Check Engine Oil
Level (Add 1 quart) Level (Add 1 quart) Mercedes-AMG vehicles: the engine oil level is too low.
! Avoid long journeys with too little engine oil. The engine will oth-
erwise be damaged.
X Check the oil level when next refueling, at the latest (Y page 323).
X If necessary, add engine oil (Y page 323).
If the engine oil needs topping up more often: X Contact a qualified specialist workshop and have the engine
checked.
Information on approved engine oils can be obtained from any quali-
fied specialist workshop or on the Internet at http://bevo.mercedes- benz.com. 00B2
Engine Oil Level Engine Oil Level
Low Stop Vehicle Low Stop Vehicle
Turn Engine Off Turn Engine Off Mercedes-AMG vehicles: the engine oil level is too low.
There is a risk of engine damage.
X Pull over and stop the vehicle safely and switch off the engine, pay-
ing attention to road and traffic conditions.
X Secure the vehicle against rolling away (Y page 156).
X Check the engine oil level (Y page 323).
X If necessary, add engine oil (Y page 323).00B6
Fuel Level Low Fuel Level Low The fuel level has dropped into the reserve range.
X Refuel at the nearest gas station. Display
messages
259On-board computer and displays Z
Page 324 of 398
X
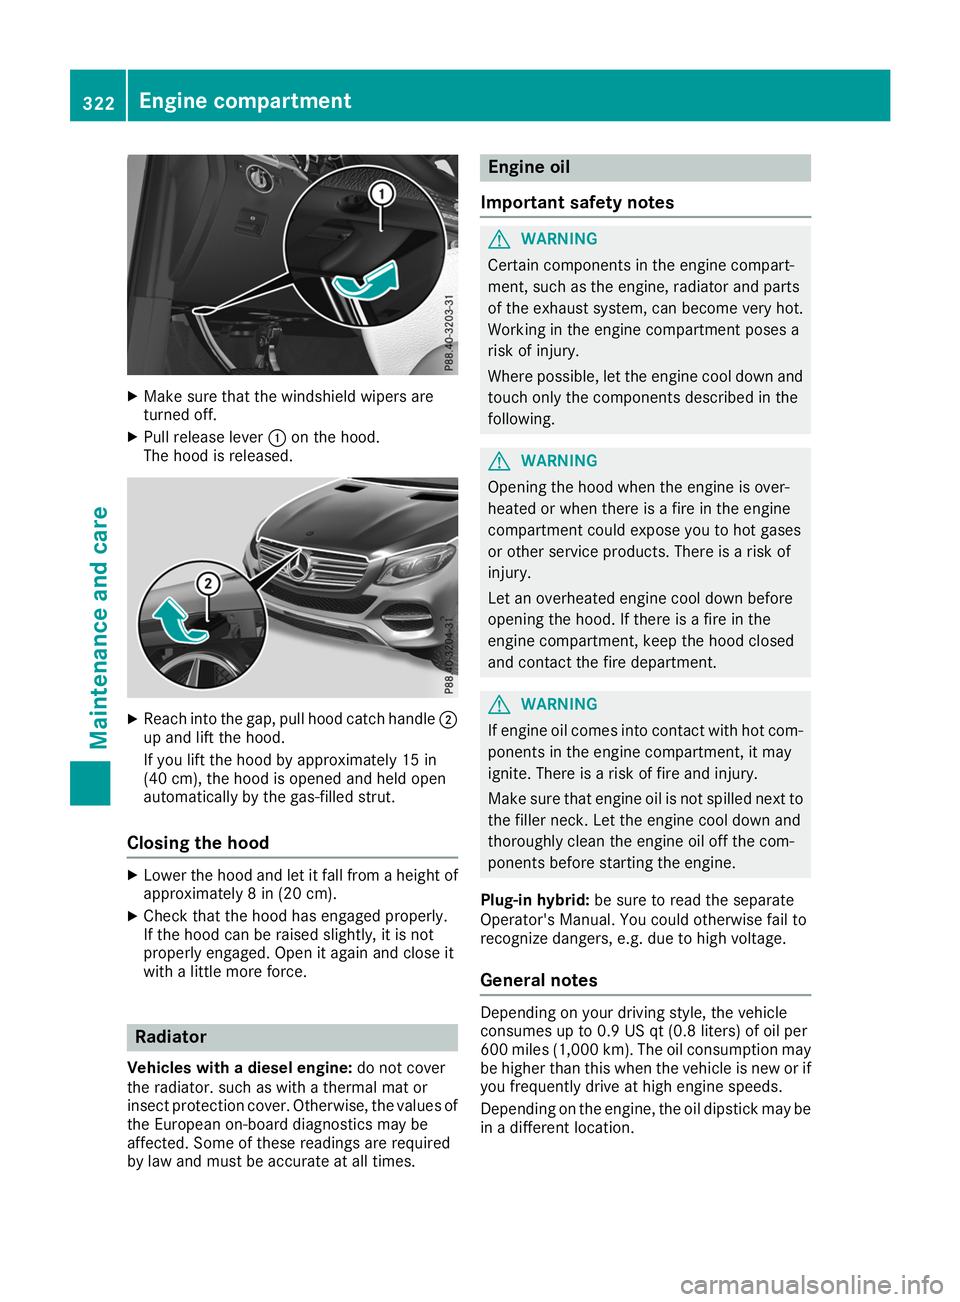
Make sure that the windshield wipers are
turned off.
X Pull release lever 0043on the hood.
The hood is released. X
Reach into the gap, pull hood catch handle 0044
up and lift the hood.
If you lift the hood by approximately 15 in
(40 cm), the hood is opened and held open
automatically by the gas-filled strut.
Closing the hood X
Lower the hood and let it fall from a height of
approximately 8 in (20 cm).
X Check that the hood has engaged properly.
If the hood can be raised slightly, it is not
properly engaged. Open it again and close it
with a little more force. Radiator
Vehicles with a diesel engine: do not cover
the radiator. such as with a thermal mat or
insect protection cover. Otherwise, the values of the European on-board diagnostics may be
affected. Some of these readings are required
by law and must be accurate at all times. Engine oil
Important safety notes G
WARNING
Certain components in the engine compart-
ment, such as the engine, radiator and parts
of the exhaust system, can become very hot.
Working in the engine compartment poses a
risk of injury.
Where possible, let the engine cool down and touch only the components described in the
following. G
WARNING
Opening the hood when the engine is over-
heated or when there is a fire in the engine
compartment could expose you to hot gases
or other service products. There is a risk of
injury.
Let an overheated engine cool down before
opening the hood. If there is a fire in the
engine compartment, keep the hood closed
and contact the fire department. G
WARNING
If engine oil comes into contact with hot com- ponents in the engine compartment, it may
ignite. There is a risk of fire and injury.
Make sure that engine oil is not spilled next to
the filler neck. Let the engine cool down and
thoroughly clean the engine oil off the com-
ponents before starting the engine.
Plug-in hybrid: be sure to read the separate
Operator's Manual. You could otherwise fail to
recognize dangers, e.g. due to high voltage.
General notes Depending on your driving style, the vehicle
consumes up to 0.9 US qt (0.8 liters) of oil per
600 miles (1,000 km). The oil consumption may
be higher than this when the vehicle is new or if
you frequently drive at high engine speeds.
Depending on the engine, the oil dipstick may be in a different location. 322
Engine compartmentMaintenance and care
Page 325 of 398
When checking the oil level:
R
park the vehicle on a level surface.
R the engine should be switched off for approx-
imately five minutes if the engine is at normal
operating temperature.
R if the engine is not at normal operating tem-
perature, e.g. if the engine was only started
briefly, wait about 30 minutes before carrying
out the measurement.
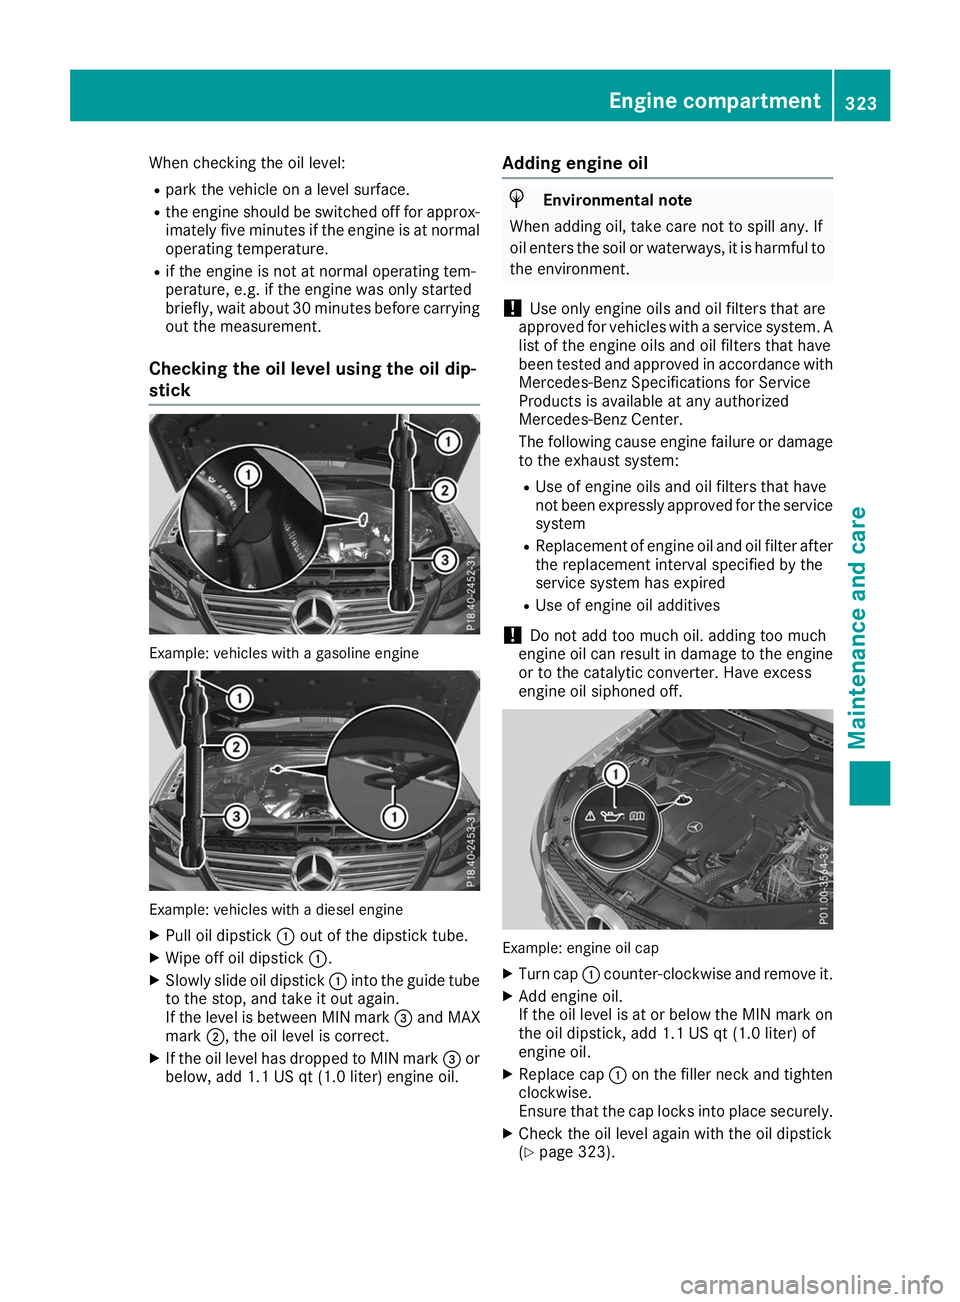
Checking the oil level using the oil dip-
stick Example: vehicles with a gasoline engine
Example: vehicles with a diesel engine
X Pull oil dipstick 0043out of the dipstick tube.
X Wipe off oil dipstick 0043.
X Slowly slide oil dipstick 0043into the guide tube
to the stop, and take it out again.
If the level is between MIN mark 0087and MAX
mark 0044, the oil level is correct.
X If the oil level has dropped to MIN mark 0087or
below, add 1.1 US qt (1.0 liter) engine oil. Adding engine oil H
Environmental note
When adding oil, take care not to spill any. If
oil enters the soil or waterways, it is harmful to the environment.
! Use only engine oils and oil filters that are
approved for vehicles with a service system. A list of the engine oils and oil filters that have
been tested and approved in accordance with
Mercedes-Benz Specifications for Service
Products is available at any authorized
Mercedes-Benz Center.
The following cause engine failure or damage
to the exhaust system:
R Use of engine oils and oil filters that have
not been expressly approved for the service
system
R Replacement of engine oil and oil filter after
the replacement interval specified by the
service system has expired
R Use of engine oil additives
! Do not add too much oil. adding too much
engine oil can result in damage to the engine or to the catalytic converter. Have excess
engine oil siphoned off. Example: engine oil cap
X Turn cap 0043counter-clockwise and remove it.
X Add engine oil.
If the oil level is at or below the MIN mark on
the oil dipstick, add 1.1 US qt (1.0 liter) of
engine oil.
X Replace cap 0043on the filler neck and tighten
clockwise.
Ensure that the cap locks into place securely.
X Check the oil level again with the oil dipstick
(Y page 323). Engine compartment
323Maintenance and care Z
Page 326 of 398
Further information on engine oil (Y
page 387).Additional service products
Important safety notes G
WARNING
Certain components in the engine compart-
ment, such as the engine, radiator and parts
of the exhaust system, can become very hot.
Working in the engine compartment poses a
risk of injury.
Where possible, let the engine cool down and touch only the components described in the
following. G
WARNING
The cooling system is pressurized, particularly when the motor is warm. If you open the cap, you could be scalded if hot coolant sprays out.
There is a risk of injury.
Let the engine cool down before you open the
cap. Wear protective gloves and protective
eyewear when opening. Open the cap slowly
to release pressure.
The coolant level may only be checked and cool- ant refilled when the engine and engine coolingsystem have cooled down. G
WARNING
Windshield washer concentrate could ignite if it comes into contact with hot engine compo-
nents or the exhaust system. There is a risk of
fire and injury.
Make sure that no windshield washer con-
centrate is spilled next to the filler neck. Checking coolant level X
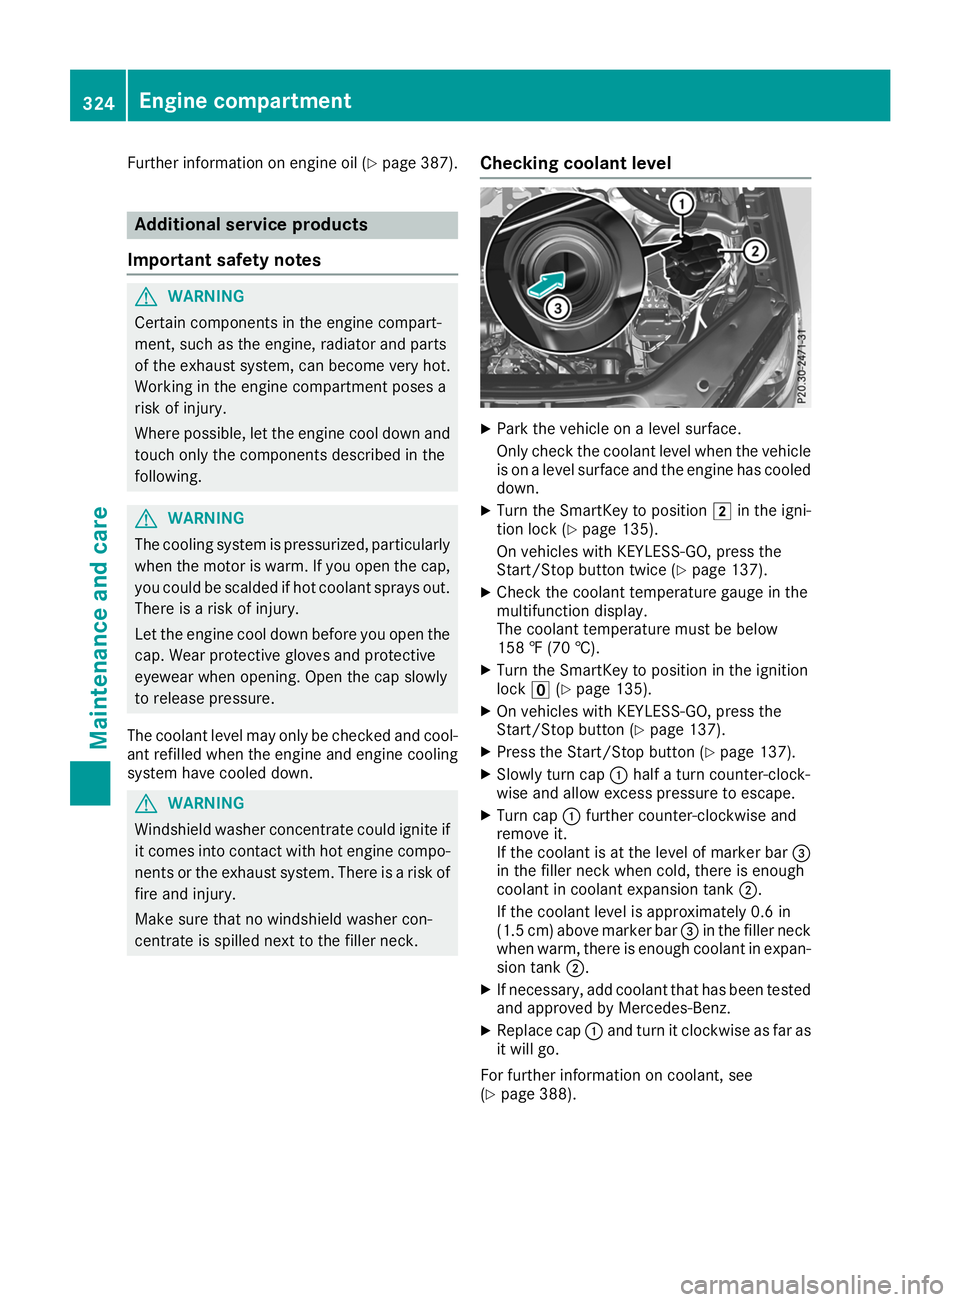
Park the vehicle on a level surface.
Only check the coolant level when the vehicle
is on a level surface and the engine has cooled
down.
X Turn the SmartKey to position 0048in the igni-
tion lock (Y page 135).
On vehicles with KEYLESS-GO, press the
Start/Stop button twice (Y page 137).
X Check the coolant temperature gauge in the
multifunction display.
The coolant temperature must be below
158 ‡ (70 †).
X Turn the SmartKey to position in the ignition
lock 0092(Ypage 135).
X On vehicles with KEYLESS-GO, press the
Start/Stop button (Y page 137).
X Press the Start/Stop button (Y page 137).
X Slowly turn cap 0043half a turn counter-clock-
wise and allow excess pressure to escape.
X Turn cap 0043further counter-clockwise and
remove it.
If the coolant is at the level of marker bar 0087
in the filler neck when cold, there is enough
coolant in coolant expansion tank 0044.
If the coolant level is approximately 0.6 in
(1.5 cm) above marker bar 0087in the filler neck
when warm, there is enough coolant in expan- sion tank 0044.
X If necessary, add coolant that has been tested
and approved by Mercedes-Benz.
X Replace cap 0043and turn it clockwise as far as
it will go.
For further information on coolant, see
(Y page 388). 324
Engine compartmentMaintenance and care
Page 328 of 398
A qualified specialist workshop will reset the
ASSYST PLUS service interval display after the
service work has been carried out. You can also obtain further information on maintenance
work, for example.
Special service requirements The specified maintenance interval takes only
the normal operation of the vehicle into
account. Under increased load on the vehicle,
maintenance work must be carried out more
frequently, for example:
R Regular city driving with frequent intermedi-
ate stops
R If the vehicle is primarily used to travel short
distances
R Use in mountainous terrain or on poor road
surfaces
R If the engine is often left idling for long periods
Under these or similar conditions, have, for
example, the air filter, engine oil and oil filter
replaced or changed more frequently. Under
arduous operating conditions, the tires must be
checked more often. Further information can be
obtained at a qualified specialist workshop.
Driving abroad An extensive Mercedes-Benz Service network is
also available in other countries. You can obtain further information from any authorized
Mercedes-Benz Center. Care
General notes
H
Environmental note
Dispose of empty packaging and cleaning
cloths in an environmentally responsible man-
ner.
! When cleaning your car, do not use:
R dry, coarse or hard cloths
R abrasive cleaning agents
R solvents
R cleaning agents containing solvents
Do not scrub.
Do not touch the surfaces and films with hard objects, e.g. rings or ice scrapers. Otherwise, you may scratch or damage the surfaces and
films.
! Do not park your vehicle for a long period of
time directly after cleaning, particularly after
cleaning the wheel rim with wheel cleaner.
Wheel cleaner can lead to the increased cor-
rosion of the brake discs and pads. Therefore,
drive for a few minutes after cleaning. By
heating up the brakes, the brake discs and
pads dry. The vehicle can then be parked for a
long period of time.
Regular care of your vehicle is a condition for
retaining the quality in the long term.
Use care products and cleaning agents recom-
mended and approved by Mercedes-Benz. Washing the vehicle and cleaning the
paintwork
Automatic car wash G
WARNING
Braking efficiency is reduced after washing
the vehicle. There is a risk of an accident.
After the vehicle has been washed, brake
carefully while paying attention to the traffic
conditions until full braking power is restored.
! Before driving into an automatic car wash,
make sure that it is suitable for the dimen-
sions of the vehicle. In particular, make sure
that:
R there is enough ground clearance between
the vehicle underbody and the guide rails of the automatic car wash.
R the clearance width of the automatic car
wash is sufficient, particularly the width of
the guide rails.
R you enter the automatic car wash straight
and in the center of the guide rails in order
to avoid damaging the tires or wheel rims.
Fold in the exterior mirrors before the vehicle
is washed. The exterior mirrors could other-
wise be damaged.
! When Active Distance Assist DISTRONIC or
the HOLD function is activated, the vehicle
brakes automatically in certain situations. 326
CareMaintenance and care
Page 334 of 398
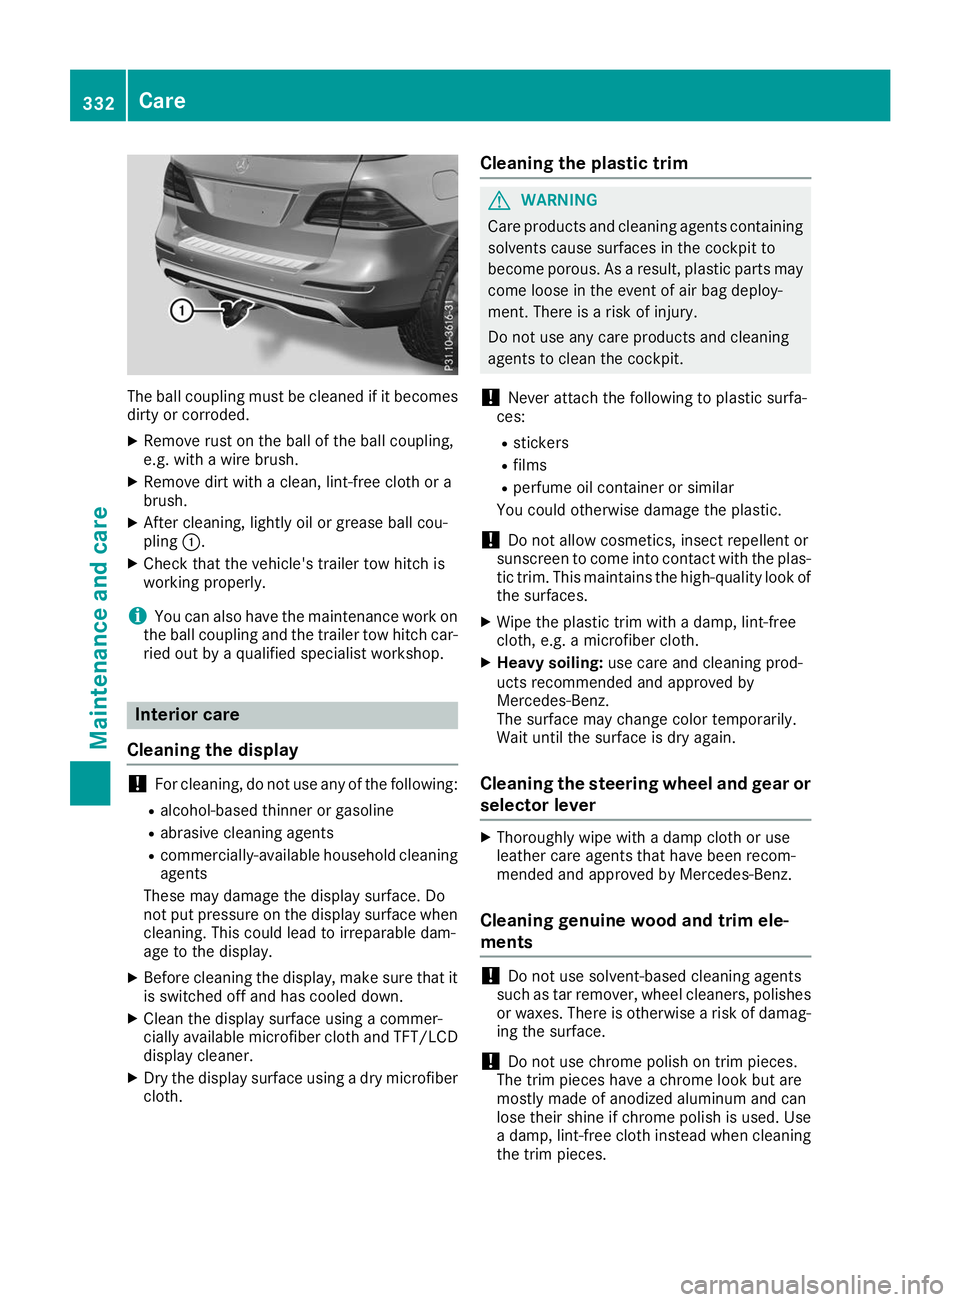
The ball coupling must be cleaned if it becomes
dirty or corroded.
X Remove rust on the ball of the ball coupling,
e.g. with a wire brush.
X Remove dirt with a clean, lint-free cloth or a
brush.
X After cleaning, lightly oil or grease ball cou-
pling 0043.
X Check that the vehicle's trailer tow hitch is
working properly.
i You can also have the maintenance work on
the ball coupling and the trailer tow hitch car-
ried out by a qualified specialist workshop. Interior care
Cleaning the display !
For cleaning, do not use any of the following:
R alcohol-based thinner or gasoline
R abrasive cleaning agents
R commercially-available household cleaning
agents
These may damage the display surface. Do
not put pressure on the display surface when
cleaning. This could lead to irreparable dam-
age to the display.
X Before cleaning the display, make sure that it
is switched off and has cooled down.
X Clean the display surface using a commer-
cially available microfiber cloth and TFT/LCD
display cleaner.
X Dry the display surface using a dry microfiber
cloth. Cleaning the plastic trim G
WARNING
Care products and cleaning agents containing solvents cause surfaces in the cockpit to
become porous. As a result, plastic parts may
come loose in the event of air bag deploy-
ment. There is a risk of injury.
Do not use any care products and cleaning
agents to clean the cockpit.
! Never attach the following to plastic surfa-
ces:
R stickers
R films
R perfume oil container or similar
You could otherwise damage the plastic.
! Do not allow cosmetics, insect repellent or
sunscreen to come into contact with the plas-
tic trim. This maintains the high-quality look of the surfaces.
X Wipe the plastic trim with a damp, lint-free
cloth, e.g. a microfiber cloth.
X Heavy soiling: use care and cleaning prod-
ucts recommended and approved by
Mercedes-Benz.
The surface may change color temporarily.
Wait until the surface is dry again.
Cleaning the steering wheel and gear or selector lever X
Thoroughly wipe with a damp cloth or use
leather care agents that have been recom-
mended and approved by Mercedes-Benz.
Cleaning genuine wood and trim ele-
ments !
Do not use solvent-based cleaning agents
such as tar remover, wheel cleaners, polishes
or waxes. There is otherwise a risk of damag- ing the surface.
! Do not use chrome polish on trim pieces.
The trim pieces have a chrome look but are
mostly made of anodized aluminum and can
lose their shine if chrome polish is used. Use
a damp, lint-free cloth instead when cleaning the trim pieces. 332
CareMaintenance and care
Page 374 of 398
be required earlier. Do not change the direction
of wheel rotation.
Clean the contact surfaces of the wheel and the
brake disc thoroughly every time a wheel is rota- ted. Check the tire pressure and, if necessary,
restart the tire pressure loss warning system or
the tire pressure monitor (Y page 358).Direction of rotation
Tires with a specified direction of rotation have
additional benefits, e.g. if there is a risk of hydro-
planing. These advantages can only be gained if the tires are installed corresponding to the
direction of rotation.
An arrow on the sidewall of the tire indicates itscorrect direction of rotation. Storing wheels
Store wheels that are not being used in a cool,
dry and preferably dark place. Protect the tires
from oil, grease, gasoline and diesel. Mounting a wheel
Preparing the vehicle X
Vehicle with emergency spare wheel:
when mounting the emergency spare wheel in
the event of a flat tire, follow the additional
notes on vehicle preparation under "Flat tire"
(Y page 335).
X Stop the vehicle on solid, non-slippery and
level ground.
X Apply the electric parking brake manually.
X Bring the front wheels into the straight-ahead
position.
X Vehicles with automatic transmission:
shift the transmission to position
005D.
X Vehicles with the AIRMATIC package:
make sure that the normal vehicle level is
selected (Y page 185).
X Vehicles with the Off-Road Engineering
package:
make sure that the normal vehicle
level is selected (Y page 179).
X Switch off the engine.
X Vehicles without KEYLESS-GO: remove the
SmartKey from the ignition lock. X
Vehicles with KEYLESS-GO: open the driv-
er's door.
The vehicle electronics are now in position
0092. This means no SmartKey is in the ignition
lock.
X Vehicles with KEYLESS-GO: remove the
Start/Stop button from the ignition lock
(Y page 135).
X Make sure that the engine cannot be started
via your smartphone (Y page 137).
X If included in the vehicle equipment, remove
the tire-change tool kit from the vehicle.
X Safeguard the vehicle against rolling away.
i Apart from certain country-specific varia-
tions, vehicles are not equipped with a tire-
change tool kit. For more information on
which tools are required to perform a wheel
change on your vehicle, consult a qualified
specialist workshop.
Necessary tire-changing tools can include, for
example:
R Jack
R Wheel chock
R Lug wrench
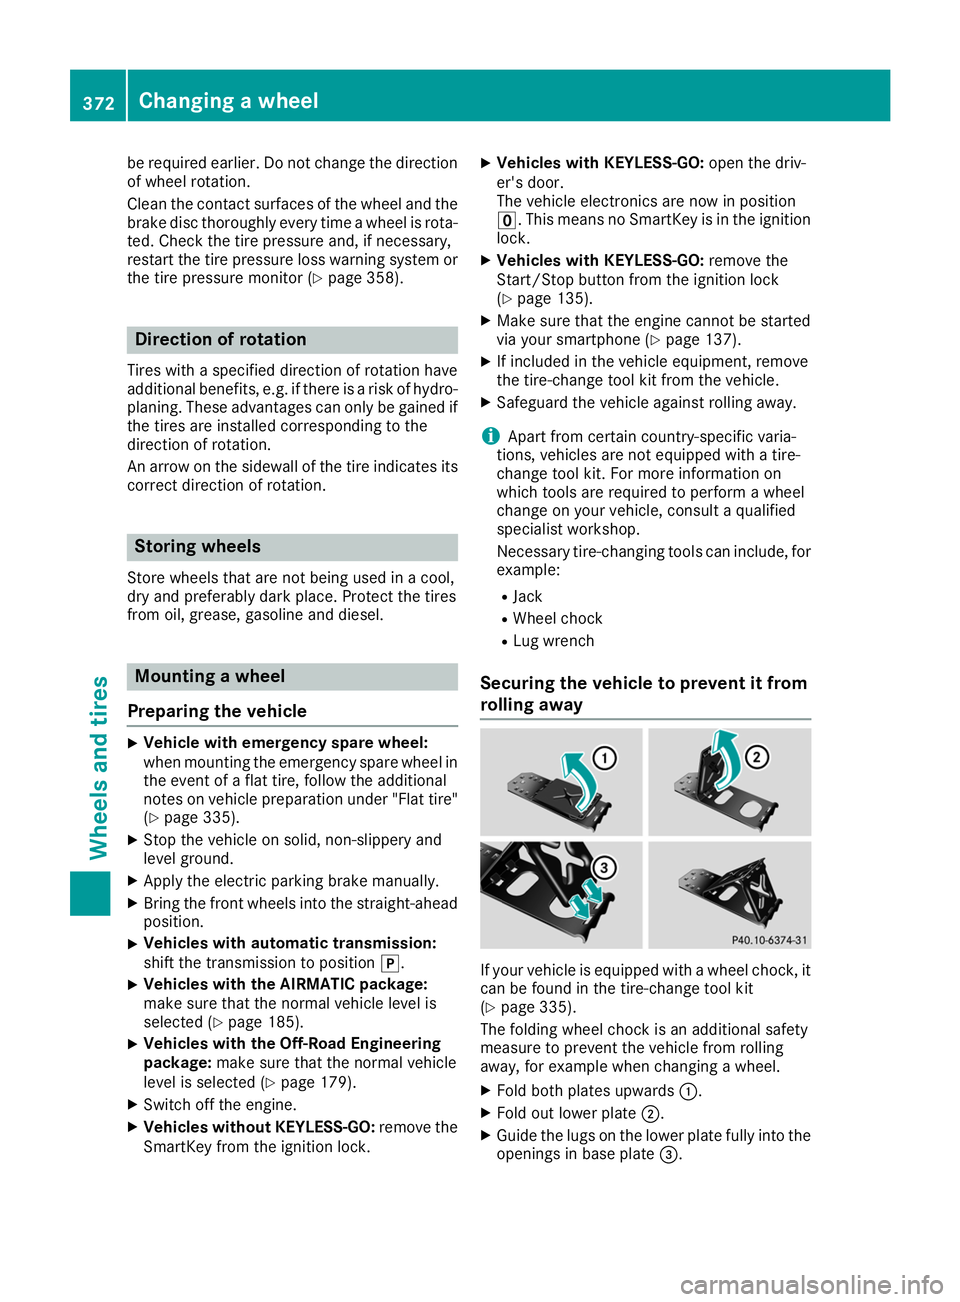
Securing the vehicle to prevent it from
rolling away If your vehicle is equipped with a wheel chock, it
can be found in the tire-change tool kit
(Y page 335).
The folding wheel chock is an additional safety
measure to prevent the vehicle from rolling
away, for example when changing a wheel.
X Fold both plates upwards 0043.
X Fold out lower plate 0044.
X Guide the lugs on the lower plate fully into the
openings in base plate 0087.372
Changing a wheelWheels and tires
Page 391 of 398
The antifreeze concentrate/corrosion inhibitor
concentration in the engine cooling system
should:
R be at least 50%. This will protect the engine
cooling system against freezing down to
approximately -35 ‡ (-37 †).
R not exceed 55% (antifreeze protection down
to -49 ‡[-45 †]). Otherwise, heat will not be
dissipated as effectively.
Mercedes-Benz recommends an antifreeze/
corrosion inhibitor concentrate in accordance
with MB Specifications for Service Products
310.1.
i When the vehicle is first delivered, it is filled
with a coolant mixture that ensures adequate
antifreeze and anti-corrosion protection.
i The coolant is checked at specified intervals
at a qualified specialist workshop.
Filling capacities Missing values were not available at time of
going to print. Model Capacity
Mercedes‑AMG
vehicles
Approx. 11.9 US qt
(11.3l) GLE 300 d 4MATIC
Approx. 10.7 US qt
(10.1l) GLE 350
Approx. 11.1 US qt
(10.5l) GLE 350 4MATIC
Approx. 11.1 US qt
(10.5l) GLE 350 d 4MATIC
Approx. 12.2 US qt
(11.5l) GLE 400 4MATIC
Approx. 10.3 US qt
(9.7 l) Mercedes-AMG
GLE 43 4MATIC
Approx. 10.3 US qt
(9.7 l) GLE 550 4MATIC
All other models
Approx. 10.3 US qt
(9.7 l) Windshield washer system
Important safety notes G
WARNING
Windshield washer concentrate could ignite if it comes into contact with hot engine compo-
nents or the exhaust system. There is a risk of
fire and injury.
Make sure that no windshield washer con-
centrate is spilled next to the filler neck.
! Only MB SummerFit and MB WinterFit
washer fluid should be mixed together. The
spray nozzles may otherwise become
blocked.
Do not use distilled or de-ionized water. Other-
wise, the level sensor may give a false reading.
When handling washer fluid, observe the impor- tant safety notes on service products
(Y page 383).
At temperatures above freezing:
X Fill the washer fluid reservoir with a mixture of
water and windshield washer fluid, e.g. MB
SummerFit.
Add 1 part MB SummerFit to 100 parts water.
At temperatures below freezing:
X Fill the washer fluid reservoir with a mixture of
water and washer fluid, e.g. MB WinterFit.
For the correct mixing ratio refer to the infor- mation on the antifreeze reservoir.
i Add windshield washer fluid, e.g. MB Sum-
merFit or MB WinterFit, to the washer fluid all
year round. Climate control system refrigerant
Important safety notes The climate control system of your vehicle is fil-
led with refrigerant R‑134a.
The instruction label regarding the refrigerant
type used can be found on the radiator cross
member.
! Only the refrigerant R‑134a and the PAG oil
approved by Mercedes-Benz may be used.
The approved PAG oil may not be mixed with
any other PAG oil that is not approved for Service products and filling capacities
389Technical data Z