2019 MERCEDES-BENZ GLE reset
[x] Cancel search: resetPage 7 of 398
ADS (Adaptive Damping System)
Function/notes ............................ .184
Air bags
Deployment ..................................... 56
Display message ............................ 254
Front air bag (driver, front
passenger) ....................................... 50
Important safety notes .................... 49
Introduction ..................................... 49
Knee bag .......................................... 50
Occupant Classification System
(OCS) ............................................... 51
PASSENGER AIR BAG indicator
lamps ............................................... 45
Side impact air bag .......................... 51
Window curtain air bag .................... 51
Air filter (display message) .............. 260
AIR FLOW .......................................... .128
Air vents
Glove box ....................................... 132
Important safety notes .................. 132
Rear ............................................... 133
Setting .......................................... .132
Setting the center air vents ........... 132
Setting the side air vents .............. .132
Air-conditioning system
see Climate control
AIRMATIC package
ADS (Adaptive Damping System) ... 184
Function/notes ............................ .183
Alarm
ATA (Anti-Theft Alarm system) ......... 75
Switching off (ATA) .......................... 75
Switching the function on/off
(ATA) ................................................ 75
Alarm system
see ATA (Anti-Theft Alarm system)
AMG
Adaptive sport suspension sys-
tem ................................................ 187
AMG menu (on-board computer) ..... 241
Anti-lock braking system
see ABS (Anti-lock Braking System)
Anti-skid chains
see Snow chains
Anti-Theft Alarm system
see ATA (Anti-Theft Alarm system)
Approach/departure angle .............. 168Ashtray
............................................... 307
Assistance display (on-board com-
puter) ................................................. .237
Assistance menu (on-board com-
puter) ................................................. .237
ASSYST PLUS
Displaying a service message ....... .325
Hiding a service message .............. 325
Resetting the service interval dis-
pla y................................................ 325
Service message ............................ 325
Special service requirements ......... 326
ATA (Anti-Theft Alarm system)
Activating/deactivating ................... 75
Function ........................................... 75
Switching off the alarm .................... 75
ATTENTION ASSIST
Activating/deactivating ................. 238
Display message ............................ 261
Function/note s............................. 203
Audio menu (on-board computer) .... 235
Authorized Mercedes-Benz Center
see Qualified specialist workshop
Authorized workshop
see Qualified specialist workshop
AUTO lights
Display message ............................ 256
see Lights
Automatic car wash (care) ............... 326
Automatic engine start (ECO start/
stop function) .................................... 140
Automatic engine switch-off (ECO
start/stop function) .......................... 139
Automatic headlamp mode .............. 110
Automatic transmission
Accelerator pedal position ............. 146
Changing gear ............................... 146
DIRECT SELECT lever ..................... 143
Display message ............................ 270
Drive program ................................ 146
Drive program display .................... 145
Driving tips .................................... 146
DYNAMIC SELECT controlle r......... 142
Emergency running mode .............. 150
Engaging drive position .................. 145
Engaging neutral ............................ 144 Index
5
Page 22 of 398
Side windows
Cleaning ......................................... 330
Convenience closing feature ............ 90
Convenience opening feature ..........89
Important safety information ........... 88
Opening/closing .............................. 89
Overview .......................................... 88
Problem (malfunction) .....................91
Resetting ........................................ .91
Reversing feature ............................ .89
SIRIUS services
see also Digital Operator's Man-
ual .................................................. 287
Sliding sunroof
Important safety notes .................... 92
Opening/closing .............................. 93
Problem (malfunction) ..................... 95
Resetting ......................................... 93
see Panorama roof with power
tilt/sliding panel
SmartKey
Changing the battery ....................... 80
Changing the programming .............79
Checking the battery ...................... .80
Convenience closing feature ............ 90
Convenience opening feature .......... 89
Display message ............................ 273
Door central locking/unlocking ...... .77
Important safety notes .................... 77
KEYLESS-GO start function .............. 79
Loss .................................................81
Mechanical key ................................ 79
Overview .......................................... 77
Positions (ignition lock) ................. 135
Problem (malfunction) ..................... 81
Starting the engine ........................ 137
Smartphone
Starting the engine ........................ 137
SMS
see also Digital Operator's Man-
ual .................................................. 287
Snow chains
Information .................................... 353
Sockets
Center console .............................. 308
General notes ................................ 308
Luggage compartment ...................3 08
Rear compartment ......................... 308 Sound
Switching on/off ........................... 288
Special seat belt retractor .................. 60
Specialist workshop ............................ 31
Speed, controlling
see Cruise control
Speedometer
Digital ............................................ 233
In the Instrument cluster ................. 37
Segments ...................................... 229
Selecting the display unit .............. .239
Standing lamps
Display message ............................ 256
Switching on/off ........................... 111
Start/Stop button
Starting the engine ........................ 137
Start/stop function
see ECO start/stop function
Starting (engine) ................................ 136
STEER CONTROL .................................. 75
Steering
Display message ............................ 272
Steering wheel
Adjusting (electrically) ................... 104
Adjusting (manually) ...................... 103
Button overview ............................... 38
Buttons (on-board computer) ......... 230
Cleaning ......................................... 332
Important safety notes .................. 103
Steering wheel heating .................. 104
Storing settings (memory func-
tion) ............................................... 108
Steering wheel heating
Problem (malfunction) ................... 104
Switching on/of f........................... 104
Steering wheel paddle shifters ........ 147
Stopwatch (RACETIMER) ................... 242
Stowage areas ................................... 295
Stowage compartments
Armrest (under) ............................. 296
Center console .............................. 297
Center console (rear) ..................... 297
Cup holders ................................... 304
Eyeglasses compartment ............... 297
Glove box ....................................... 296
Important safety information ......... 295
Stowage net ................................... 297 20
Index
Page 25 of 398
Important safety notes .................. 345
Towing
Permitted towing methods ............ 347
Towing a trailer
Axle load, permissible .................... 394
Cleaning the trailer tow hitch .........3 31
Coupling up a trailer ..................... .223
Decoupling a trailer ....................... 225
Driving tips ................................... .221
Important safety notes .................. 220
Installing the ball coupling ............. 222
Lights display message .................. 256
Mounting dimensions .................... 394
Parking Assist PARKTRONIC .......... 188
Power supply ................................. 226
Pulling away with a trailer .............. 138
Removing the ball coupling ............ 225
Trailer loads ................................... 394
Towing away
Important safety guidelines ........... 345
Installing the towing eye ................ 347
Notes for 4MATIC vehicles ............ 348
Removing the towing eye .............. .347
Transporting the vehicle ................ 348
With both axles on the ground ....... 347
Towing eye ......................................... 335
Traffic reports
see also Digital Operator's Man-
ual ................................................. .287
Traffic Sign Assist
Activating/deactivating the warn-ing function ................................... .237
Display message ............................ 264
Function/notes ............................ .205
Important safety notes .................. 205
Instrument cluster display ............. 205
Trailer coupling
see Towing a trailer
Trailer loads and drawbar nose-
weights ............................................... 225
Trailer towing
Active Blind Spot Assist ................. 211
Active Lane Keeping Assist ............ 214
Blind Spot Assist ............................ 207
Permissible trailer loads and
drawbar noseweights ..................... 225
Transfer case ..................................... 150 Transmission
see Automatic transmission
Transmission position display ......... 145
Transporting the vehicle .................. 348
Traveling uphill
Brow of hill ..................................... 169
Driving downhill ............................ .169
Maximum gradient-climbing capa-
bility ............................................... 168
Trim pieces (cleaning instruc-
tions) ................................................. .332
Trip computer (on-board com-
puter) ................................................. .232
Trip odometer
Calling up ....................................... 232
Resetting (on-board computer) ...... 233
Trunk
see Tailgate
Turn signals
Display message ............................ 256
Replacing bulbs (front) ................... 117
Switching on/off ........................... 111
Two-way radio
Frequencies ................................... 381
Installation ..................................... 381
Transmission output (maximum ).... 381
TWR (Tongue Weight Rating) (defi-
nition) ................................................. 371
Type identification plate
see Vehicle identification plate U
Unlocking Emergency unlocking ....................... 84
From inside the vehicle (central
unlocking button) ............................. 83
Upshift indicator (on-board com-
puter, Mercedes-AMG vehicles) ....... 241
USB devices
Connecting to the Media Inter-
face ............................................... 294 V
Vanity mirror (in the sun visor) ........ 306
Vehicle
Correct use ...................................... 31 Index
23
Page 33 of 398
These devices may not cause harmful interfer-
ence, and 2) These devices must accept any
interference received, including interference
that may cause undesired operation. Changes
or modifications not expressly approved by the
party responsible for compliance could void the
user’s authority to operate the equipment."
Canada: "The wireless devices of this vehicle
comply with Industry Canada license-exempt
RSS standard(s). Operation is subject to the fol-
lowing two conditions: (1) These devices may
not cause interference, and (2) These devices
must accept any interference, including inter-
ference that may cause undesired operation of
the device." Diagnostics connection
The diagnostics connection is only intended for
the connection of diagnostic equipment at a
qualified specialist workshop. G
WARNING
If you connect equipment to a diagnostics
connection in the vehicle, it may affect the
operation of vehicle systems. As a result, the operating safety of the vehicle could be affec-
ted. There is a risk of an accident.
Only connect equipment to a diagnostics con-
nection in the vehicle, which is approved for
your vehicle by Mercedes-Benz. G
WARNING
Objects in the driver's footwell can restrict the pedal travel or obstruct a depressed pedal.
The operating and road safety of the vehicle is
jeopardized. There is a risk of an accident.
Make sure that all objects in the vehicle are
stowed correctly, and that they cannot enter
the driver's footwell. Install the floormats
securely and as specified in order to ensure
sufficient clearance for the pedals. Do not use loose floormats and do not place floormats on
top of one another.
! If the engine is switched off and equipment
on the diagnostics connection is used, the
starter battery may discharge.
Connecting equipment to the diagnostics con-
nection can lead to emissions monitoring infor- mation being reset, for example. This may lead
to the vehicle failing to meet the requirements of
the next emissions test during the main inspec-
tion. Qualified specialist workshop
An authorized Mercedes-Benz Center is a quali-
fied specialist workshop. It has the necessary
specialist knowledge, tools and qualifications to correctly carry out the work required on your
vehicle. This is especially the case for work rel-
evant to safety.
Always have the following work carried out at an authorized Mercedes-Benz Center:
R work relevant to safety
R service and maintenance work
R repair work
R alterations, installation work and modifica-
tions
R work on electronic components Correct use
If you remove any warning stickers, you or oth-
ers could fail to recognize certain dangers.
Leave warning stickers in position.
Observe the following information when driving your vehicle:
R the safety notes in this manual
R the vehicle technical data
R traffic rules and regulations
R laws and safety standards pertaining to motor
vehicles Problems with your vehicle
If you should experience a problem with your
vehicle, particularly one that you believe may
affect its safe operation, we urge you to contact
an authorized Mercedes-Benz Center immedi-
ately to have the problem diagnosed and recti-
fied. If the problem is not resolved to your sat-
isfaction, please discuss the problem again with
the Mercedes-Benz Center or, if necessary, con-
tact us at one of the following addresses.
In the USA
Customer Assistance Center
Mercedes-Benz USA, LLC Operating safety
31Introduction Z
Page 35 of 398
and processed only in the vehicle itself. Only a
small part of the data is stored in event or mal-
function memories.
When you use services, the technical data from
the vehicle can be read out by service network
employees (e.g. workshops, manufacturers) or
third parties (e.g. breakdown services). Services
can include repair services, maintenance pro-
cesses, warranty cases and quality assurance
measures. The data are read out via the con-
nection for the diagnostics connection in the
vehicle, which is required by law. The relevant
offices in the service network or third parties
collect, process and use the data. This data
documents the vehicle's technical states, is
used to help in finding malfunctions and improv-
ing quality and is sent to the manufacturer
where necessary. In addition, the manufacturer is subject to product liability. The manufacturerneeds technical data from vehicles for this pur-
pose.
Malfunction memories in the vehicle can be
reset by a service center during repair or service
work.
You can incorporate data into the vehicle's com- fort and infotainment functions yourself as part of the selected equipment.
These include, for example:
R multimedia data such as music, films or pho-
tos for playback in an integrated multimedia
system
R address book data for use in conjunction with
an integrated hands-free system or an inte-
grated navigation system
R navigation destinations that have been
entered
R data about using Internet services
This data can be saved locally in the vehicle or
located on a device that you have connected to
the vehicle (e.g. smartphone, USB memory stick or MP3 player). If this data is saved in the vehi-
cle, you can delete it at any time. This data is
sent to third parties only at your request, par-
ticularly when you use online services in accord- ance with the settings that you have selected.
You can save and change comfort settings/
customizations in the vehicle at any time.
Depending on the equipment in question, these
can include:
R seat and steering wheel position settings
R suspension and climate control settings
R custom settings such as interior lighting If your vehicle is equipped appropriately, you
can connect your smartphone or another mobile
end device to the vehicle. You can control this by
means of the control elements integrated in the vehicle. The smartphone's picture and sound
can be output via the multimedia system. Spe-
cific items of information are also sent to your
smartphone.
Depending on the type of integration, this can
include:
R general vehicle information
R position data
This allows the use of selected smartphone
apps, such as navigation or music player apps.
There is no additional interaction between the
smartphone and the vehicle, particularly active
access to vehicle data. The type of additional
data processing is determined by the provider of the app being used. Whether you can configure
settings for it and, if so, which ones, depends on
the app and your smartphone's operating sys-
tem. Online services
Wireless network connection If your vehicle has a wireless network connec-
tion, data can be exchanged between your vehi-
cle and other systems. The wireless network
connection is made possible by the vehicle's
own transmitter and receiver or by mobile devi- ces that you have brought into the vehicle (e.g.
smartphones). Online functions can be used via this wireless network connection. These include
online services and applications/apps provided by the manufacturer or other providers.
Services provided by the manufacturer In the case of the manufacturer's online serv-
ices, the manufacturer describes the functions
in a suitable place (e.g. operating instructions,
manufacturer's website) and provides the asso-
ciated information subject to data protection
legislation. Personal data can be used in order to provide online services. The exchange of data
for this purpose takes place via a secure con-
nection, e.g. with the manufacturer's IT systems
intended for the purpose. Collecting, processing
and using personal data beyond the provision of
services is permitted only on the basis of a stat-
utory permit or declaration of consent. Data stored in the vehicle
33Introduction Z
Page 91 of 398
G
WARNING
If children operate the side windows they
could become trapped, particularly if they are left unsupervised. There is a risk of injury.
Activate the override feature for the rear side
windows. When leaving the vehicle, always
take the SmartKey with you and lock the vehi-
cle. Never leave children unsupervised in the
vehicle. Side window reversing feature
The side windows are equipped with an auto-
matic reversing feature. If a solid object blocks
or restricts a side window during the closing
process, the side window opens again automat-
ically. However, the automatic reversing feature is only an aid and does not relieve you of the
responsibility of paying attention when closing a side window. G
WARNING
The reversing feature does not react:
R to soft, light and thin objects, e.g. small fin-
gers
R over the last 1/6 in(4 mm) of the closing
movement
R during resetting
R when closing the side window again man-
ually immediately after automatic reversing
This means that the reversing feature cannot
prevent someone being trapped in these sit-
uations. There is a risk of injury.
Make sure that no body parts are in close
proximity during the closing procedure. If
someone becomes trapped, press the switch to open the side window again. Opening and closing the side win-
dows
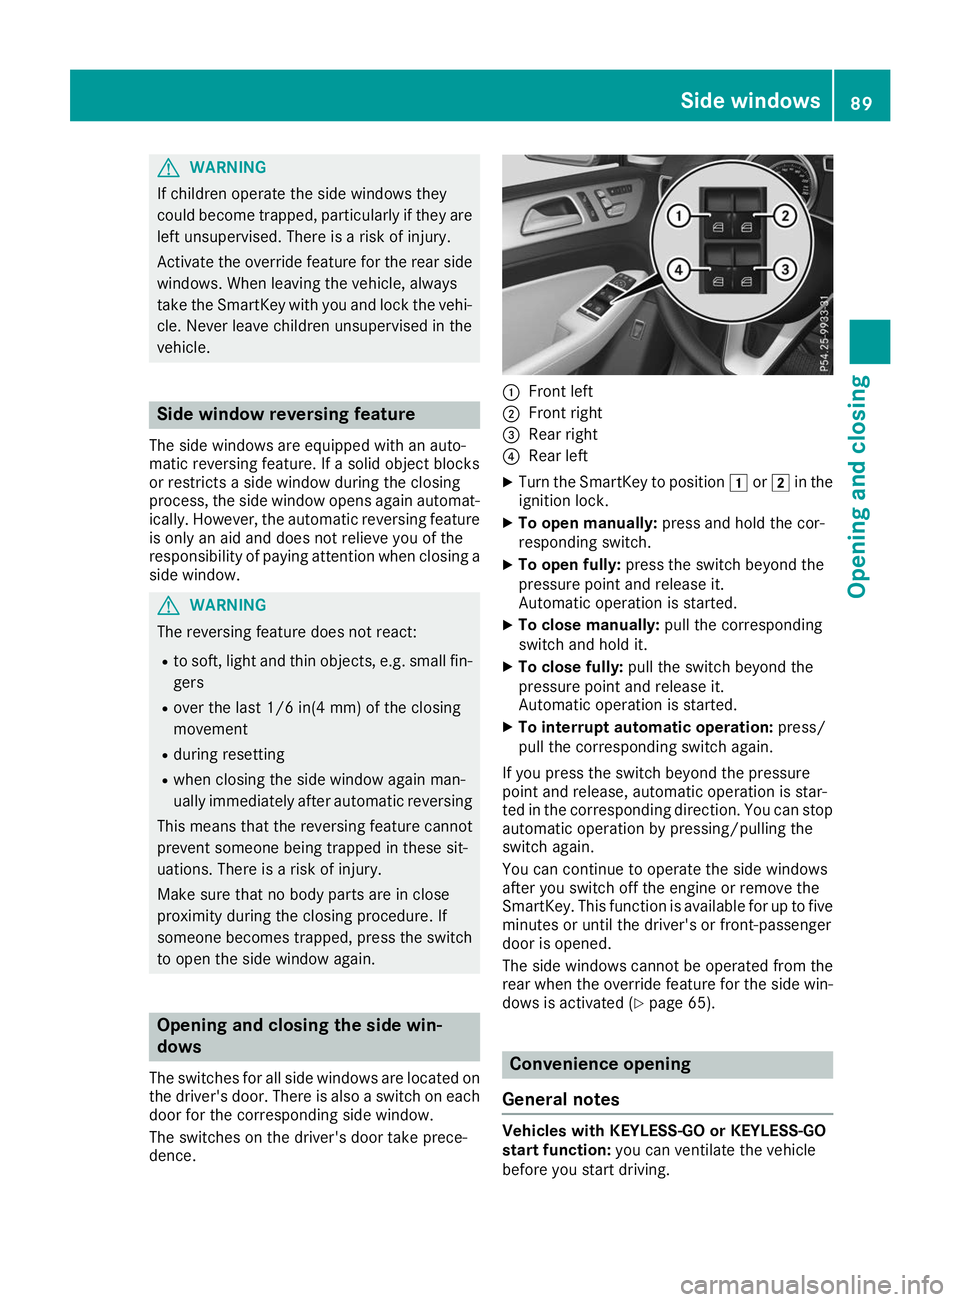
The switches for all side windows are located on
the driver's door. There is also a switch on each door for the corresponding side window.
The switches on the driver's door take prece-
dence. 0043
Front left
0044 Front right
0087 Rear right
0085 Rear left
X Turn the SmartKey to position 0047or0048 in the
ignition lock.
X To open manually: press and hold the cor-
responding switch.
X To open fully: press the switch beyond the
pressure point and release it.
Automatic operation is started.
X To close manually: pull the corresponding
switch and hold it.
X To close fully: pull the switch beyond the
pressure point and release it.
Automatic operation is started.
X To interrupt automatic operation: press/
pull the corresponding switch again.
If you press the switch beyond the pressure
point and release, automatic operation is star-
ted in the corresponding direction. You can stop automatic operation by pressing/pulling the
switch again.
You can continue to operate the side windows
after you switch off the engine or remove the
SmartKey. This function is available for up to five
minutes or until the driver's or front-passenger
door is opened.
The side windows cannot be operated from the
rear when the override feature for the side win- dows is activated (Y page 65). Convenience opening
General notes Vehicles with KEYLESS-GO or KEYLESS-GO
start function:
you can ventilate the vehicle
before you start driving. Side windows
89Opening and closing Z
Page 93 of 398
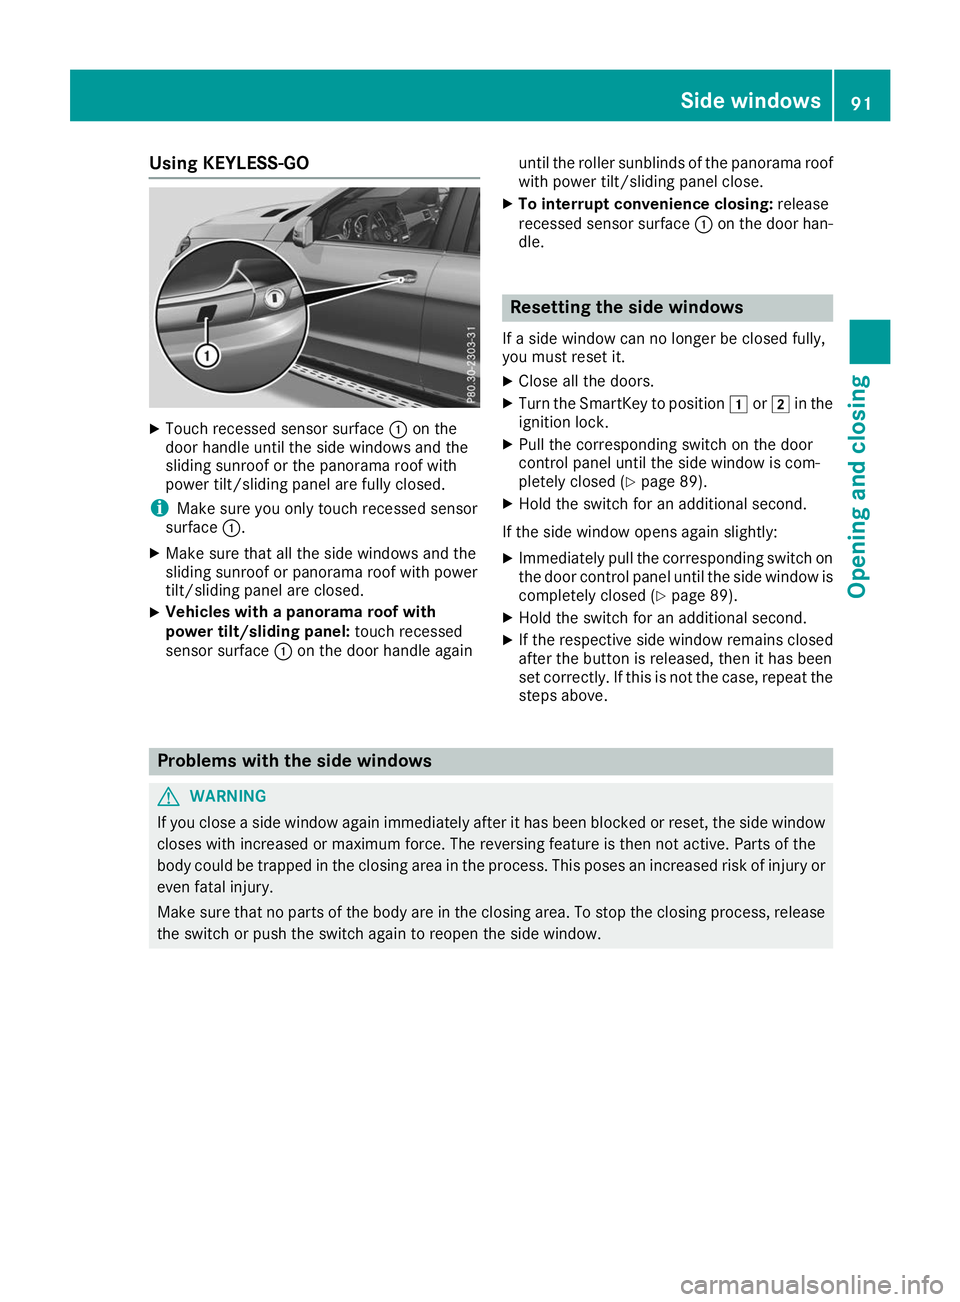
Using KEYLESS-GO
X
Touch recessed sensor surface 0043on the
door handle until the side windows and the
sliding sunroof or the panorama roof with
power tilt/sliding panel are fully closed.
i Make sure you only touch recessed sensor
surface 0043.
X Make sure that all the side windows and the
sliding sunroof or panorama roof with power
tilt/sliding panel are closed.
X Vehicles with a panorama roof with
power tilt/sliding panel:
touch recessed
sensor surface 0043on the door handle again until the roller sunblinds of the panorama roof
with power tilt/sliding panel close.
X To interrupt convenience closing: release
recessed sensor surface 0043on the door han-
dle. Resetting the side windows
If a side window can no longer be closed fully,
you must reset it.
X Close all the doors.
X Turn the SmartKey to position 0047or0048 in the
ignition lock.
X Pull the corresponding switch on the door
control panel until the side window is com-
pletely closed (Y page 89).
X Hold the switch for an additional second.
If the side window opens again slightly: X Immediately pull the corresponding switch on
the door control panel until the side window is completely closed (Y page 89).
X Hold the switch for an additional second.
X If the respective side window remains closed
after the button is released, then it has been
set correctly. If this is not the case, repeat the
steps above. Problems with the side windows
G
WARNING
If you close a side window again immediately after it has been blocked or reset, the side window
closes with increased or maximum force. The reversing feature is then not active. Parts of the
body could be trapped in the closing area in the process. This poses an increased risk of injury or even fatal injury.
Make sure that no parts of the body are in the closing area. To stop the closing process, releasethe switch or push the switch again to reopen the side window. Side windows
91Opening and closing Z
Page 95 of 398
tion of the sliding sunroof or open a side win-
dow. The noise will be reduced or eliminated. Sliding sunroof reversing feature
Your vehicle may be equipped with a sliding
sunroof or a panorama roof with power tilt/slid- ing panel. In the following section, the term
"sliding sunroof" refers to both sliding sunroof
variants.
The sliding sunroof is equipped with an auto-
matic reversing feature. If a solid object blocks
or restricts the sliding sunroof during the closing process, the sliding sunroof opens again auto-
matically. However, the automatic reversing
feature is only an aid and does not relieve you of the responsibility of paying attention when clos-
ing the sliding sunroof. G
WARNING
The reversing feature does not react:
R to soft, light and thin objects, e.g. small fin-
gers
R over the last 1/6 in (4 mm) of the closing
movement
R during resetting
R when closing the sliding sunroof again man-
ually immediately after automatic reversing
This means that the reversing feature cannot
prevent someone being trapped in these sit-
uations. There is a risk of injury.
Make sure that no body parts are in close
proximity during the closing procedure.
If somebody becomes trapped:
R release the switch immediately, or
R press the switch in any direction during the
automatic closing process
The closing process is stopped. Operating the sliding sunroof
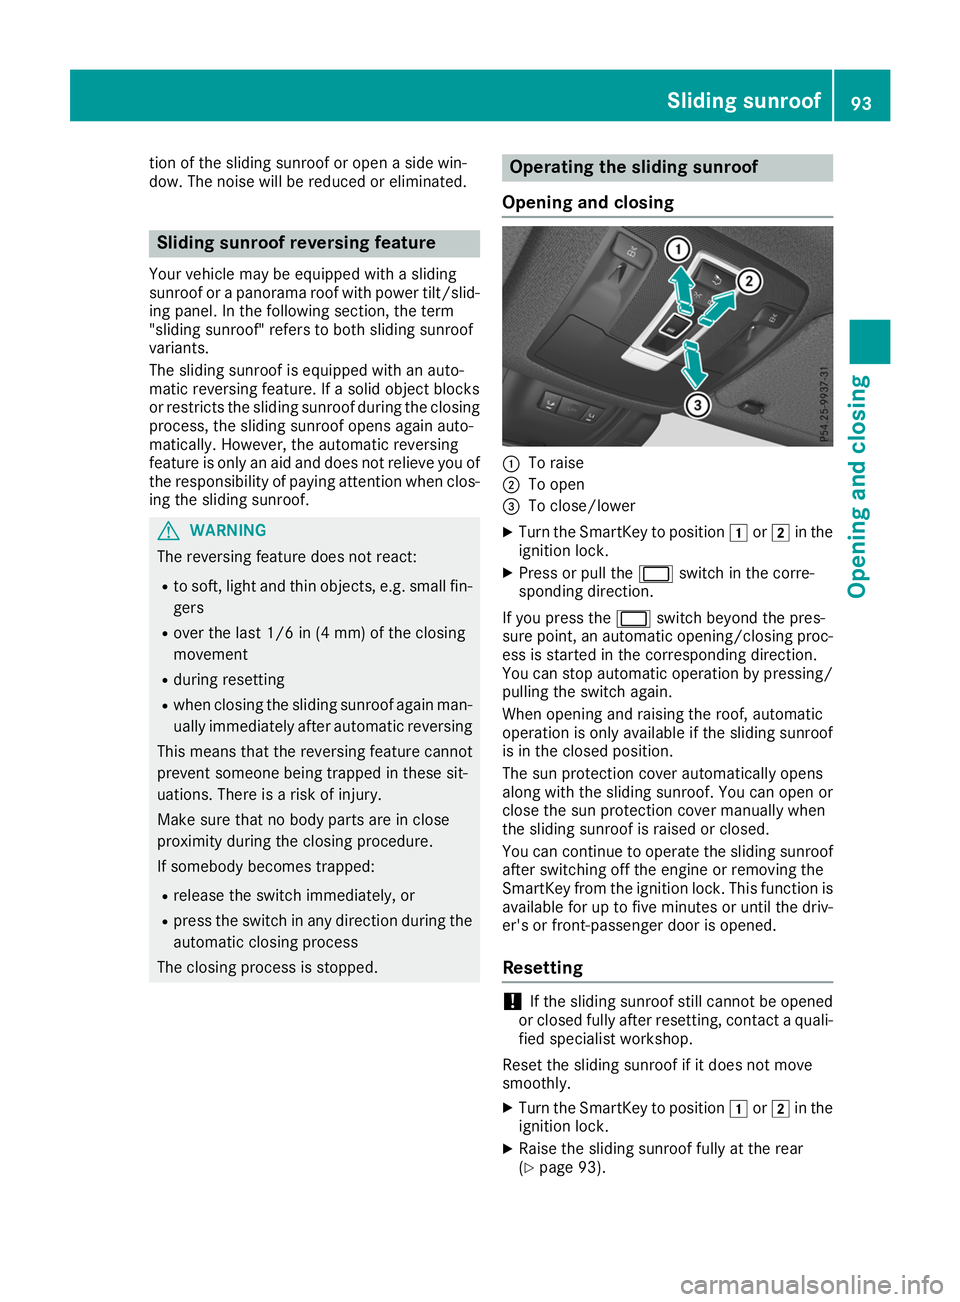
Opening and closing 0043
To raise
0044 To open
0087 To close/lower
X Turn the SmartKey to position 0047or0048 in the
ignition lock.
X Press or pull the 0056switch in the corre-
sponding direction.
If you press the 0056switch beyond the pres-
sure point, an automatic opening/closing proc- ess is started in the corresponding direction.
You can stop automatic operation by pressing/
pulling the switch again.
When opening and raising the roof, automatic
operation is only available if the sliding sunroof
is in the closed position.
The sun protection cover automatically opens
along with the sliding sunroof. You can open or
close the sun protection cover manually when
the sliding sunroof is raised or closed.
You can continue to operate the sliding sunroof
after switching off the engine or removing the
SmartKey from the ignition lock. This function is available for up to five minutes or until the driv-
er's or front-passenger door is opened.
Resetting !
If the sliding sunroof still cannot be opened
or closed fully after resetting, contact a quali- fied specialist workshop.
Reset the sliding sunroof if it does not move
smoothly.
X Turn the SmartKey to position 0047or0048 in the
ignition lock.
X Raise the sliding sunroof fully at the rear
(Y page 93). Sliding sunroof
93Opening and closing Z