2019 MERCEDES-BENZ GLE COUPE light
[x] Cancel search: lightPage 176 of 697
#
Press button 1.
The red or blue indicator lamp on button 1
will light up or go out.
Indicator lamp colours: R blue: stationary ventilation is switched on
R red: stationary heater is swit ched on
R Yello w: departure time preselected
The stationary heater/ stationary ventilation will
switch off au tomatically af ter 50 minutes.
Setting thest ationary heater / stationary
ve ntilation via the multimedia sy stem #
Call up the air conditioning menu
(/ page 167). #
Select Auxiliary heating.
Selecting the departu retime #
Select the time TIME A: XX, TIME B: XXor
TIME C: XX.
Setting the departu retime #
Select the time TIME A: XX, TIME B: XXor
TIME C: XX. #
Select the pen beside the time. #
Set a time.
Setting thest ationary heater/stationary ven‐
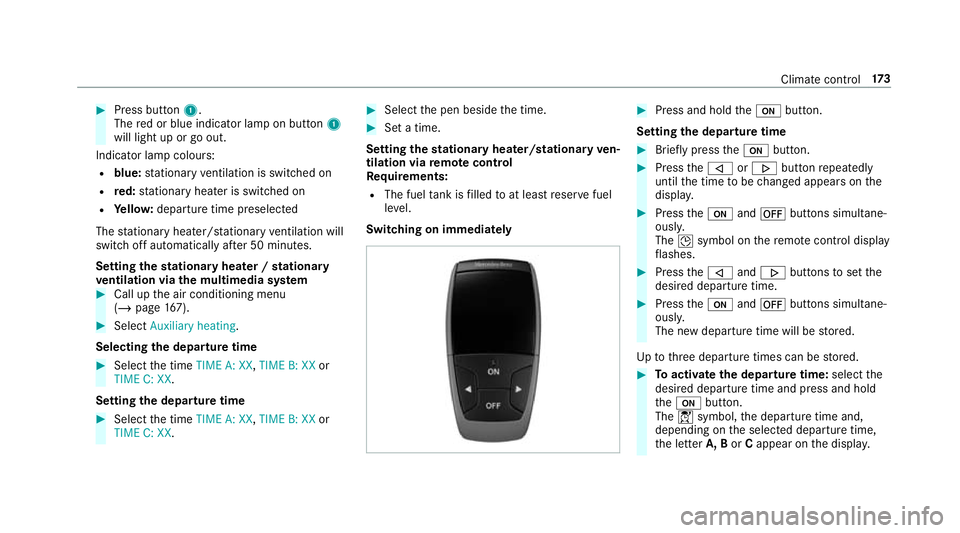
tilation via remo tecont rol
Re quirements:
R The fuel tank is filled toat least reser vefuel
le ve l.
Switching on immedia tely #
Press and hold theu button.
Setting the departu retime #
Brie fly press theu button. #
Press the, or. button repeatedly
until the time tobe changed appears on the
displa y. #
Press theu and^ buttons simultane‐
ousl y.
The Îsymbol on there mo tecontrol displ ay
fl ashes. #
Press the, and. buttons toset the
desired departure time. #
Press theu and^ buttons simultane‐
ousl y.
The new departure time will be stored.
Up tothre e departure times can be stored. #
Toactivate the departu retime: select the
desired departure time and press and hold
th eu button.
The Ísymbol, the departure time and,
depending on the selected departure time,
th e letter A, BorCappear on the displa y. Climate cont
rol17 3
Page 183 of 697
The po
wer supp lyis switched off again if thefo l‐
lowing conditions are me t:
R you open the driver's door.
R you press but ton1 twice more. #
Toswitch on the ignition: press button 1
twice.
The indicator lamps in the instrument clus ter
light up.
The ignition is switched off again if one of the
fo llowing conditions is me t:
R you do not start theve hicle within
15 minutes.
R the transmission is in position jorthe
electric parking brake has been applied.
R you press but ton1 once. St
arting theve hicle St
arting theve hicle with thest art/s top but‐
ton &
DANG ER Risk death caused by exhaust
ga ses
Combustion engines emit poisonous exhaust
ga ses such as carbon monoxide. Inhaling
th ese exhaust gases is hazardous tohealth
and leads topoisoning. #
Never lea vethe engine or, if present,
th e auxiliary heating running in an
enclosed space wi thout suf ficient venti‐
lation. &
WARNING Risk offire caused byflam‐
mable material on theex haust sy stem
Flammable materials brought in byeither ani‐
mals or environmen tal influences may ignite
if th ey come into contact wi thhot parts of
th e engine or exhaust sy stem. #
Therefore, check regularly that there
are no flammable materials in the engine compartment or on
theex haust
sy stem. Re
quirements:
R theke y is located in theve hicle and thekey
battery is not dischar ged.
R or: a Digital Vehicle Key is located in the
mar ked space (/ page181). #
Shift the transmission toposition jori. #
Depress the brake pedal and press button
1 once. #
Ifth eve hicle does not star t:switch off non-
essential consumers and press button 1
once.
If th eve hicle still does not start, one of thefo l‐
lowing display messages appears in the multi‐
function display: #
Place the key in the marked space See Own-
er's Manual :st art theve hicle in emer gency
operation mode (/ page 182).
or 18 0
Driving and pa rking
Page 186 of 697
If
yo ustart theve hicle via your smartphone, the
pr ev iously selec ted air conditioning adjustment
is active.
Ensure thefo llowing before starting the engine:
R the legal stipulations in the area where your
ve hicle is par ked allow engine starting via
smartphone.
R it is safe tostart and runth e engine where
yo ur vehicle is par ked.
R the fuel tank is su fficiently filled.
R thest ar ter battery is suf ficiently charge d.
% You can also set thete mp erature with your
smartphone. In form ation on Mercedes me
connect and other services: http://
www.mercedes.me
This function is not available for all models.
Charging the bat tery before commencing
yo ur journey
If th eve hicle battery is dischar ged, youre cei ve a
messa geon your smartphone. You can then
st art theve hicle with the smartphone tocharge
th e batter y.The vehicle is automatically
switched off af terte n minu tes. Ensure
thefo llowing before starting the engine:
R the legal stipulations in the area where your
ve hicle is par ked allow engine starting via
smartphone.
R it is safe tostart and runth e engine where
yo ur vehicle is par ked.
R the fuel tank is su fficiently filled.
St arting theve hicle (Remo teOnline) &
WARNING Risk of crushing or entrap‐
ment due tounin tentional starting of the
engine
Limbs could be crushed or trapped if the
engine is star ted unintentionally during
service or maintenance work. #
Alw ays secure the engine against unin‐
te ntional starting before car rying out
maintenance or repair work. Re
quirements:
R park position jis selected.
R the anti- theft alarm sy stem is not activated. R
the panic alarm is not activated.
R the hazard warning lights are switched off.
R the bonn etis closed.
R the doors are closed and loc ked.
R the windo wsand sliding sun roof are closed. #
Start theve hicle using the smartphone.
Af tereve ryvehicle start, the engine runs for
te n minu tes.
Yo u can car ryout a maximum of two consecu‐
tive starting attem pts. The vehicle must be star‐
te d once with theke y before trying tostart the
ve hicle again with the smartphone. you can stop
th eve hicle again at any time.
% Further information can be found in the
smartphone app.
Securing the engine against starting before
car rying out maintenance or repair work: #
switch on the hazard warning lights.
or #
unlock the doors.
or Driving and parking
18 3
Page 189 of 697
#
Never use the brake pedal as a foot re st. #
Do not depress the brake pedal and the
accelerator pedal at the same time
while driving. *
NO
TECausing wearto the brake linings
by permanently depressing the brake
pedal #
Do not permanently depress the brake
pedal while driving. #
Touse braking ef fect of the engine,
shift toa lo werge ar in good time. *
NO
TEDama getothe driv etra in and
engine when pulling away #
Do not warm upthe engine while the
ve hicle is stationar y.Pull away immedi‐
atel y. #
Avoid high engine speeds and driving at
full thro ttle until the engine has reached
its operating temp erature. *
NO
TEDama getothe catalytic con verter
due tonon-combu sted fuel The engine is not
running smo othly and is
misfiring.
Non-combus ted fuel may get into the cata‐
lytic con verter. #
Only depress the accelera tor pedal
slightl y. #
Have the cause rectified immediately at
a qu alified specialist workshop. Limited braking ef
fect on salt-trea tedro ads:
R due tosalt build-up on the brake disks and
brakepads, the braking dis tance can increase
conside rably or result in braking only on one
side
R maintain a much greater safe dis tance tothe
ve hicle in front
To preve nt salt build-up:
R brake occasionally while paying attention to
th e tra ffic conditions R
carefully depress the brake pedal at the end
of the journey and when starting the next
journey Note
s on off-road driving &
WARNING Risk of accident if you do not
ke ep toline of fall on inclines
If yo u drive at an angle or turn on an incline,
th eve hicle could slip side ways, tip and roll‐
ove r. #
Alw ays drive on inclines in the line of
fa ll (straight up or down) and do not
turn. &
WARNING Risk offire due toflammable
materials on hot parts of theex haust
sy stem
Flammable material such as lea ves, grass or
twigs may ignite if they come into contact
wi th hot parts of theex haust sy stem. 18 6
Driving and pa rking
Page 195 of 697
#
Press button 1.
A display appears in the instrument clus ter
when swit ching the ECO start/ stop function
off/on.
% A continuous display appears in the instru‐
ment clus ter while the ECO start/ stop func‐
tion is deactivated. ECO display function
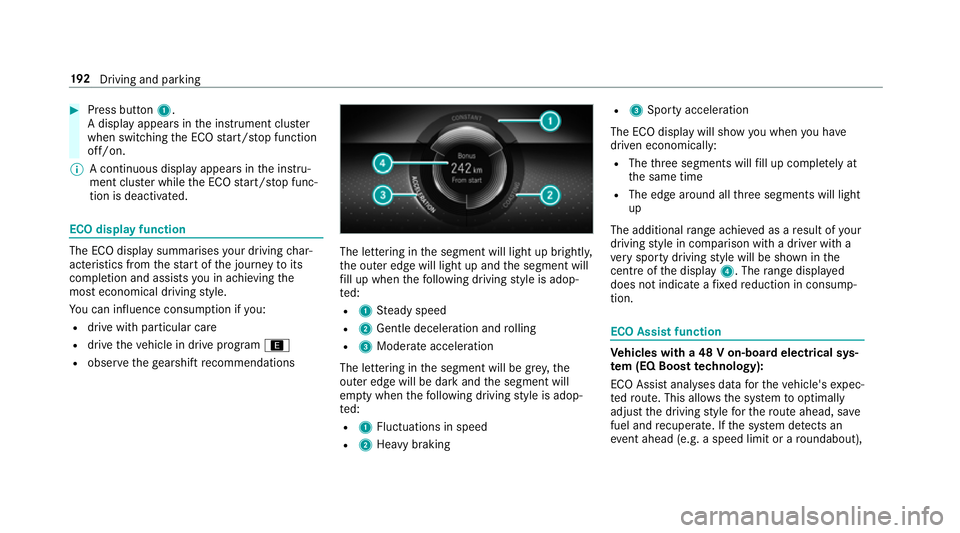
The ECO display summarises
your driving char‐
acteristics from thest art of the journey toits
completion and assists you in achieving the
most economical driving style.
Yo u can influence consum ption if you:
R drive with particular care
R drive theve hicle in drive program ;
R obser vethege arshift recommendations The lettering in
the segment will light up brightl y,
th e outer edge will light up and the segment will
fi ll up when thefo llowing driving style is adop‐
te d:
R 1 Steady speed
R 2 Gentle deceleration and rolling
R 3 Moderate acceleration
The lettering in the segment will be gr ey,the
outer edge will be dark and the segment will
em pty when thefo llowing driving style is adop‐
te d:
R 1 Fluctuations in speed
R 2 Heavy braking R
3 Sporty acceleration
The ECO display will show you when you ha ve
driven economically:
R The thre e segments will fill up comple tely at
th e same time
R The edge around all thre e segments will light
up
The additional range achi eved as a result of your
driving style in comparison with a driver with a
ve ry sporty driving style will be shown in the
centre of the display 4. Therange displ ayed
does not indicate a fixe dre duction in consump‐
tion. ECO Assist function
Ve
hicles with a 48 V on-board electrical sys‐
te m (EQ Boo sttech nology):
ECO Assist analyses data forth eve hicle's expec‐
te dro ute. This allo wsthe sy stem tooptimally
adjust the driving style fo rth ero ute ahead, sa ve
fuel and recuperate. If the sy stem de tects an
eve nt ahead (e.g. a speed limit or a roundabout), 19 2
Driving and pa rking
Page 197 of 697
If
th e sy stem does not inter vene du ring the
eve nt ahead, no thing will be displa yed. The sys‐
te m is passive.
ECO Assist is active only in drive programs ;
and A.
Sy stem limits
ECO Assist can function even more precisely if
th ero ute is adhered towhen route guidance is
active. The basic function is also available with‐
out active route guidance. Notall information
and traf fic situations can be fore seen. The qual‐
ity depends on the map data.
ECO Assist is only an aid. The driver is responsi‐
ble forke eping a safe dis tance from theve hicle
in front, forve hicle speed and for braking in
good time. The driver must be ready tobrake at
all times ir respective of whe ther the sy stem
inter venes.
The sy stem may be impaired or may not function
in thefo llowing situations:
R If visibility is poor (e.g. due toinsuf ficient illu‐
mination of thero ad, high lyvariable shade
conditions, rain, sno w,fog or heavy spr ay). R
Ifth ere is glare (e.g. from oncoming traf fic,
di re ct sunlight or reflections).
R Ifth ere is dirt on the windscreen in the vicin‐
ity of the multifunction camera or the camera
is mis ted up, damaged or obscured.
R If tra ffic signs are hard todiscern (e.g. due to
dirt, snow or insuf ficient lighting, or because
th ey are obscured).
R Ifth e information on the navigation sy stem's
digital map is incor rect or out of da te.
R Ifth e signs are ambiguous (e.g. traf fic signs
in roadwor ksor in adjacent lanes). DY
NA MIC SELECT switch Fu
nction of theDY NA MIC SELECT switch Depending on
the engine and equipment, the
ve hicle has dif fere nt drive programs.
Use theDY NA MIC SELECT switch tochange
between thefo llowing drive programs:
= (Individual) : individual settings
B (Sport +): particularly sporty driving style C
(Sport): sporty driving style
A (Comfort): comfortable and economical
driving style
; (Eco):particularly economical driving
st yle
N (CURVE): comfortable driving with cur ve
inclination function (vehicles with
E‑ AC TIVE BODY CONTROL)
F Offroad: driving on less demanding off-
ro ad terrain
% The drive prog ram selected appears in the
multifunction display of the on-board com‐
puter.
Depending on the drive prog ram, thefo llowing
sy stems change their characteristics:
R drive
-
engine and transmission management
- Active Dis tance Assi stDISTRONIC
R ESP ®
R vehicles with AIRMATIC or E‑ACTIVE
BO DY CONT ROL: 194
Driving and pa rking
Page 204 of 697
The automatic transmission shifts up
tothe next
ge ar when the maximum engine speed is
re ached toprotect the engine from overrev ving. Glide mode function
Mercedes-AMG
vehicles: observeth e no tes in
th e Supplement. Otherwise, you may failto rec‐
ognise dangers.
Wi th an anticipatory driving style, Glide mode
helps youto reduce fuel consum ption.
Glide mode is characterised bythefo llowing:
R the combustion engine is disconnected from
th e driv etra in and continues torun in neutral.
R the transmission position his displa yed in
green in the multifunction displa y.
R Vehicles with 48 V on-board electrical
sy stem (EQ Boost tech nology): the com‐
bustion engine is switched off. All of theve hi‐
cle functions remain active.
Glide mode is activated if thefo llowing condi‐
tions are me t:
R drive program ;is selected. R
the speed is within a suitable range.
R thero ad's course is suitable, e.g. no steep
uphill or downhill inclines or tight bends.
R there is no trailer coupled tothe trailer hitch,
and no bicycle rack fitted.
R you do not depress the accelerator or brake
pedal (e xcept for light brake applications).
% Glide mode can also be activated if you ha ve
selected the "Eco" setting forth e drive in the
drive prog ram =.
Glide mode is deactivated again if one of the
conditions is no longer met.
Glide mode can also be pr evented bythefo llow‐
ing parame ters:
R incline
R downhill gradient
R temp erature
R height
R speed
R operating status of the engine
R traffic situation Fu
nction of the 4MATIC
4MATIC ensures that all four wheels are driven
when needed. Toget her with ESP ®
and 4ETS,
4MATIC impr ovesth e traction of your vehicle
whene ver a driven wheel spins due toinsuf fi‐
cient traction.
If yo ufa ilto adapt your driving style, 4MATIC can
neither reduce therisk of an accident nor over‐
ri de the la wsof ph ysics. 4MATIC cannot take
account of road, weather and traf fic conditions.
4MATIC is only an aid. You are responsible espe‐
cially for maintaining a safe dis tance from the
ve hicle in front, forve hicle speed, for braking in
good time and forst ay ing in lane.
% In wint ryroad conditions, the maximum
ef fect of 4MATIC can be achie ved only if you
use winter tyres (M+S tyres), with sn ow
ch ains if necessar y. Driving and pa
rking 201
Page 211 of 697
Pa
rking Pa
rking theve hicle &
WARNING Risk of accident and inju ry
caused byan insuf ficiently secu redve hi‐
cle rolling away.
If th eve hicle is not securely par ked suf fi‐
ciently, it can rollaw ay in an uncont rolled
wa yev en at a slight downhill gradient. #
Ensure that the par kedve hicle is alw ays
properly secured against rolling away as
fo llo ws:
R on uphill or downhill gradients, turn
the front wheels so that theve hicle
ro lls towa rdsth eke rb if it starts
moving.
R apply the parking brake.
R switch the transmission toposition
j. &
WARNING Risk offire caused byhot
ex haust sy stem parts
Flammable material such as lea ves, grass or
twigs may ignite if they come into contact
wi th hot parts of theex haust sy stem or
ex haust gasflow. #
Park theve hicle so that no flammable
material can come into con tact wi thhot
ve hicle components. #
In particular, do not park on dry grass‐
land or har vested grain fields. &
WARNING Risk of accident and inju ry
due tochildren left unat tended in the
ve hicle
If ch ildren are left unat tended in theve hicle,
th ey could:
R Open doo rs,th ereby endangering other
persons or road users.
R Get out and be stru ck byoncoming traf‐
fi c. R
Ope rate ve hicle equipment and become
trapped, forex ample.
In addition, thech ildren could also set the
ve hicle in motion, forex ample by:
R Releasing the parking brake.
R Changing the transmission position.
R Starting theve hicle. #
Never lea vechildren unat tended in the
ve hicle. #
When leaving theve hicle, alw aysta ke
th eke y with you and lock theve hicle. #
Keep theve hicle key out of reach of
ch ildren. This also applies
tothe Digital Vehicle Key if the
"Digital Vehicle Key" function is activated via
Mercedes me connect.
* NO
TEDama getotheve hicle due toit
ro lling away #
Alw ays secure theve hicle against roll‐
ing away. 208
Driving and parking