2019 MERCEDES-BENZ GLE COUPE change wheel
[x] Cancel search: change wheelPage 284 of 697
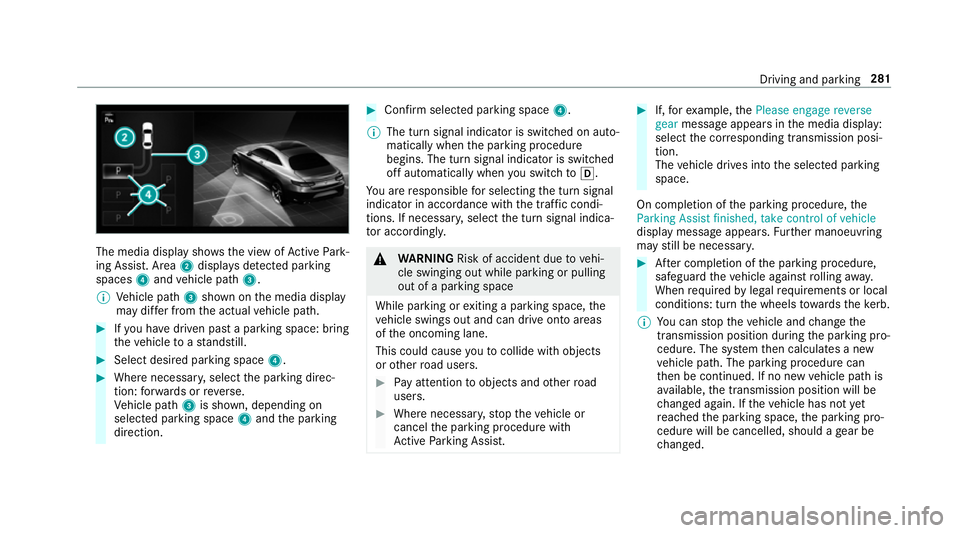
The media display sho
ws the view of Active Park‐
ing Assist. Area 2displa ysdetected pa rking
spaces 4and vehicle path 3.
% Vehicle path 3shown on the media display
may dif fer from the actual vehicle path. #
Ifyo u ha vedriven past a parking space: bring
th eve hicle toast andstill. #
Select desired parking space 4.#
Where necessar y,select the parking direc‐
tion: forw ards or reve rse.
Ve hicle path 3is shown, depending on
selected parking space 4and the parking
direction. #
Confirm selected parking space 4.
% The turn signal indicator is switched on auto‐
matically when the parking procedure
begins. The turn signal indicator is switched
off automatically when you swit chtoh .
Yo u are responsible for selecting the turn signal
indicator in accordance with the traf fic condi‐
tions. If necessar y,select the turn signal indica‐
to r according ly. &
WARNING Risk of accident due tovehi‐
cle swinging out while parking or pulling
out of a parking space
While parking or exiting a parking space, the
ve hicle swings out and can drive onto areas
of the oncoming lane.
This could cause youto collide wi thobjects
or other road users. #
Pay attention toobjects and other road
users. #
Where necessar y,stop theve hicle or
cancel the parking procedure with
Ac tive Parking Assist. #
If,forex ample, thePlease engage reverse
gear message appears in the media display:
select the cor responding transmission posi‐
tion.
The vehicle drives into the selected parking
space.
On completion of the parking procedure, the
Parking Assist finished, take control of vehicle
display message appears. Further manoeuvring
may still be necessar y. #
After completion of the parking procedure,
safeguard theve hicle against rolling away.
When requ ired bylegal requirements or local
conditions: turn the wheels towa rdsth eke rb.
% You can stop theve hicle and change the
transmission position du ring the parking pro‐
cedure. The sy stem then calculates a new
ve hicle path. The parking procedure can
th en be continued. If no new vehicle path is
av ailable, the transmission position will be
ch anged again. If theve hicle has not yet
re ached the parking space, the parking pro‐
cedure will be cancelled, should a gear be
ch anged. Driving and parking
281
Page 323 of 697
R
Ifyo u use thevo ice control sy stem in an
emer gency your voice can change and your
te lephone call, e.g. an emer gency call, can
th ereby be unnecessarily dela yed.
R Familiarise yourself with thevo ice control
sy stem functions before starting the journe y.
R Comply with the loading guidelines
(/ page 122). Operation
Overview of operating
the multifunction
st eering wheel LINGU
ATRO NIC is operational appr oximately
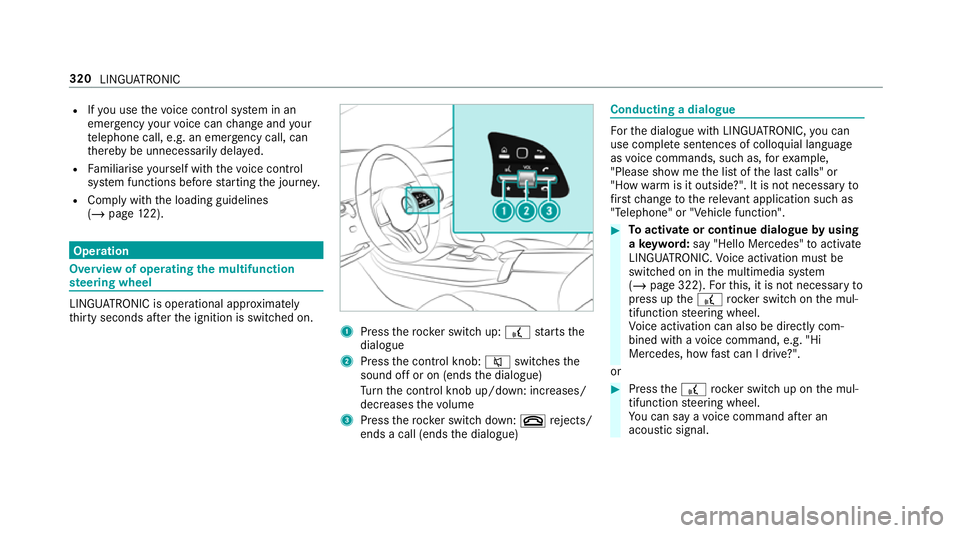
th irty seconds af terth e ignition is switched on. 1
Press therock er switch up: £starts the
dialogue
2 Press the control knob: 8switches the
sound off or on (ends the dialogue)
Tu rn the control knob up/down: increases/
decreases thevo lume
3 Press therock er switch down: ~rejects/
ends a call (ends the dialogue) Conducting a dialogue
Fo
rth e dialogue with LINGU ATRO NIC, you can
use co mplete sentences of colloquial language
as voice commands, such as, forex ample,
"Please show me the list of the last calls" or
"How warm is it outside?". It is not necessary to
fi rs tch ange tothere leva nt application su chas
"Telephone" or "Vehicle function". #
Toactivate or continue dialogue byusing
a ke yword: say "Hello Mercedes" toactivate
LINGU ATRO NIC. Voice activation must be
switched on in the multimedia sy stem
(/ page 322). Forth is, it is not necessary to
press up the£ rock er switch on the mul‐
tifunction steering wheel.
Vo ice activation can also be directly com‐
bined with a voice command, e.g. "Hi
Mercedes, how fastcan I drive?".
or #
Press the£ rocker switch up on the mul‐
tifunction steering wheel.
Yo u can say a voice command af ter an
acou stic signal. 320
LINGU ATRO NIC
Page 324 of 697
#
Tocor rect an ent ry:say theCorrection
vo ice command. #
Toselect an entry from the selection lis t:
say the line number or the conte nts. #
Tobrows eth e selection lis t:say theNext
or Back voice command. #
Tointer rupt the dialogue: saythePause
vo ice command.
The dialogue can be continued with the
"Hello Mercedes" voice command or by
pressing up the£ rock er switch on the
multifunction steering wheel. #
Tojump tothe preceding dialogue: saythe
Back voice command. #
Tojump back totheto p dialogue le vel:
say theHome voice command. #
Tocancel the dialogue: saytheClose voice
command or press the8 or~ button
on the multifunction steering wheel. #
Tointer rupt avo ice output: speak inthe
middle of a voice dialogue when the sy stem
is still answering.
The voice output is shor tened and the con‐
clusion is reached more quickl y.
% The Voice barge-in option must be switched
on in the multimedia sy stem forth is
(/ page 322). Overview of operable functions in LINGUA‐
TRONIC
Yo
u can use the LINGU ATRO NIC voice control
sy stem tooperate thefo llowing functions
depending on theve hicle equipment:
R Telephone
R Text messa geand e-mail
R Navigation
R Address book
R Radio
R Media
R Vehicle functions
R Weather Fu
ll functionality is only available foryo u with
activation of online voice control (/ page 322). Note
s onthe language setting Yo
u can change the language of LINGU ATRO NIC
via the sy stem language settings. If the set sys‐
te m language is not suppor tedby LINGUA‐
TRONIC, English will be selected.
LINGU ATRO NIC is available in thefo llowing lan‐
guages:
R German
R English
R French
R Italian
R Dutch
R Polish
R Portuguese
R Russian
R Swedish
R Spanish
R Czech LINGU
ATRO NIC 321
Page 409 of 697
Using
quick- access for a destination in form a‐
tion, alternative route and POIs
Re quirements:
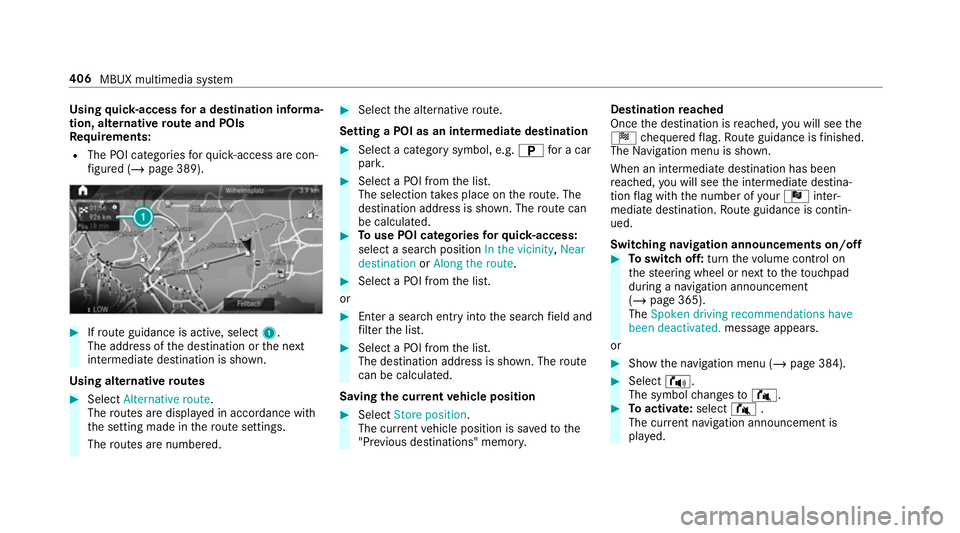
R The POI categories forqu ick- access are con‐
fi gured (/ page 389). #
Ifro ute guidance is active, select 1.
The address of the destination or the next
intermediate destination is shown.
Using alternative routes #
Select Alternative route .
The routes are displ ayed in accordance with
th e setting made in thero ute settings.
The routes are numbered. #
Select the alternative route.
Setting a POI as an intermediate destination #
Select a category symbol, e.g. Bfor a car
par k. #
Select a POI from the list.
The selection take s place on thero ute. The
destination address is shown. The route can
be calculated. #
Touse POI catego ries forqu ick- access:
select a sea rch position In the vicinity, Near
destination orAlong the route. #
Select a POI from the list.
or #
Ente r a sear chentry intothe sear chfield and
fi lter the list. #
Select a POI from the list.
The destination address is shown. The route
can be calculated.
Saving the cur rent vehicle position #
Select Store position .
The cur rent vehicle position is sa vedto the
"Pr evious destinations" memo ry.Destination
reached
Once the destination is reached, you will see the
Í chequered flag. Route guidance is finished.
The Navigation menu is shown.
When an intermediate destination has been
re ached, you will see the intermediate destina‐
tion flag with the number of your Î inter‐
mediate destination. Route guidance is contin‐
ued.
Swit ching navigation announcements on/off #
Toswitch off: turnthevo lume control on
th esteering wheel or next totheto uchpad
during a navigation announcement
(/ page 365).
The Spoken driving recommendations have
been deactivated. message appears.
or #
Show the navigation menu (/ page 384). #
Select !.
The symbol changes to# . #
Toactivate: select#.
The cur rent navigation announcement is
pl ay ed. 406
MBUX multimedia sy stem
Page 410 of 697
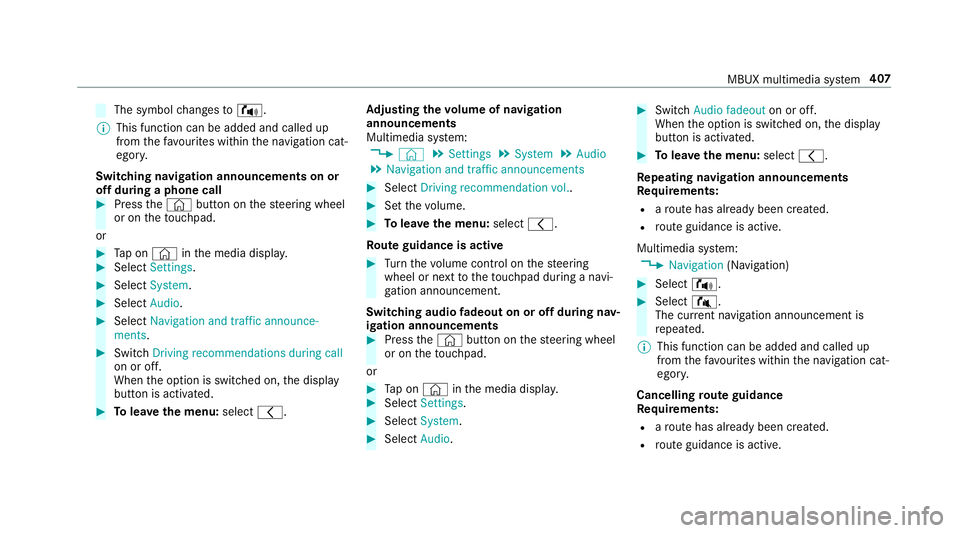
The symbol
changes to! .
% This function can be added and called up
from thefa vo urites within the navigation cat‐
egor y.
Switching navigation announcements on or
off during a phone call #
Press the© button on thesteering wheel
or on theto uchpad.
or #
Tap on © inthe media displa y. #
Select Settings . #
Select System . #
Select Audio. #
Select Navigation and traffic announce-
ments . #
Switch Driving recommendations during call
on or off.
When the option is switched on, the display
button is activated. #
Tolea vethe menu: selectq. Ad
justing the volume of navigation
announcements
Multimedia sy stem:
4 © 5
Settings 5
System 5
Audio
5 Navigation and traffic announcements #
Select Driving recommendation vol. . #
Set thevo lume. #
Tolea vethe menu: selectq.
Ro ute guidance is active #
Turn thevo lume control on thesteering
wheel or next totheto uchpad during a navi‐
ga tion announcement.
Switching audio fadeout on or off during nav‐
igation announcements #
Press the© button on thesteering wheel
or on theto uchpad.
or #
Tap on © inthe media displa y. #
Select Settings . #
Select System . #
Select Audio. #
Switch Audio fadeout on or off.
When the option is switched on, the display
button is activated. #
Tolea vethe menu: selectq.
Re peating navigation announcements
Re quirements:
R aro ute has already been created.
R route guidance is active.
Multimedia sy stem:
4 Navigation (Navigation) #
Select !. #
Select #.
The cur rent navigation announcement is
re peated.
% This function can be added and called up
from thefa vo urites within the navigation cat‐
egor y.
Cancelling route guidance
Re quirements:
R aro ute has already been created.
R route guidance is active. MBUX multimedia sy
stem 407
Page 518 of 697
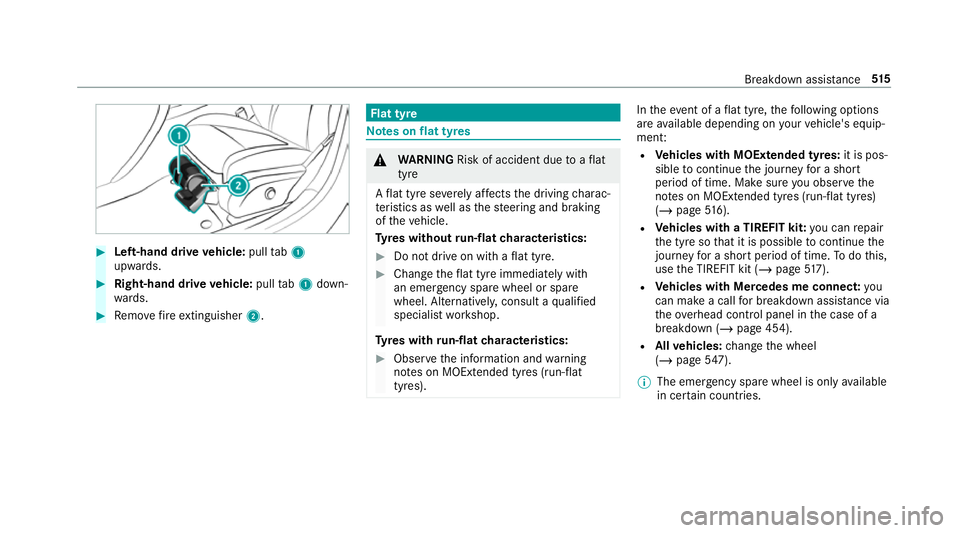
#
Left-hand drive vehicle: pulltab1
upwards. #
Right-hand drive vehicle: pulltab1 down‐
wa rds. #
Remo vefire extinguisher 2. Flat tyre
Note
s onflat tyres &
WARNING Risk of accident due toaflat
tyre
A flat tyre se verely affects the driving charac‐
te rist ics as well as thesteering and braking
of theve hicle.
Ty res without run-flat characteristics: #
Do not drive on with a flat tyre. #
Chan getheflat tyre immediately with
an emer gency spa rewheel or spare
wheel. Alternativel y,consult a qualified
specialist workshop.
Ty res with run-flat characteristics: #
Obse rveth e information and warning
no tes on MOExtended tyres (run-flat
tyres). In
theeve nt of a flat tyre, thefo llowing options
are available depending on your vehicle's equip‐
ment:
R Vehicles with MOExtended tyres: it is pos‐
sible tocontinue the journey for a short
period of time. Make sure you obse rvethe
no tes on MOExtended tyres (run-flat tyres)
(/ page 516).
R Vehicles with a TIREFIT kit: you can repair
th e tyre so that it is possible tocontinue the
jou rney fo r a short period of time. Todo this,
use the TIREFIT kit (/ page517).
R Vehicles with Mercedes me connect: you
can make a call for breakdown assi stance via
th eove rhead control panel in the case of a
breakdown (/ page 454).
R Allvehicles: change the wheel
(/ page 547).
% The emer gency spa rewheel is only available
in cer tain countries. Breakdown assis
tance 515
Page 521 of 697
#
If tyre sealant gets into your eyes, thor‐
oughly rinse them using clean water
immediatel y. #
If tyre sealant has been swallowe d,
th oroughly rinse out your mouth imme‐
diately and drink plenty of water.Do not
induce vomiting and seek medical
attention immediately. #
Change out of clo thing which has come
into con tact wi thtyre sealant immedi‐
ately. #
If an alle rgic reaction occurs, seek med‐
ical attention immediatel y.*
NO
TEOverheating due tothe tyre infla‐
tion compressor running too long #
Do not runth e tyre inflation compres‐
sor for longer than ten minu tes without
inter ruption. Comply with
the manufacturer's saf ety no tes on
th est icke r on the tyre inflation compressor. Ha
ve the tyre sealant bottle replaced in a quali‐
fi ed specialist workshop every five years. #
Do not remo veany fore ign objects which
ha ve entered the tyre. #
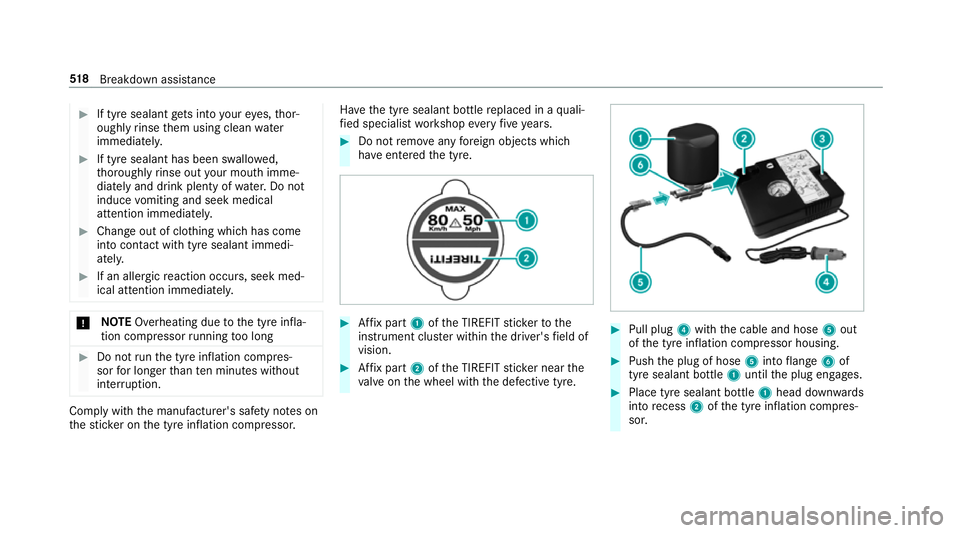
Affix pa rt1 ofthe TIREFIT sticke rto the
instrument clus ter within the driver's field of
vision. #
Affix pa rt2 ofthe TIREFIT sticke r near the
va lve on the wheel with the defective tyre. #
Pull plug 4with the cable and hose 5out
of the tyre inflation compressor housing. #
Push the plug of hose 5into flange 6of
tyre sealant bottle 1until the plug engages. #
Place tyre sealant bottle 1head down wards
into recess 2ofthe tyre inflation compres‐
sor. 518
Breakdown assis tance
Page 533 of 697
#
Secu retheve hicle on all four wheels af ter
loading.
4MATIC vehicles/ vehicles with automatic
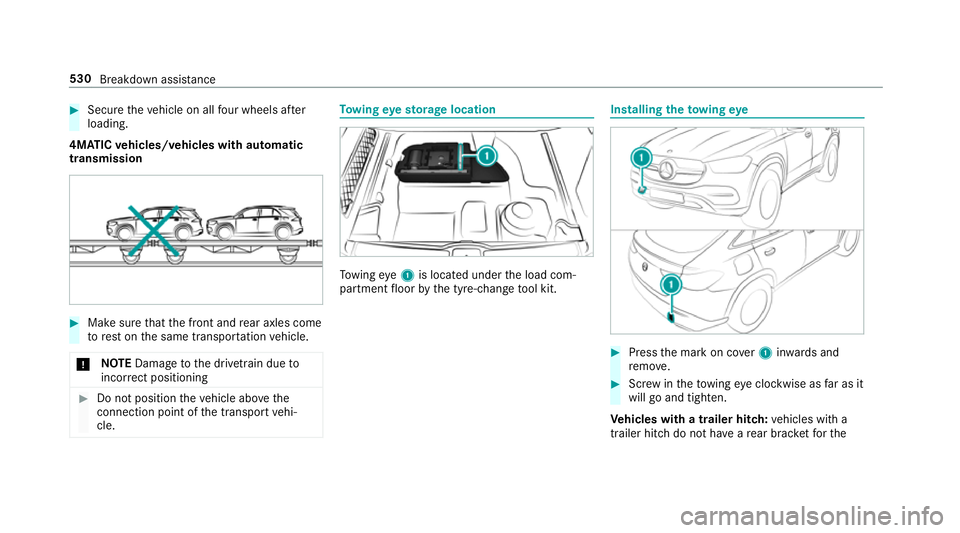
transmission #
Make sure that the front and rear axles come
to rest on the same transpor tation vehicle.
* NO
TEDama getothe driv etra in due to
incor rect positioning #
Do not position theve hicle abo vethe
connection point of the transport vehi‐
cle. To
wing eyesto rage location To
wing eye1 is located under the load com‐
partment floor bythe tyre-change tool kit. Installing
theto wing eye #
Press the mark on co ver1 inwa rds and
re mo ve. #
Screw intheto wing eyeclockwise as far as it
will go and tighten.
Ve hicles with a trailer hitch: vehicles with a
trailer hitch do not ha veare ar brac ketfo rthe 530
Breakdown assis tance