2019 MERCEDES-BENZ GLE COUPE ECU
[x] Cancel search: ECUPage 201 of 370

R
an obstacle has been detected in the lane in
which you are driving
R when a loss of tire pressure or a defective tire
has been detected and displayed
There is a possibility that the Active Lane Keep- ing Assist could misjudge the given traffic sit-
uation. An inappropriate brake application may
be interrupted at any time if you:
R steer slightly in the opposite direction
R switch on the turn signal
R clearly brake or accelerate
A lane-correcting brake application is interrup-
ted automatically if:
R a driving safety system intervenes, e.g. ESP ®
,
PRE-SAFE ®
Brake or Active Blind Spot Assist
R lane markings are no longer detected
Switching on Active Lane Keeping Assist X Switch on Active Lane Keeping Assist using
the on-board computer; to do so, select
Standard
Standard orAdaptive Adaptive (Ypage 217).
If you drive at speeds above 40 mph
(60 km/h) and lane markings are detected,
the lines in the assistance graphic are shown in green (Y page 216). Active Lane Keeping
Assist is ready for use.
If Standard Standard is selected, no warning vibration
occurs if:
R you switch on the turn signals. In this event,
the warnings are suppressed for a certain
period of time.
R a driving safety system intervenes, such as
ABS, BAS or ESP ®
.
When Adaptive
Adaptive is selected, no warning vibra-
tion occurs if:
R you switch on the turn signals. In this event,
the warnings are suppressed for a certain
period of time.
R a driving safety system intervenes, e.g.
ABS, BAS or ESP ®
.
R you accelerate hard, e.g. kickdown.
R you brake hard.
R you steer actively, e.g. swerve to avoid an
obstacle or change lanes quickly.
R you cut the corner on a sharp bend.
Towing a trailer
When you attach a trailer, make sure you have
correctly established the electrical connection.
This can be accomplished by checking the trailer lighting. Lane-correcting brake application does
not take place when towing a trailer. Active Lane
Keeping Assist is not activated and the lines in
the assistance graphic are gray. Towing a trailer
Important safety notes
G
WARNING
Installing an unsuitable ball coupling may
overload the trailer tow hitch and the rear
axle. This is particularly likely in the case of
longer or differently angled ball couplings.
Consequently, the driving characteristics may
be significantly impaired and the trailer may
detach. This presents the risk of an accident
or even fatal injuries!
Install only a ball coupling that adheres to the permissible dimensions and is designed for
your intended purpose for towing a trailer. Do
not make any changes to the ball coupling or the trailer tow hitch.
You will find the values approved by the manu-
facturer on the vehicle identification plates and
those for the towing vehicle under "Technical
data" (Y page 367). G
WARNING
If the ball coupling is not installed correctly or not secured with the bolt provided and the
corresponding spring cotter, the trailer may
come loose. There is a risk of an accident.
Always install and secure the ball coupling as
described. Before every journey, ensure that
the ball coupling is secured with the bolt and
the corresponding spring cotter. G
WARNING
When the vehicle/trailer combination begins
to lurch, you could lose control of it. The vehi- cle/trailer combination could even rollover.
There is a risk of an accident.
On no account should you attempt to
straighten up the vehicle/trailer combination
by increasing the speed. Reduce vehicle Towing a trailer
199Driving and parking
Z
Page 203 of 370
legally permissible maximum speed in the rele-
vant country.
For certain Mercedes-Benz vehicles, the maxi-
mum permissible rear axle load is increased
when towing a trailer. See "Technical data" to
find out whether this applies to your vehicle
(Y page 367). If you utilize any of the added
maximum rear axle load when towing a trailer,
the vehicle/trailer combination may not exceed a maximum speed of 60 mph (100 km/h) for
reasons concerning the operating permit. This
also applies in countries in which the maximum
permissible speed for car/trailer combinations
is greater than 60 mph (100 km/h).
When towing a trailer, your vehicle's handling
characteristics will be different in comparison
with when driving without a trailer.
Use the left-hand steering wheel paddle shifter
to shift into a lower gear in good time on long
and steep downhill gradients.
This also applies if you have activated cruise
control or Active Distance Assist DISTRONIC.
This will use the braking effect of the engine, so
that less braking will be required to maintain the speed. This relieves the load on the brake sys-
tem and prevents the brakes from overheating
and wearing too quickly. If you need additional
braking, depress the brake pedal repeatedly
rather than continuously.
Driving tips If the trailer swings from side to side:
X Do not accelerate.
X Do not counter-steer.
X Brake if necessary.
R Maintain a greater distance from the vehicle
in front than when driving without a trailer.
R Avoid braking abruptly. If possible, brake gen-
tly at first to allow the trailer to run on. Then,
increase the braking force rapidly.
R The values given for gradient-climbing capa-
bilities from a standstill refer to sea level.
When driving in mountainous areas, note that
the power output of the engine and, conse-
quently, the vehicle's gradient-climbing capa- bility, decreases with increasing altitude. Installing the ball coupling
G
WARNING
If the ball coupling is not correctly installed
and secured, it can come loose during the
journey and endanger other road users. There is a risk of an accident and injury.
Always install and secure the ball coupling as
described. Before every journey, ensure that
the ball coupling is secured with the bolt and
the corresponding spring cotter. G
WARNING
If the ball coupling is not installed correctly or not secured with the bolt provided and the
corresponding spring cotter, the trailer may
come loose. There is a risk of an accident.
Always install and secure the ball coupling as
described. Before every journey, ensure that
the ball coupling is secured with the bolt and
the corresponding spring cotter. G
WARNING
If the ball coupling is not installed and secured
correctly the trailer may come loose. There is
a risk of an accident.
Install and secure the ball coupling as descri-
bed in the ball coupling installation instruc-
tions. Make sure that the ball coupling is
installed and secured correctly before every
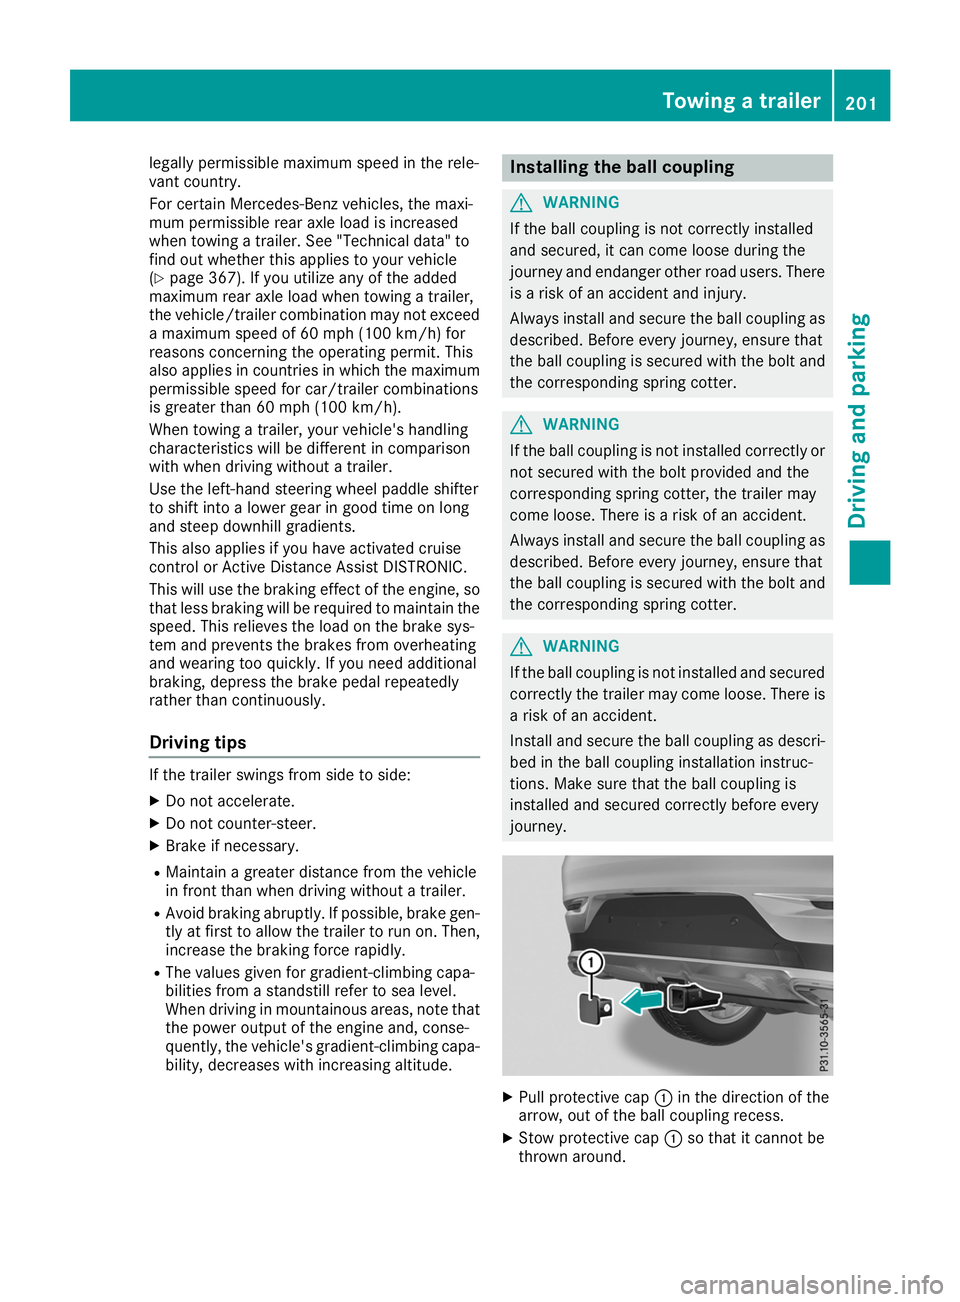
journey. X
Pull protective cap 0043in the direction of the
arrow, out of the ball coupling recess.
X Stow protective cap 0043so that it cannot be
thrown around. Towing a trailer
201Driving and parking Z
Page 204 of 370

and the safety notes regarding stowage
spaces (Y page 272). X
Insert the ball coupling horizontally into ball
coupling recess 0044in the direction of the
ar")
Observe the loading guidelines (Y
page 272)
and the safety notes regarding stowage
spaces (Y page 272). X
Insert the ball coupling horizontally into ball
coupling recess 0044in the direction of the
arrow until the holes in ball coupling 0087are in
line with the holes in ball coupling recess 0085.X
Slide bolt 0083into the hole in the ball coupling
recess and the ball coupling to the stop. X
Secure the bolt using spring cotter 0084. X
Check the ball coupling, bolt and spring cotter
for correct installation.
If the ball coupling cannot be correctly mounted,
remove the ball coupling. Under these circum-
stances, the ball coupling must not be used for
trailer towing.
Have the entire trailer tow hitch checked at a
qualified specialist workshop. Coupling up a trailer
! Do not connect the trailer's brake system (if
featured) to the hydraulic brake system of the towing vehicle, as the latter is equipped with
an anti-lock brake system. Doing so will result
in a loss of function of the brake systems of
both the vehicle and the trailer.
X Shift the transmission to position 005D.
X Apply the vehicle's electric parking brake.
X Start the engine.
X Vehicles with AIRMATIC Package: select
normal level and the Comfortdrive program.
X Switch off the engine.
X Close the doors and tailgate.
X Couple up the trailer. 202
Towing a trailerDriving and parking
Page 205 of 370

X
Establish the electrical connection between
the vehicle and the trailer.
X Check that the trailer lighting system is work-
ing.
X Push the combination switch upwards/down-
wards and check whether the corresponding
turn signal on the trailer flashes.
A trailer that is connected is recognized only
when the electrical connection is established
correctly and when the lighting system is work-
ing properly. The function of other systems also depends on this, for example:
R ESP ®
R Parking Assist PARKTRONIC
R Active Parking Assist
R Parking Package with rear view camera
R Active Blind Spot Assist
R Active Lane Keeping Assist
i Vehicles with the AIRMATIC Package: if you
couple up a trailer, the vehicle always remains
at normal level. When coupling up a trailer,
please observe the following:
R If the normal level has not been set man-
ually, the vehicle is automatically lowered
to normal level. This is the case if a speed of
5 mph (8 km/h) is reached.
R The Sport drive program is not available.
These restrictions apply to all accessories
powered through a connection to the trailer
power socket of your vehicle, e.g. a bicycle
carrier.
Observe the maximum permissible trailer
dimensions (width and length).
Most U.S. states and all Canadian provinces
require by law: R Safety chains between the towing vehicle and
the trailer. The chains should be cross-woundunder the trailer drawbar. They must be fas-
tened to the vehicle's trailer coupling, not to
the bumper or the axle.
Leave enough play in the chains to make tight
cornering possible.
R A separate brake system for certain types of
trailer.
R Safety switch for braked trailers. Check the
specific legal requirements applicable to your
state.
If the trailer becomes detached from the tow-
ing vehicle, the safety feature triggers the
trailer brakes. Towing a trailer
There are numerous legal requirements con-
cerning the towing of a trailer, e.g. speed restric- tions. Make sure that your car/trailer combina-
tion complies with the local regulations:
R in your place of residence
R in the location to which you are driving
The police and local authorities can provide reli- able information.
Observe the following when towing a trailer:
R To gain driving experience and to become
accustomed to the new handling characteris-
tics, you should practice the following in a
traffic-free location:
- cornering
- stopping
- backing up
R Before driving, check:
- trailer tow hitch
- safety switch for braked trailers
- safety chains
- electrical connections
- lights
- wheels
R Adjust the exterior mirrors to provide an
unobstructed view of the rear section of the
trailer.
R If the trailer has electronically controlled
brakes, pull away carefully. Brake manually
using the brake controller and check whether
the brakes function correctly.
R Secure any objects on the trailer to prevent
the cargo from slipping when the vehicle is in
motion.
R When you couple up a trailer, check at regular
intervals that the load is firmly secured. If the trailer is equipped with trailer lights and
brakes, check the trailer to ensure that these
are working.
R Bear in mind that the handling will be less
stable when towing a trailer than when driving
without one. Avoid sudden steering move-
ments.
R The vehicle/trailer combination is heavier,
accelerates more slowly, has a decreased
gradient climbing capability and a longer
braking distance.
It is more susceptible to side winds and
requires more careful steering. Towing a trailer
203Driving and parking Z
Page 208 of 370

Important safety notes
G
WARNING
The bicycle rack can detach from the vehicle if
you
R exceed the permissible payload of the
trailer tow hitch
R use the bicycle rack incorrectly
R attach the bicycle rack to the ball coupling
beneath the ball head
There is a risk of an accident.
For your safety and that of other road users,
observe the following:
R Always observe the permissible payload of
the trailer tow hitch.
R Use the bicycle rack only to transport bicy-
cles.
R Always attach the bicycle rack correctly by
clamping onto the ball head and, if possible, to the guide pin on the ball coupling as well.
R To transport four bicycles, always use bicy-
cle racks with additional support on the ball
coupling's guide pin. R
Use only bicycle racks approved by
Mercedes-Benz.
R Always comply with the bicycle rack's oper-
ating manual.
! Using unsuitable bicycle racks or using
them incorrectly can cause damage to and
fractures in the trailer tow hitch.
Use only bicycle racks approved by
Mercedes-Benz.
Bicycle racks cause your vehicle's driving char-
acteristics to change. The vehicle:
R is heavier
R is restricted in its acceleration and gradient-
climbing capability
R has an increased braking distance
This could impair the handling characteristics.
Adapt your driving style accordingly. Maintain a safe distance and drive carefully.
When using bicycle racks, set the tire pressure
on the rear axle of the vehicle for the maximum
load. Further information on tire pressure can be
found on the tire pressure table (Y page 330).Loading instructions
The greater the distance between the load's center of gravity and the ball head, the higher the load exerted on the trailer tow hitch.
Therefore, observe the following notes:
R Attach heavy bicycles as close as possible to the vehicle.
R Always distribute the load on the bicycle rack as symmetrically as possible to the vehicle longi-
tudinal axis.
Before loading the bicycle rack, Mercedes-Benz advises you to remove all add-on parts from the
bicycles, e.g. bicycle baskets, child seats or batteries. This will allow you to improve the aerody-
namic resistance and the bicycle rack's center of gravity.
Always secure bicycles against slipping and check that they are firmly seated at regular intervals.
Do not use tarpaulins or other covers. This could impair the driving characteristics and rear visibility. The aerodynamic resistance would also rise, and so would the load exerted on the trailer tow hitchas a result. 206
Bicycle rackDriving and pa
rking
Page 229 of 370
 or 0024
(Canada only) indicator lamp light up.
The electric parking brake is")
Display messages
Possible causes/consequences and
0050
0050Solutions The yellow
0024warning lamp and the red 0049(USA only) or 0024
(Canada only) indicator lamp light up.
The electric parking brake is malfunctioning.
To release:
X Switch off the ignition and turn it back on.
X Release the electric parking brake manually.
or X Release the electric parking brake automatically (Y page 145).
If the electric parking brake still cannot be released:
X Do not drive on.
X Consult a qualified specialist workshop. The red
0049(USA only) or 0024(Canada only) indicator lamp flashes
and the yellow 0024warning lamp lights up.
The electric parking brake is malfunctioning.
To release:
X Switch off the ignition and turn it back on.
X Release the electric parking brake manually.
To apply: X Switch off the ignition and turn it back on.
X Apply the electric parking brake manually.
If the red 0049(USA only) or 0024(Canada only) indicator lamp con-
tinues to flash:
X Do not drive on.
X Secure the vehicle against rolling away (Y page 349).
X Shift the transmission to position 005D.
X Turn the front wheels towards the curb.
X Consult a qualified specialist workshop. Display
messages
227On-board computer and displays Z
Page 231 of 370

or 0024 (Canada only) indicator lamp flashes.
It is not possible t")
Display messages
Possible causes/consequences and
0050
0050Solutions The yellow
0024warning lamp lights up and the red 0049(USA only)
or 0024 (Canada only) indicator lamp flashes.
It is not possible to apply the electric parking brake manually.
X Shift the transmission to position 005D.
X Visit a qualified specialist workshop. 0027
(USA only)
004D (Canada only)
Check Brake Fluid Check Brake Fluid
Level Level There is not enough brake fluid in the brake fluid reservoir. In addition,
the 0027 (USA only) or 004D(Canada only) warning lamp lights up in
the instrument cluster and a warning tone sounds.
G WARNING
The braking effect may be impaired.
There is a risk of an accident.
X Pull over and stop the vehicle safely as soon as possible, paying
attention to road and traffic conditions. Do not continue driving
under any circumstances.
X Secure the vehicle against rolling away (Y page 144).
X Consult a qualified specialist workshop.
X Do not add brake fluid. This does not correct the malfunction. 0026
Check Check
Brake
BrakePad
PadWear
Wear The brake pads/linings have reached their wear limit.
USA only: the red
0027brake system warning lamp is lit while the
engine is running.
X Visit a qualified specialist workshop. 0053
Inoperative Inoperative One or more main features of the mbrace system are malfunctioning.
X Visit a qualified specialist workshop. Active
Active
Brake
BrakeAssist
Assist
Functions
Functions Currently
Currently
Limited See Opera‐
Limited See Opera‐
tor's Manual tor's Manual Active Brake Assist is temporarily inoperative.
Possible causes are:
R the radar sensor system is temporarily inoperative, e.g. due to elec-
tromagnetic radiation emitted by nearby TV or radio stations or
other sources of electromagnetic radiation
R the system is outside the operating temperature range
R the on-board voltage is too low
When the causes stated above no longer apply, the display message
disappears.
Active Brake Assist is operational again.
If the display message does not disappear:
X Pull over and stop the vehicle safely as soon as possible, paying
attention to road and traffic conditions.
X Secure the vehicle against rolling away (Y page 144).
X Restart the engine. Display
messages
229On-board computer and displays Z
Page 232 of 370

Display messages
Possible causes/consequences and
0050
0050Solutions Active
Active
Brake
Brake Assist
Assist
Functions Limited
Functions Limited
See Operator's Man‐ See Operator's Man‐
ual ual Active Brake Assist is unavailable due to a malfunction. Adaptive
Brake Assist may also have failed.
X Visit a qualified specialist workshop immediately. PRE-SAFE Inopera‐
PRE-SAFE Inopera‐
tive tive
See
See Operator's
Operator's
Manual
Manual Important functions of PRE-SAFE
®
have failed. All other occupant
safety systems, e.g. air bags, remain available.
X Visit a qualified specialist workshop immediately. Active
Active
Brake
Brake Assist
Assist
Functions
Functions Currently
Currently
Limited See Opera‐
Limited See Opera‐
tor's Manual tor's Manual Active Brake Assist or PRE‑SAFE
®
PLUS is temporarily inoperative.
Possible causes are:
R function is impaired due to heavy rain or snow
R the radar sensor system is temporarily inoperative, e.g. due to elec-
tromagnetic radiation emitted by nearby TV or radio stations or
other sources of electromagnetic radiation
R Mercedes-AMG vehicles: ESP ®
is deactivated
R the system is outside the operating temperature range
R the on-board voltage is too low
When the causes stated above no longer apply, the display message
disappears.
Active Brake Assist or PRE‑SAFE ®
PLUS is operative again.
If the display message does not disappear:
X Pull over and stop the vehicle safely as soon as possible, paying
attention to road and traffic conditions.
X Secure the vehicle against rolling away (Y page 144).
X Restart the engine.
X Mercedes-AMG vehicles: switch ESP ®
on again (Y page 68). Active Active
Brake
Brake Assist
Assist
Functions Limited
Functions Limited
See Operator's Man‐ See Operator's Man‐
ual ual Active Brake Assist with cross-traffic function or PRE
‑SAFE®
PLUS is
not available due to a malfunction.
X Visit a qualified specialist workshop immediately. 230
Display
messagesOn-board computer and displays