2019 MERCEDES-BENZ GLE COUPE warning lights
[x] Cancel search: warning lightsPage 110 of 370
The blue
0057indicator lamp in the instru-
ment cluster lights up when the high-beam
headlamps are switched on.
X To switch off the high-beam headlamps:
move the combination switch back to its nor- mal position.
The blue 0057indicator lamp in the instru-
ment cluster goes out.
Vehicles with Adaptive Highbeam Assist: if
Adaptive Highbeam Assist is activated, it auto-
matically controls activation and deactivation of
the high-beam headlamps (Y page 109).Hazard warning lamps
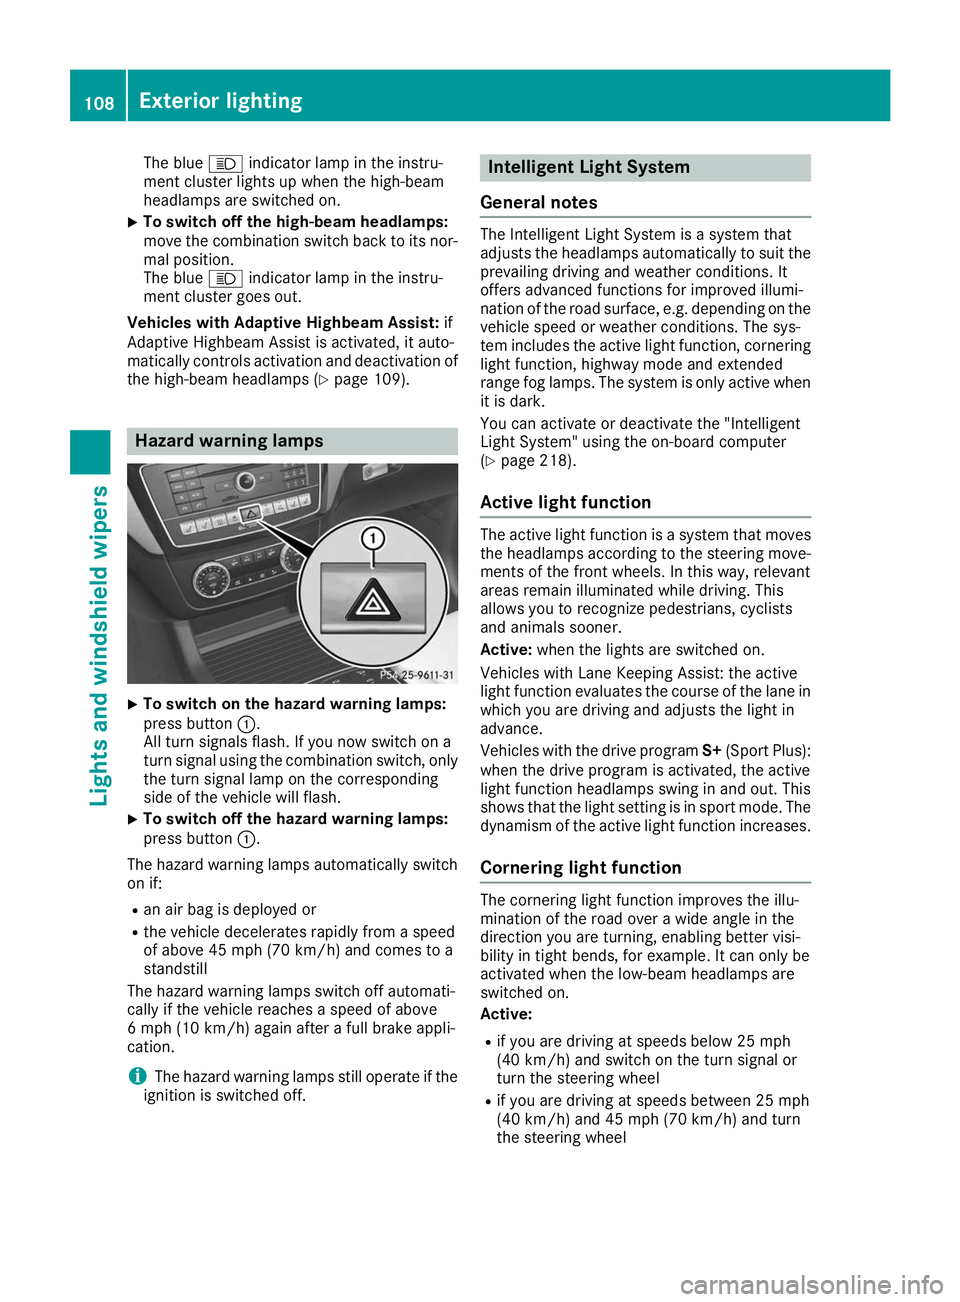
X
To switch on the hazard warning lamps:
press button
0043.
All turn signals flash. If you now switch on a
turn signal using the combination switch, only the turn signal lamp on the corresponding
side of the vehicle will flash.
X To switch off the hazard warning lamps:
press button
0043.
The hazard warning lamps automatically switch
on if:
R an air bag is deployed or
R the vehicle decelerates rapidly from a speed
of above 45 mph (70 km/h) and comes to a
standstill
The hazard warning lamps switch off automati-
cally if the vehicle reaches a speed of above
6 mph (10 km/h) again after a full brake appli-
cation.
i The hazard warning lamps still operate if the
ignition is switched off. Intelligent Light System
General notes The Intelligent Light System is a system that
adjusts the headlamps automatically to suit the
prevailing driving and weather conditions. It
offers advanced functions for improved illumi-
nation of the road surface, e.g. depending on the vehicle speed or weather conditions. The sys-
tem includes the active light function, corneringlight function, highway mode and extended
range fog lamps. The system is only active when it is dark.
You can activate or deactivate the "Intelligent
Light System" using the on-board computer
(Y page 218).
Active light function The active light function is a system that moves
the headlamps according to the steering move- ments of the front wheels. In this way, relevant
areas remain illuminated while driving. This
allows you to recognize pedestrians, cyclists
and animals sooner.
Active: when the lights are switched on.
Vehicles with Lane Keeping Assist: the active
light function evaluates the course of the lane in which you are driving and adjusts the light in
advance.
Vehicles with the drive program S+(Sport Plus):
when the drive program is activated, the active
light function headlamps swing in and out. This
shows that the light setting is in sport mode. The
dynamism of the active light function increases.
Cornering light function The cornering light function improves the illu-
mination of the road over a wide angle in the
direction you are turning, enabling better visi-
bility in tight bends, for example. It can only be
activated when the low-beam headlamps are
switched on.
Active:
R if you are driving at speeds below 25 mph
(40 km/h) and switch on the turn signal or
turn the steering wheel
R if you are driving at speeds between 25 mph
(40 km/h) and 45 mph (70 km/h) and turn
the steering wheel 108
Exterior lightingLights and windshield wipers
Page 111 of 370
The cornering lamp may remain lit for a short
time, but is automatically switched off after no
more than three minutes.
Cornering light function with traffic circle
function:
The cornering light function is activated on both sides before entering a traffic circle through an
evaluation of the current GPS position of the
vehicle. It remains active until after the vehicle
has left the traffic circle. In this way, pedestrians
crossing the road, for example, are illuminated
by your vehicle in good time.
Highway mode Highway mode increases the range of the beam.
Active: if you are driving at a speed above
110 km/h and do not make any large steering
movements for at least 1,000 m or if you are
driving at a speed above 130 km/h.
Not active: if you are driving at speeds below
80 km/h following activation.
Extended range fog lamps The extended range fog lamps reduce the glare
experienced by the driver and improve the illu-
mination of the edge of the road.
Active: if you are driving at speeds below
40 mph (70 km/ h)and you switch on the rear
fog lamp.
Not active: if, following activation, you are driv-
ing at speeds above 60 mph (100 km/h)or if you
switch off the rear fog lamp Adaptive Highbeam Assist
General notes You can use this function to set the headlamps
to change between low beam and high beam
automatically. The system recognizes vehicles
with their lights on, either approaching from the opposite direction or traveling in front of your
vehicle, and consequently switches the head-
lamps from high beam to low beam.
The system automatically adapts the low-beam
headlamp range depending on the distance to
the other vehicle. Once the system no longer
detects any other vehicles, it reactivates the
high-beam headlamps. The system's optical sensor is located behind
the windshield near the overhead control panel.
Important safety notes G
WARNING
Adaptive Highbeam Assist does not recognize road users:
R who have no lights, e.g. pedestrians
R who have poor lighting, e.g. cyclists
R whose lighting is blocked, e.g. by a barrier
On very rare occasions, Adaptive Highbeam
Assist may fail to recognize other road users
that have lights, or may recognize them too
late. In this, or in similar situations, the auto-
matic high-beam headlamps will not be deac-
tivated or will be activated regardless. There is a risk of an accident.
Always carefully observe the traffic conditionsand switch off the high-beam headlamps in
good time.
Adaptive Highbeam Assist cannot take into
account road, weather or traffic conditions.
Adaptive Highbeam Assist is only an aid. You are responsible for adjusting the vehicle's lighting
to the prevailing light, visibility and traffic con-
ditions.
In particular, the detection of obstacles can be
impaired if:
R poor visibility, e.g. due to fog, heavy rain or
snow
R dirt on the sensors or the sensors are
obscured
Switching Adaptive Highbeam Assist
on/off X
To switch on: turn the light switch to 0058.
X Press the combination switch beyond the
pressure point in the direction of arrow 0043.
The 00CE indicator lamp in the multifunction
display lights up when it is dark and the light
sensor activates the low-beam headlamps.
If you are driving at speeds above approx-
imately 16 mph (25 km/h):
The headlamp range is set automatically
depending on the distance between the vehi-
cle and other road users. Exterior lighting
109Lights and windshield wipers Z
Page 112 of 370
If you are driving at speeds above approx-
imately 19 mph (30 km/h) and no other road users have been detected:
The high-beam headlamps are switched on
automatically. The 0057indicator lamp in the
instrument cluster also lights up.
If you are driving at speeds below approx-
imately 16 mph (25 km/h) or other road users
have been detected or the roads are ade-
quately lit:
The high-beam headlamps are switched off
automatically. The 0057indicator lamp in the
instrument cluster goes out. The 00CEindi-
cator lamp in the multifunction display
remains lit.
X To switch off: move the combination switch
back to its normal position or move the light
switch to another position.
The 00CE indicator lamp in the multifunction
display goes out. Headlamps fogged up on the inside
Certain climatic and physical conditions may
cause moisture to form in the headlamp. This
moisture does not affect the functionality of the headlamp. Interior lighting
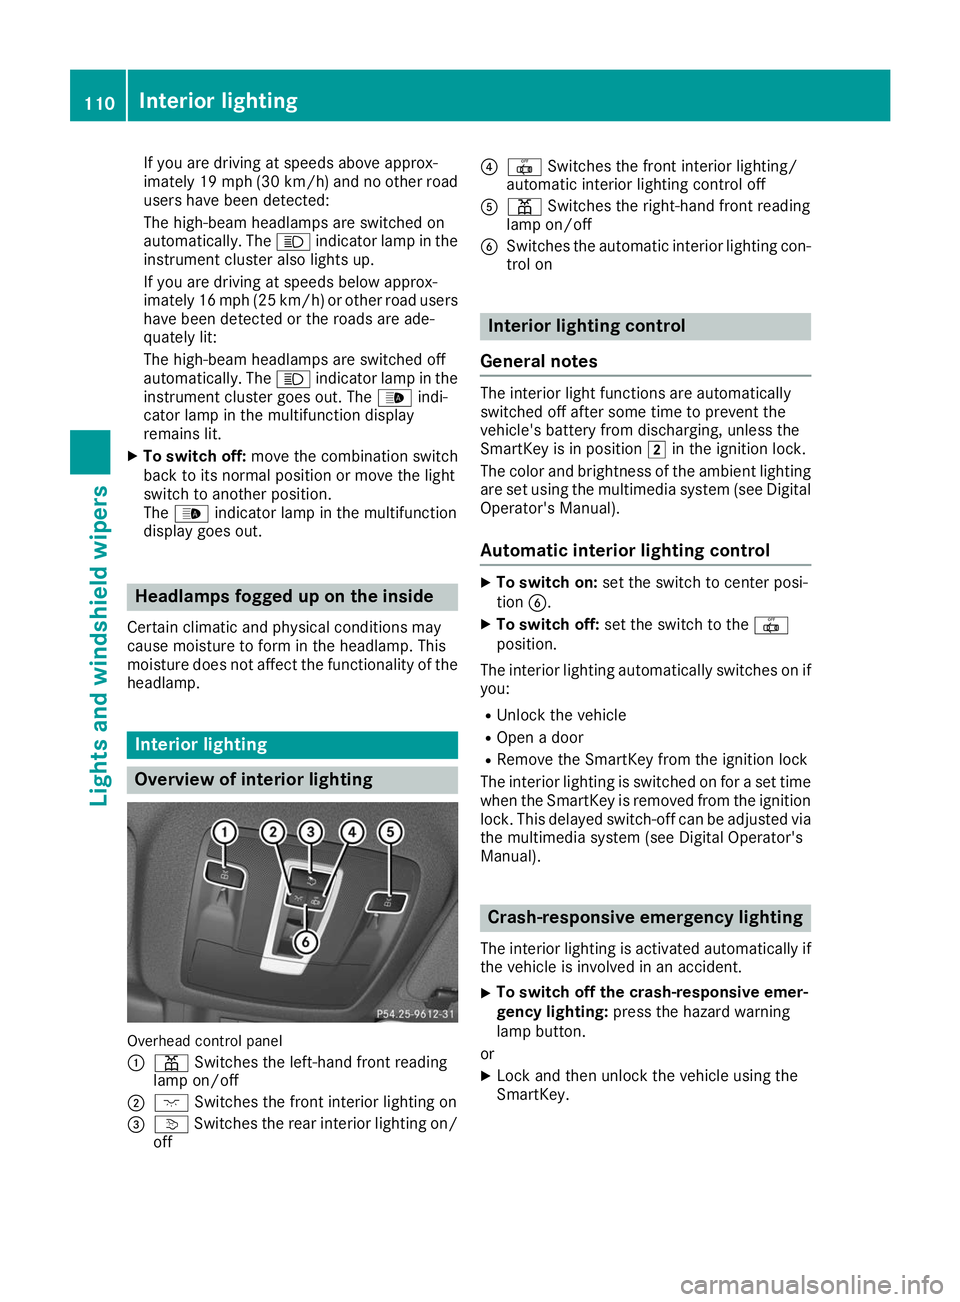
Overview of interior lighting
Overhead control panel
0043
003D Switches the left-hand front reading
lamp on/off
0044 004A Switches the front interior lighting on
0087 0043 Switches the rear interior lighting on/
off 0085
0033 Switches the front interior lighting/
automatic interior lighting control off
0083 003D Switches the right-hand front reading
lamp on/off
0084 Switches the automatic interior lighting con-
trol on Interior lighting control
General notes The interior light functions are automatically
switched off after some time to prevent the
vehicle's battery from discharging, unless the
SmartKey is in position
0048in the ignition lock.
The color and brightness of the ambient lighting
are set using the multimedia system (see Digital Operator's Manual).
Automatic interior lighting control X
To switch on: set the switch to center posi-
tion 0084.
X To switch off: set the switch to the 0033
position.
The interior lighting automatically switches on if you:
R Unlock the vehicle
R Open a door
R Remove the SmartKey from the ignition lock
The interior lighting is switched on for a set time
when the SmartKey is removed from the ignition
lock. This delayed switch-off can be adjusted via
the multimedia system (see Digital Operator's
Manual). Crash-responsive emergency lighting
The interior lighting is activated automatically if
the vehicle is involved in an accident.
X To switch off the crash-responsive emer-
gency lighting:
press the hazard warning
lamp button.
or X Lock and then unlock the vehicle using the
SmartKey. 110
Interior lightingLights and windshield wipers
Page 113 of 370
Replacing bulbs (vehicles with LED
headlamps)
The front and rear light clusters of your vehicle
are equipped with light-emitting diodes. Do not
replace the vehicle's bulbs yourself. Contact a
qualified specialist workshop which has the nec-
essary specialist knowledge and tools to carry
out the work required.
Lamps are an important aspect of vehicle safety. You must therefore make sure that these func-
tion correctly at all times. Have the headlamp
setting checked regularly. Windshield wipers
Switching the windshield wipers
on/off
! Do not operate the windshield wipers when
the windshield is dry, as this could damage
the wiper blades. Moreover, dust that has col-
lected on the windshield can scratch the glass
if wiping takes place when the windshield is
dry.
If it is necessary to switch on the windshield
wipers in dry weather conditions, always use
washer fluid when operating the windshield
wipers.
! If the windshield wipers leave smears on the
windshield after the vehicle has been washed
in an automatic car wash, wax or other resi-
dues may be the reason for this. Clean the
windshield using washer fluid after washing
the vehicle in an automatic car wash.
! Intermittent wiping with rain sensor: due to
optical influences and the windshield becom- ing dirty in dry weather conditions, the wind-
shield wipers may be activated inadvertently. This could then damage the windshield wiper
blades or scratch the windshield.
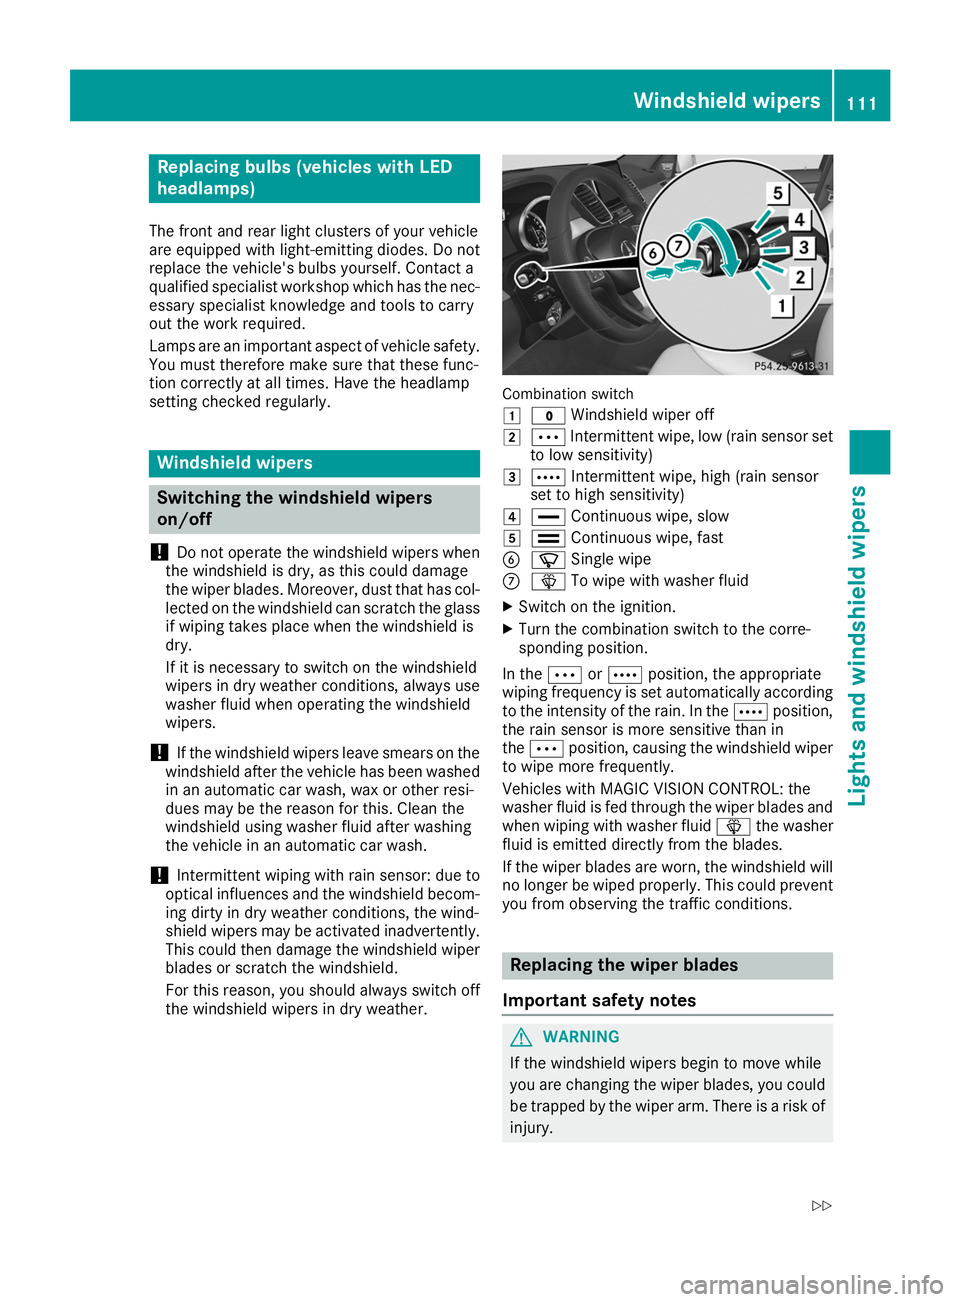
For this reason, you should always switch off the windshield wipers in dry weather. Combination switch
0047
003F Windshield wiper off
0048 0062 Intermittent wipe, low (rain sensor set
to low sensitivity)
0049 0063 Intermittent wipe, high (rain sensor
set to high sensitivity)
004A 00AA Continuous wipe, slow
004B 00A9 Continuous wipe, fast
0084 00D3 Single wipe
006B 00D4 To wipe with washer fluid
X Switch on the ignition.
X Turn the combination switch to the corre-
sponding position.
In the 0062or0063 position, the appropriate
wiping frequency is set automatically according
to the intensity of the rain. In the 0063position,
the rain sensor is more sensitive than in
the 0062 position, causing the windshield wiper
to wipe more frequently.
Vehicles with MAGIC VISION CONTROL: the
washer fluid is fed through the wiper blades and when wiping with washer fluid 00D4the washer
fluid is emitted directly from the blades.
If the wiper blades are worn, the windshield will no longer be wiped properly. This could prevent
you from observing the traffic conditions. Replacing the wiper blades
Important safety notes G
WARNING
If the windshield wipers begin to move while
you are changing the wiper blades, you could be trapped by the wiper arm. There is a risk of
injury. Windshield wipers
111Lights and windshield wipers
Z
Page 130 of 370
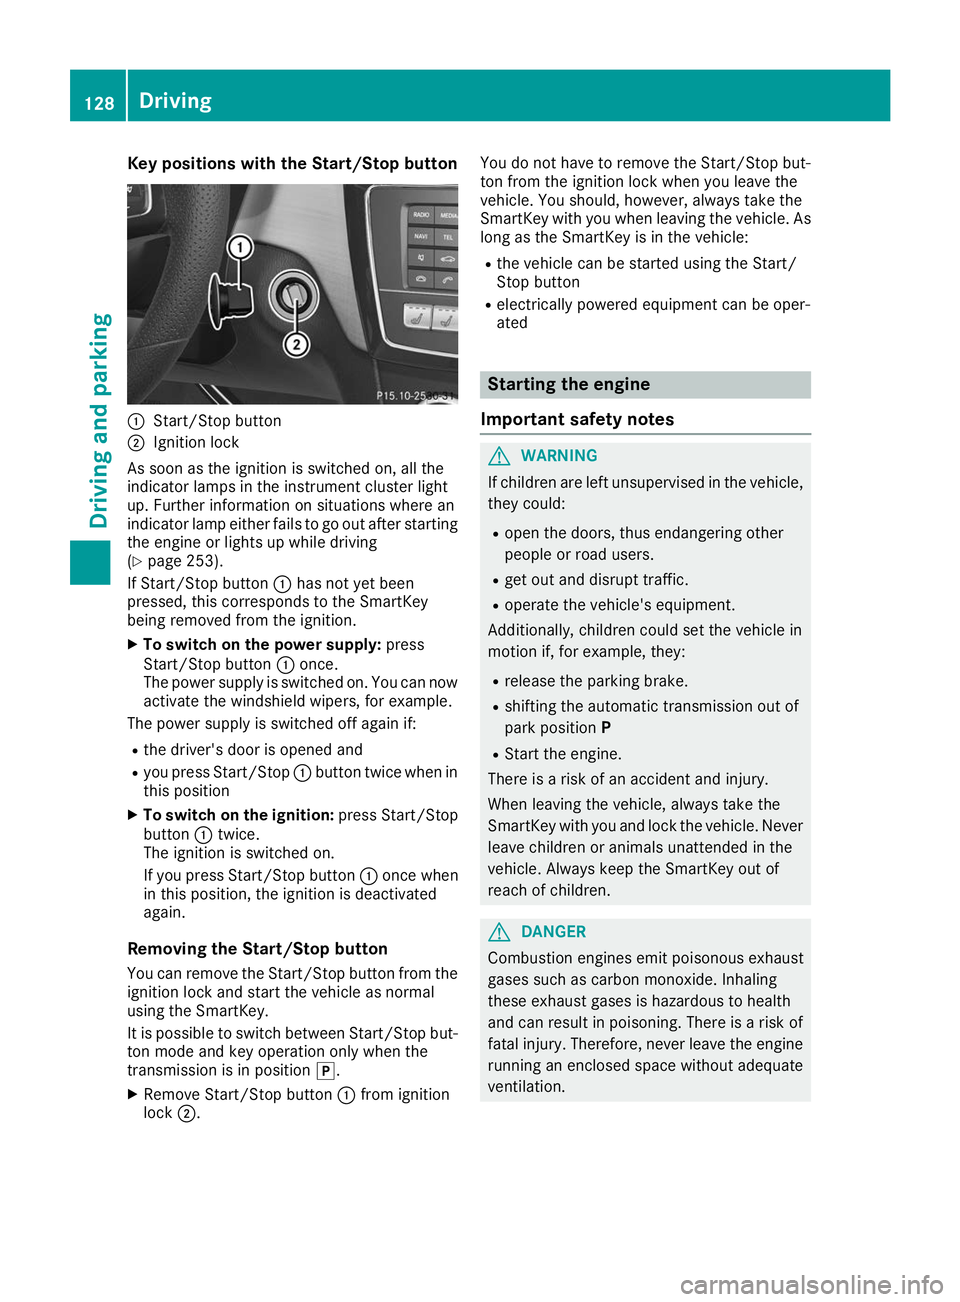
Key positions with the Start/Stop button
0043
Start/Stop button
0044 Ignition lock
As soon as the ignition is switched on, all the
indicator lamps in the instrument cluster light
up. Further information on situations where an
indicator lamp either fails to go out after starting the engine or lights up while driving
(Y page 253).
If Start/Stop button 0043has not yet been
pressed, this corresponds to the SmartKey
being removed from the ignition.
X To switch on the power supply: press
Start/Stop button 0043once.
The power supply is switched on. You can now activate the windshield wipers, for example.
The power supply is switched off again if:
R the driver's door is opened and
R you press Start/Stop 0043button twice when in
this position
X To switch on the ignition: press Start/Stop
button 0043twice.
The ignition is switched on.
If you press Start/Stop button 0043once when
in this position, the ignition is deactivated
again.
Removing the Start/Stop button
You can remove the Start/Stop button from the
ignition lock and start the vehicle as normal
using the SmartKey.
It is possible to switch between Start/Stop but- ton mode and key operation only when the
transmission is in position 005D.
X Remove Start/Stop button 0043from ignition
lock 0044. You do not have to remove the Start/Stop but-
ton from the ignition lock when you leave the
vehicle. You should, however, always take the
SmartKey with you when leaving the vehicle. As
long as the SmartKey is in the vehicle:
R the vehicle can be started using the Start/
Stop button
R electrically powered equipment can be oper-
ated Starting the engine
Important safety notes G
WARNING
If children are left unsupervised in the vehicle, they could:
R open the doors, thus endangering other
people or road users.
R get out and disrupt traffic.
R operate the vehicle's equipment.
Additionally, children could set the vehicle in
motion if, for example, they:
R release the parking brake.
R shifting the automatic transmission out of
park position P
R Start the engine.
There is a risk of an accident and injury.
When leaving the vehicle, always take the
SmartKey with you and lock the vehicle. Never
leave children or animals unattended in the
vehicle. Always keep the SmartKey out of
reach of children. G
DANGER
Combustion engines emit poisonous exhaust
gases such as carbon monoxide. Inhaling
these exhaust gases is hazardous to health
and can result in poisoning. There is a risk of
fatal injury. Therefore, never leave the engine running an enclosed space without adequate
ventilation. 128
DrivingDriving and pa
rking
Page 147 of 370
If you want the automatic transmission to
remain in neutral 005C, e.g. when having the vehi-
cle cleaned in an automatic, tow-through car
wash:
X Vehicles with a SmartKey: switch on the
ignition.
X Vehicles with KEYLESS-GO: remove the
Start/Stop button from the ignition lock.
X Insert the SmartKey into the ignition lock.
X Switch on the ignition.
X All vehicles: depress the brake pedal and
keep it depressed.
X Engage neutral 005C.
X Release the brake pedal.
X Release the electric parking brake.
X Switch off the ignition and leave the SmartKey
in the ignition lock.
i The engine can be switched off in an emer-
gency while the vehicle is in motion by press-
ing and holding the Start/Stop button for
three seconds. Electric parking brake
General notes G
WARNING
If you leave children unsupervised in the vehi- cle, they could set it in motion by, for example:
R release the parking brake.
R shift the automatic transmission out of the
parking position P.
R start the engine.
In addition, they may operate vehicle equip-
ment and become trapped. There is a risk of
an accident and injury.
When leaving the vehicle, always take the
SmartKey with you and lock the vehicle. Never
leave children unsupervised in the vehicle. The function of the electric parking brake is
dependent on the on-board voltage. If the on-
board voltage is low or there is a malfunction in
the system, it may not be possible to apply the
released parking brake.
X If this is the case, only park the vehicle on
level ground and secure it to prevent it rolling
away.
X Shift the automatic transmission to position
005D.
It may not be possible to release an applied
parking brake if the on-board voltage is low or
there is a malfunction in the system. Contact a
qualified specialist workshop.
i The electric parking brake performs a func-
tion test at regular intervals while the engine
is switched off. The sounds that can be heard while this is occurring are normal.
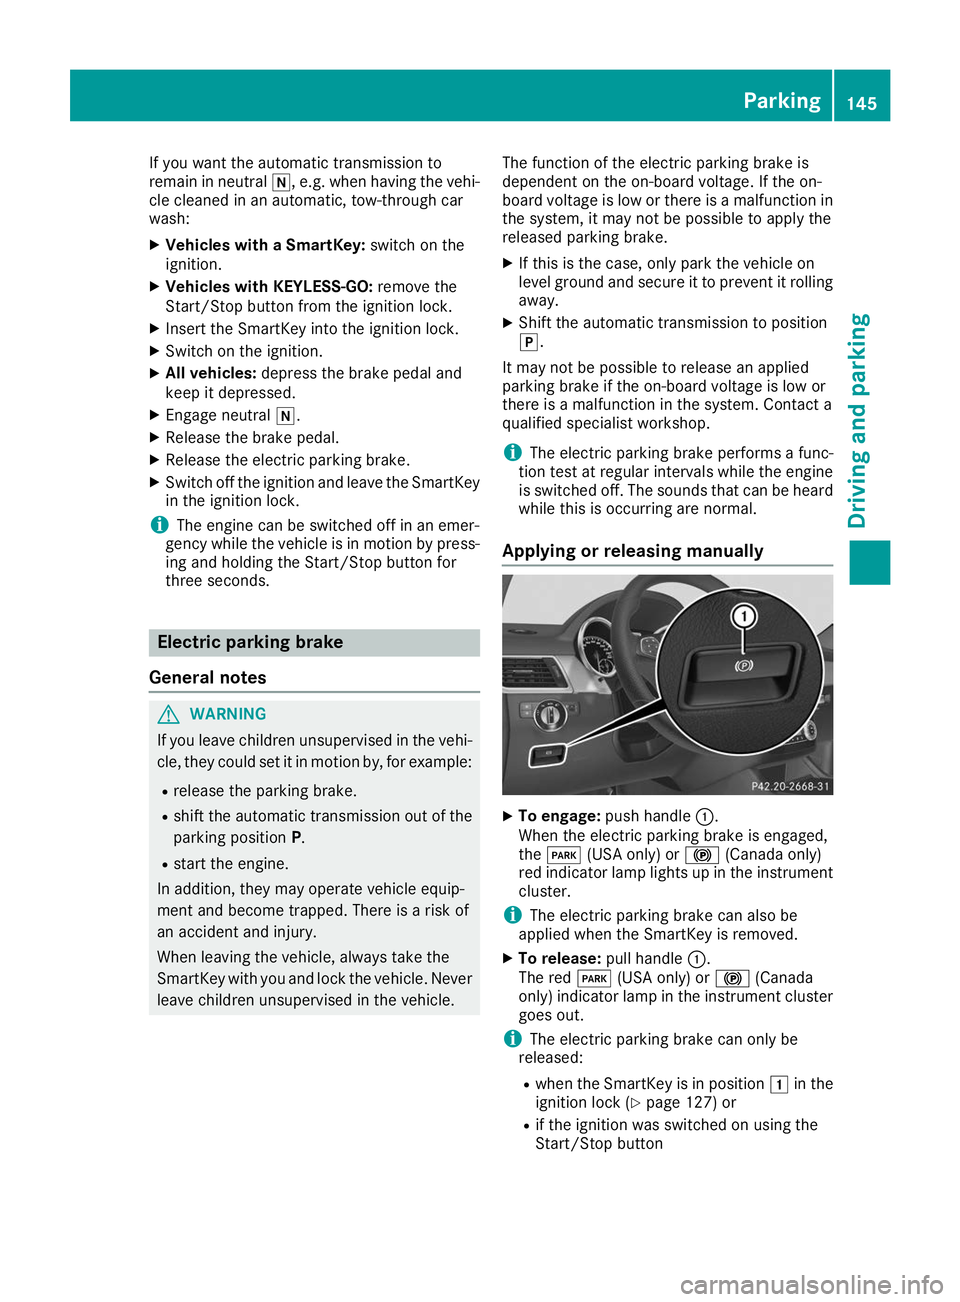
Applying or releasing manually X
To engage: push handle 0043.
When the electric parking brake is engaged,
the 0049 (USA only) or 0024(Canada only)
red indicator lamp lights up in the instrument
cluster.
i The electric parking brake can also be
applied when the SmartKey is removed.
X To release: pull handle0043.
The red 0049(USA only) or 0024(Canada
only) indicator lamp in the instrument cluster goes out.
i The electric parking brake can only be
released:
R when the SmartKey is in position 0047in the
ignition lock (Y page 127) or
R if the ignition was switched on using the
Start/Stop button Parking
145Driving and parking Z
Page 148 of 370
To ensure that you do not roll backwards when
pulling away on an uphill slope, engage the elec-
tric parking brake (Y page 130).
Applying automatically The electric parking brake is automatically
applied when the transmission is in position 005D
and
R the engine is switched off or
R the driver is not wearing a seat belt and the
driver's door is opened
To prevent the electric parking brake from being automatically applied, pull handle 0043.
The electric parking brake is also applied auto-
matically if:
R Active Distance Assist DISTRONIC brings the
vehicle to a standstill or
R the HOLD function is keeping the vehicle sta-
tionary
R Active Parking Assist or the Parking Package
with rear view camera is keeping the vehicle
stationary
In addition, at least one of the following condi-
tions must be fulfilled:
R the engine is switched off
R the driver is not wearing a seat belt and the
driver's door is opened
R there is a system malfunction
R the power supply is insufficient
R the vehicle is stationary for a lengthy period
The red 0049(USA only) or 0024(Canada only)
indicator lamp in the instrument cluster lights
up.
The electric parking brake is not automatically
applied if the engine is switched off by the ECO
start/stop function.
Releasing automatically The electric parking brake is released automat-
ically when all of the following conditions are
fulfilled:
R
The engine is running.
R The seat belt tongue is engaged in the belt
buckle.
R The transmission is in position 005Bor005E and
you depress the accelerator pedal or, on a level surface, you shift from transmission
position
005Dto005B or005E.
R If the transmission is in position 005E, the trunk
lid must be closed.
If the seat belt tongue is not engaged in the seat belt buckle, the following conditions must be
fulfilled:
R The driver's door is closed.
R You are shifting from transmission position
005D or have previously driven at speeds
greater than 2 mph (3 km/h).
R If the transmission is in position 005E, the trunk
lid must be closed.
When the electric parking brake is released,
the 0024 indicator lamp goes out in the instru-
ment cluster.
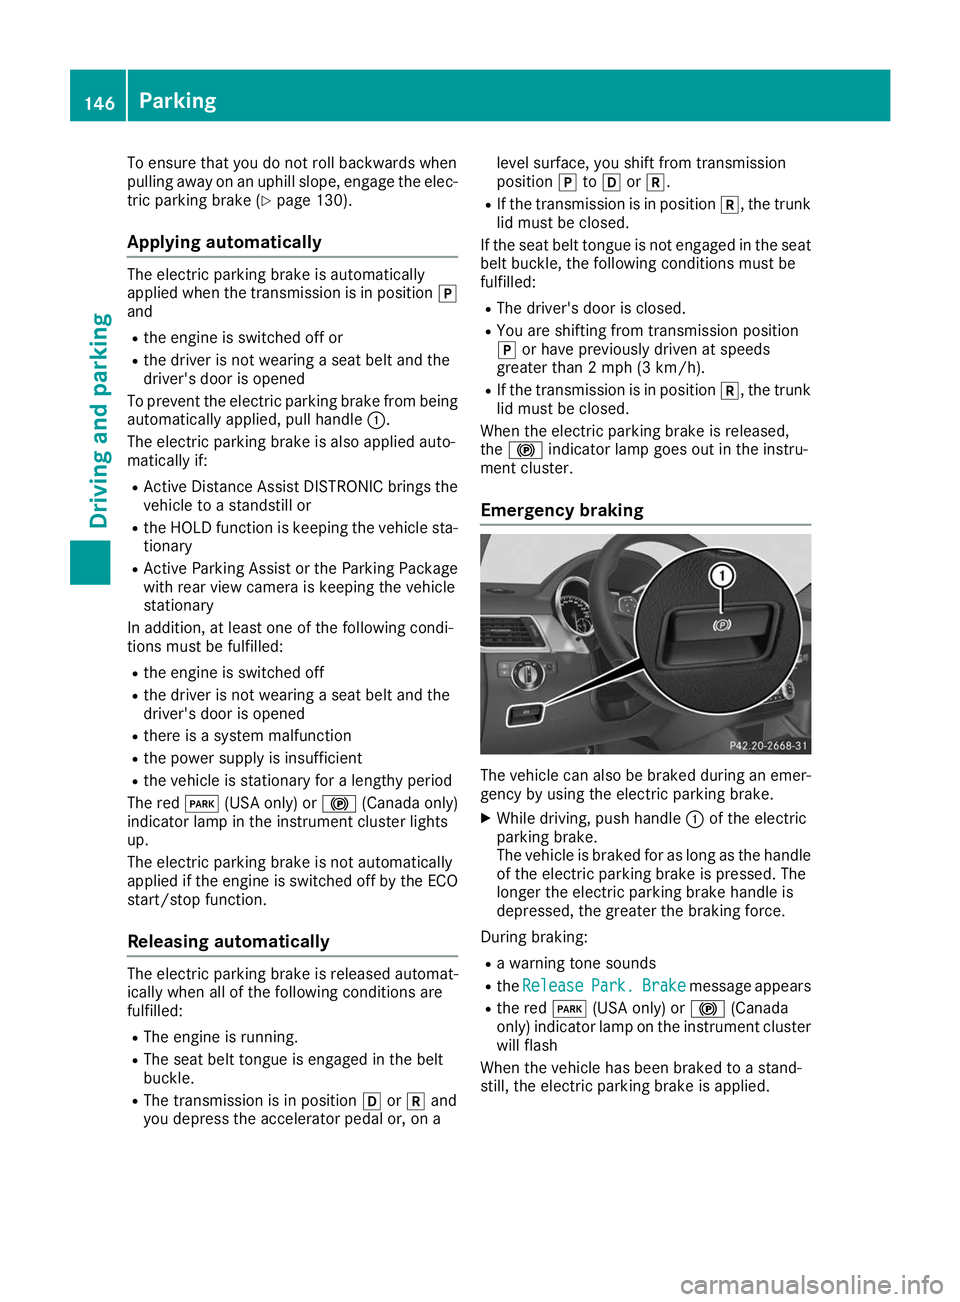
Emergency braking The vehicle can also be braked during an emer-
gency by using the electric parking brake.
X While driving, push handle 0043of the electric
parking brake.
The vehicle is braked for as long as the handle
of the electric parking brake is pressed. The
longer the electric parking brake handle is
depressed, the greater the braking force.
During braking: R a warning tone sounds
R the Release Release Park.
Park.Brake
Brakemessage appears
R the red 0049(USA only) or 0024(Canada
only) indicator lamp on the instrument cluster will flash
When the vehicle has been braked to a stand-
still, the electric parking brake is applied. 146
ParkingDriving and parking
Page 150 of 370
Certain engine systems are designed to keep
the level of poisonous components in exhaust
fumes within legal limits.
These systems only work at peak efficiency if
they are serviced exactly in accordance with the manufacturer's specifications. Always have
work on the engine carried out at a qualified
specialist workshop. Mercedes-Benz recom-
mends that you use an authorized Mercedes-
Benz Center for this purpose. In particular, work
relevant to safety or on safety-related systems
must be carried out at a qualified specialist
workshop.
The engine settings must not be changed under
any circumstances. Furthermore, all specific
service work must be carried out at regular
intervals and in accordance with the Mercedes- Benz service requirements.
You can obtain current information concerning
the servicing of your vehicle at any time from a
qualified specialist workshop. This could be an
overview of the maintenance work or any addi-
tional maintenance work, for example. ECO display
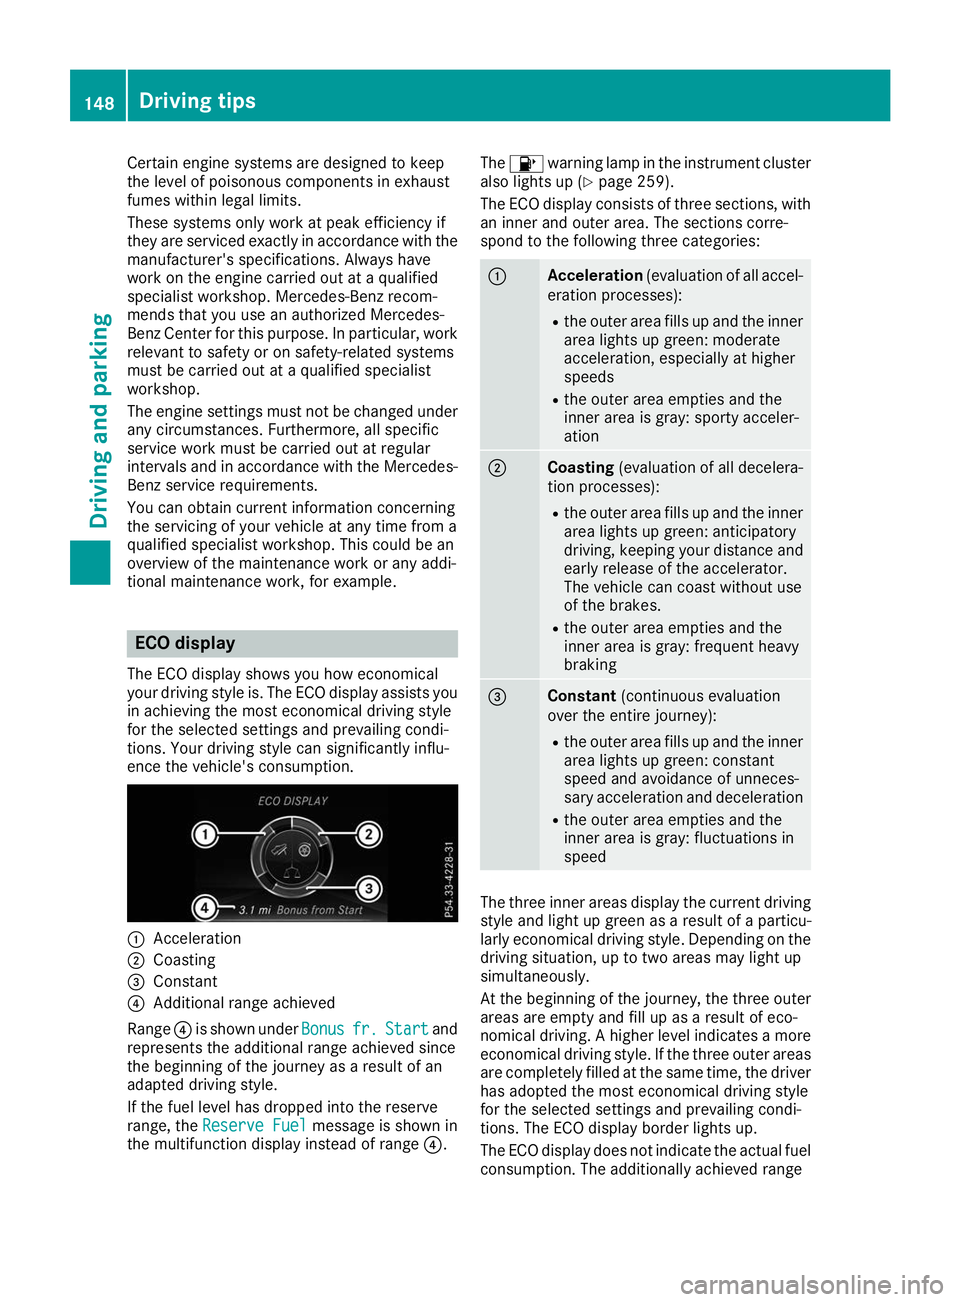
The ECO display shows you how economical
your driving style is. The ECO display assists you in achieving the most economical driving style
for the selected settings and prevailing condi-
tions. Your driving style can significantly influ-
ence the vehicle's consumption. 0043
Acceleration
0044 Coasting
0087 Constant
0085 Additional range achieved
Range 0085is shown under Bonus Bonusfr. fr.Start
Start and
represents the additional range achieved since
the beginning of the journey as a result of an
adapted driving style.
If the fuel level has dropped into the reserve
range, the Reserve Fuel Reserve Fuel message is shown in
the multifunction display instead of range 0085.The
00B6 warning lamp in the instrument cluster
also lights up (Y page 259).
The ECO display consists of three sections, with an inner and outer area. The sections corre-
spond to the following three categories: 0043
Acceleration
(evaluation of all accel-
eration processes):
R the outer area fills up and the inner
area lights up green: moderate
acceleration, especially at higher
speeds
R the outer area empties and the
inner area is gray: sporty acceler-
ation 0044
Coasting
(evaluation of all decelera-
tion processes):
R the outer area fills up and the inner
area lights up green: anticipatory
driving, keeping your distance and
early release of the accelerator.
The vehicle can coast without use
of the brakes.
R the outer area empties and the
inner area is gray: frequent heavy
braking 0087
Constant
(continuous evaluation
over the entire journey):
R the outer area fills up and the inner
area lights up green: constant
speed and avoidance of unneces-
sary acceleration and deceleration
R the outer area empties and the
inner area is gray: fluctuations in
speed The three inner areas display the current driving
style and light up green as a result of a particu-
larly economical driving style. Depending on the driving situation, up to two areas may light up
simultaneously.
At the beginning of the journey, the three outer
areas are empty and fill up as a result of eco-
nomical driving. A higher level indicates a more
economical driving style. If the three outer areas
are completely filled at the same time, the driver
has adopted the most economical driving style
for the selected settings and prevailing condi-
tions. The ECO display border lights up.
The ECO display does not indicate the actual fuel consumption. The additionally achieved range 148
Driving tipsDriving and parking