2019 MERCEDES-BENZ GLE COUPE engine oil
[x] Cancel search: engine oilPage 308 of 370
X
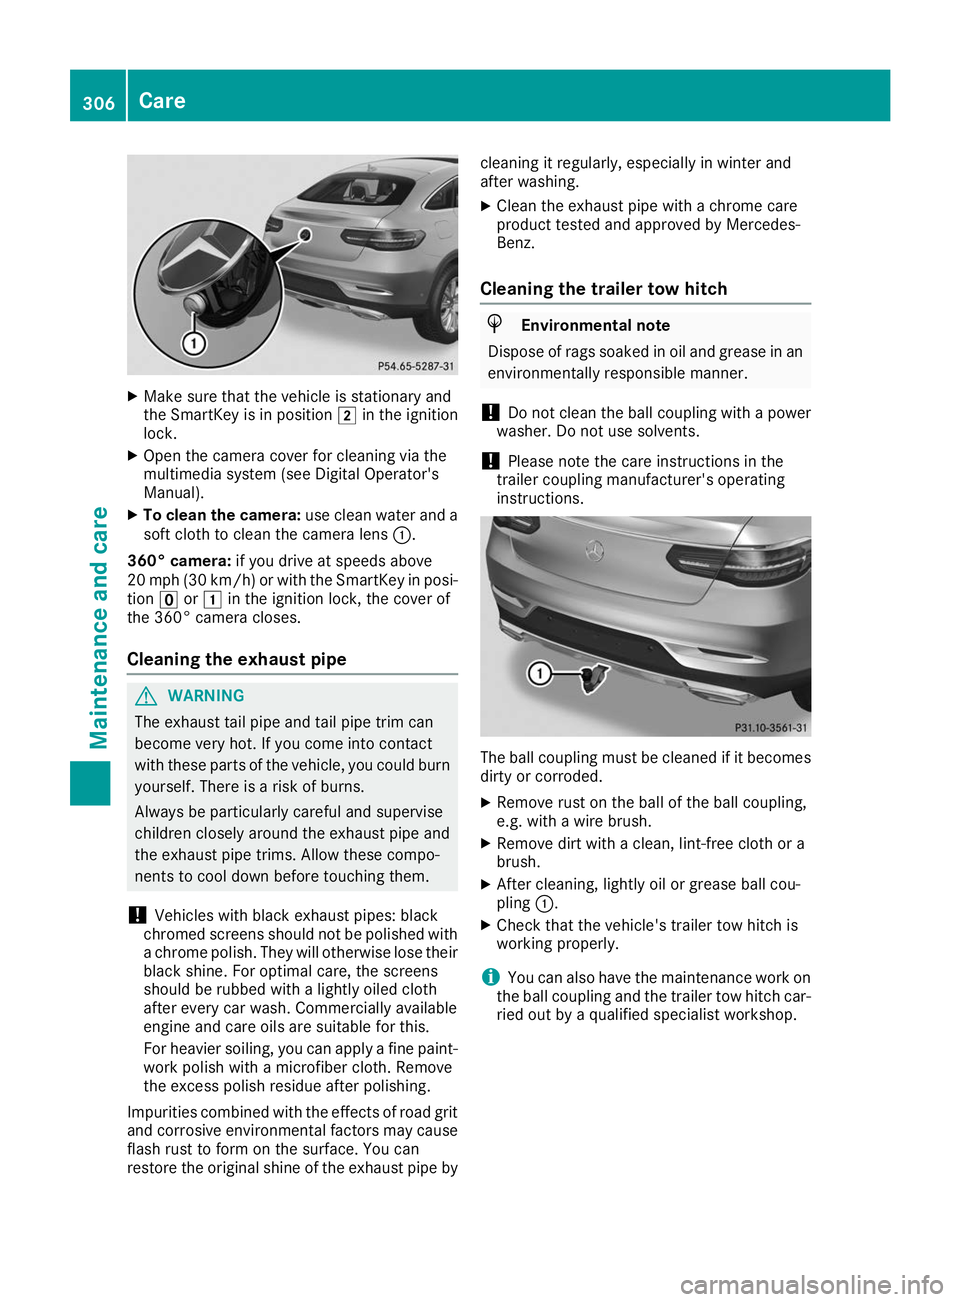
Make sure that the vehicle is stationary and
the SmartKey is in position 0048in the ignition
lock.
X Open the camera cover for cleaning via the
multimedia system (see Digital Operator's
Manual).
X To clean the camera: use clean water and a
soft cloth to clean the camera lens 0043.
360° camera: if you drive at speeds above
20 mph (30 km/h) or with the SmartKey in posi- tion 0092or0047 in the ignition lock, the cover of
the 360° camera closes.
Cleaning the exhaust pipe G
WARNING
The exhaust tail pipe and tail pipe trim can
become very hot. If you come into contact
with these parts of the vehicle, you could burn
yourself. There is a risk of burns.
Always be particularly careful and supervise
children closely around the exhaust pipe and
the exhaust pipe trims. Allow these compo-
nents to cool down before touching them.
! Vehicles with black exhaust pipes: black
chromed screens should not be polished with a chrome polish. They will otherwise lose their
black shine. For optimal care, the screens
should be rubbed with a lightly oiled cloth
after every car wash. Commercially available
engine and care oils are suitable for this.
For heavier soiling, you can apply a fine paint- work polish with a microfiber cloth. Remove
the excess polish residue after polishing.
Impurities combined with the effects of road grit
and corrosive environmental factors may cause flash rust to form on the surface. You can
restore the original shine of the exhaust pipe by cleaning it regularly, especially in winter and
after washing.
X Clean the exhaust pipe with a chrome care
product tested and approved by Mercedes-
Benz.
Cleaning the trailer tow hitch H
Environmental note
Dispose of rags soaked in oil and grease in an environmentally responsible manner.
! Do not clean the ball coupling with a power
washer. Do not use solvents.
! Please note the care instructions in the
trailer coupling manufacturer's operating
instructions. The ball coupling must be cleaned if it becomes
dirty or corroded.
X Remove rust on the ball of the ball coupling,
e.g. with a wire brush.
X Remove dirt with a clean, lint-free cloth or a
brush.
X After cleaning, lightly oil or grease ball cou-
pling 0043.
X Check that the vehicle's trailer tow hitch is
working properly.
i You can also have the maintenance work on
the ball coupling and the trailer tow hitch car-
ried out by a qualified specialist workshop. 306
CareMaintenance and care
Page 315 of 370
X
Do not remove any foreign objects which have
penetrated the tire, e.g. screws or nails.
X Remove the tire sealant bottle, the accompa-
nying TIREFIT sticker and the tire inflation
compressor from the stowage well under-
neath the cargo compartment floor
(Y page 310).
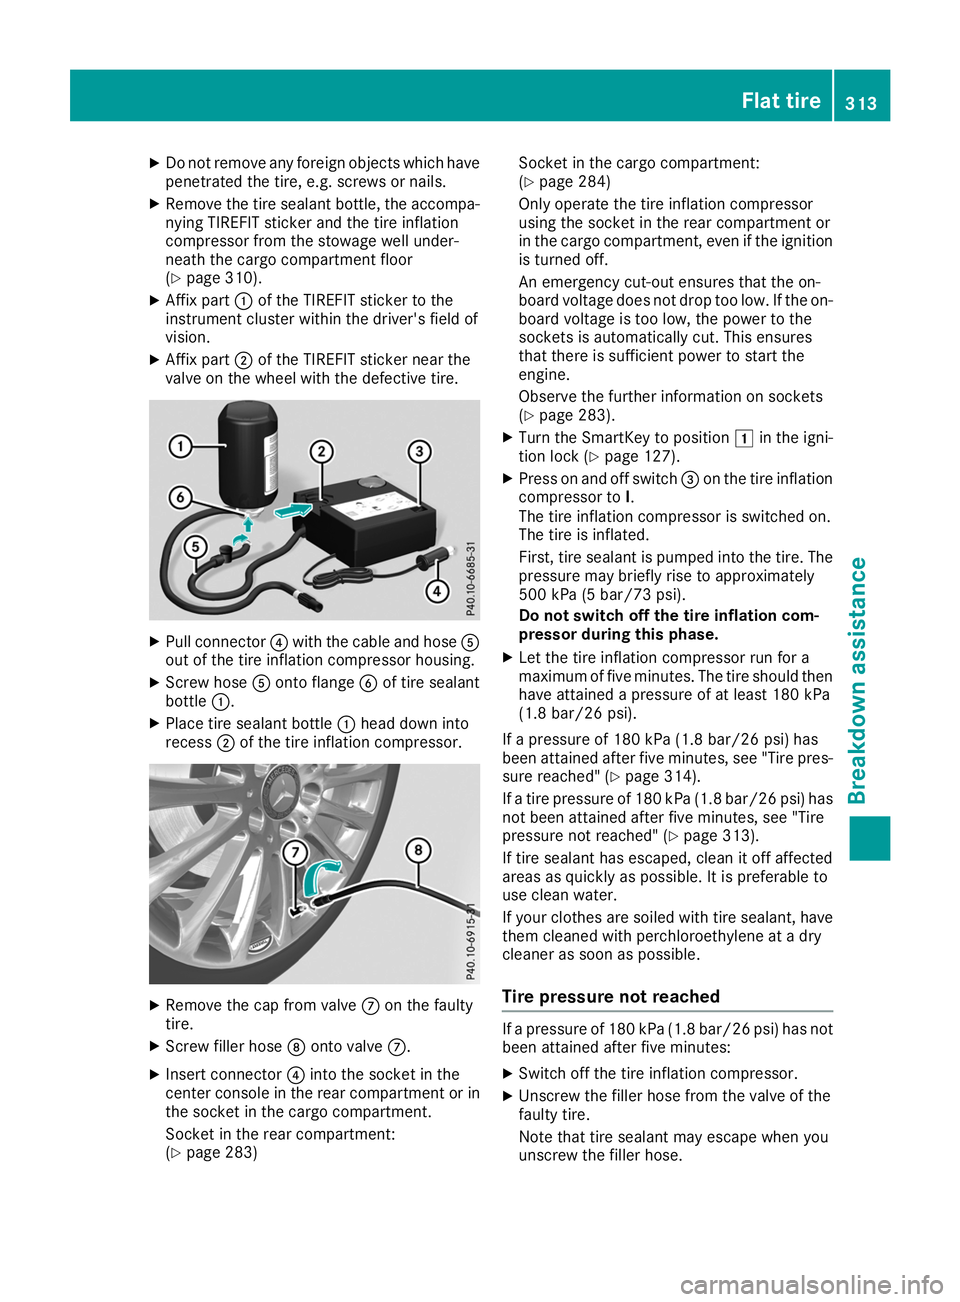
X Affix part 0043of the TIREFIT sticker to the
instrument cluster within the driver's field of
vision.
X Affix part 0044of the TIREFIT sticker near the
valve on the wheel with the defective tire. X
Pull connector 0085with the cable and hose 0083
out of the tire inflation compressor housing.
X Screw hose 0083onto flange 0084of tire sealant
bottle 0043.
X Place tire sealant bottle 0043head down into
recess 0044of the tire inflation compressor. X
Remove the cap from valve 006Bon the faulty
tire.
X Screw filler hose 006Conto valve 006B.
X Insert connector 0085into the socket in the
center console in the rear compartment or in
the socket in the cargo compartment.
Socket in the rear compartment:
(Y page 283) Socket in the cargo compartment:
(Y page 284)
Only operate the tire inflation compressor
using the socket in the rear compartment or
in the cargo compartment, even if the ignition
is turned off.
An emergency cut-out ensures that the on-
board voltage does not drop too low. If the on-
board voltage is too low, the power to the
sockets is automatically cut. This ensures
that there is sufficient power to start the
engine.
Observe the further information on sockets
(Y page 283).
X Turn the SmartKey to position 0047in the igni-
tion lock (Y page 127).
X Press on and off switch 0087on the tire inflation
compressor to I.
The tire inflation compressor is switched on.
The tire is inflated.
First, tire sealant is pumped into the tire. The
pressure may briefly rise to approximately
500 kPa (5 bar/73 psi).
Do not switch off the tire inflation com-
pressor during this phase.
X Let the tire inflation compressor run for a
maximum of five minutes. The tire should then have attained a pressure of at least 180 kPa
(1.8 bar/26 psi).
If a pressure of 180 kPa (1.8 ba r/26 psi) has
been at tained after five minutes, see "Tire pres-
sure reached" (Y page 314).
If a tire pressure of 180 kPa (1.8 bar/26 psi) has not been attained after five minutes, see "Tire
pressure not reached" (Y page 313).
If tire sealant has escaped, clean it off affected
areas as quickly as possible. It is preferable to
use clean water.
If your clothes are soiled with tire sealant, have them cleaned with perchloroethylene at a dry
cleaner as soon as possible.
Tire pressure not reached If a pressure of 180 kPa (1.8 bar/26 psi) has not
been attained after five minutes:
X Switch off the tire inflation compressor.
X Unscrew the filler hose from the valve of the
faulty tire.
Note that tire sealant may escape when you
unscrew the filler hose. Flat tire
313Breakdown assistance Z
Page 350 of 370
ponents may also be damaged. There is a risk
of an accident.
Rotate front and rear wheels only if the wheels
and tires are of the same dimensions.
! On vehicles equipped with a tire pressure
monitor, electronic components are located
in the wheel.
Tire-mounting tools should not be used near
the valve. This could damage the electronic
components.
Only have tires changed at a qualified spe-
cialist workshop.
Always observe the instructions and safety
notes in the "Mounting a wheel" section
(Y page 348).
The wear patterns on the front and rear tires
differ, depending on the operating conditions.
Rotate the wheels before a clear wear pattern
has formed on the tires. Front tires typically
wear more on the shoulders and the rear tires in
the center.
On vehicles that have the same size front and
rear wheels, you can rotate the wheels accord-
ing to the intervals in the tire manufacturer's
warranty book in your vehicle documents. If no
warranty book is available, the tires should be
rotated every 3,000 to 6,000 miles (5,000 to
10,000 km). Depending on tire wear, this may
be required earlier. Do not change the direction
of wheel rotation.
Clean the contact surfaces of the wheel and the brake disc thoroughly every time a wheel is rota-
ted. Check the tire pressure and, if necessary,
restart the tire pressure loss warning system or
the tire pressure monitor (Y page 334).Direction of rotation
Tires with a specified direction of rotation have
additional benefits, e.g. if there is a risk of hydro-
planing. These advantages can only be gained if the tires are installed corresponding to the
direction of rotation.
An arrow on the sidewall of the tire indicates its
correct direction of rotation. Storing wheels
Store wheels that are not being used in a cool,
dry and preferably dark place. Protect the tires
from oil, grease, gasoline and diesel. Mounting a wheel
Preparing the vehicle X
Vehicle with emergency spare wheel:
when mounting the emergency spare wheel in
the event of a flat tire, follow the additional
notes on vehicle preparation under "Flat tire" (Y page 310).
X Stop the vehicle on solid, non-slippery and
level ground.
X Apply the electric parking brake manually.
X Bring the front wheels into the straight-ahead
position.
X Vehicles with automatic transmission:
shift the transmission to position
005D.
X Vehicles with the AIRMATIC package:
make sure that the normal vehicle level is
selected (Y page 170).
X Switch off the engine.
X Vehicles without KEYLESS-GO: remove the
SmartKey from the ignition lock.
X Vehicles with KEYLESS-GO: open the driv-
er's door.
The vehicle electronics are now in position
0092. This means no SmartKey is in the ignition lock.
X Vehicles with KEYLESS-GO: remove the
Start/Stop button from the ignition lock
(Y page 127).
X Make sure that the engine cannot be started
via your smartphone (Y page 129).
X If included in the vehicle equipment, remove
the tire-change tool kit from the vehicle.
X Safeguard the vehicle against rolling away.
i Apart from certain country-specific varia-
tions, vehicles are not equipped with a tire-
change tool kit. For more information on
which tools are required to perform a wheel
change on your vehicle, consult a qualified
specialist workshop. 348
Changing a wheelWheels and tires
Page 361 of 370
from the data shown here. You can find the
data applicable to your vehicle on the vehicle
identification plate. Vehicle identification number (VIN)
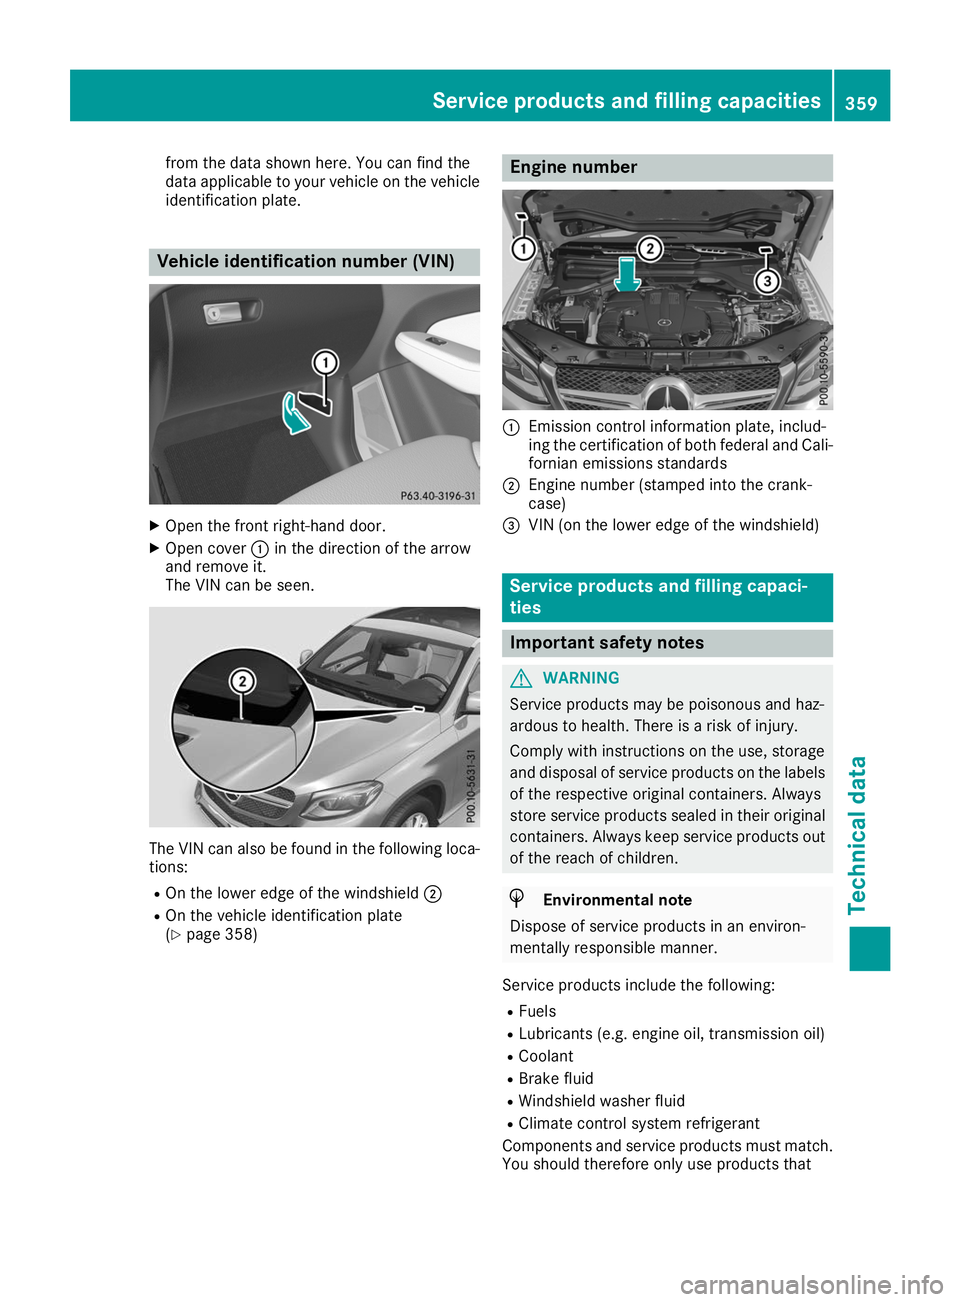
X
Open the front right-hand door.
X Open cover 0043in the direction of the arrow
and remove it.
The VIN can be seen. The VIN can also be found in the following loca-
tions:
R On the lower edge of the windshield 0044
R On the vehicle identification plate
(Y page 358) Engine number
0043
Emission control information plate, includ-
ing the certification of both federal and Cali-
fornian emissions standards
0044 Engine number (stamped into the crank-
case)
0087 VIN (on the lower edge of the windshield) Service products and filling capaci-
ties
Important safety notes
G
WARNING
Service products may be poisonous and haz-
ardous to health. There is a risk of injury.
Comply with instructions on the use, storage
and disposal of service products on the labels of the respective original containers. Always
store service products sealed in their original containers. Always keep service products out
of the reach of children. H
Environmental note
Dispose of service products in an environ-
mentally responsible manner.
Service products include the following: R Fuels
R Lubricants (e.g. engine oil, transmission oil)
R Coolant
R Brake fluid
R Windshield washer fluid
R Climate control system refrigerant
Components and service products must match.
You should therefore only use products that Service products and filling capacities
359Technical data Z
Page 363 of 370
!
Never refuel using:
R Diesel
R Gasoline with more than 10% ethanol by
volume, e.g. E15, E20, E85, E100
R Gasoline with more than 3% methanol by
volume, e.g. M15, M30, M85, M100
R Gasoline with metalliferous additives
Do not mix such fuels with the fuel recom-
mended for your vehicle.
! To ensure the longevity and full perform-
ance of the engine, only premium-grade
unleaded gasoline may be used.
If premium-grade unleaded gasoline is
unavailable and you have to refuel with regu-
lar unleaded gasoline, observe the following
precautions:
R Only fill the fuel tank to half full with regular
unleaded gasoline and add the rest as soon
as possible with premium-grade unleaded
gasoline.
R Do not drive at the maximum design speed.
R Avoid sudden acceleration and engine
speeds over 3000 rpm.
i For more information, please contact a
qualified specialist workshop or visit
http://www.mbusa.com (USA only).
As a temporary measure, if the recommended
fuel is not available, you may also use regular
unleaded gasoline with an octane rating of
87 AKI/91 RON. This may reduce engine per-
formance and increase fuel consumption. Avoid driving at full throttle and sudden acceleration.
Never refuel using gasoline with a lower AKI.
Information on refueling (Y page 142).
Additives ! Operating the engine with fuel additives
added later can lead to engine failure. Do not mix fuel additives with fuel. This does not
include additives for the removal and preven-
tion of residue buildup. gasoline must only be
mixed with additives recommended by
Mercedes-Benz. Comply with the instructions for use on the product label. More information
about recommended additives can be
obtained from any authorized Mercedes-Benz
Center.
Mercedes-Benz recommends that you use bran- ded fuels that have additives. The fuel quality available in some countries may
not be sufficient. Residue could build up in the
fuel injection system as a result. In such cases, and in consultation with an authorized
Mercedes-Benz Center, the fuel may be mixed
with the cleaning additive recommended by
Mercedes-Benz. You must observe the notes
and mixing ratios specified on the container. Engine oil
General notes !
Do not use engine oil or an oil filter with
specifications deviating from those expressly required for the prescribed service intervals.
Do not change the engine oil or oil filter in
order to set replacement intervals longer than
those prescribed. This could otherwise cause damage to the engine or exhaust gas after-
treatment.
Follow the instructions on the service interval display for changing the engine oil. This could
otherwise cause damage to the engine or
exhaust gas aftertreatment.
When handling engine oil, observe the important safety notes on service products (Y page 359).
The engine oils are matched to the performance of Mercedes-Benz engines and service intervals.
You should therefore only use engine oils and oil filters that are approved for vehicles with main-
tenance systems.
For a list of approved engine oils and oil filters,
consult an authorized Mercedes-Benz Center.
Alternatively, visit the website
http://bevo.mercedes-benz.com.
The table shows which engine oils have been
approved for your vehicle. Service products and filling capacities
361Technical data Z
Page 364 of 370
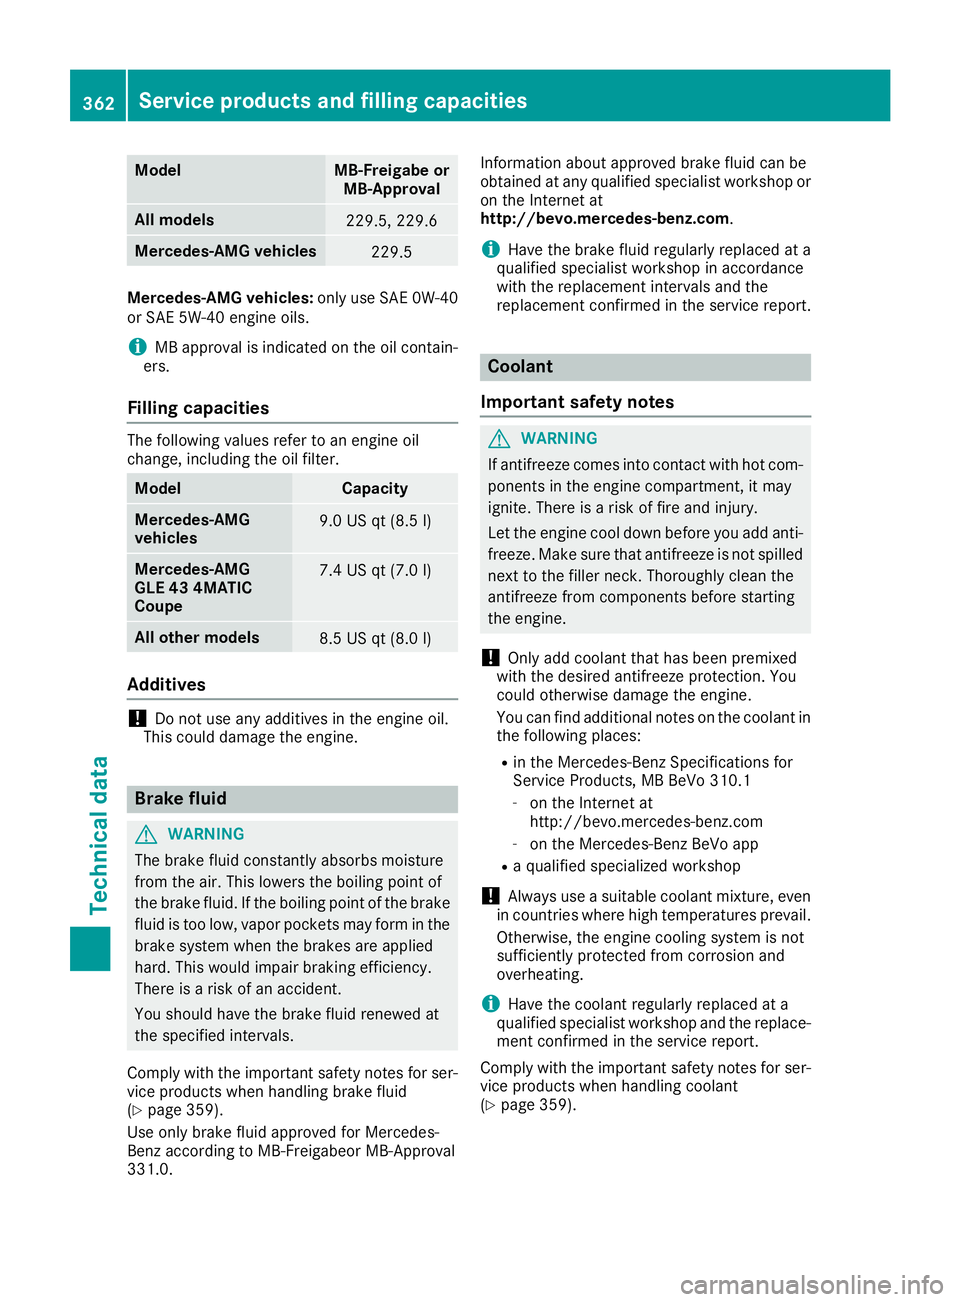
Model MB-Freigabe or
MB-Approval All models
229.5, 229.6
Mercedes‑AMG vehicles
229.5
Mercedes-AMG vehicles:
only use SAE 0W-40
or SAE 5W-40 engine oils.
i MB approval is indicated on the oil contain-
ers.
Filling capacities The following values refer to an engine oil
change, including the oil filter. Model Capacity
Mercedes‑AMG
vehicles 9.0 US qt (8.5
l) Mercedes‑AMG
GLE 43 4MATIC
Coupe 7.4 US qt (7.0
l) All ot
her models 8.5 US qt (8.0
l) Ad
ditives !
Do not use any additives in the engine oil.
This could damage the engine. Brake fluid
G
WARNING
The brake fluid constantly absorbs moisture
from the air. This lowers the boiling point of
the brake fluid. If the boiling point of the brake fluid is too low, vapor pockets may form in the brake system when the brakes are applied
hard. This would impair braking efficiency.
There is a risk of an accident.
You should have the brake fluid renewed at
the specified intervals.
Comply with the important safety notes for ser- vice products when handling brake fluid
(Y page 359).
Use only brake fluid approved for Mercedes-
Benz according to MB-Freigabeor MB-Approval
331.0. Information about approved brake fluid can be
obtained at any qualified specialist workshop or on the Internet at
http://bevo.mercedes-benz.com.
i Have the brake fluid regularly replaced at a
qualified specialist workshop in accordance
with the replacement intervals and the
replacement confirmed in the service report. Coolant
Important safety notes G
WARNING
If antifreeze comes into contact with hot com- ponents in the engine compartment, it may
ignite. There is a risk of fire and injury.
Let the engine cool down before you add anti-
freeze. Make sure that antifreeze is not spilled
next to the filler neck. Thoroughly clean the
antifreeze from components before starting
the engine.
! Only add coolant that has been premixed
with the desired antifreeze protection. You
could otherwise damage the engine.
You can find additional notes on the coolant in
the following places:
R in the Mercedes-Benz Specifications for
Service Products, MB BeVo 310.1
- on the Internet at
http://bevo.mercedes-benz.com
- on the Mercedes-Benz BeVo app
R a qualified specialized workshop
! Always use a suitable coolant mixture, even
in countries where high temperatures prevail.
Otherwise, the engine cooling system is not
sufficiently protected from corrosion and
overheating.
i Have the coolant regularly replaced at a
qualified specialist workshop and the replace- ment confirmed in the service report.
Comply with the important safety notes for ser- vice products when handling coolant
(Y page 359). 362
Service products and filling capacitiesTechnical data
Page 365 of 370
The coolant is a mixture of water and anti-
freeze/corrosion inhibitor. It is responsible for
the following:
R anti-corrosion protection
R antifreeze protection
R raising the boiling point
If the coolant has antifreeze protection down to -35 ‡ (-37 †), the boiling point of the coolant
during operation is approximately 266 ‡
(130 †).
The antifreeze concentrate/corrosion inhibitor
concentration in the engine cooling system
should:
R be at least 50%. This will protect the engine
cooling system against freezing down to
approximately -35 ‡ (-37 †).
R not exceed 55% (antifreeze protection down
to -49 ‡[-45 †]). Otherwise, heat will not be
dissipated as effectively.
Mercedes-Benz recommends an antifreeze/
corrosion inhibitor concentrate in accordance
with MB Specifications for Service Products
310.1.
i When the vehicle is first delivered, it is filled
with a coolant mixture that ensures adequate
antifreeze and anti-corrosion protection.
i The coolant is checked at specified intervals
at a qualified specialist workshop.
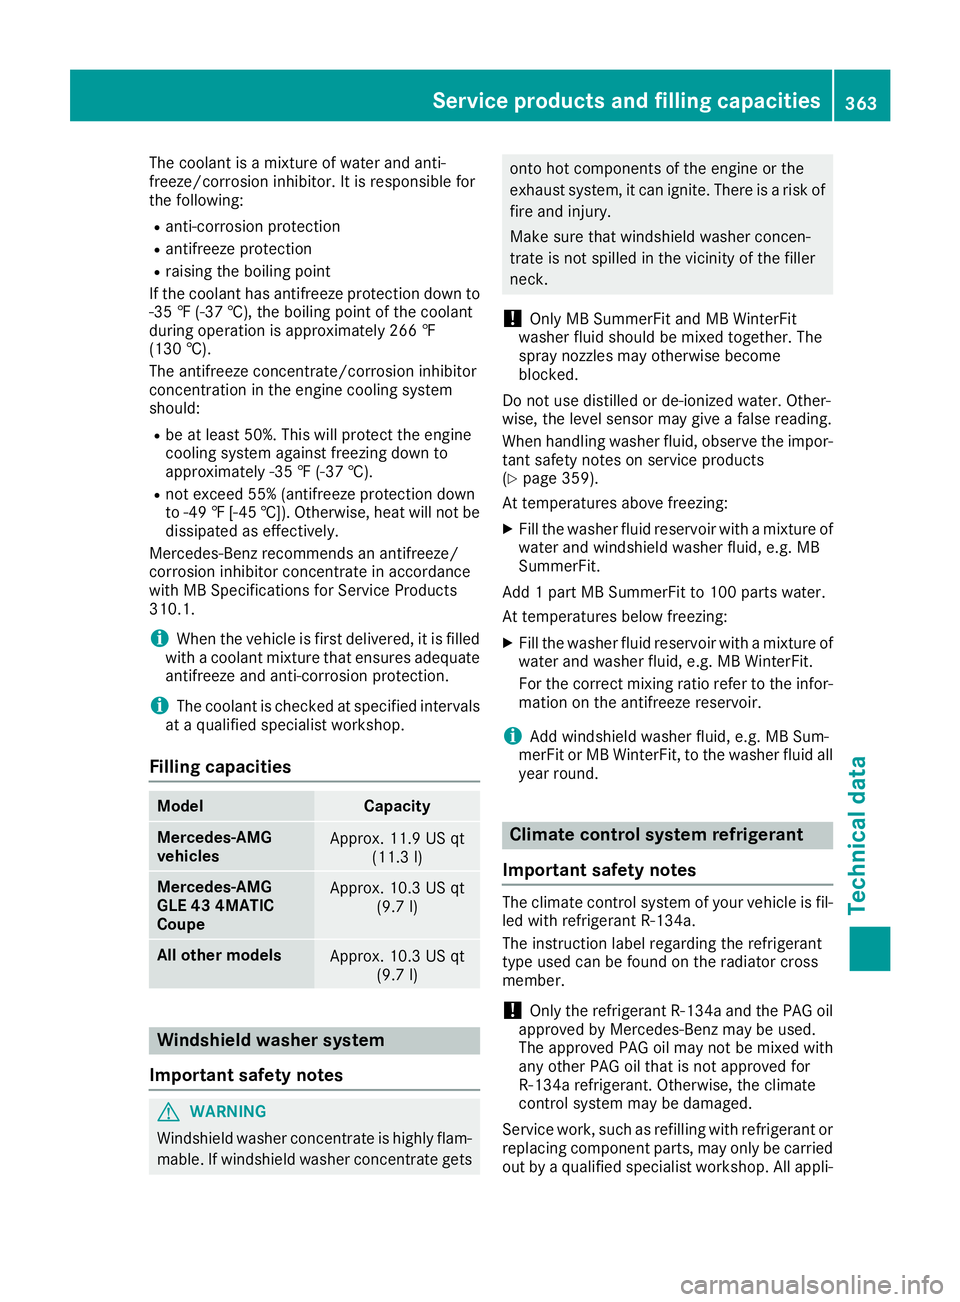
Filling capacities Model Capacity
Mercedes
‑AMG
vehicles Approx. 11.9 US qt
(11.3 l) Mercedes
‑AMG
GLE 43 4MATIC
Coupe Approx. 10.3 US qt
(9.7 l) All other models
Approx. 10.3 US qt
(9.7 l) Windshield washer system
Important safety notes G
WARNING
Windshield washer concentrate is highly flam- mable. If windshield washer concentrate gets onto hot components of the engine or the
exhaust system, it can ignite. There is a risk of
fire and injury.
Make sure that windshield washer concen-
trate is not spilled in the vicinity of the filler
neck.
! Only MB SummerFit and MB WinterFit
washer fluid should be mixed together. The
spray nozzles may otherwise become
blocked.
Do not use distilled or de-ionized water. Other-
wise, the level sensor may give a false reading.
When handling washer fluid, observe the impor- tant safety notes on service products
(Y page 359).
At temperatures above freezing:
X Fill the washer fluid reservoir with a mixture of
water and windshield washer fluid, e.g. MB
SummerFit.
Add 1 part MB SummerFit to 100 parts water.
At temperatures below freezing:
X Fill the washer fluid reservoir with a mixture of
water and washer fluid, e.g. MB WinterFit.
For the correct mixing ratio refer to the infor- mation on the antifreeze reservoir.
i Add windshield washer fluid, e.g. MB Sum-
merFit or MB WinterFit, to the washer fluid all
year round. Climate control syste
m refrigerant
Important safety notes The climate control system of your vehicle is fil-
led with refrigerant R‑134a.
The instruction label regarding the refrigerant
type used can be found on the radiator cross
member.
! Only the refrigerant R‑134a and the PAG oil
approved by Mercedes-Benz may be used.
The approved PAG oil may not be mixed with
any other PAG oil that is not approved for
R-134a refrigerant. Otherwise, the climate
control system may be damaged.
Service work, such as refilling with refrigerant or
replacing component parts, may only be carried out by a qualified specialist workshop. All appli- Service products and filling capacities
363Technical data Z