2019 MERCEDES-BENZ GLE COUPE ignition
[x] Cancel search: ignitionPage 339 of 370

Restarting the tire pressure monitor
When you restart the tire pressure monitor, all
existing warning messages are deleted and the
warning lamps go out. The monitor uses the cur-
rently set tire pressures as the reference values
for monitoring. In most cases, the tire pressure
monitor will automatically detect the new refer- ence values after you have changed the tire
pressure. However, you can also set reference
values manually as described here. The tire
pressure monitor then monitors the new tire
pressure values.
X Set the tire pressure to the value recommen-
ded for the corresponding driving situation on the Tire and Loading Information placard on
the driver's side B-pillar (Y page 330).
You can find more tire pressure values for
various operating conditions in the tire pres-
sure table inside the fuel filler flap
(Y page 331).
X Make sure that the tire pressure is correct on
all four wheels.
X Make sure that the SmartKey is in position 0048
in the ignition lock.
X Press the 0059or0065 button on the steering
wheel to select the Serv. Serv.menu.
X Press the 0063or0064 button to select
Tire Pressure
Tire Pressure .
X Press 0076.
The multifunction display shows the current
tire pressure for the individual tires or the
Tire pressure will be displayed Tire pressure will be displayed
after driving a few minutes after driving a few minutes message.
X Press the 0064button.
The Use
Use Current
Current Pressures
Pressures as
asNew
New Ref‐
Ref‐
erence
erence Values
Valuesmessage appears in the mul-
tifunction display.
If you wish to confirm the restart:
X Press the 0076button.
The Tire
Tire Press.
Press. Monitor
Monitor Restarted
Restarted mes-
sage appears in the multifunction display.
After driving for a few minutes, the system
checks whether the current tire pressures are
within the specified range. The new tire pres- sures are then accepted as reference values
and monitored.
If you wish to cancel the restart: X Press the 0038button.
The tire pressure values stored at the last
restart will continue to be monitored. Radio type approval for the tire pres-
sure monitor Country Radio type approval number
USA FCC ID: MRXGG4
FCC ID: MRXMC34MA4
This device complies with Part 15
of the FCC Rules. Operation is
subject to the following two con- ditions: (1) This device may not
cause harmful interference, and
(2) This device must accept any
interference received, including
interference that may cause
undesired operation. Canada IC: 2546A-GG4;
IC: 2546A- MC34MA4;
Le présent appareil est conforme
aux CNR d'Industrie Canada
applicables aux appareils radio
exempts de license. L'exploita-
tion est autorisée aux deux con-
ditions suivantes: (1) l'appareil
ne doit pas produire de brouil-
lage, et (2) l'utilisateur de l'ap-
pareil doit accepter tout brouil-
lage radioélectrique subi, même
si le brouillage est susceptible
d'en compromettre le fonc-
tionnement. Loading the vehicle
Instruction labels for tires and loads
G
WARNING
Overloaded tires can overheat, causing a
blowout. Overloaded tires can also impair the steering and driving characteristics and lead
to brake failure. There is a risk of accident.
Observe the load rating of the tires. The load
rating must be at least half of the GAWR of
your vehicle. Never overload the tires by
exceeding the maximum load.
Two instruction labels on your vehicle show the maximum possible load.
(1) The Tire and Loading Information placard is on the B-pillar on the driver's side. The Tire Loading the vehicle
337Wheels and tires Z
Page 350 of 370

ponents may also be damaged. There is a risk
of an accident.
Rotate front and rear wheels only if the wheels
and tires are of the same dimensions.
! On vehicles equipped with a tire pressure
monitor, electronic components are located
in the wheel.
Tire-mounting tools should not be used near
the valve. This could damage the electronic
components.
Only have tires changed at a qualified spe-
cialist workshop.
Always observe the instructions and safety
notes in the "Mounting a wheel" section
(Y page 348).
The wear patterns on the front and rear tires
differ, depending on the operating conditions.
Rotate the wheels before a clear wear pattern
has formed on the tires. Front tires typically
wear more on the shoulders and the rear tires in
the center.
On vehicles that have the same size front and
rear wheels, you can rotate the wheels accord-
ing to the intervals in the tire manufacturer's
warranty book in your vehicle documents. If no
warranty book is available, the tires should be
rotated every 3,000 to 6,000 miles (5,000 to
10,000 km). Depending on tire wear, this may
be required earlier. Do not change the direction
of wheel rotation.
Clean the contact surfaces of the wheel and the brake disc thoroughly every time a wheel is rota-
ted. Check the tire pressure and, if necessary,
restart the tire pressure loss warning system or
the tire pressure monitor (Y page 334).Direction of rotation
Tires with a specified direction of rotation have
additional benefits, e.g. if there is a risk of hydro-
planing. These advantages can only be gained if the tires are installed corresponding to the
direction of rotation.
An arrow on the sidewall of the tire indicates its
correct direction of rotation. Storing wheels
Store wheels that are not being used in a cool,
dry and preferably dark place. Protect the tires
from oil, grease, gasoline and diesel. Mounting a wheel
Preparing the vehicle X
Vehicle with emergency spare wheel:
when mounting the emergency spare wheel in
the event of a flat tire, follow the additional
notes on vehicle preparation under "Flat tire" (Y page 310).
X Stop the vehicle on solid, non-slippery and
level ground.
X Apply the electric parking brake manually.
X Bring the front wheels into the straight-ahead
position.
X Vehicles with automatic transmission:
shift the transmission to position
005D.
X Vehicles with the AIRMATIC package:
make sure that the normal vehicle level is
selected (Y page 170).
X Switch off the engine.
X Vehicles without KEYLESS-GO: remove the
SmartKey from the ignition lock.
X Vehicles with KEYLESS-GO: open the driv-
er's door.
The vehicle electronics are now in position
0092. This means no SmartKey is in the ignition lock.
X Vehicles with KEYLESS-GO: remove the
Start/Stop button from the ignition lock
(Y page 127).
X Make sure that the engine cannot be started
via your smartphone (Y page 129).
X If included in the vehicle equipment, remove
the tire-change tool kit from the vehicle.
X Safeguard the vehicle against rolling away.
i Apart from certain country-specific varia-
tions, vehicles are not equipped with a tire-
change tool kit. For more information on
which tools are required to perform a wheel
change on your vehicle, consult a qualified
specialist workshop. 348
Changing a wheelWheels and tires
Page 358 of 370

Inflating the collapsible spare wheel
(Mercedes-AMG GLE 63 4MATIC
Coupe)
! Inflate the collapsible spare wheel using the
tire inflation compressor before lowering the
vehicle. The wheel rim could otherwise be
damaged.
! Do not operate the tire inflation compressor
for longer than eight minutes at a time without
a break. It may otherwise overheat.
The tire inflation compressor can be operated again once it has cooled down.
Comply with the manufacturer's safety instruc-
tions on the tire inflation compressor label and
on the tire sealant bottle.
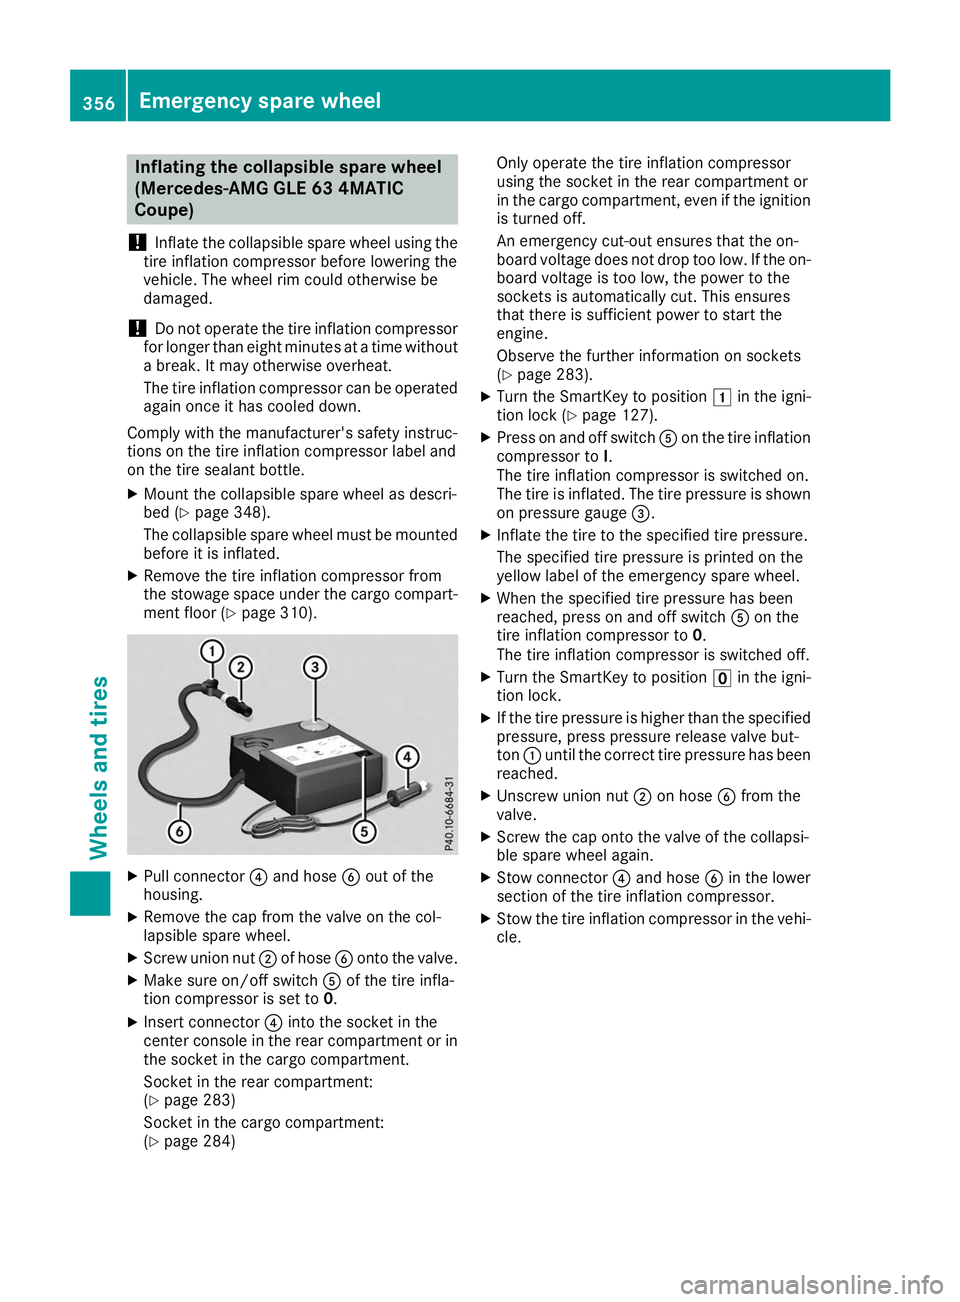
X Mount the collapsible spare wheel as descri-
bed (Y page 348).
The collapsible spare wheel must be mounted before it is inflated.
X Remove the tire inflation compressor from
the stowage space under the cargo compart-
ment floor (Y page 310). X
Pull connector 0085and hose 0084out of the
housing.
X Remove the cap from the valve on the col-
lapsible spare wheel.
X Screw union nut 0044of hose 0084onto the valve.
X Make sure on/off switch 0083of the tire infla-
tion compressor is set to 0.
X Insert connector 0085into the socket in the
center console in the rear compartment or in
the socket in the cargo compartment.
Socket in the rear compartment:
(Y page 283)
Socket in the cargo compartment:
(Y page 284) Only operate the tire inflation compressor
using the socket in the rear compartment or
in the cargo compartment, even if the ignition
is turned off.
An emergency cut-out ensures that the on-
board voltage does not drop too low. If the on-
board voltage is too low, the power to the
sockets is automatically cut. This ensures
that there is sufficient power to start the
engine.
Observe the further information on sockets
(Y page 283).
X Turn the SmartKey to position 0047in the igni-
tion lock (Y page 127).
X Press on and off switch 0083on the tire inflation
compressor to I.
The tire inflation compressor is switched on.
The tire is inflated. The tire pressure is shown
on pressure gauge 0087.
X Inflate the tire to the specified tire pressure.
The specified tire pressure is printed on the
yellow label of the emergency spare wheel.
X When the specified tire pressure has been
reached, press on and off switch 0083on the
tire inflation compressor to 0.
The tire inflation compressor is switched off.
X Turn the SmartKey to position 0092in the igni-
tion lock.
X If the tire pressure is higher than the specified
pressure, press pressure release valve but-
ton 0043until the correct tire pressure has been
reached.
X Unscrew union nut 0044on hose 0084from the
valve.
X Screw the cap onto the valve of the collapsi-
ble spare wheel again.
X Stow connector 0085and hose 0084in the lower
section of the tire inflation compressor.
X Stow the tire inflation compressor in the vehi-
cle. 356
Emergency spare wheelWheels and ti
res
Page 362 of 370

have been tested and approved by Mercedes-
Benz.
You can identify service products approved by
Mercedes-Benz by the following inscriptions on
the container:
R MB-Freigabe (e.g. MB-Freigabe 229.51)
R MB-Approval (e.g. MB-Approval 229.51)
Other designations or recommendations indi-
cate a level of quality or a specification in
accordance with an MB Sheet Number (e.g. MB 229.5). They have not necessarily been
approved by Mercedes-Benz.
Other identifications, for example:
R 0W-30
R 5W-30
R 5W-40 Fuel
Important safety notes G
WARNING
Fuel is highly flammable. Risk of fire and
explosion by improper handling of fuel.
You must avoid fire, open flames, smoking
and creating sparks. Switch off the ignition
before refueling and, if present, switch off the auxiliary heating. G
WARNING
Fuels are toxic and harmful to health. There is a risk of injury.
You must avoid fuels coming into contact with
skin, eyes and clothes or being swallowed.
Do not inhale the fuel vapors. Keep children
away from fuels.
Keep doors and windows closed during the
refueling process.
If you or others come into contact with fuel,
observe the following points:
R Immediately rinse the fuel off your skin with
soap and water.
R If you get fuel into your eyes, immediately
rinse your eyes throughly with clean water.
Seek medical attention immediately. R
Seek medical attention immediately if fuel
has been swallowed. Do not induce vomit-
ing.
R Immediately change out of clothing which
has come into contact with fuel.
Tank capacity Model Total capa-
city All models
24.6 US gal
(93.0 l) Model Of which
reserve Mercedes‑AMG GLE 43
4MATIC Coupe Approx.
3.2 US gal (12.0 l) Mercedes-
AMG GLE 63 S 4MATIC
Coupe
Approx.
3.7 US gal (14.0 l) Gasoline
Fuel grade
!
Do not use diesel to refuel vehicles with a
gasoline engine. Do not switch on the ignition if you accidentally refuel with the wrong fuel.
Otherwise, the fuel will enter the fuel system.
Even small amounts of the wrong fuel could
result in damage to the fuel system and the
engine. Notify a qualified specialist workshop
and have the fuel tank and fuel lines drained
completely.
! Only refuel using unleaded premium grade
gasoline with at least 91 AKI/95 RON.
i E10 fuel contains up to 10% bioethanol.
Your vehicle is E10-compatible. You can
refuel your vehicle using E10 fuel.
! Only use the fuel recommended. Operating
the vehicle with other fuels can lead to dam-
age to the fuel system, engine and exhaust
system. 360
Service products and filling capacitiesTechnical data