2019 MERCEDES-BENZ GLC SUV window
[x] Cancel search: windowPage 94 of 673
Con
venience closing (closing theve hicle
from outside) &
WARNING Risk of entrapment caused by
inadver tent con venience closing
When the con venience closing feature is
operating, parts of the body could become
trapped in the closing area of the side win‐
dow and the sliding sunroof. #
Obser vethe comple teclosing proce‐
du re when using con venience closing. #
When closing, ma kesure that no body
parts are in the closing area. #
Press and hold theß button on thekey.
The following functions are per form ed:
R The vehicle is loc ked. R
The side windo wsare closed.
R The pano ramic sliding sunroof is closed. #
Tointer rupt convenience closing: release
th eß button. #
Toclose thero ller sunblinds: press and
hold theß button again.
% Con venience closing can also be operated
wi th KEYLESS-GO (/ page 80). Problems with
the side windo ws &
WARNING Risk of becoming trapped or
fa ta lly injured if reve rsing pr otection is
not activated
If yo u close a side wind owagain immediately
af te r it has been bloc ked, the side window
will close with increased or maximum forc e.
The reve rsing feature will then not be active.
Pa rts of the body could become trapped in
th e closing area in the process. #
Make sure that no parts of the body are
in the closing area. #
Tostop the closing process, release the
button or press the button again tore-
open the side windo w. Problem
Possible causes/consequences and M
MSolutions
A side window cann otbe closed and
yo u cannot see the cause. #
Check tosee whe ther any objects are in the window guide. #
Adjust the side windo ws. Opening and closing
91
Page 95 of 673
Problem
Possible causes/consequences and M
MSolutions
Ad justing the side windo ws
If a side window is obstructed during closing and reopens again immediately: #
Immediately af terth is, pull the cor responding button again until the side window has closed, and hold
th e button for at least one more second (re-adjustment).
The side window is closed without the automatic reve rsing function.
If th e side window is obstructed again and reopens again immediately: #
Immediately af terth is, pull the cor responding button again until the side window has closed, and hold
th e button for at least one more second (follo w-up adjustment).
The side wind owis closed without the automatic reve rsing function.
The side windo wscannot be opened or
closed using the con venience opening
fe ature. The
key bat tery iswe ak or dischar ged. #
Check the battery using the battery check lamp and replace if necessary (/ page76). Sliding sunroof
Opening and closing
the sliding sunroof %
The term "sliding sun roof" also refers to the
panorama sliding sunroof. &
WARNING Risk of becoming trapped
while opening and closing the sliding
sunroof
During opening and closing, parts of the
body could getcaught in the sweep of the
sliding sunroof. #
When opening or closing, make sure
that no body parts are in the sweep. #
Release the button immediately if
somebody becomes trapped.
or 92
Opening and closing
Page 100 of 673
Problem
Possible causes/consequences and M
MSolutions #
Immediately af ter auto matic reve rsing, pull and hold the3 button down again tothe point of resist‐
ance until the sliding sunroof is closed.
The sliding sunroof will be closed with increased forc e.
If th e sliding sunroof is obstructed again and reopens again slightly: #
Repeat the pr evious step.
The sliding sunroof will be closed again with increased forc e.
Ve hicles with a panoramic sliding
sunroof: the sliding sunroof or the
ro ller sunblind does not opera te
smoo thly. #
Pull and hold the3 button little bylittle until the sliding sunroof is fully closed. #
Pull and hold the3 button little bylittle until thero ller sunblind is fully closed. #
Use automatic operation tofully open and then close the sliding sunroof. Ro
ller sunblinds Extending
there ar side window roller sun‐
blinds *
NO
TEDama getothe inertia reel due to
it snapping back If suddenly snapped bac
k,the inertia reel
may be damaged. #
Alw ays mo vethero ller sun blind man‐
uall y. #
Do not drive wi th thero ller sun blind
hooked in and one or more side win‐
do ws open at the same time. Opening and closing
97
Page 105 of 673
Interior pr
otection is only primed when thefo l‐
lowing components are closed:
R the doors
R theta ilgate
Interior pr otection is automatically deactivated:
R afte r pressing theÜ orp button on
th ekey
R afte r pressing thest art/ stop button with the
ke y in thestow age compartment
(/ page 174)
R afte r unlocking theve hicle using KEYLESS-
GO
R when using HANDS-FREE ACCESS
The following situations can lead toafa lse
alarm:
R moving objects such as masc ots in theve hi‐
cle interior
R when the side window is open
R when the panoramic sliding sunroof is open Priming/deactivating interior pr
otection Multimedia sy
stem:
4 © 5
Settings 5
Quick access #
Prime or deactivate Interior motion sensor.
Interior pr otection is primed again in thefo llow‐
ing cases:
R The vehicle is unloc ked again.
R A door is opened.
R The vehicle is loc ked again.
% Ifqu ick access is una vailable, select the
Vehicle menu under Settingstoprime or
deactivate interior pr otection. 102
Opening and closing
Page 155 of 673
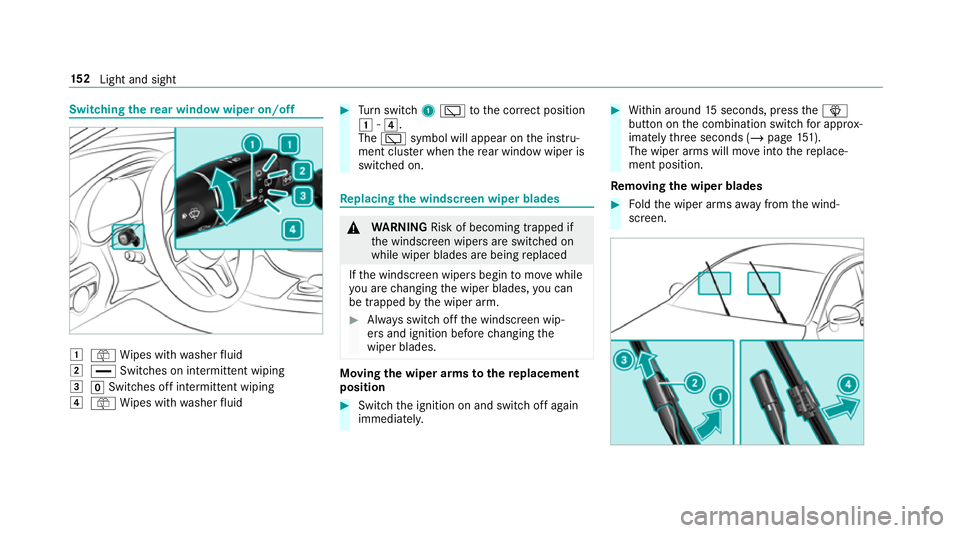
Switching
there ar window wiper on/off 1
ô Wipes with washer fluid
2 ° Switches on intermittent wiping
3 gSwitches off intermittent wiping
4 ô Wipes with washer fluid #
Turn switch 1è tothe cor rect position
1 -4.
The è symbol will appear on the instru‐
ment clus ter when there ar wind owwiper is
swit ched on. Re
placing the windsc reen wiper blades &
WARNING Risk of becoming trapped if
th e windscreen wipers are switched on
while wiper blades are being replaced
If th e windscreen wipers begin tomo vewhile
yo u are changing the wiper blades, you can
be trapped bythe wiper arm. #
Alw ays switch off the windscreen wip‐
ers and ignition before changing the
wiper blades. Moving
the wiper arms tothere placement
position #
Switch the ignition on and switch off again
immediatel y. #
Within around 15seconds, press theî
button on the combination switch for appro x‐
ima tely thre e seconds (/ page151).
The wiper arms will mo veinto there place‐
ment position.
Re moving the wiper blades #
Foldthe wiper arms away from the wind‐
screen. 15 2
Light and sight
Page 157 of 673
#
Remo vethe pr otective film 1 from the
maintenance display on the tip of the newly
fi tted wiper blades.
If th e colour of the maintenance display changes
from black to yellow, the wiper blades should be
re placed.
% The duration until the colour changes varies
depending on the usage conditions. Re
placing the rear window wiper blade &
WARNING Risk of becoming trapped if
th e windscreen wipers are switched on
while wiper blades are being replaced
If th e windscreen wipers begin tomo vewhile
yo u are changing the wiper blades, you can
be trapped bythe wiper arm. #
Alw ays switch off the windscreen wip‐
ers and ignition before changing the
wiper blades. Re
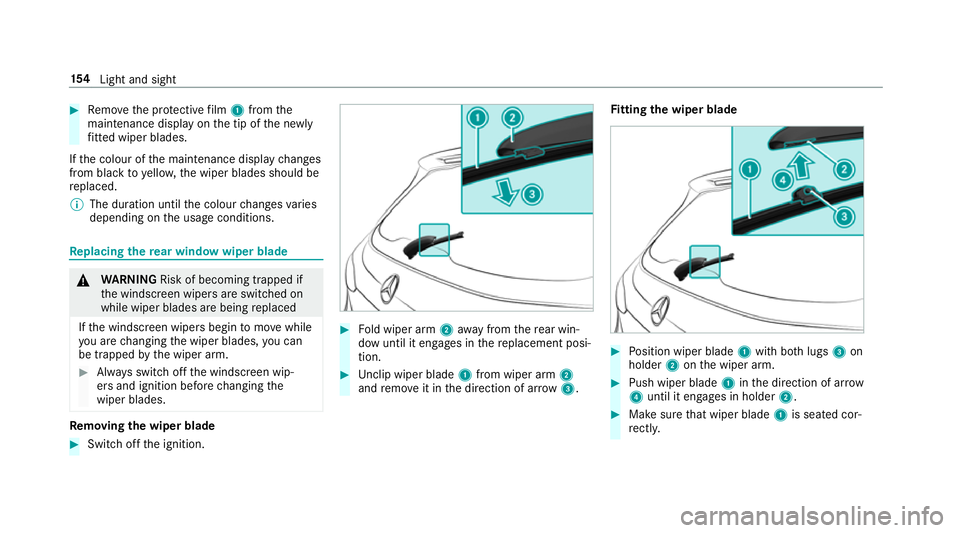
moving the wiper blade #
Switch off the ignition. #
Fold wiper arm 2away from there ar win‐
dow until it engages in there placement posi‐
tion. #
Unclip wiper blade 1from wiper arm 2
and remo veit in the direction of ar row 3. Fi
tting the wiper blade #
Position wiper blade 1with bo thlugs 3on
holder 2onthe wiper arm. #
Push wiper blade 1inthe direction of ar row
4 until it en gage s in holder 2. #
Make sure that wiper blade 1is seated cor‐
re ctly. 15 4
Light and sight
Page 168 of 673
R
Ifth e outside temp erature changes, ventila‐
tion mode au tomatical lyswitches toheating
mode or heating mode automatically
switches toventilation mode.
The stationary heater and theex haust gas outlet
are situated at theright-hand front wheel.
Switching thest ationary heater / stationary
ve ntilation on/off via the control panel &
DANG ER Risk of fata l injury due topoi‐
sonous exhaust gases
If th eta ilpipe is bloc ked or suf ficient ventila‐
tion is not possible, poisonous exhaust gases
such as carbon monoxide may enter theve hi‐
cle. This is the case in enclosed spaces or if
th eve hicle gets stuck in sn ow,fo rex ample. #
Alw ays switch thest ationary heater off
in enclosed spaces without an air
ex traction sy stems, e.g. in garage s. #
Keep theta ilpipe and the area around
th eve hicle free from snow when the
engine or thest ationary heater are run‐
ning. #
Open a window on the windward side of
th eve hicle toensure an adequate sup‐
ply of fresh air. &
WARNING Risk offire due tohot station‐
ary heater components
When thest ationary heater is swit ched on,
parts of theve hicle can become very hot,
e.g. thest ationary heater exhaust sy stem.
Flammable materials such as lea ves, grass or
twigs may ignite if they come into contact
wi th:
R hot parts of thest ationary heater exhaust
sy stem
R theex haust gas itself
There is a risk of fire. #
When thest ationary heater is swit ched
on, make sure that:
R hot vehicle parts do not come into
contact with flammable materials. R
theex haust gas can flow out of the
st ationary heater exhaust pipe
unhindered.
R theex haust gas does not come into
contact with flammable materials. *
NO
TEBattery discharge caused bysta‐
tionary heater or stationary ventilation
operation Ope
rating thest ationary heater or stationary
ve ntilation drains the batter y. #
After heating or ventilating theve hicle
twice, drive for a longer period of time. Re
quirements:
R The fuel tank is filled toat least reser vefuel
le ve l. Climate control
16 5
Page 179 of 673
#
open a side window or the sliding sunroof. Ru
nning-in no tes Mercedes-AMG
vehicles: observeth e no tes in
th e Supplement. Otherwise, you may failto rec‐
ognise dangers.
To preser vethe engine during thefirs t1, 500 km:
R drive at varying road speeds and engine
speeds.
R drive theve hicle in drive program A
or ;.
R change gear before there v counter needle is
Ô ofthewa yto there d area of there v coun‐
te r.
R do not shift down a gear manually in order to
brake.
R avoidoverstra ining theve hicle, e.g. driving at
full thro ttle.
R do not depress the accelera tor pedal past
th e pressure point (kickdown). R
only increase the engine speed gradually and
accelerate theve hicle tofull speed af ter
1, 500 km.
This also applies when the engine or parts of the
driv etra in ha vebeen replaced.
Please also obser vethefo llowing running-in
no tes:
R in cer tain driving and driving saf ety sy stems,
th e sensors adjust automatically while a cer‐
ta in dis tance is being driven af terth eve hicle
has been delivered or af terre pairs. Full sys‐
te m ef fectiveness is not reached until the
end of this teach-in process.
R brakepads, brake discs and tyres that are
either new or ha vebeen replaced only ach‐
ie ve optimum braking ef fect and grip af ter
se veral hundred kilom etre s of driving. Com‐
pensate forth ere duced braking ef fect by
applying greaterfo rc eto the brake pedal. Note
s on driving &
WARNING Risk of accident due to
objects in the driver's foot we ll
Objects in the driver's foot we ll may impede
pedal tr avel or block a depressed pedal.
This jeopardises the operating and road
saf ety of theve hicle. #
Stow all objects in theve hicle securely
so that they cannot getinto the driver's
fo ot we ll. #
Alw aysfit th efloor mats securely and
as prescribed in order toensure that
th ere is alw ays suf ficient room forthe
pedals. #
Do not use loose floor mats and do not
place floor mats on top of one ano ther. 176
Driving and pa rking