2019 MERCEDES-BENZ GLB SUV height
[x] Cancel search: heightPage 144 of 689
#
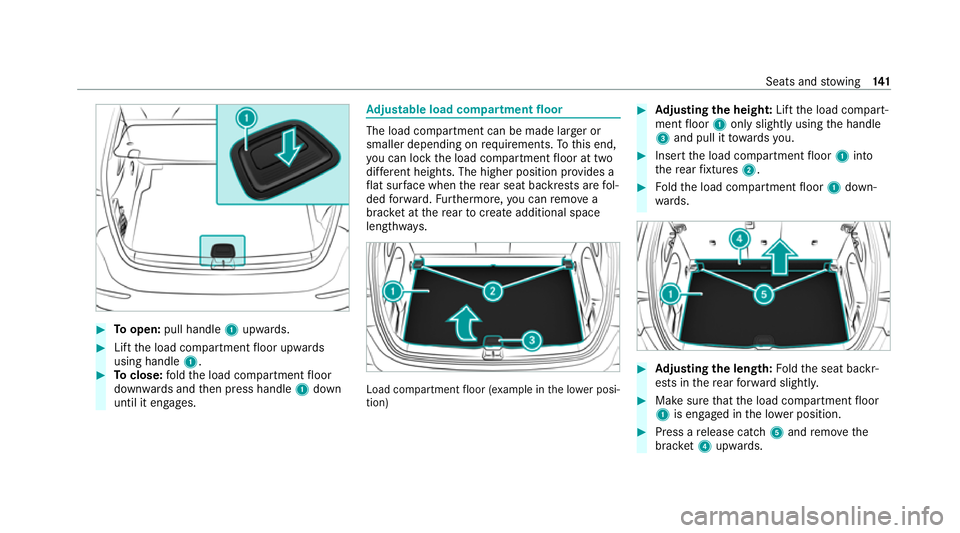
Toopen: pull handle 1upwards. #
Lift the load compartment floor upwards
using handle 1. #
Toclose: fold the load compartment floor
down wards and then press handle 1down
until it engages. Ad
justable load co mpartment floor The load compartment can be made larg
er or
smaller depending on requ irements. Tothis end,
yo u can lock the load compartment floor at two
dif fere nt heights. The higher position pr ovides a
fl at sur face when there ar seat backrests are fol‐
ded forw ard. Furthermore, you can remo ve a
brac ket at there ar to crea teadditional space
lengthw ays. Load compartment
floor (e xamp le in the lo wer posi‐
tion) #
Adjusting the height: Lift the load compart‐
ment floor 1only slightly using the handle
3 and pull it towa rdsyo u. #
Insert the load compartment floor 1into
th ere ar fixtures 2. #
Foldthe load compartment floor 1down‐
wa rds. #
Adjusting the length: Foldthe seat backr‐
ests in there ar forw ard slightl y. #
Make sure that the load compartment floor
1 is engaged in the lo wer position. #
Press a release cat ch5 and remo vethe
brac ket4 upwa rds. Seats and
stowing 141
Page 196 of 689
To
remo vesalt build-up:
R brake occasionally while paying attention to
th e tra ffic conditions
R carefully depress the brake pedal at the end
of the journey and when starting the next
journey
Note s on aquaplaning
Aq uaplaning can take place once a cer tain
amount of water has accumulated on thero ad
sur face.
Obser vethefo llowing no tes during heavy precip‐
itation or in conditions in which aquaplaning may
occur:
R reduce speed
R avoid tyre ruts
R avoid sudden steering mo vements
R brake carefully
% Also obser vethe no tes on regular lych ecking
wheels and tyres (/ page 524). Note
s on driving through water on the road
sur face
Wa ter which has entered into theve hicle can
damage the engine, electrics and transmission.
Wa ter can also enter the air intake of the engine
and cause engine damage.
Obser vethefo llowing if you must drive thro ugh
wate r:
R obser vethe maximum permissible ford ing
dep th (/ page 562)
R drive at walking pace at most, otherwise
wate r can enter theve hicle interior or engine
compartment
R vehicles tr avelling in front, or oncoming vehi‐
cles, can create waves which may exceed the
maximum permissible height of thewater
The braking ef fect of the brakes is reduced af ter
fo rd ing. Brake carefully while paying attention to
th e tra ffic conditions until braking po wer has
been fully restored. Note
s on off-road driving &
WARNING Risk of accident if you do not
ke ep toline of fall on inclines
If yo u drive at an angle or turn on an incline,
th eve hicle could slip side ways, tip and roll‐
ove r. #
Alw ays drive on inclines in the line of
fa ll (straight up or down) and do not
turn. &
WARNING Risk offire due toflammable
materials on hot parts of theex haust
sy stem
Flammable material such as lea ves, grass or
twigs may ignite if they come into contact
wi th hot parts of theex haust sy stem. #
When driving on unpa vedro ads or off-
ro ad, regular lych eck theve hicle under‐
side. #
Remo vetrapped plants or other flam‐
mable material, in particular. Driving and parking
19 3
Page 210 of 689
Glide mode is
characterised bythefo llowing:
R the combustion engine is disconnected from
th e driv etra in and continues torun in neutral.
R the transmission position his displa yed in
green in the multifunction displa y.
Glide mode is activated if thefo llowing condi‐
tions are me t:
R drive prog ram ; is selected.
R the speed is within a suitable range.
R thero ad's course is suitable, e.g. no steep
uphill or downhill inclines or tight bends.
R there is no trailer coupled tothe trailer hitch,
and no bicycle rack fitted.
R you do not depress the accelerator or brake
pedal (e xcept for light brake applications).
% Glide mode can also be activated if you ha ve
selected the "Eco" setting forth e drive in the
drive prog ram =.
Glide mode is deactivated again if one of the
conditions is no longer met.
Ve hicles with Active Di stance Assist
DISTRO NIC:when Active Dis tance Assi st DISTRONIC is acti
ve,th eglide mode function is
not available.
Glide mode can also be pr evented bythefo llow‐
ing parame ters:
R Incline
R Downhill gradient
R temp erature
R height
R Speed
R operating status of the engine
R traffic situation
% Glide mode can be ended bypressing a
st eering wheel gearshift paddle
(/ page 205). Driving and parking
207
Page 273 of 689
th
eir setting checked at a qualified specialist
wo rkshop.
% Do not use the 360° Camera under such cir‐
cums tances. You could otherwise injure oth‐
ers or collide with objects when parking the
ve hicle.
If th eve hicle is car rying a heavy load, leaving the
st andard height can result in inaccuracies in the
guide lines and in the display of thege nerated
ima ges, depending on tech nical conditions.
The field of vision and other functions of the
came rasystem may be restricted due toaddi‐
tional attachments on theve hicle (e.g. licence
plate brac ket, bicycle rack ).
% The contrast of the display may be impaired
by abrupt direct sunlight or by other light
sources, e.g. when driving out of a garage . In
th is case, pay particular attention.
% Have the display repaired or replaced if, for
ex ample, pixel er rors considerably restrict its
use.
See the no tes on cleaning the 360° Camera
(/ page 497). Selecting a view
for the 360° Camera
Re quirements:
R The Auto reversing camera function is activa‐
te d in the multimedia sy stem (/ page270). #
Engage reve rsege ar. #
Select the desired view in the multimedia
sy stem (/ page 267).
Switching reve rsing camera automatic mode
on/off
The reve rsing camera is only an aid. It is not a
substitute foryo ur attention tothe sur roundings.
The responsibility for safe manoeuvring and
parking remains with you. Make sure that no
persons, animals or objects etc. are in the
manoeuvring range. Pay attention to your sur‐
ro undings and be ready tobrake at all times.
Multimedia sy stem:
4 © 5
Settings 5
Assistance
5 Camera & parking #
Switch Auto reversing camera on or off.Opening
the camera co ver of the reve rsing
camera
Multimedia sy stem:
4 © 5
Settings 5
Assistance
5 Camera & parking #
Select Open camera cover.
% The camera co ver closes auto maticallyafter
some time or af ter an ignition cycle. Ac
tive Parking Assist Fu
nction of Active Parking Assist
Ac tive Parking Assist is an elect ronic pa rking
assis tance sy stem which uses ultrasound and is
automatically activated during forw ard tra vel.
The sy stem is operational at speeds below
appr oximately 35 km/h.
If all requ irements are met, theÇ display
appears in the multifunction displa y.The sy stem
th en independently locates and measures paral‐
lel and perpendicular parking spaces on bo th
sides of theve hicle.
When Active Parking Assist has de tected pa rking
spaces, theÈ display appears in the multi‐ 270
Driving and pa rking
Page 343 of 689
Ac
tivating co verch ange in thera dio menu
and media menu
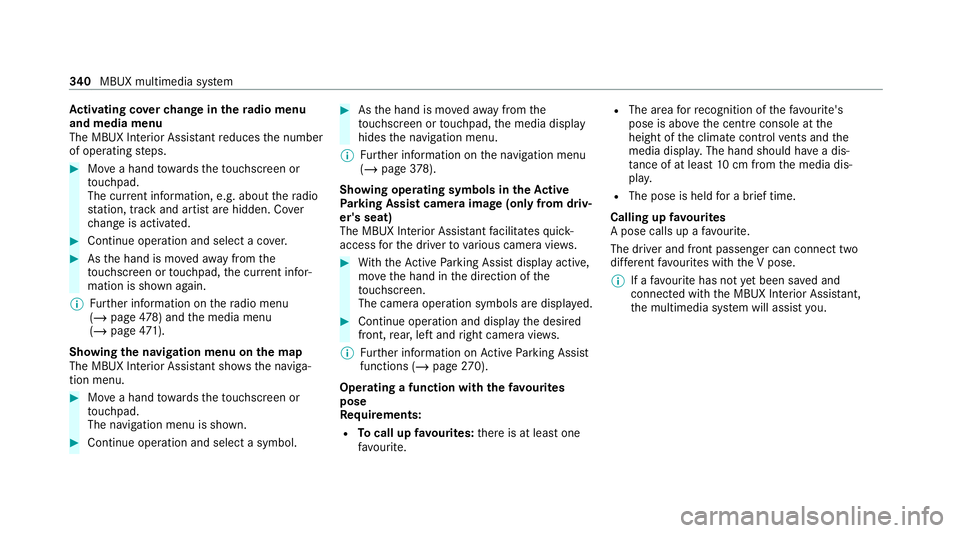
The MBUX Interior Assi stant reduces the number
of operating steps. #
Movea hand towa rdsth eto uchsc reen or
to uchpad.
The cur rent information, e.g. about thera dio
st ation, track and artist are hidden. Co ver
ch ange is activated. #
Continue operation and select a co ver. #
Asthe hand is mo vedaw ay from the
to uchsc reen or touchpad, the cur rent infor‐
mation is shown again.
% Further information on thera dio menu
(/ page 478) and the media menu
(/ page 471).
Sh ow ing the navigation menu on the map
The MBUX In terior Assis tant sho wsthe naviga‐
tion menu. #
Movea hand towa rdsth eto uchsc reen or
to uchpad.
The navigation menu is shown. #
Continue operation and select a symbol. #
Asthe hand is mo vedaw ay from the
to uchsc reen or touchpad, the media display
hides the navigation menu.
% Further information on the navigation menu
(/ page 378).
Sh ow ing operating symbols in theAc tive
Pa rking Assist camera ima ge(only from driv‐
er's seat)
The MBUX In terior Assis tant facilitates quick-
access forth e driver tovarious camera vie ws. #
With th eAc tive Parking Assist display active,
mo vethe hand in the direction of the
to uchsc reen.
The camera operation symbols are displa yed. #
Continue operation and display the desired
front, rear, left and right camera vie ws.
% Further information on Active Parking Assist
functions (/ page270).
Operating a function with thefa vo urites
pose
Re quirements:
R Tocall up favo urites: there is at least one
fa vo urite. R
The area forre cognition of thefa vo urite's
pose is abo vethe cent reconsole at the
height of the climate control vents and the
media displa y.The hand should ha vea dis‐
ta nce of at least 10cm from the media dis‐
pla y.
R The pose is held for a brief time.
Calling up favo urites
A pose calls up a favo urite.
The driver and front passen ger can connect two
dif fere nt favo urites with the V pose.
% If afavo urite has not yet been sa ved and
connec ted with the MBUX Interior Assis tant,
th e multimedia sy stem will assist you. 340
MBUX multimedia sy stem
Page 420 of 689
Displaying
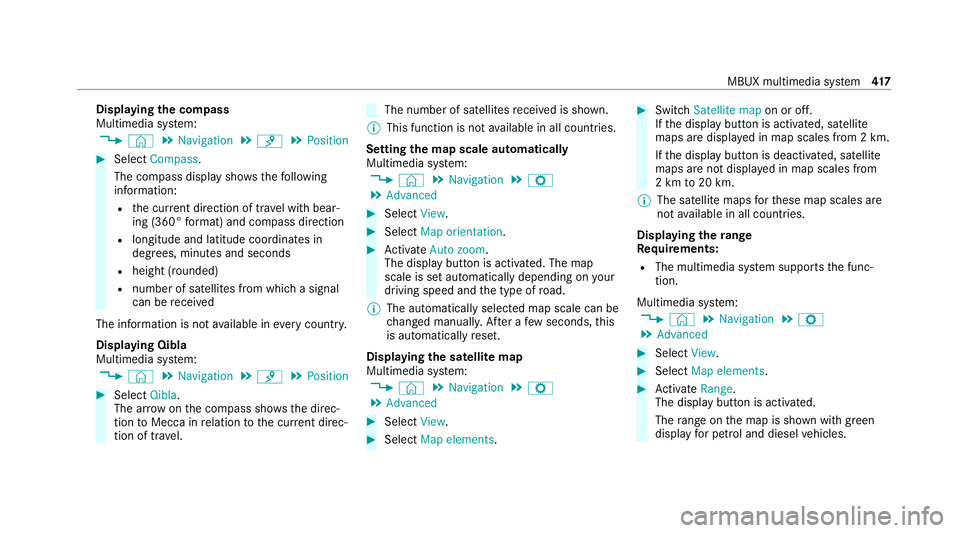
the compass
Multimedia sy stem:
4 © 5
Navigation 5
¡ 5
Position #
Select Compass.
The compass display sho wsthefo llowing
information:
R the cur rent di rection of tr avel with bear‐
ing (360° form at) and compass direction
R longitude and latitude coo rdinates in
degrees, minutes and seconds
R height (rounded)
R number of satellites from which a signal
can be recei ved
The information is not available in every count ry.
Displaying Qibla
Multimedia sy stem:
4 © 5
Navigation 5
¡ 5
Position #
Select Qibla.
The ar rowonthe compass sho wsthe direc‐
tion toMecca in relation tothe cur rent di rec‐
tion of tr avel. The number of satellites
recei ved is shown.
% This function is not available in all countries.
Setting the map scale automatically
Multimedia sy stem:
4 © 5
Navigation 5
Z
5 Advanced #
Select View. #
Select Map orientation. #
Activate Auto zoom.
The display button is acti vated. The map
scale is set automatically depending on your
driving speed and the type of road.
% The automatically selec ted map scale can be
ch anged manuall y.After a few seconds, this
is automatically reset.
Displaying the satellite map
Multimedia sy stem:
4 © 5
Navigation 5
Z
5 Advanced #
Select View. #
Select Map elements. #
Switch Satellite map on or off.
If th e display button is activated, satellite
maps are displa yed in map scales from 2 km.
If th e display button is deactivated, satellite
maps are not displa yed in map scales from
2 km to20 km.
% The satellite maps forth ese map scales are
not available in all countries.
Displ aying thera nge
Re quirements:
R The multimedia sy stem supports the func‐
tion.
Multimedia sy stem:
4 © 5
Navigation 5
Z
5 Advanced #
Select View. #
Select Map elements. #
Activate Range.
The display button is acti vated.
The range on the map is shown with green
display for petrol and diesel vehicles. MBUX multimedia sy
stem 417
Page 422 of 689
Pa
rking service Note
s onthe pa rking service &
WARNING Risk of accident and inju ry
due tonot observing the maximum per‐
mitted access height
If th eve hicle height exceeds the maximum
permitted access height for multi-s torey car
par ksand unde rgro und car par ks,th eve hicle
ro of as well as other vehicle parts could be
damaged.
There could be a risk of injury totheve hicle
occupants. #
Before driving into a multi-s torey car
park or under ground car pa rkobser ve
th e locally signpos ted access height. #
Ifth eve hicle height, including any addi‐
tional equipment, exceeds the maxi‐
mum permitted access height, do not
drive into the multi-s torey car park or
underground car par k.This service is not
available in all countries. Selecting pa
rking options
* NO
TEBefore selecting the parking
option The data is based on information pr
ovided by
th ere spective service pr ovider.
Mercedes Benz accepts no liability forthe
accuracy of the information pr ovided relating
to the multi-s torey car park/parking area. #
Alwa ys obser vethe local Information
and conditions. Re
quirements:
R The navigation services option is available,
subsc ribed toand activated in the Mercedes
me por tal.
R The parking service is within the scope of the
navigation service.
R Parking is activated (/ page 420).
Multimedia sy stem:
4 © 5
Navigation #
Tap on jinthe map. #
Select a parking option.
The map sho ws the parking options in the
vicinity.
The following information is displa yed (if
av ailable):
R Destination address, dis tance from cur‐
re nt vehicle position and ar riva l time
R Information on the multi-s torey car
park/car park
Fo rex ample, opening times, parking
ch arge s, cur rent occupancy, maximum
pa rking time, maximum access height .
The maximum access height shown by
th e parking service does not replace the
need for obser vation of the actual cir‐
cums tances.
R Available payment options (Mercedes
pa y,coins, bank no tes, cards)
R Details on parking tariffs
R Number of available parking spaces
R Payment me thod (e.g. at the parking
machine)
R Services/ facilities at the parking option MBUX multimedia sy
stem 419
Page 491 of 689
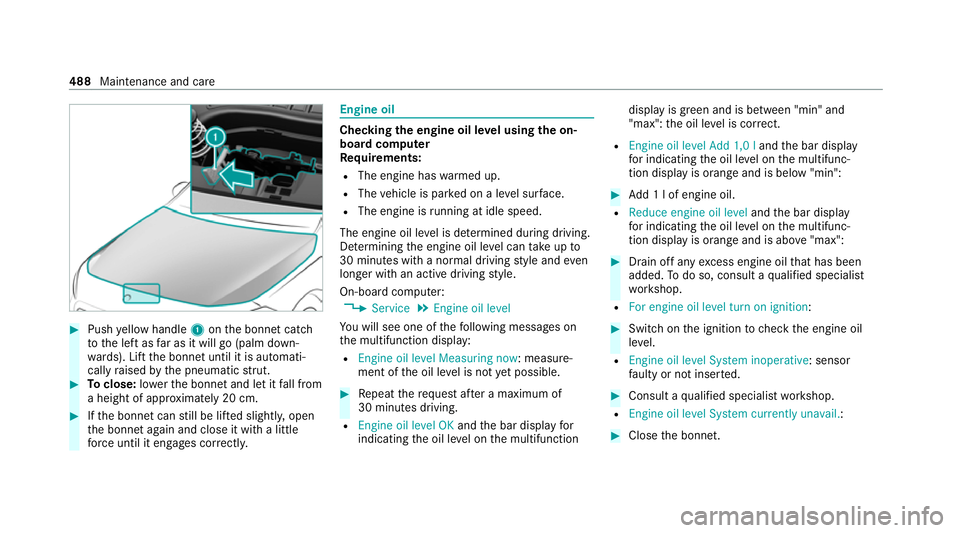
#
Push yellow handle 1onthe bonn etcatch
to the left as far as it will go (palm down‐
wa rds). Lift the bonn etuntil it is automati‐
cally raised bythe pneumatic stru t. #
Toclose: lowe rth e bonn etand let it fall from
a height of appr oximately 20 cm. #
Ifth e bonn etcan still be lif ted slightl y,open
th e bonn etagain and close it with a little
fo rc e until it engages cor rectl y. Engine oil
Checking
the engine oil le vel using the on-
board compu ter
Re quirements:
R The engine has warmed up.
R The vehicle is par ked on a le vel sur face.
R The engine is running at idle speed.
The engine oil le vel is de term ined during driving.
De term ining the engine oil le vel can take up to
30 minutes with a normal driving style and even
longer with an active driving style.
On-board computer: 4 Service 5
Engine oil level
Yo u will see one of thefo llowing messages on
th e multifunction display:
R Engine oil level Measuring now : measure‐
ment of the oil le vel is not yet possible. #
Repeat there qu est af ter a maximum of
30 minutes driving.
R Engine oil level OK andthe bar display for
indicating the oil le vel on the multifunction display is green and is between "min" and
"max": the oil le vel is cor rect.
R Engine oil level Add 1,0 l andthe bar display
fo r indicating the oil le vel on the multifunc‐
tion display is orange and is below "min": #
Add 1 l of engine oil.
R Reduce engine oil level andthe bar display
fo r indicating the oil le vel on the multifunc‐
tion display is orange and is abo ve"max": #
Drain off any excess engine oil that has been
added. Todo so, consult a qualified specialist
wo rkshop.
R For engine oil level turn on ignition: #
Switch on the ignition tocheck the engine oil
le ve l.
R Engine oil level System inoperative : sensor
fa ulty or not inser ted. #
Consult a qualified specialist workshop.
R Engine oil level System currently unavail. : #
Close the bonn et. 488
Maintenance and care