2019 MERCEDES-BENZ GLA ECU
[x] Cancel search: ECUPage 257 of 346

Vehicles with the cargo compartment pack-age: to enlarge the cargo compartment, youcan adjust the rear seat backrests to a 15°steeper angle (cargo position).
XFold the seat backrest forward(Ypage 254).
XMove handleCin the direction of thearrow.
XPush back seat backrestDas far as han-dleCuntil the backrest engages.The backrest is now in the cargo position.
Securing loads
Cargo tie-down rings
Observe the following notes on securing loads:
RObserve the loading guidelines(Ypage 250).
RSecure the load using the cargo tie-downrings.
RDistribute the load on the cargo tie-downrings evenly.
RDo not use elastic straps or nets to secure aload, as these are only intended as an anti-slip protection for light loads.
RDo not route tie-downs across sharp edgesor corners.
RPad sharp edges for protection.
CCargo tie-down rings
Bag hook
GWARNING
The bag hooks cannot restrain heavy objects
or items of luggage. Objects or items of lug-
gage could be flung around and thereby hit
vehicle occupants when braking or abruptly
changing directions. There is a risk of injury.
Only hang light objects on the bag hooks.
Never hang hard, sharp-edged or fragile
objects on the bag hooks.
!The bag hook can bear a maximum load of6.6lbs (3kg) and should not be used tosecure a load.
CBag hook
Parcel shelf
!The maximum load which may be placedon the parcel shelf is 3.3 lbs (1.5 kg).
XTo remove:detach strapsCfrom the tail-gate.
XFold the parcel shelf downwards.
XPull the parcel shelf out to the rearD.
XTo install:place the parcel shelf on theguide rails on the left and right.
XPush the parcel shelf evenly forwards usingboth hands until it engages.
XFold the parcel shelf up.
XAttach strapsCto the tailgate.
Stowage areas255
Stowage and features
Z
Page 259 of 346

You will find information on the maximum roofload in the "Technical data" section(Ypage 339).
An incorrectly secured roof carrier or roof loadmay become detached from the vehicle. Youmust therefore ensure that you observe theroof carrier manufacturer's installation instruc-tions.
Attaching the roof carrier
XSecure the roof carrier to the roof rails. Indoing so, observe the manufacturer's instal-lation instructions.
Features
Cup holder
Important safety notes
GWARNING
The cup holder cannot hold a container
secure whilst traveling. If you use a cup
holder whilst traveling, the container may be
flung around and liquid may be spilled. The
vehicle occupants may come into contact
with the liquid and if it is hot, they may be
scalded. You may be distracted from the
traffic conditions and you could lose control
of the vehicle. There is a risk of an accident
and injury.
Only use the cup holder when the vehicle is
stationary. Only use the cup holder for con-
tainers of the right size. Always close the
container, particularly if the liquid is hot.
GWARNING
The heating elements of the cup holder can
become very hot. You could burn yourself on
them.
There is a risk of injury.
Do not touch the hot heating elements of
the cup holder. Always make sure that chil-
dren cannot access the hot heating ele-
ments of the cup holder. Never leave chil-
dren unsupervised in the vehicle.
GWARNING
If you transport objects in the vehicle inte-
rior and these are not adequately secured,
they could slip or be flung around and
thereby strike vehicle occupants. In addi-
tion, cup holders, open stowage spaces and
mobile phone brackets may not always be
able to hold the objects placed in them in
the event of an accident. There is a risk of
injury, particularly in the event of sharp
braking or sudden changes of direction.
RAlways stow objects in such a way that
they cannot be tossed about in these or
similar situations.
RAlways make sure that objects do not pro-
trude out of the stowage spaces, luggage
nets or stowage nets.
REnsure that closable stowage spaces are
shut before beginning your journey.
RAlways stow and secure heavy, hard, poin-
ted, sharp-edged, fragile or large objects
in the cargo compartment.
!Only use the cup holders for containers ofthe right size and which have lids. Thedrinks could otherwise spill.
Observe the loading guidelines (Ypage 250).
The stowage compartments in the doors pro-vide space for bottles:
Rfront: capacity up to 34 fl. oz. (1.0 l)
Rrear: capacity up to 17 fl. oz. (0.5 l)
Cup holder in the front center console
CCup holder
Features257
Stowage and features
Z
Page 268 of 346

USA only: alternatively, the vehicle can beopened via:
Rthe Internet, under the "Owners Online" sec-tion
Rtelephone applications (e.g. for iPhone®,
Android®)
To do this, you will need your identificationnumber and password.
iVehicle remote opening is only possible ifthe corresponding mobile phone network isaccessible.
Vehicle remote closing
The vehicle valet locking feature can be usedwhen you have forgotten to lock the vehicleand you are no longer nearby.
The vehicle can then be locked by theMercedes-Benz Customer Assistance Center.
The vehicle can be immediately lockedremotely up to four days after the ignition waslast switched off. After this time, valet lockingmay be delayed by 15 to 60 minutes. After30 days the vehicle can no longer be lockedremotely.
XContact the following service hotlines:
RUSA:Mercedes-Benz Customer Assis-tance Center at 1-800-FOR-MERCedes(1-800-367-6372) or 1-866-990-9007
RCanada:Customer Service at1-888-923-8367You will be asked for your password.
The next time you are inside the vehicle andyou switch on the ignition, theDoors LockedDoors LockedRemotelyRemotelymessage will appear on the multi-function display.
USA only: alternatively, the vehicle can belocked via:
Rthe Internet, under the "Owners Online" sec-tion
Rtelephone applications (e.g. for iPhone®,
Android®)
To do this, you will need your identificationnumber and password.
iThe vehicle valet locking feature is availa-ble when the relevant mobile phone networkis available and data connection is possible.
Stolen vehicle recovery service
If your vehicle has been stolen:
XNotify the police.The police will issue a numbered incidentreport.
XThis number will be forwarded to theMercedes-Benz Customer Assistance Centertogether with your PIN.The Mercedes-Benz Customer AssistanceCenter then tries to locate the system. TheMercedes-Benz Customer Assistance Centercontacts you and the local law enforcementagency if the vehicle is located.
However, only the law enforcement agencyis informed of the location of the vehicle.
iIf the anti-theft alarm system is activatedfor longer than 30 seconds, Mercedes meconnect automatically notifies theMercedes-Benz Customer Assistance Cen-ter.
Vehicle Health Check
With the Vehicle Health Check, the CustomerAssistance Center can provide improved sup-port for problems with your vehicle. During anexisting call, vehicle data is transferred to theCustomer Assistance Center. The customerservice representative can use the receiveddata to decide what kind of assistance isrequired. You are then, for example, guided tothe nearest Mercedes-Benz Service Center ora recovery vehicle is called.
If vehicle data needs to be transferred duringan MB Info call or a Roadside Assistance call,this is initiated by the Customer AssistanceCenter. You will see theRoadside Assis‐Roadside Assis‐tance Connectedtance Connectedmessage on the multimediasystem display. If the vehicle remote malfunc-tion diagnosis can be started, theRequestRequestfor vehicle diagnosis received.for vehicle diagnosis received.Start vehicle diagnosis?Start vehicle diagnosis?messageappears in the display.
XConfirm the message withYesYes.
XWhen theVehicle diagnosis: PleaseVehicle diagnosis: Pleasestart ignitionstart ignitionmessage appears, turnthe SmartKey to position2in the ignitionlock (Ypage 125).
XWhen thePlease follow the instruc‐Please follow the instruc‐tions received by phone and movetions received by phone and moveyour vehicle to a safe positionyour vehicle to a safe positionmes-
266Features
Stowage and features
Page 274 of 346

Magnetic field zone maps
North America
South America
Floormats
GWARNING
Objects in the driver's footwell can restrict
the pedal travel or obstruct a depressed
pedal. The operating and road safety of the
vehicle is jeopardized. There is a risk of an
accident.
Make sure that all objects in the vehicle are
stowed correctly, and that they cannot enter
the driver's footwell. Install the floormats
securely and as specified in order to ensure
sufficient clearance for the pedals. Do not
use loose floormats and do not place floor-
mats on top of one another.
XSlide the seat back.
XTo install:place the floormat in the foot-well.
XPress safety catch knobsConto retain-ersD.
XTo remove:pull the floormat off retain-ersD.
XRemove the floormat.
272Features
Stowage and features
Page 278 of 346
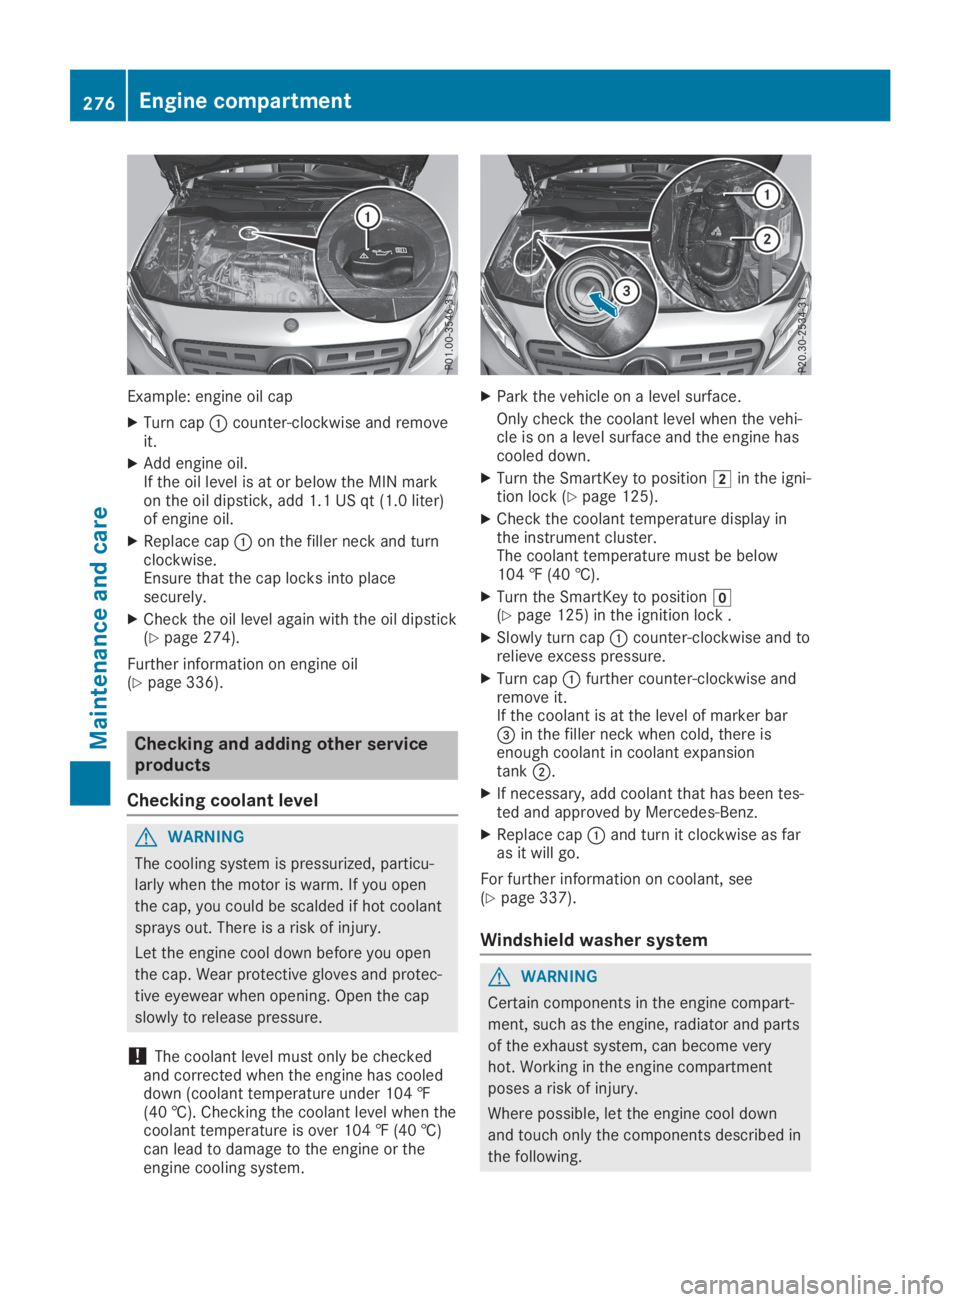
Example: engine oil cap
XTurn capCcounter-clockwise and removeit.
XAdd engine oil.If the oil level is at or below the MIN markon the oil dipstick, add 1.1 US qt (1.0 liter)of engine oil.
XReplace capCon the filler neck and turnclockwise.Ensure that the cap locks into placesecurely.
XCheck the oil level again with the oil dipstick(Ypage 274).
Further information on engine oil(Ypage 336).
Checking and adding other service
products
Checking coolant level
GWARNING
The cooling system is pressurized, particu-
larly when the motor is warm. If you open
the cap, you could be scalded if hot coolant
sprays out. There is a risk of injury.
Let the engine cool down before you open
the cap. Wear protective gloves and protec-
tive eyewear when opening. Open the cap
slowly to release pressure.
!The coolant level must only be checkedand corrected when the engine has cooleddown (coolant temperature under 104 ‡(40 †). Checking the coolant level when thecoolant temperature is over 104 ‡ (40 †)can lead to damage to the engine or theengine cooling system.
XPark the vehicle on a level surface.
Only check the coolant level when the vehi-cle is on a level surface and the engine hascooled down.
XTurn the SmartKey to positionHin the igni-tion lock (Ypage 125).
XCheck the coolant temperature display inthe instrument cluster.The coolant temperature must be below104 ‡ (40 †).
XTurn the SmartKey to positionZ(Ypage 125) in the ignition lock .
XSlowly turn capCcounter-clockwise and torelieve excess pressure.
XTurn capCfurther counter-clockwise andremove it.If the coolant is at the level of marker bar
Page 284 of 346

Always switch off the windshield wipers and
the ignition before cleaning the windshield
or wiper blades.
!Only fold the windshield wipers away fromthe windshield when vertical. Otherwise, youwill damage the hood.
!Do not use dry cloths, abrasive products,solvents or cleaning agents containing sol-vents to clean the inside of the windows. Donot touch the insides of the windows withhard objects, e.g. an ice scraper or ring.There is otherwise a risk of damaging thewindows.
!Clean the water drainage channels of thewindshield and the rear window at regularintervals. Deposits such as leaves, petalsand pollen may under certain circumstancesprevent water from draining away. This canlead to corrosion damage and damage toelectronic components.
XClean the inside and outside of the windowswith a damp cloth and a cleaning productthat is recommended and approved byMercedes-Benz.
Cleaning wiper blades
GWARNING
You could become trapped by the wind-
shield wipers if they start moving while
cleaning the windshield or wiper blades.
There is a risk of injury.
Always switch off the windshield wipers and
the ignition before cleaning the windshield
or wiper blades.
!Only fold the windshield wipers away fromthe windshield when vertical. Otherwise, youwill damage the hood.
!Do not pull the wiper blade. Otherwise, thewiper blade could be damaged.
!Do not clean wiper blades too often anddo not rub them too hard. Otherwise, thegraphite coating could be damaged. Thiscould cause wiper noise.
!Hold the wiper arm securely when foldingback. The windshield could be damaged ifthe wiper arm smacks against it suddenly.
XFold the windshield wiper arms away fromthe windshield.
XCarefully clean the wiper blades with adamp cloth.
XFold the windshield wiper arms back againbefore switching on the ignition.
Cleaning the exterior lighting
!Only use cleaning agents or cleaningcloths that are suitable for plastic lenses.Caustic, irritant or otherwise unsuitablecleaning agents or cleaning cloths couldscratch or damage the exterior lighting plas-tic lenses.
XClean the plastic lenses of the exterior lightswith a wet sponge and a mild cleaningagent, e.g. Mercedes-Benz car shampoo orcleaning cloths.
Cleaning the mirror turn signals
!Only use cleaning agents or cleaningcloths that are suitable for plastic lenses.Unsuitable cleaning agents or cleaningcloths could scratch or damage the plasticlenses of the mirror turn signals.
XClean the plastic lenses of the mirror turnsignals in the exterior mirror housing using awet sponge and mild cleaning agent, e.g.Mercedes-Benz car shampoo or cleaningcloths.
Cleaning the sensors
!If you clean the sensors with a powerwasher, make sure that you keep a distanceof at least 11.8 in (30 cm) between the vehi-cle and the power washer nozzle. Informa-tion about the correct distance is availablefrom the equipment manufacturer.
282Care
Maintenance and care
Page 295 of 346
or sparks are created, the hydrogen gas can
ignite. There is a risk of an explosion.
RMake sure that the positive terminal of a
connected battery does not come into
contact with vehicle parts.
RNever place metal objects or tools on a
battery.
RIt is important that you observe the
described order of the battery terminals
when connecting and disconnecting a bat-
tery.
RWhen jump-starting, make sure that the
battery poles with identical polarity are
connected.
RIt is particularly important to observe the
described order when connecting and dis-
connecting the jumper cables.
RNever connect or disconnect the battery
terminals while the engine is running.
GWARNING
Battery acid is caustic. There is a risk of
injury.
Avoid contact with skin, eyes or clothing. Do
not inhale any battery gases. Do not lean
over the battery. Keep children away from
batteries. Wash away battery acid immedi-
ately with plenty of clean water and seek
medical attention.
HEnvironmental note
Batteries contain pollutants.
It is illegal to dispose of
them with the household
rubbish. They must be col-
lected separately and dis-
posed of in an environmen-
tally responsible recycling
system.
Dispose of batteries in an
environmentally responsible
manner. Take discharged
batteries to a qualified spe-
cialist workshop or to a col-
lection point for used bat-
teries.
!Have the battery regularly checked at aqualified specialist workshop.
Comply with the service intervals in theMaintenance Booklet, or contact a qualifiedspecialist workshop for more information.
!You should have all work involving the bat-tery carried out at a qualified specialistworkshop. In the exceptional case that it isnecessary for you to disconnect the batteryyourself, make sure that:
Rswitch off the engine and remove theSmartKey. On vehicles with KEYLESS-GO,make sure that the ignition is switchedoff. Check that all the indicator lamps inthe instrument cluster are off. Otherwise,electronic components, such as the alter-nator, may be damaged.
Ryou first remove the negative terminalclamp and then the positive terminalclamp. Never swap the terminal clamps.Otherwise, the vehicle's electronic systemmay be damaged.
Rin vehicles with automatic transmission,the transmission is locked in position]after the battery is disconnected. Thevehicle is secured against rolling away.You can then no longer move the vehicle.
The battery and the cover of the positive ter-minal clamp must be installed securely dur-ing operation.
Comply with safety precautions and take pro-tective measures when handling batteries.
Risk of explosion.
Fire, open flames and smoking areprohibited when handling the bat-tery. Avoid creating sparks.
Battery acid is caustic. Avoid con-tact with skin, eyes or clothing.
Wear suitable protective clothing,especially gloves, apron and face-guard.
Rinse any acid spills immediatelywith clear water. Contact a physi-cian if necessary.
Battery (vehicle)293
Roadside Assistance
Z
Page 298 of 346
GWARNING
During the charging process, a battery produces hydrogen gas. If a short circuit occurs or
sparks are created, the hydrogen gas can ignite. There is a risk of an explosion.
RMake sure that the positive terminal of a connected battery does not come into contact with
vehicle parts.
RNever place metal objects or tools on a battery.
RIt is important that you observe the described order of the battery terminals when connect-
ing and disconnecting a battery.
RWhen jump-starting, make sure that the battery poles with identical polarity are connected.
RIt is particularly important to observe the described order when connecting and disconnect-
ing the jumper cables.
RNever connect or disconnect the battery terminals while the engine is running.
GWARNING
A discharged battery can freeze at temperatures below freezing point. When jump-starting the
vehicle or charging the battery, gases can escape from the battery. There is a risk of an explo-
sion.
Allow the frozen battery to thaw out before charging it or jump-starting.
!Avoid repeated and lengthy starting attempts. Otherwise, the catalytic converter could bedamaged by the non-combusted fuel.
If the indicator/warning lamps do not light up in the instrument cluster at low temperatures, it isvery likely that the discharged battery has frozen. In this case you may neither jump-start thevehicle nor charge the battery. Let the battery thaw first. The service life of a thawed-out batterymay be shorter. The starting characteristics can be impaired, particularly at low temperatures.Have the thawed-out battery checked at a qualified specialist workshop.
Do not start the vehicle using a rapid charging device. If your vehicle's battery is discharged, theengine can be jump-started from another vehicle or from a second battery using jumper cables.Observe the following points:
RThe battery is not accessible in all vehicles. If the other vehicle's battery is not accessible,jump-start the vehicle using a second battery or a jump-starting device.
RYou may only jump-start the vehicle when the engine and exhaust system are cold.
RDo not start the engine if the battery is frozen. Let the battery thaw first.
ROnly jump-start from batteries with a 12 V voltage rating.
ROnly use jumper cables that are not damaged and have a sufficient cross-section and insula-ted terminal clamps.
RMake sure that the two vehicles do not touch.
Make sure that:
RThe jumper cables are not damaged.
RNon-insulated parts of the terminal clamps do not come into contact with other metal partswhile the jumper cables are connected to the battery.
RThe jumper cables cannot come into contact with parts that can move when the engine is run-ning, such as the V-belt pulley or the fan.
XSecure the vehicle by applying the electric parking brake.
XShift the transmission to position].
XTurn the SmartKey to positionZin the ignition lock and remove it.
296Jump-starting
Roadside Assistance