2019 MERCEDES-BENZ EQC SUV height
[x] Cancel search: heightPage 237 of 629
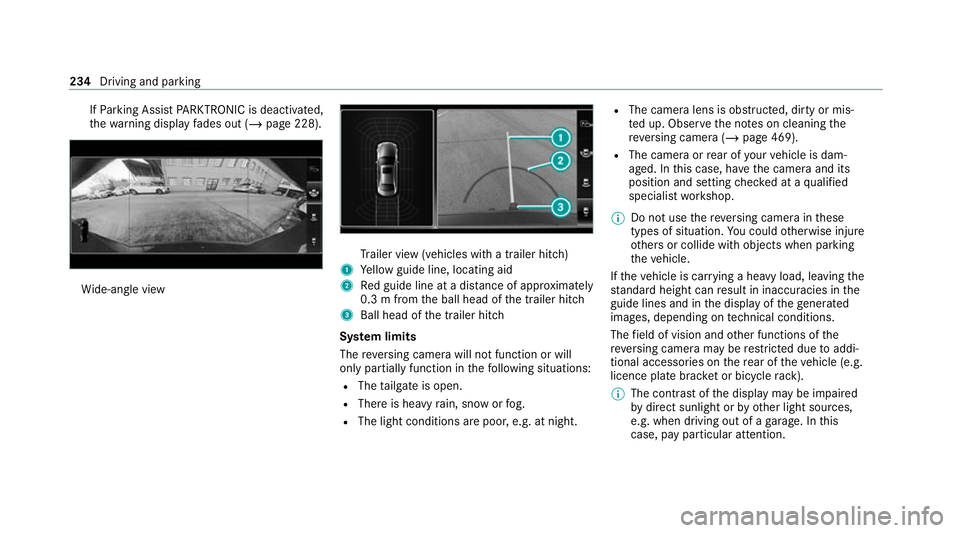
If
Pa rking Assist PARKTRONIC is deacti vated,
th ewa rning display fades out (/ page 228). Wi
de-angle view Tr
ailer view (vehicles with a trailer hit ch)
1 Yellow guide line, locating aid
2 Red guide line at a dis tance of appr oximately
0.3 m from the ball head of the trailer hitch
3 Ball head of the trailer hitch
Sy stem limits
The reve rsing camera will not function or will
only partially function in thefo llowing situations:
R The tailgate is open.
R There is heavy rain, snow or fog.
R The light conditions are poor, e.g. at night. R
The camera lens is obstructed, dirty or mis‐
ted up. Obser vethe no tes on cleaning the
re ve rsing camera (/ page 469).
R The camera or rear of your vehicle is dam‐
aged. In this case, ha vethe camera and its
position and setting checked at a qualified
specialist workshop.
% Do not use there ve rsing camera in these
types of situation. You could otherwise injure
ot hers or collide with objects when parking
th eve hicle.
If th eve hicle is car rying a heavy load, leaving the
st andard height can result in inaccuracies in the
guide lines and in the display of thege nerated
ima ges, depending on tech nical conditions.
The field of vision and other functions of the
re ve rsing camera may be restricted due toaddi‐
tional accesso ries on there ar of theve hicle (e.g.
licence plate brac ket or bicycle rack ).
% The contrast of the display may be impaired
by direct sunlight or by other light sources,
e.g. when driving out of a garage . In this
case, pay particular attention. 234
Driving and parking
Page 241 of 629
th
eir setting checked at a qualified specialist
wo rkshop.
% Do not use the 360° Camera under such cir‐
cums tances. You could otherwise injure oth‐
ers or collide with objects when parking the
ve hicle.
If th eve hicle is car rying a heavy load, leaving the
st andard height can result in inaccuracies in the
guide lines and in the display of thege nerated
ima ges, depending on tech nical conditions.
The field of vision and other functions of the
came rasystem may be restricted due toaddi‐
tional attachments on theve hicle (e.g. licence
plate brac ket, bicycle rack ).
% The contrast of the display may be impaired
by abrupt direct sunlight or by other light
sources, e.g. when driving out of a garage . In
th is case, pay particular attention.
% Have the display repaired or replaced if, for
ex ample, pixel er rors considerably restrict its
use.
See the no tes on cleaning the 360° Camera
(/ page 469). Selecting a view
for the 360° Camera
Re quirements:
R The Auto reversing camera function is activa‐
te d in the multimedia sy stem (/ page 238). #
Enga gereve rsege ar. #
Select the desired view in the multimedia
sy stem (/ page 235).
Switching reve rsing camera automatic mode
on/off
The reve rsing camera is only an aid. It is not a
substitute foryo ur attention tothe sur roundings.
The responsibility for safe manoeuvring and
parking remains with you. Make sure that no
persons, animals or objects etc. are in the
manoeuvring range. Pay attention to your sur‐
ro undings and be ready tobrake at all times.
Multimedia sy stem:
4 © 5
Settings 5
Assistance
5 Camera & parking #
Switch Auto reversing camera on or off.Opening
the camera co ver of the reve rsing
camera
Multimedia sy stem:
4 © 5
Settings 5
Assistance
5 Camera & parking #
Select Open camera cover.
% The camera co ver closes auto maticallyafter
some time or af ter an ignition cycle.
Setting the camera as a favo urite
Yo u can call up the camera view directly in the
multimedia sy stem bysetting it as a favo urite. #
Press theò button on theto uchpad.
The main functions are displ ayed. #
Navigate down wards twice.
The Favourites menu appears. #
Select New favourite. #
Select Vehicle . #
Select Camera. 238
Driving and parking
Page 309 of 629
Ac
tivating co verch ange in thera dio menu
and media menu
The MBUX Interior Assi stant reduces the number
of operating steps. #
Movea hand towa rdsth eto uchsc reen or
to uchpad.
The cur rent information, e.g. about thera dio
st ation, track and artist are hidden. Co ver
ch ange is activated. #
Continue operation and select a co ver. #
Asthe hand is mo vedaw ay from the
to uchsc reen or touchpad, the cur rent infor‐
mation is shown again.
% Further information on thera dio menu
(/ page 445) and the media menu
(/ page 439).
Showing the navigation menu on the map
The MBUX In terior Assis tant sho wsthe naviga‐
tion menu. #
Movea hand towa rdsth eto uchsc reen or
to uchpad.
The navigation menu is shown. #
Continue operation and select a symbol. #
Asthe hand is mo vedaw ay from the
to uchsc reen or touchpad, the media display
hides the navigation menu.
% Further information on the navigation menu
(/ page 343).
Showing operating symbols in theAc tive
Pa rking Assist camera ima ge(only from driv‐
er's seat)
The MBUX In terior Assis tant facilitates quick-
access forth e driver tovarious camera vie ws. #
With th eAc tive Parking Assist display active,
mo vethe hand in the direction of the
to uchsc reen.
The camera operation symbols are displa yed. #
Continue operation and display the desired
front, rear, left and right camera vie ws.
% Further information on Active Parking Assist
functions (/ page 239).
Operating a function with thefa vo urites
pose
Re quirements:
R Tocall up favo urites: there is at least one
fa vo urite. R
The area forre cognition of thefa vo urite's
pose is abo vethe cent reconsole at the
height of the climate control vents and the
media displa y.The hand should ha vea dis‐
ta nce of at least 10cm from the media dis‐
pla y.
R The pose is held for a brief time.
Calling up favo urites
A pose calls up a favo urite.
The driver and front passen ger can connect two
dif fere nt favo urites with the V pose.
% If afavo urite has not yet been sa ved and
connec ted with the MBUX Interior Assis tant,
th e multimedia sy stem will assist you. 306
MBUX multimedia sy stem
Page 388 of 629

Obser
vethefo llowing when entering the activa‐
tion code:
R The activation code can be used for one vehi‐
cle
R The activation code is not transferable
R The activation code has six digits
In theeve nt of thefo llowing problems, please
con tact a Mercedes-Benz service centre:
R The multimedia sy stem does not accept the
activation code
R You ha velost the activation code
Displaying the compass
Multimedia sy stem:
4 © 5
Navigation 5
¡ 5
Position #
Select Compass.
The compass display sho wsthefo llowing
information:
R the cur rent di rection of tr avel with bear‐
ing (360° form at) and compass direction
R longitude and latitude coo rdinates in
degrees, minutes and seconds R
height (rounded)
R number of satellites from which a signal
can be recei ved
The information is not available in everycountr y.
Displaying Qibla
Multimedia sy stem:
4 © 5
Navigation 5
¡ 5
Position #
Select Qibla.
The ar rowonthe compass sho wsthe direc‐
tion toMecca in relation tothe cur rent di rec‐
tion of tr avel.
The number of satellites recei ved is shown.
% This function is not available in all countries.
Setting the map scale automatically
Multimedia sy stem:
4 © 5
Navigation 5
Z
5 Advanced #
Select View. #
Select Map orientation. #
Activate Auto zoom.
The display button is acti vated. The map
scale is set automatically depending on your
driving speed and the type of road.
% The automatically selec ted map scale can be
ch anged manuall y.After a few seconds, this
is automatically reset.
Displaying the satellite map
Multimedia sy stem:
4 © 5
Navigation 5
Z
5 Advanced #
Select View. #
Select Map elements. #
Switch Satellite map on or off.
If th e display button is activated, satellite
maps are displa yed in map scales from 2 km.
If th e display button is deactivated, satellite
maps are not displa yed in map scales from
2 km to20 km.
% The satellite maps forth ese map scales are
not available in all countries. MBUX multimedia sy
stem 385
Page 390 of 629
R
2D north up option:the 2D map view is
displa yed so that no rth is alw ays at the
to p.
R 3Doption: the 3D map view is aligned to
th e direction of tra vel. Pa
rking service Note
s onthe pa rking service &
WARNING Risk of accident and inju ry
due tonot observing the maximum per‐
mitted access height
If th eve hicle height exceeds the maximum
permitted access height for multi-s torey car
par ksand unde rgro und car par ks,th eve hicle
ro of as well as other vehicle parts could be
damaged.
There could be a risk of injury totheve hicle
occupants. #
Before driving into a multi-s torey car
park or under ground car pa rkobser ve
th e locally signpos ted access height. #
Ifth eve hicle height, including any addi‐
tional equipment, exceeds the maxi‐
mum permitted access height, do not
drive into the multi-s torey car park or
underground car par k. This service is not
available in all countries.
Selecting pa rking options
* NO
TEBefore selecting the parking
option The data is based on information pr
ovided by
th ere spective service pr ovider.
Mercedes Benz accepts no liability forthe
accuracy of the information pr ovided relating
to the multi-s torey car park/parking area. #
Alwa ys obser vethe local Information
and conditions. Re
quirements:
R The navigation services option is available,
subsc ribed toand activated in the Mercedes
me por tal. R
The parking service is within the scope of the
navigation service.
R Parking is activated (/ page 388).
Multimedia sy stem:
4 © 5
Navigation #
Tap on jinthe map. #
Select a parking option.
The map sho ws the parking options in the
vicinity.
The following information is displa yed (if
av ailable):
R Destination address, dis tance from cur‐
re nt vehicle position and ar riva l time
R Information on the multi-s torey car
park/car park
Fo rex ample, opening times, parking
ch arge s, cur rent occupancy, maximum
pa rking time, maximum access height .
The maximum access height shown by
th e parking service does not replace the
need for obser vation of the actual cir‐
cums tances. MBUX multimedia sy
stem 387
Page 464 of 629
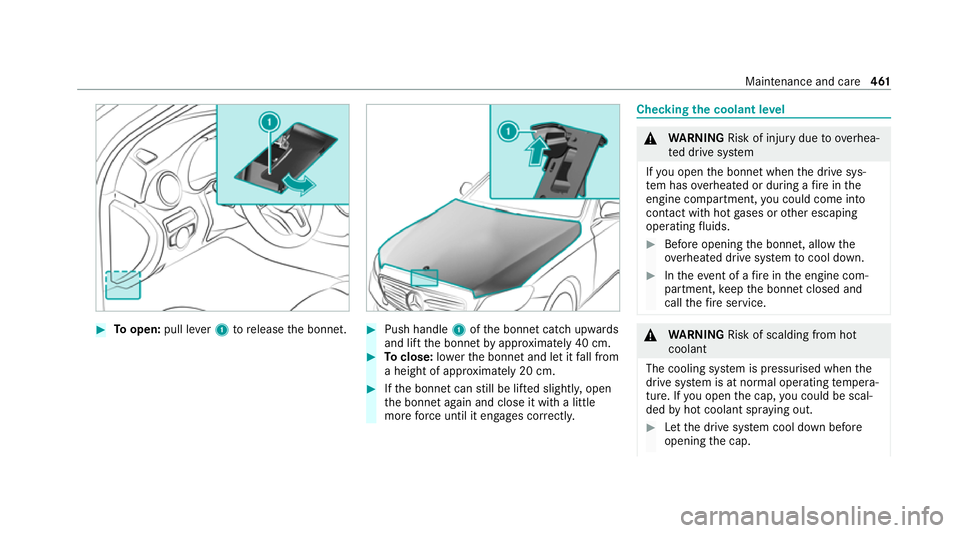
#
Toopen: pull lever1 torelease the bonn et. #
Push handle 1ofthe bonn etcatch up wards
and lift the bonn etby appr oximately 40 cm. #
Toclose: lowe rth e bonn etand let it fall from
a height of appr oximately 20 cm. #
Ifth e bonn etcan still be lif ted slightl y,open
th e bonn etagain and close it with a little
more forc e until it engages cor rectly. Che
cking the coolant le vel &
WARNING Risk of inju rydue to ov erhea‐
te d drive sy stem
If yo u open the bonn etwhen the drive sys‐
te m has overheated or during a fire inthe
engine compartment, you could come into
contact with hot gases or other escaping
operating fluids. #
Before opening the bonn et, allow the
ove rheated drive sy stem tocool down. #
Intheeve nt of a fire inthe engine com‐
partment, keep the bonn etclosed and
call thefire service. &
WARNING Risk of scalding from hot
coolant
The cooling sy stem is pressurised when the
drive sy stem is at normal operating temp era‐
ture. If you open the cap, you could be scal‐
ded byhot coolant spr aying out. #
Let the drive sy stem cool down before
opening the cap. Maintenance and care
461
Page 519 of 629

*
NO
TEBlocked spr aynozzles caused by
mixing windscreen washer fluids #
Do not mix MB SummerFit and MB Win‐
te rFit with other windscreen washer flu‐
ids. Do not use distilled or de-ionised
water asthefill
le ve l sensor may be triggered er roneously.
Re commended windscreen washer fluid:
R abo vefreezing point: e.g. MB SummerFit
R below freezing point: e.g. MB WinterFit
Fo rth e cor rect mixing ratio, referto the informa‐
tion on the antif reeze contai ner.
Mix thewa sher fluid with the windscreen washer
fl uid all year round. Ve
hicle data Ve
hicle dimensions The heights speci
fied may vary as a result of the
fo llowing factors:
R tyres R
load
R condition of the suspension
R optional equipment Height when opened
Model
1
1
Height
when
opened 2
2 Head‐
ro om
EQC 400 4MATIC 2113 mm 1971 mm Ve
hicle dimensions EQC 400 4MATIC
Ve
hicle lengt h4 761 mm
Ve hicle width including out‐
side mir rors 2096 mm
Ve hicle width excluding out‐
side mir rors 18
84 mm
Ve hicle height 1623 mm
Wheelbase 2873 mm We
ights and loads Please obser
vethefo llowing no tesfo rth e speci‐
fi ed vehicle data:
R items of optional equipment increase the
unladen weight and reduce the pa yload.
R vehicle-specific weight information can be
fo und on theve hicle identification plate
(/ page 511). 516
Tech nical da ta
Page 614 of 629
Seat
............................................. 99, 100,11 5
4-w aylumbar support .......................... 103
Ad justing (electrically) ........................ .103
Ad justing (me chanically and electri‐
cally) .................................................... 100
Ad justing (Seat Comfort) ..................... 102
Au tomatic seat adju stment ................. 105
Backrest (rear) locking ......................... 11 7
Con figuring the settings ......................1 05
Cor rect driver's seat position ................ 99
ENERGIZING seat kinetics ................... 338
Fo lding the backrest (rear) back ..........1 16
Fo lding the backrest (rear) forw ards .... 11 5
Operating the memory function ........... 111
Pa nel heating ....................................... 108
Re setting the settings .......................... 106
Setting options ...................................... 12
Seat belt ............................................... 32, 36
Ac tivating/deactivating seat belt
adjustment ............................................ 36
Ad justing the height .............................. 35
Care ..................................................... 471
Centre rear seat (releasing) .................. .35
Fa stening ............................................... 35
Pr otection ..............................................32 Re
ar seat belt status display ................ .36
Re duced pr otection ...............................33
Re leasing .............................................. .36
Seat belt adjustment (function) ............. 36
Wa rning lamp ........................................ 36
Seat belt adju stment
Ac tivating/deactivating ......................... 36
Fu nction ................................................ 36
Seat belt tensioners
Ac tivation .............................................. 31
Seat belt warning
see Seat belt
Seat co ver (Care) ..................................... 471
Seat heater Activating/deactivating ...................... .106
Seat kinetics Setting ................................................. 338
Seat kinetics see ENERGIZING COMFORT
Seat ventilation
Switching on/o ff................................. 108
Second telephone .................................. .395
Connecting .......................................... 395 Fe
atures .............................................. 395
Selecting the sound profile
Burmes ter®
sur round sound sy stem ... 457
Selector le ver
see DIRECT SELECT le ver
Self-test Automatic front passenger front air‐
bag shutoff ............................................ 41
Sensors (Care) ......................................... 469
Service Menu (on-board computer) .................. 268
Service see ASS YST PLUS
Service centre see Qualified specialist workshop
Service inter val display
see AS SYST PLUS
Service station sear ch
St arting automatic sear ch................... 363
Setting a speed see Cruise control
Setting the date form at .......................... 330 Index
611