2019 MERCEDES-BENZ CLA COUPE weight
[x] Cancel search: weightPage 24 of 645
Pr
otection of the environment
+ ENVIRONMENTAL
NOTEEnvironmental
dama gedue tooperating conditions and
personal driving style The pollutant emission of
your vehicle is
directly related tothewa yyo u operate your
ve hicle.
Help toprotect the environment byoperating
yo ur vehicle in an environmentally responsi‐
ble manner. Please obser vethefo llowing rec‐
ommendations on ope rating conditions and
pe rsonal driving style.
Operating conditions: #
Make sure that the tyre pressure is cor‐
re ct. #
Do not car ryany unnecessary weight
(e.g. roof luggage rack s once you no
lon ger need them). #
Adhere tothe service inter vals.
A regularly serviced vehicle will contri b‐
ute toenvironmen tal pr otection. #
Alw ays ha vemaintenance workcar ried
out at a qualified specialist workshop.
Pe rsonal driving style: #
Do not depress the accelera tor pedal
when starting the engine. #
Do not warm upthe engine while the
ve hicle is stationar y. #
Drive carefully and maintain a suitable
di st ance from theve hicle in front. #
Avoid frequent, sudden acceleration
and braking. #
Change gear in good time and use each
ge ar on lyup toÔ of its maximum
engine speed. #
Switch off the engine in stationary traf‐
fi c, e.g. byusing the ECO start/ stop
function. #
Drive fuel-ef ficiently. Obser vethe ECO
display for a fuel-ef ficient driving style. Ta
ke -back of end-of-life vehicles
EU countries onl y:
Mercedes-Benz will take back your end-of-life
ve hicle for environment-friendly disposal in
accordance with the European Union(EU) End-
of-Life Vehicles Directive.
A network of vehicle take -ba ckpoints and dis‐
mantlers has been es tablished foryo uto return
yo ur vehicle. You can lea veit at any of these
points free of charge . This makes an impor tant
contribution toclosing there cycling circle and
conse rving resources.
Fo r fur ther information about there cycling and
disposal of end-of-li fevehicles, and theta ke-
back conditions, please visit the national
Mercedes-Benz website foryo ur count ry. Gene
ral no tes 21
Page 33 of 645
ship.
You can do this at a Mercedes-Benz service
centre, forex ample. Cor
rect use of theve hicle
If yo ure mo veany warning sticke rs,yo u or others
could failto recognise cer tain dangers. Lea ve
wa rning sticke rs in position.
Obser vethefo llowing information in particular
when driving your vehicle:
R the saf ety no tes in this manual
R tech nical da taforth eve hicle
R traf fic ru les and regulations
R laws and saf etyst andards per taining to
mo torve hicles Information on
the REACH regulation
EU and EFTA countries onl y:
The REA CHRegulation (Regulation (EC) No.
19 07 /2006, Article 33) stipulates an informa‐
tion obligation for subs tances of very high con‐
cern (SVHC). Daimler
AGis acting tothe best of its know ledge
to av oidthe use and application of these SVHCs
and toenable the cus tomer tohandle theses
subs tances sa fely.Ac cording tosupplier infor‐
mation and internal product information of
Daimler AG,SV HCs are known whi chare more
th an 0.1 percent byweight in individual products
of this vehicle.
Fu rther information can be found at:
R http://www.daimler.com/ reach
R http://www.daimler.com/ reach/en Implied
warranty
* NO
TEDama getotheve hicle arising
from violation of these operating instruc‐
tions. Damage
totheve hicle can arise from viola‐
tion of these operating instructions.
This damage is not co vered either bythe
Mercedes-Benz implied warranty or bythe
New‑ or Used- Vehicle Warrant y. #
Follow the instructions in these operat‐
ing instructions on proper operation of
yo ur vehicle as well as on possible vehi‐
cle damage. QR code
forre scue card
The QR code is secured in the fuel filler flap and
on the opposite side on the B-pillar. In theeve nt
of an accident, rescue services can use the QR
code toquickly find the appropriate rescue card
fo ryo ur vehicle. The cur rent rescue card con‐
ta ins the most impor tant information about your
ve hicle in a compact form , e.g. thero uting of the
electric lines.
Fu rther information can be obtained at http://
www.mercedes-benz.de/qr-code. Data
storage Electronic control units
Elect
ronic control units are fitted in your vehicle.
Some of these are necessary forth e safe opera‐
tion of your vehicle, while some assist you when 30
General no tes
Page 48 of 645
#
The entire base of thech ild restra int
sy stem must alw aysre st on the sitting
sur face of the front passenger seat. #
The backrest of thefo rw ard-facing child
re stra int sy stem must, as far as possi‐
ble, be resting on the seat backrest of
th e front passenger seat. #
Alw ays comply with thech ild restra int
sy stem manufacturer's ins tallation
instructions. A person on
the front passenger seat must
obser vethefo llowing information:
R Fasten seat belts cor rectly (/ page 36).
R Sit in an almost upright seat position with
th eir back against the seat backrest.
R Sit with their feet resting on thefloor, if pos‐
sible.
The front passenger front airbag may otherwise
be disabled bymis take ,fo rex ample in thefo l‐
lowing situations:
R The front passen ger transfers their weight by
supporting themselves on a vehicle armrest. R
The front passenger sits in such a wayth at
th eir weight is raised from the sitting sur‐
fa ce. &
WARNING Risk of inju ryor death due to
deactivated front passenger airbag
If th ePA SSENGER AIRB AGOFF indicator
lamp is lit, the front passenger airbag is disa‐
bled. It will not be deplo yed in theeve nt of
an accident and cannot pe rform its intended
pr otective function.
A person in the front passenger seat could
th en, forex ample, come into con tact wi th
th eve hicle interior, especially if the person is
sitting too close tothe cockpit.
If th e front passenger seat is occupied,
alw ays ensure that:
R The classification of the person in the
front passenger seat is cor rect and the
front passenger airbag is enabled or disa‐
bled in accordance with the person in the
front passenger seat. R
The front passenger seat has been mo ved
as far back as possible.
R The person is seated cor rectl y. #
Ensu re, bo thbefore and during the jour‐
ne y,that thest atus of the front
passenger airbag is cor rect. If
th e front passenger seat is occupied, the clas‐
sification of the person or child restra int sy stem
on the front passenger seat take s place af terthe
front passenger front airbag shutoff self-test.
The PASSENGER AIR BAG indicator lamps dis‐
play thest atus of the front passenger front air‐
bag.
Alw ays obser vethe no tes on the function of the
PA SSENGER AIR BAG indicator lamps
(/ page 46). Occupant saf
ety45
Page 53 of 645
Safely transporting
children in theve hicle Alw
ays obser vewhen children are tr avelling
in theve hicle %
Also strictly obser vethe saf ety no tesfo rthe
specific situation. In this wa yyo u can recog‐
nise po tential risks and avoid dangers if chil‐
dren are tr avelling in theve hicle
(/ page 51).
Be diligent
Bear in mind that neglecting tosecure a child in
th ech ild restra int sy stem may ha veserious con‐
sequences. Alw ays be diligent in securing a child
carefully before everyjou rney.
To impr oveprotection forch ildren younger than
12 years old or under 1.50 m in height,
Mercedes-Benz recommends you obse rvethe
fo llowing information:
R Alw ays secure thech ild in a child restra int
sy stem suitable forth is Mercedes-Benz vehi‐
cle.
R The child restra int sy stem must be appropri‐
ate tothe age, weight and size of thech ild. R
The vehicle seat must be suitable forfitting a
ch ild restra int sy stem (/ page 56).
Ac cident statistics show that children secured
on there ar seats are general lysafer than chil‐
dren secured on the front seats. Forth is reason,
Mercedes-Benz strongly advises that youfit a
ch ild restra int sy stem toare ar seat.
Generic term"child restra int sy stem"
The generic term child restra int sy stem is used
in this Owner's Manual. A child restra int sy stem
is, forex ample:
R a baby car seat
R are ar wa rd-f acing child seat
R afo rw ard-facing child seat
R ach ild boos ter seat with a backrest and seat
belt guide
Mercedes-Benz recommends using a child
boos ter seat with a backrest.
The child restra int sy stem must be appropriate
to the age, weight and size of thech ild. Observing la
wsand legal requirements
Alw ays obser vethe legal requ irements when
using a child restra int sy stem in theve hicle.
Make sure that thech ild restra int sy stem is
appr oved in accordance with theva lid test speci‐
fi cations and guidelines. Further information can
be obtained at a qualified specialist workshop.
Mercedes-Benz recommends that you use a
Mercedes-Benz Service Centre forth is purpose.
Only use appr ovedch ild restra int sy stems
On lych ild restra int sy stems that meet thefo l‐
lowing UNECE standards are permit tedfo r use in
th eve hicle:
R UN-R44
R UN-R129 (i-Size child restra int sy stems)
Information on child restra int sy stem appr oval
categories and de tails on the appr oval label on
th ech ild restra int sy stem (/ page57). 50
Occupant saf ety
Page 67 of 645
i‑Size
child seat securing sy stem
(/ page 62)
O Alw
ays comply with the manufacturer's
ins tallation and operating instructions for
th ech ild restra int sy stem used.
O Make sure
that thech ild's feet do not touch
th e front seat. If necessar y,mo vethe front
seat forw ard slightl y. When
fitting an ISOFIX child restra int sys‐
te m, obser vethefo llowing:
O When
you are using a Group 0/0+ baby
car seat and a Group 1 rear wa rd-facing
ch ild restra int sy stem on a rear seat:
adju stthe front seat so that the seat does
not touch thech ild restra int sy stem.
O When
you are using a Group 1 forw ard-
fa cing child restra int sy stem: remo vethe
head restra int from there spective seat, if
possible. In addition, the seat backrest of
th ech ild restra int sy stem must, as far as
possible, lie flat against the backrest of the
ve hicle seat. Af
terth ech ild restra int sy stem has been
re mo ved, replace the head restra ints again
immediately and adjust them cor rectly.
O Fo
r cer tain child restra int sy stems in weight
group 2 or 3, there may be limitations for
th e maximum size setting, e.g. due topossi‐
ble con tact wi th thero of.
O The
child restra int sy stem must not be ten‐
sioned between thero of and the seat cush‐
ion and/or be fitted facing the wrong direc‐
tion. Where possible, adjust the seat cush‐
ion inclination accordingly.
O The
child restra int sy stem must not be put
under stra in by the head restra ints. Adjust
th e head restra ints according ly. When
fitting an i‑Size child restra int sys‐
te m, obser vethefo llowing:
O When
you are using a rear wa rd-facing
ch ild restra int sy stem: adjust the front
seat so that it does not touch thech ild
re stra int sy stem. O
When
you are using a forw ard-facing
ch ild restra int sy stem: remo vethe head
re stra int from there spective seat, if possi‐
ble. In addition, the seat backrest of the
ch ild restra int sy stem must, as far as possi‐
ble, lie flat against the backrest of theve hi‐
cle seat.
Af terth ech ild restra int sy stem has been
re mo ved, replace the head restra ints again
immediately and adjust them cor rectly. 64
Occupant saf ety
Page 73 of 645
Obser
vethe no tes under "Suitability of
seats for attaching belt-secu redch ild
re stra int sy stems" (/ page67).
O Wh
en using a category 0/0+ baby car
seat and a category I rear wa rd-facing
ch ild restra int sy stem on a rear seat:
adju stthe front seat so that the seat does
not touch thech ild restra int sy stem.
O When using a category I
forw ard-facing
ch ild restra int sy stem: remo vethe head
re stra int from there spective seat, if possi‐
ble.
Af terre moving thech ild restra int sy stem,
re place the head restra ints again immedi‐
ately and adjust them cor rectly.
O The ba
ckrest of thefo rw ard-facing child
re stra int sy stem must, as far as possible, be
re sting on the seat backrest of there ar
seat.
O Fo
r cer tain child restra int sy stems of weight
category II or III there may be limitations for
th e maximum size setting, e.g. due topossi‐
ble con tact wi th thero of. O
The
child restra int sy stem must not be put
under stra in between thero of and the seat
cushion and/or be fitted facing the wrong
direction. If possible, adjust the seat cush‐
ion angle as appropriate.
O The
child restra int sy stem must not be put
under stra in by the head restra int. Adjust
th e head restra ints according ly.
O Make sure
that thech ild's feet do not touch
th e front seat. If necessar y,mo vethe front
seat slightly forw ards. #
Fitthech ild restra int sy stem.
The entire base of thech ild restra int sy stem
must alw aysre st on the sitting sur face of the
re ar seat. #
Alw ays make sure that the shoulder belt
st ra p is cor rectly routed from the seat belt
outlet of theve hicle tothe shoulder belt
guide on thech ild restra int sy stem.
The shoulder belt stra p must be routed for‐
wa rds and down wards from the seat belt out‐
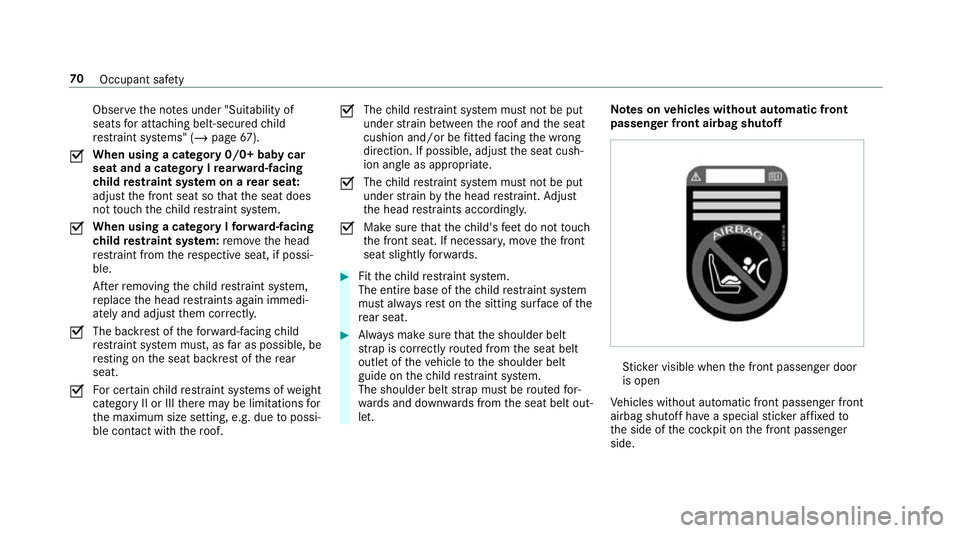
let. Note
s onvehicles without automatic front
passen ger front airbag shu toff St
icke r visible when the front passenger door
is open
Ve hicles without automatic front passenger front
airbag shutoff ha vea special sticke r af fixe dto
th e side of the cockpit on the front passenger
side. 70
Occupant saf ety
Page 75 of 645
R
When using a rear wa rd-facing child restra int
sy stem on the front passenger seat, the front
passenger front airbag must alw ays be disa‐
bled. This is only the case if thePA SSENGER
AIR BAG OFF indicator lamp is lit continu‐
ously (/ page 46).
R Ifth ePA SSENGER AIR BAG OFF indicator
lamp is off, the front passenger front airbag
is enabled. The front passenger front airbag
may deploy during an accident.
Securing the child restra int sy stem with the
seat belt on the front passenger seat
When fitting a belt-secu redch ild restra int sys‐
te m on the front passenger seat, alw ays obser ve
th efo llowing:
O Obser
vethech ild restra int sy stem manufac‐
turer's ins tallation and operating instruc‐
tions.
O Fo
r a child restra int sy stem in the "Univer‐
sal" or "Semi-Universal" categor y,make
sure that the sy stem has been appr ovedfor
th eve hicle seat. Obser
vethe no tes under "Suitability of
seats for attaching belt-secu redch ild
re stra int sy stems" (/ page67).
O When using a
forw ard-facing child restra int
sy stem in Group I: remo vethe head
re stra int from there spective seat, if possi‐
ble.
Af terth ech ild restra int sy stem has been
re mo ved, replace the head restra ints again
immediately and adjust them cor rectly.
O The ba
ckrest of thefo rw ard-facing child
re stra int sy stem must, as far as possible, be
re sting on the seat backrest of the front
passenger seat.
O Fo
r cer tainch ild restra int sy stems of weight
category II or III there may be limitations for
th e maximum size setting, e.g. due topossi‐
ble con tact wi th th ero of.
O The
child restra int sy stem must not be ten‐
sioned between thero of and the seat cush‐
ion and/or be fitted facing the wrong direc‐
tion. Adjust the seat backrest inclination
according ly. O
The
child restra int sy stem must not be put
under stra in by the head restra ints. Adjust
th e head restra ints accordingly.
O Ne
ver place objects under or behind the
ch ild restra int sy stem, e.g. cushions. #
Set the front passenger seat as far back as
possible and mo vethe seat into the highest
position. #
Fully retract the seat cushion length adjust‐
ment. #
Adjust the seat cushion inclination so that
th e front edge of the seat cushion is in the
highest position and there ar edge of the
seat cushion is in the lo west position. #
Set the seat backrest toan almost vertical
position. #
Fitthech ild restra int sy stem.
The entire base of thech ild restra int sy stem
must alw aysre st on the sitting sur face of the
front passenger seat. #
Alw ays make sure that the shoulder belt
st ra p is cor rectly routed from the seat belt 72
Occupant saf ety
Page 123 of 645
%
The cup holder wings can be folded down‐
wa rds and loc ked. The cup holder's holding
function will then not be available. Opening or closing
the cup holder in there ar
armrest *
NO
TEDama getothere ar armrest due to
body weight When
folded out, there ar armrest can be
damaged due tobody weight. #
Do not sit or support yourself on the
re ar seat armrest. *
NO
TEDama getothe cup holder When
there ar armrest is folded back the cup
holder could become damaged. #
Only fold there ar armrest back when
th e cup holder is closed. #
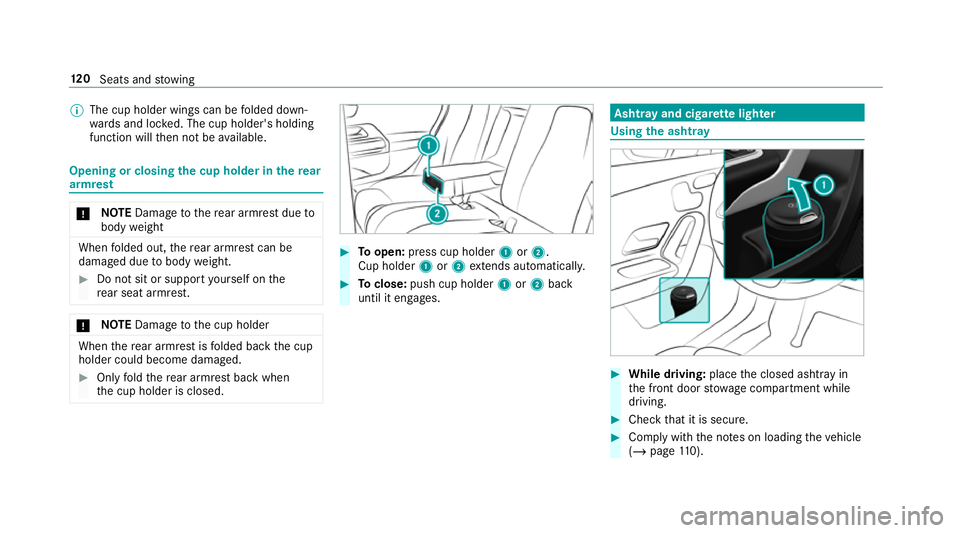
Toopen: press cup holder 1or2.
Cup holder 1or2 extends au tomatical ly. #
Toclose: push cup holder 1or2 back
until it engages. Asht
ray and cigar ette lighter Using
the ashtr ay #
While driving: placethe closed ashtray in
th e front door stowage compartment while
driving. #
Check that it is secure. #
Comply with the no tes on loading theve hicle
(/ page 110). 12 0
Seats and stowing