2019 MERCEDES-BENZ CLA COUPE rims
[x] Cancel search: rimsPage 114 of 645
#
Alw ays be particular lycareful when in
th e vicinity of theta ilpipe and tailpipe
trims and supervise children very
closely when in this area. #
Before any con tact, allow the car parts
to cool down. The driving
characteristics of your vehicle are
dependent on the distribution of the load within
th eve hicle. You should bear thefo llowing in
mind when loading theve hicle:
R neverex ceed the permissible gross mass or
th e permissible axle loads forth eve hicle
(including occupants).
Information can be found on theve hicle iden‐
tification plate (/ page512).
R the load must not pr otru de abo vethe upper
edge of the seat backrests.
R always place the load behind unoccupied
seats if possible.
R secure the load using the tie-down eyes and
distribute the load evenly. St
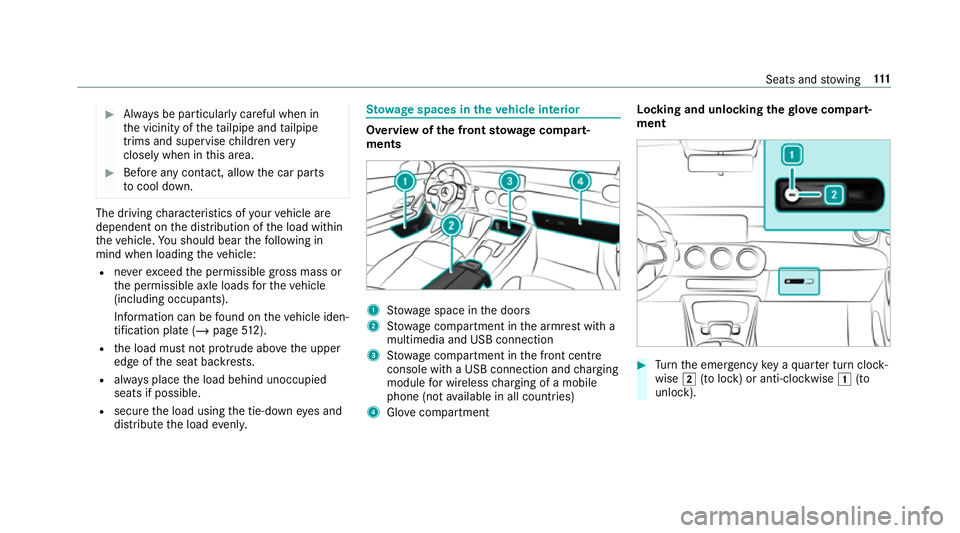
ow age spaces in theve hicle interior Overview of
the front stowage compa rt‐
ments 1
Stow age space in the doors
2 Stow age compartment in the armrest with a
multimedia and USB connection
3 Stow age compartment in the front cent re
console wi tha USB connection and charging
module for wireless charging of a mobile
phone (not available in all countries)
4 Glovecompa rtment Locking and unlo
cking thegl ove compa rt‐
ment #
Turn the emer gency key a quarter turn clock‐
wise 2(to lock) or anti-clockwise 1(to
unlock). Seats and
stowing 111
Page 461 of 645
Note
s on care of car parts &
WARNING Risk of entrapment if the
windscreen wipers are swit ched on while
th e windscreen is being cleaned
If th e windscreen wipers are set in motion
while you are cleaning the windscreen or
wiper blades, you can be trapped bythe
wiper arm. #
Alw ays switch off the windscreen wip‐
ers and the ignition before cleaning the
windscreen or wiper blades. &
WARNING Risk of bu rning from theta il‐
pipe or tailpipe trim
The tailpipe and tailpipe trim can become
ve ry hot. If you come into contact with these
car parts, you could burn yourself. #
Alw ays be particular lycareful when in
th e vicinity of theta ilpipe and tailpipe
trims and supervise children very
closely when in this area. #
Before any con tact, allow the car parts
to cool down. Obser
vethefo llowing information: Note
s on cleaning and car eA voiding vehicle damage
Wheels/rims Usewate r and acid-free wheel cleaners. R
Do not use acidic wheel cleaners toremo vebrake dust.
This could damage wheel bolts and brake components.
R Toavoid cor rosion of the brake discs and brakepads, drive
th eve hicle for a few minutes af ter cleaning before parking
it. The brake discs and brakepads warm up and dry out.
Wi ndo ws
Clean windowsinside and outside with a damp clo thand with
a cleaning agent recommended for Mercedes-Benz. Do not use dry clo
ths or abrasive or sol vent-based cleaning
agents toclean the inside of windo ws.
Wi per blades
Fold out the wiper blades and clean them using a damp clo th.D o not clean the wiper blades too of ten. 458
Maintenance and care
Page 468 of 645
R
Vehicles with Mercedes me connect: you
can make a call for breakdown assi stance via
th eove rhead control panel in the case of a
breakdown .
R Allvehicles: change the wheel
(/ page 500).
% The emer gency spa rewheel is only available
in cer tain countries. Note
s on MOExtended tyres (run-flat tyres) &
WARNING Risk of accident when driving
in eme rgency mode
When driving in emer gency mode, the han‐
dling characteristics are impaired. e.g. when
cornering, when accelerating stronglyand
when braking. #
Do not exceed the permissible maxi‐
mum speed. #
Avoid any abrupt steering and driving
maneuvers as well as driving over
obs tacles (curbs, pot holes, off-road). This applies, in pa
rticular, toa loaded
ve hicle. #
Stop driving in the emer gency mode if
yo u notice:
R banging noise
R vehicle vibration
R smoke which smells like rubber
R continuous ESP ®
inter vention
R crac ksin tire side walls #
After driving in emergency mode ha ve
th erims checkedby aqu alified special‐
ist workshop with rega rd totheir fur ther
use. #
The defective tire must be replaced in
eve rycase. Wi
th MOExtended tyres (run-flat tyres), you can
continue todrive your vehicle even if there is a
tot al loss of pressure in one or more tyres. How‐
eve r,th e tyre af fected must not show any clearly
visible damage. Yo
u can recognise MOExtended tyres bythe
MOExtended marking which appears onthe side
wa ll of the tyre.
Ve hicles with tyre pressure loss warning sys‐
te m: MOExtended tyres may only be used in
conjunction wi than activated tyre pressure loss
wa rning sy stem.
Ve hicles with tyre pressure monitoring sys‐
te m: MOExtended tyres may only be used in
conjunction wi than activated tyre pressure mon‐
itoring sy stem.
If a pressure loss warning message appears in
th e multifunction displa y,proceed as follo ws:
R Check the tyre for dama ge.
R If driving on, obser vethefo llowing no tes. Breakdown assis
tance 465
Page 489 of 645
*
NO
TEDama getothe wheel trim from fit‐
te d snow chains If sn
ow ch ains are fitted tosteel wheels, the
wheel trims can be damaged. #
Remo vethe wheel trims of steel wheels
before fitting snow chains. Obse
rveth efo llowing no tes when using snow
ch ains:
R Snow ch ains are on ly permissible for cer tain
wheel/tyre combinations. You can obtain
information about this from a Mercedes-Benz
Service Cent re.
R For saf etyre asons, on lyuse sn ow chainsthat
ha ve been specifically appr ovedfo ryo ur
ve hicle byMercedes-Benz, or snow chains
with the same quality standard.
R If sn ow ch ains are fitted, the maximum per‐
missible speed is 50 km/h.
R Vehicles with Active Park ing Assis t:do
not use Active Parking Assist when snow
ch ains are fitted. %
You can permanently limit the maximum
ve hicle speed for driving with winter tyres
(/ page 207).
% You can deactivate ESP ®
to pull away
( / page 195). This all owsth e wheels to
spin, achieving an increased driving forc e. Ty
re pressure Note
s on tyre pressure &
WARNING Risk of accident due toinsuf‐
fi cient or excessive tyre pressure
Underinfla ted or overinfla ted tyres pose the
fo llowing risks:
R The tyres may bur st, especially as the
load and vehicle speed increase.
R The tyres may wearexc essively and/or
une venly, which may greatlyimpair tyre
traction.
R The driving characteristics, as well as
st eering and braking, may be greatly
impaired. #
Comply with there commended tyre
pressure and check the tyre pressure of
all tyres including the spare wheel regu‐
larly:
R at least once a month
R when the load changes
R before embarking on a lon ger journey
R if operating conditions change, e.g. off-
ro ad driving #
Adjust the tyre pressure as necessar y. Ty
re pressure which is too high or too low can:
R Shor tenth e service life of the tyres.
R Cause increased tyre damage.
R Adversely af fect driving characteristics and
th us driving saf ety, e.g. due toaquaplaning. &
WARNING Risk of accident from repea‐
te d tyre pressure drop
If th e tyre pressure drops repeatedly, the
wheel, valve or tyre may be damaged. 486
Wheels and tyres
Page 605 of 645
Car-to-X-Communication
Displaying hazard warnings ................ .371
Overview ..............................................3 71
Sending hazard warnings .................... .372
Care .......................................................... 460
Air-water duct ...................................... 452
Car wash ............................................. 452
Carpet .................................................4 60
Decorative foil .................................... .456
Displ ay................................................ 460
Exterior lighting ................................... 458
High-pressure cleaner ......................... 454
Matt finish ........................................... 455
Pa int wo rk ............................................ 455
Plastic trim .......................................... 460
Re alwo od/trim elements ...................4 60
Re versing camera ................................ 458
Re versing camera/360° Camera ........ 458
Ro of lining ...........................................4 60
Seat belt .............................................. 460
Seat co ver ........................................... 460
Sensors ............................................... 458
Ta ilpipes .............................................. 458
Tr ailer hit ch......................................... 458
Wa shing byhand ................................. 454 Wheels/rims ....................................... 458
Wi
ndo ws .............................................. 458
Wi per blades .......................................4 58
Carpet (Care) .......................................... .460
Changing bulbs ........................................ 137
Dipped beam ....................................... 13 9
Fitting/removing co ver (front wheel
ar ch ) .................................................... 13 9
Main beam ...........................................1 39
No tes ................................................... 137
Overview ............................................. 13 8
Re versing lights .................................. .139
Tu rn signal lights (rear) ........................ 13 9
Changing gears ........................................ 172
Manually ..............................................1 72
Changing hub caps .................................500
Changing the lights
Driving abroad (symm etrical dipped
beam) .................................................. 12 8
Cha rging
Bat tery (vehicle) ...................................4 74
USB port ..............................................1 24Child saf
ety lock
Ac tivating/deactivating (multimedia
sy stem) ............................................... 332
Re ar door .............................................. .73
Re ar side wind ows................................. 74
Child seat App rova l categories .............................. .57
At tach ing (no tes) ................................... 56
Basic instructions ..................................50
Fr ont passenger seat (no tes) ................. 71
Fr ont passenger seat (without auto‐
matic airbag shutoff) ............................. 70
ISOFIX/i-Size (fitting) ............................63
No tes on risks and dangers ...................51
Re commended child restra int sys‐
te ms ...................................................... 54
Seats suitable for belt-secu redch ild
re stra int sy stems ................................... 67
Seats suitable for i‑Size child
re stra int sy stems ................................... 62
Seats suitable for ISOFIX child
re stra int sy stems ................................... 59
Securing on the front passenger seat ....72
Secu ring on there ar seat ...................... 69
To pTe ther ..............................................65 602
Index
Page 629 of 645
Re
mo tecont rol (stationa ryheater/
ve ntilation)
Displa ys............................................... 15 2
Problems ............................................. 154
Re placing the battery .......................... 15 3
Setting ................................................. 151
Re mo teOnline
Charging the battery ............................1 60
Cooling or heating theve hicle inte‐
ri or .......................................................1 60
St arting theve hicle ............................. 16 0
Re placing a bulb
see Changing bulbs
Re scue card ............................................... 30
Re ser ve
Fu el ...................................................... 51 8
Re set function (multimedia sy stem) .....3 36
Re sidual heat ...........................................1 49
Re storing (factory settings)
see Reset function (multimedia sy stem)
Re stra int sy stem ...................................... .34
Basic instructions forch ildren .............. .50
Fu nction in an accident ......................... 35 Fu
nctionality .......................................... 35
Malfunction ........................................... 35
Pr otection ..............................................34
Re duced pr otection ...............................34
Self-test ................................................. 35
Wa rning lamp ........................................ 35
Re versege ar
Inserting .............................................. 171
Re versing camera .................................... 227
Care .................................................... 458
Fu nction .............................................. 227
Opening the camera co ver (360°
Camera) ............................................. .234
Setting favo urites (360° Camera) ...... .234
Switching auto matic operation
on/off (360° Camera) ......................... 233
Re versing lights (changing bulbs) .........139
Rims (Care) .............................................. 458
Ro llaw ay protection
see HOLD function
Ro of lining (care) .................................... .460
Ro of load .................................................. 524 Ro
of load display
In fo rm ation .......................................... 16 6
Ro ofrack
At tach ing ............................................ .115
Loading ................................................ 11 5
Ro ute ................................................ 351, 357
Ac cepting a de tour recommendation
af te r a prom pt..................................... 353
Ac tivating a commuter route .............. .357
Alternati veroute (quic k-access) .......... 363
Calculating .......................................... .351
Displ aying destination information ...... 355
Displaying thero ute list ...................... .356
Editing a stored route .......................... 359
Ex tern al .............................................. .367
Planning ..............................................3 56
Re cording a route ................................ 359
Saving a recorded route ...................... 359
Selecting a type .................................. 352
Selecting an alternative route .............. 357
Selecting notifications ........................ .354
Selecting options ................................ 353
Showing a stored route on the map ....3 58
St arting a sa vedro ute ........................ .359 626
Index