2019 MERCEDES-BENZ CLA COUPE check engine
[x] Cancel search: check enginePage 452 of 645
#
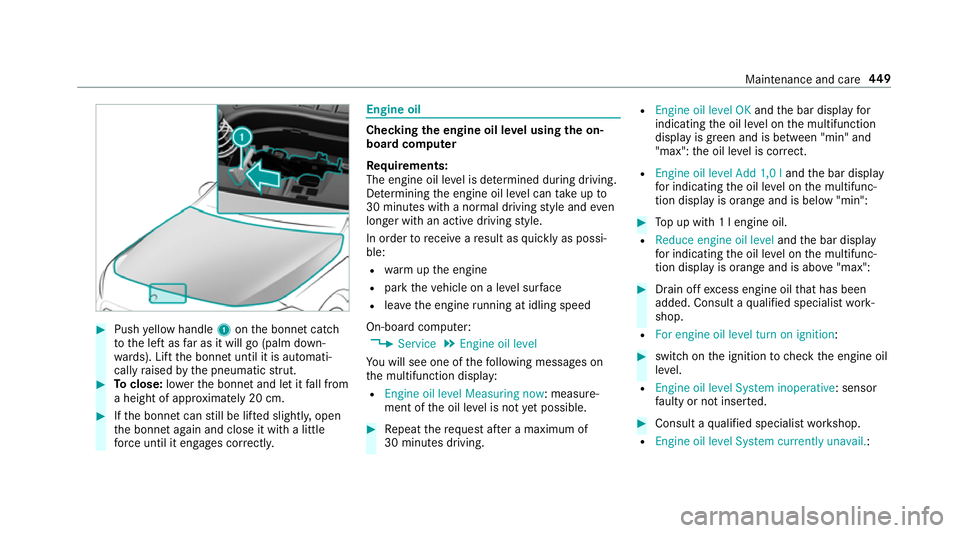
Push yellow handle 1onthe bonn etcatch
to the left as far as it will go (palm down‐
wa rds). Lift the bonn etuntil it is automati‐
cally raised bythe pneumatic stru t. #
Toclose: lowe rth e bonn etand let it fall from
a height of appr oximately 20 cm. #
Ifth e bonn etcan still be lif ted slightl y,open
th e bonn etagain and close it with a little
fo rc e until it engages cor rectl y. Engine oil
Checking
the engine oil le vel using the on-
board compu ter
Re quirements:
The engine oil le vel is de term ined during driving.
De term ining the engine oil le vel can take up to
30 minutes with a normal driving style and even
longer with an active driving style.
In order torecei veare sult as quickly as possi‐
ble:
R warm upthe engine
R park theve hicle on a le vel sur face
R leave the engine running at idling speed
On-board compu ter:
4 Service 5
Engine oil level
Yo u will see one of thefo llowing messages on
th e multifunction display:
R Engine oil level Measuring now : measure‐
ment of the oil le vel is not yet possible. #
Repeat there qu est af ter a maximum of
30 minutes driving. R
Engine oil level OK andthe bar display for
indicating the oil le vel on the multifunction
display is green and is between "min" and
"max": the oil le vel is cor rect.
R Engine oil level Add 1,0 l andthe bar display
fo r indicating the oil le vel on the multifunc‐
tion display is orange and is below "min": #
Top up with 1 l engine oil.
R Reduce engine oil level andthe bar display
fo r indicating the oil le vel on the multifunc‐
tion display is orange and is abo ve"max": #
Drain off excess engine oil that has been
added. Consult a qualified specialist work‐
shop.
R For engine oil level turn on ignition: #
switch on the ignition tocheck the engine oil
le ve l.
R Engine oil level System inoperative : sensor
fa ulty or not inser ted. #
Consult a qualified specialist workshop.
R Engine oil level System currently unavail. : Maintenance and care
449
Page 453 of 645
#
close the bonn et.
To pping up engine oil &
WARNING Risk of bu rns from hot com‐
ponent parts in the engine compartment
Cer tain components in the engine compart‐
ment can be very hot, e.g. the engine, the
ra diator and parts of theex haust sy stem. #
Allow the engine tocool down and only
to uch co mponent parts described in
th efo llowing. &
WARNING Risk offire and injury from
engine oil
If engine oil comes into con tact wi thhot
component parts in the engine compart‐
ment, it may ignite. #
Make sure that no engine oil is spilled
next tothefiller opening. #
Allow the engine tocool off and thor‐
oughly clean the engine oil from compo‐
nent parts before starting theve hicle. *
NO
TEEngine dama gecaused byan
incor rect oil filter, incor rect oil or addi‐
tives #
Do not use engine oils or oil filters
which do not cor respond tothe specifi‐
cations explicitly prescribed forthe
service inter vals. #
Do not alter the engine oil or oil filter in
order toachie velonger change inter vals
th an presc ribed. #
Do not use additives. #
Follow the instructions in the service
inter val display rega rding the oil
ch ange. *
NO
TEDama gecaused bytopping up too
much engine oil To
o much engine oil can damage the engine
or the catalytic con verter. #
Have excess engine oil remo ved at a
qu alified specialist workshop. #
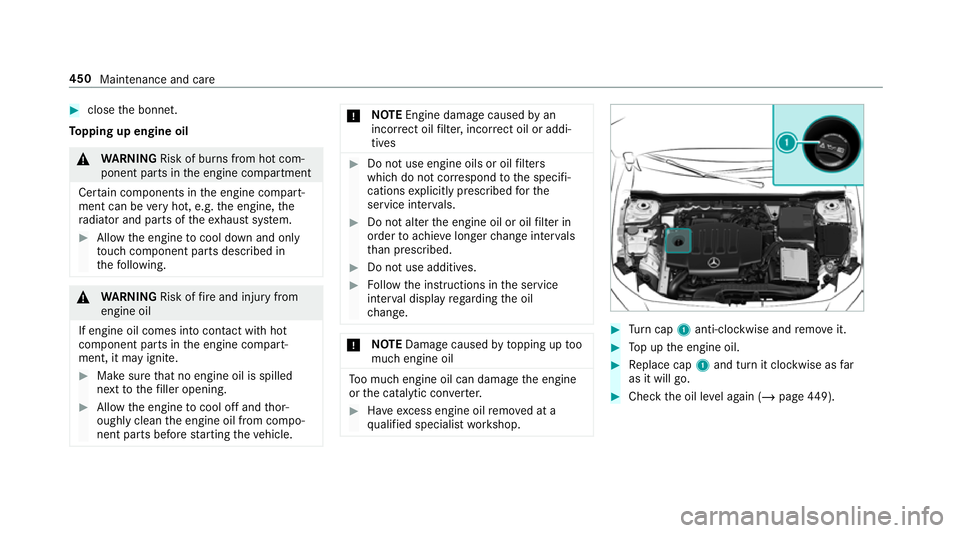
Turn cap 1anti-clockwise and remo veit. #
Top up the engine oil. #
Replace cap 1and turn it clockwise as far
as it will go. #
Check the oil le vel again (/ page449). 450
Maintenance and care
Page 454 of 645
Checking
the coolant le vel &
WARNING Risk of bu rns from hot com‐
ponent parts in the engine compartment
Cer tain components in the engine compart‐
ment can be very hot, e.g. the engine, the
ra diator and parts of theex haust sy stem. #
Allow the engine tocool down and only
to uch co mponent parts described in
th efo llowing. &
WARNING Risk of scalding from hot
coolant
The engine cooling sy stem is pressurised,
particularly when the engine is warm. If you
open the cap, you could be scalded byhot
coolant spr aying out. #
Let the engine cool down before open‐
ing the cap. #
When opening the cap, wear pr otective
gl ove s and saf etygl asses. #
Open the cap slowly torelease pres‐
sure. #
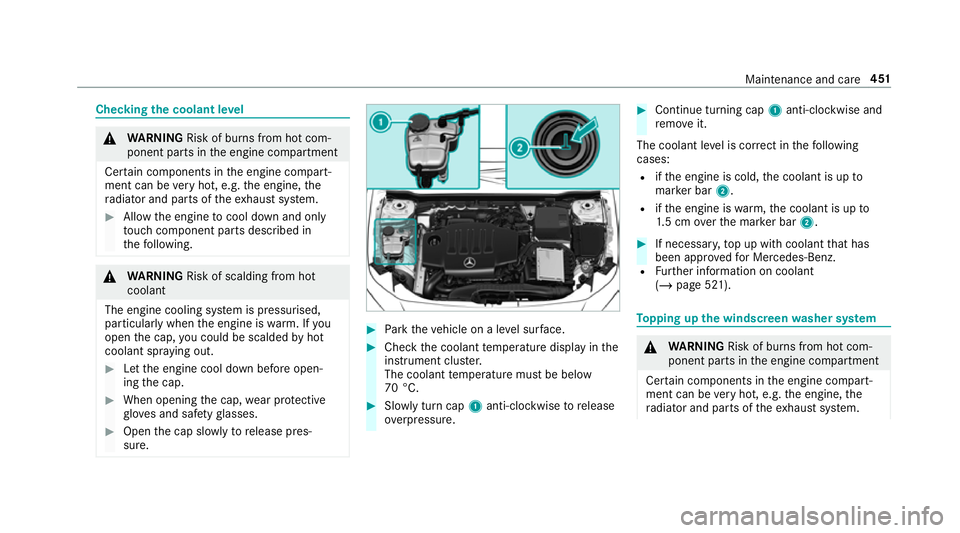
Park theve hicle on a le vel sur face. #
Check the coolant temp erature display in the
instrument clus ter.
The coolant temp erature must be below
70 °C. #
Slowly turn cap 1anti-clockwise torelease
ove rpressure. #
Continue turning cap 1anti-clockwise and
re mo veit.
The coolant le vel is cor rect in thefo llowing
cases:
R ifth e engine is cold, the coolant is up to
mar ker bar 2.
R ifth e engine is warm,th e coolant is up to
1. 5 cm overth e mar ker bar 2. #
If necessar y,top up with coolant that has
been appr ovedfo r Mercedes-Benz.
R Further information on coolant
(/ page 521). To
pping up the windsc reen washer sy stem &
WARNING Risk of bu rns from hot com‐
ponent parts in the engine compartment
Cer tain components in the engine compart‐
ment can be very hot, e.g. the engine, the
ra diator and parts of theex haust sy stem. Maintenance and care
451
Page 476 of 645
*
NO
TEDamaging the battery thro ugh
ove rvoltage When using a battery
charge r without a maxi‐
mum charging voltage, the battery or the
ve hicle electronics may be damaged. #
Only use battery charge rs with a maxi‐
mum charging voltage of 14.8 V. &
WARNING Risk ofexplosion from hydro‐
ge nga s igniting
A battery generates hydrogen gas during the
ch arging process. If there is a short circuit or
spar ksstart toform ,th ere is a danger of the
hy drogen gas igniting. #
Make sure that the positive term inal of
th e connected battery does not come
into conta ct withvehicle parts. #
Never place me tal objects or tools on a
batter y. #
When connecting and disconnecting the
batter y,yo u must obse rveth e descri‐
bed order forth e battery clamps. #
When giving starting assis tance, al ways
make sure that you on lyconnect bat‐
te ry term inals with identical polarity. #
During starting assis tance, you must
obse rveth e described order for con‐
necting and disconnecting the jump
lead. #
Do not connect or disconnect the bat‐
te ry cla mp s while the engine is running. &
WARNING Risk ofexplosion during
ch arging process and starting assis tance
During thech arging process and starting
assis tance, the battery may release an explo‐
sive gas mixture. #
Avoid fire , naked flames, creating
spar ksand smoking. #
Make sure that there is suf ficient venti‐
lation du ring thech arging process and
during starting assis tance. #
Do not lean over a batter y. &
WARNING Risk ofexplosion from a fro‐
zen battery
A dischar ged battery may freeze at temp era‐
tures slightly abo veor below freezing point.
During starting assis tance or battery charg‐
ing, bat tery gas may be released. #
Alw aysth aw a frozen bat tery out first
before charging it or per form ing start‐
ing assis tance. If
th e indicator/warning lamps in the instrument
clus ter do not light up at low temp eratures, it is
ve ry likely that the dischar ged battery has fro‐
zen. In this case you may neither jump-s tart the
ve hicle nor charge the batter y.
The service life of a battery that has been
th awe d may be dramatically shor tened. The
st arting characteristics may be impaired, espe‐
cially at low temp eratures.
It is recommended that you ha veathaw ed bat‐
te ry checked at a qualified specialist workshop. Breakdown assis
tance 473
Page 485 of 645
#
Remo vetheto wing eye. #
Have theve hicle checked at a qualified spe‐
cialist workshop. Electrical fuses
Note
s on electrical fuses &
WARNING Risk of accident and inju ry
due to ov erloaded lines
If yo u manipulate or bridge a faulty fuse or if
yo ure place it with a fuse with a higher
amperage, the electric line could be overloa‐
ded.
This could result in a fire. #
Alw aysre place faulty fuses with speci‐
fi ed new fuses conta iningthe cor rect
amperage. *
NO
TEDama gedue toincor rect fuses Electrical components or sy
stems may be
damaged byincor rect fuses, or their func‐
tionality may be significant lyimpaired. #
Only use fuses that ha vebeen appr oved
by Mercedes-Benz and which ha vethe
cor rect fuse rating. Blown fuses mu
stbe replaced with fuses of the
same rating, which you can recognise bythe col‐
our and fuse rating. The fuse ratings and fu rther
information tobe obser ved are lis ted in the fuse
assignment diagram.
Fu se assignment diag ram: onthe fuse box in
th e engine compartment (/ page 482).
* NO
TEDama geor malfunctions caused
by moisture Moisture may cause dama
getothe electrical
sy stem or cause it tomalfunction. #
When the fuse box is open, make sure
th at no moisture can enter the fuse
box. #
When closing the fuse box, make sure
th at the seal of the lid is positioned cor‐
re ctly on the fuse box. If
th e newly inser ted fuse also blo ws, ha vethe
cause traced and rectified at a qualified special‐
ist workshop.
Ensure thefo llowing before replacing a fuse:
R The vehicle is secured against rolling away.
R All electrical consumers are switched off.
R The ignition is switched off.
The electrical fuses are located in various fuse
bo xes:
R Fuse box in the engine compartment on the
left-hand side of theve hicle, when vie wed in
th e direction of tr avel (/ page 482)
R Fuse box in the front passenger foot we ll
(/ page 483)
R Fuse box in the cent reofthe boot
(/ page 484) Opening and closing
the fuse box in the
engine compa rtment Requ
irements:
R A dry clo thand a sc rewdriver are available. 482
Breakdown assis tance
Page 486 of 645
Obser
vethe no tes on electrical fuses
(/ page 482).
Opening &
WARNING Risk of inju ryfrom using the
windscreen wipers while the engine bon‐
net is open
When the engine bonn etis open, and the
windscreen wipers are set in motion, you can
be trapped bythe wiper linkage. #
Alw ays switch off the windscreen wip‐
ers and ignition before opening the
engine bonn et. #
Open the bonn et. #
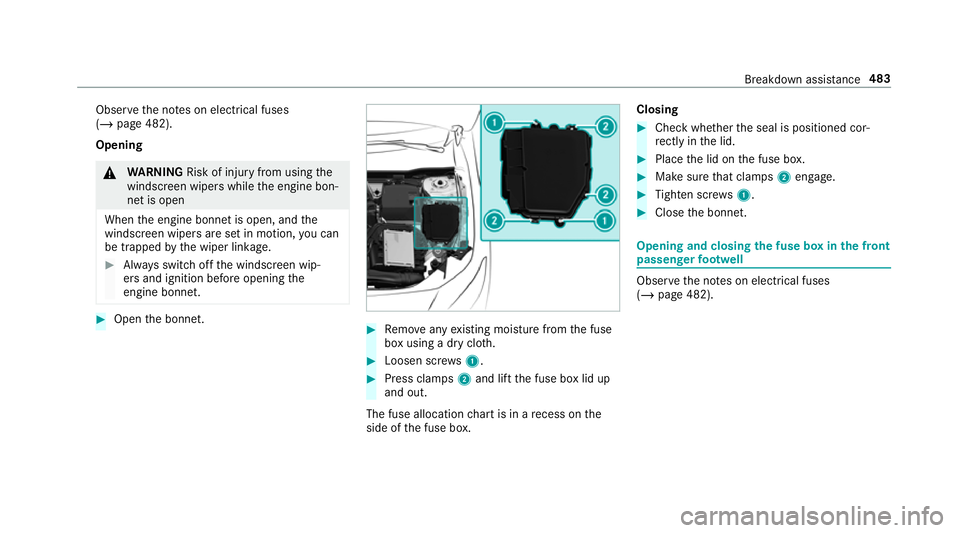
Remo veany existing moisture from the fuse
box using a dry clo th. #
Loosen scr ews1. #
Press clamps 2and lift the fuse box lid up
and out.
The fuse allocation chart is in a recess on the
side of the fuse box. Closing #
Check whe ther the seal is positioned cor‐
re ctly in the lid. #
Place the lid on the fuse box. #
Make sure that clamps 2engage. #
Tighten scr ews1. #
Close the bonn et. Opening and closing
the fuse box in the front
passenger foot we ll Obser
vethe no tes on electrical fuses
(/ page 482). Breakdown assis
tance 483
Page 522 of 645
*
NO
TEMalfunctions due tothe dilution of
Ad Blue ®
or the use of additive-enhanced
Ad Blue ® The function of
the NOx exhaust gas af ter‐
treatment can be impaire dby the use of
unsuitable denoxification agents. #
Only use AdBlue ®
in accordance wi th
ISO 222 41 . #
Do not dilu teAd Blue ®
wi th wate r. #
Do not use additive-enhanced AdBlue ®
. *
NO
TEDama geand malfunctions due to
impurities in AdBlue ® Consequences of impu
rities in AdBlue ®
:
R increased emission values
R damage tothe catalytic con verter
R NOx exhaust gas af tertre atment malfunc‐
tions #
Avoid impurities in AdBlue ®
. Ad
Blue ®
re sidues cr ystallise af ter a period of
time, and contamina tethe sur faces wi thwhich
th ey come into contact. Clean the dirty sur faces
wi th wate r as soon as possible.
When you open theAd Blue ®
tan k,small
amounts of ammonia vapour may escape. Do
not inhale any ammonia vapours that may be
re leased. Only fill th eAd Blue ®
tank in well-venti‐
lated areas.
Ad Blue ®
capacity
To tal capacity of AdBlue ®
tank Mode
lT otal capacity
All models 23.8 l Ad
Blue ®
consu mption
Like fuel consu mption, AdBlue ®
consu mption is
highly dependent upon driving style and operat‐
ing conditions. Forth is reason, your vehicle's
actual consum ption figures under normal operat‐
ing conditions may dif fer from the consum ption
fi gures calculated. AdBlue ®
consu mption is
between 1% and 5% of fuel consumption. Ha veth
eAd Blue ®
supply checked at a qualified spe‐
cialist workshop before making journe ysoutside
of Europe. Before a longer stay outside of
Europe, consult a qualified specialist workshop.
Display theAd Blue ®
ra nge and le vel
( / page 264). Engine oil
Note
s on engine oil
Obser vethe no tes on operating fluids
(/ page 514). Te
ch nical da ta519
Page 538 of 645
Display messages
Possible causes/consequences and M
MSolutions
If it is still not possible torelease the electric parking brake: #
Do not continue driving under any circums tances. Consult a qualified specialist workshop.
Risk of vehicle rolling away
Parking brake not applied
See Owner's Manual *
Ve hicles with manual transmission: the electric parking brake has not been applied and you open the driver's
door. #
Apply the electric parking brake.
Brake immediately *
Ve hicles with manual transmission: a malfunction has occurred while the HOLD function was activated.
A tone may also sound at regular inter vals. If you attem pttolock theve hicle, theto ne will become louder.
Yo u cannot start the engine. #
Immediately depress the brake pedal firm lyuntil the display message disappears.
Yo u can restart the engine.
J
Check brake fluid level *T
here is insuf ficient brake fluid in the brake fluid reser voir. &
WARNING Risk of an accident due tolow brake fluid le vel
If th e brake fluid le vel is too lo w,the braking ef fect and the braking characteristics may be impaired. #
Stop theve hicle as soon as possible, paying attention toroad and traf fic conditions. Do not continue driv‐
ing. #
Consult a qualified specialist workshop. #
Do not top up the brake fluid. Display messages and
warning/indicator lamps 535