2019 MERCEDES-BENZ CLA COUPE engine
[x] Cancel search: enginePage 283 of 330
Only
replace abattery withabattery thathas
been recommended byMercedes-Benz .
Remove theSmartKey ifyou park thevehicle
and donot require anyelectrical consumers.
The vehicle willthen usevery little energy, thus
conserving batterypower.
If the power supply hasbeen interrupted, e.g.if
you reconnec tthe battery, youwillhave to:
R set the clock using themultimedia system
(see theDigital Operator's Manual)
R reset thefunction forfolding theexterior mir-
rors in/out automaticall y,by folding themir-
rors outonce (Ypage 98) Charging
thebatter y G
WARNING
During charging andjump-startin g,explosive
gases canescape fromthebattery. Thereisa
risk ofan explosion.
Particularl yavoid fire,open flames, creating
sparks andsmoking. Ensurethereissufficient
ventilation whilecharging andjump-startin g.
Do not lean over abattery. G
WARNING
Battery acidiscaustic. Thereisarisk ofinjury.
Avoid contactwith skin, eyesorclothing. Do
not inhale anybattery gases.Donot lean over
the battery. Keepchildren awayfrom batter-
ies. Wash awaybattery acidimmediately with
plenty ofclean water andseek medical atten-
tion. G
WARNING
A discharged batterycanfreeze attempera-
tures below freezing point.Whenjump-start-
ing the vehicle orcharging thebattery, gases
can escape fromthebattery. Thereisarisk of
an explosion.
Allow thefrozen battery tothaw outbefore
charging itor jump-startin g.
! Only
usebattery chargers withamaximum
charging voltageof14.8 V.
! Only
charge thebattery usingthejump-
starting connectionpoint. The
jump-startin gconnec tionpoint isin the
engine compartment (Ypage 282).
X Open thehood.
X Connect thebattery charger tothe positive
terminal andground pointinthe same order
as when connec tingthedonor battery inthe
jump-startin gprocedure (Ypage 282).
If the <004C00510047004C004600440057005200550012005A004400550051004C0051
004A[ lampsdonot light upin
the instrument clusteratlow temperatures, itis
very likely thatthedischarged batteryhasfro-
zen. Inthis case youmay neither jump-start the
vehicle norcharge thebattery. Theservice lifeof
a thawed-out batterymaybeshorter. Thestart-
ing characteristics canbeimpaired ,particularl y
at low temperatures. Havethethawed-out bat-
tery checked ataqual ified speciali stworkshop.
Only charge theinstalled batterywithabattery
charger whichhasbeen tested andapproved by
Mercedes-Benz .A battery charger unitspeciall y
adap tedforMercedes-Benz vehiclesandtested
and approved byMercedes-Benz isavail able as
an accessory. Itpermits thecharging ofthe bat-
tery inits installed position. Contactanauthor-
ized Mercedes-Benz Centerforfurther informa-
tion andavail ability. Read thebattery charger's
operating instructionsbefore charging thebat-
tery. Replacing
the12Vbatter y
Observe thenotes onthe 12Vbattery
(Y page 279).
Mercedes-Benz recommendsthatyouhave the
12 Vbattery replaced ataqual ified speciali st
workshop, e.g.atan authorized Mercedes-Benz
Center.
If you want toreplace thebattery yourself,
observe thefollowi ngnotes:
R Alway sreplace adefective batterywithabat-
tery which meets thespecific requirements of
the vehicle.
The vehicle isequip pedwith abattery using
AGM (absorbe ntglass mat)technology ora
battery usingEFB(enhanced floodedbattery)
technology. Fullvehicle functionality isguar-
anteed onlywith anAGM orEFB battery. If
replacement isnecessary, alwaysuse thebat-
tery technology originallyinstalled. Switching
between thebattery technologies isnot per-
mitted. Forsafety reasons, Mercedes-Benz
recommends thatyouonly usebatteries Bat
tery (vehic le)
281Breakdown assistance Z
Page 285 of 330
If
the indicator/wa rninglampsdo not light upinthe instrument clusteratlow temperature s,itis very
likely thatthedischa rgedbattery hasfrozen. Inthis case youmay neither jump-start thevehicle nor
charge thebattery. Letthe battery thawfirst.Theservice lifeofathawed -outbattery maybeshorter.
The starting characteristics canbeimpa ired,particul arlyatlow temperature s.Have thethawed -out
battery checked ataqua lifiedspecia listworkshop.
Do not start thevehicle usingarapi dcharging device.Ifyou rvehicle 'sbattery isdischa rged,the
engine canbejump-started fromanother vehicleorfrom asecond batteryusingjumper cables.
Observe thefollow ingpoints:
R The battery isnot accessib lein all vehicle s.Ifthe other vehicle 'sbattery isnot accessib le,jump-
start thevehicle usingasecond batteryorajump-starting device.
R You may onlyjump-start thevehicle whentheengine andexhau stsystem arecold.
R Do not start theengine ifthe battery isfrozen. Letthe battery thawfirst.
R Only jump-start frombatteries witha12 Vvoltage rating.
R Only usejumper cablesthat arenot dama gedand have asufficie ntcross-section andinsula ted
terminal clamps.
R Make surethatthetwo vehicle sdo not touch.
Make surethat:
R The jumper cablesare not dama ged.
R Non-insula tedparts ofthe terminal clampsdonot come intocontact withother metal partswhile
the jumper cablesare connected tothe battery.
R The jumper cablescannot comeintocontact withparts thatcanmove whentheengine isrunning,
such asthe V-belt pulley orthe fan.
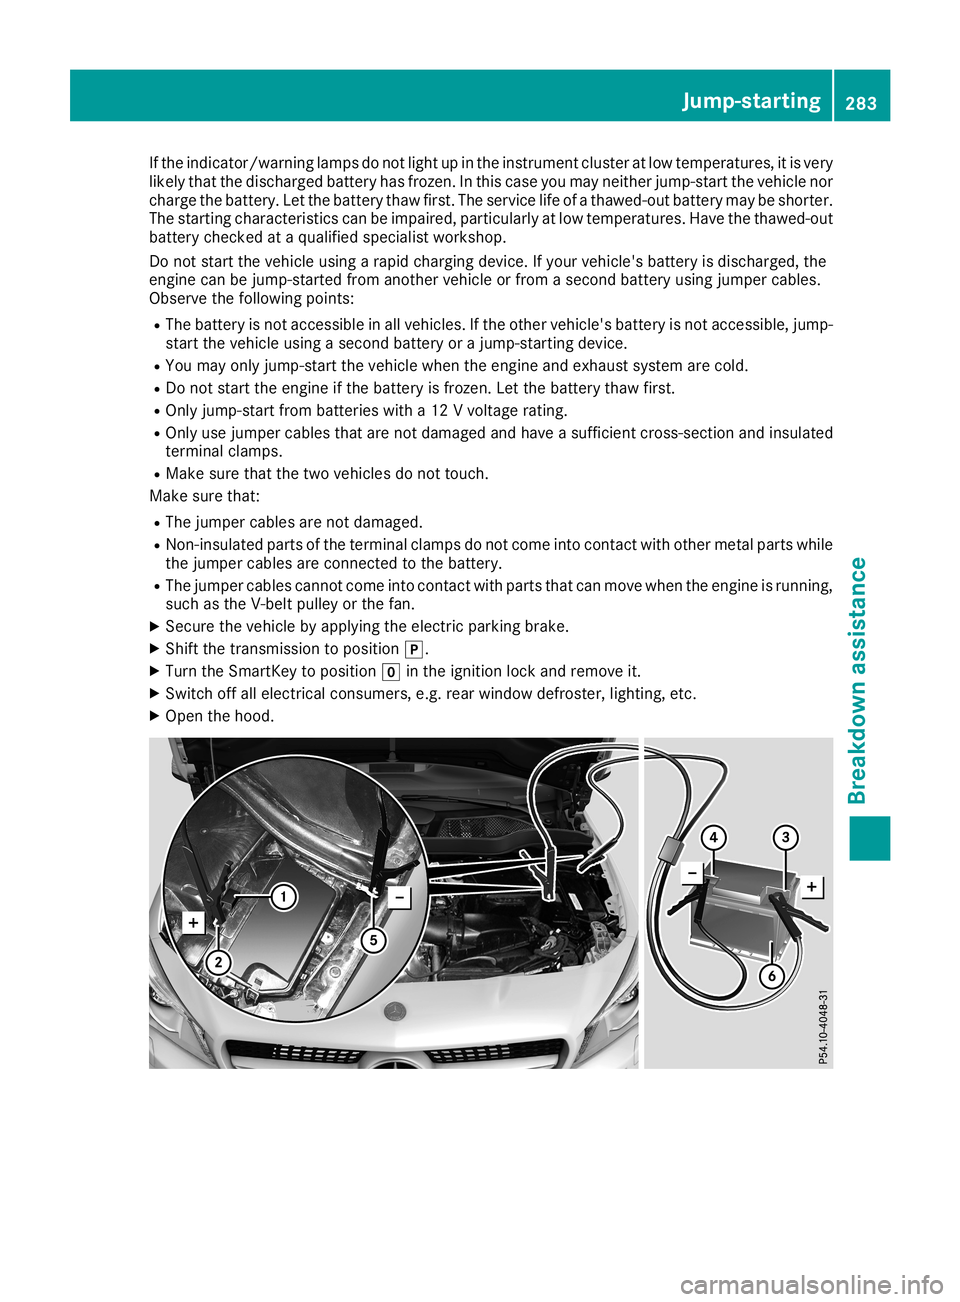
X Secure thevehicle byappl ying theelectric parking brake.
X Shift thetransmission topositio n005D.
X Turn theSmartKey topositio n005A inthe ignition lockandremove it.
X Switch offallelectrical consumers, e.g.rear window defroster, lighting,etc.
X Open thehood. Jump-st
arting
283Breakd ownassis tance Z
Page 286 of 330
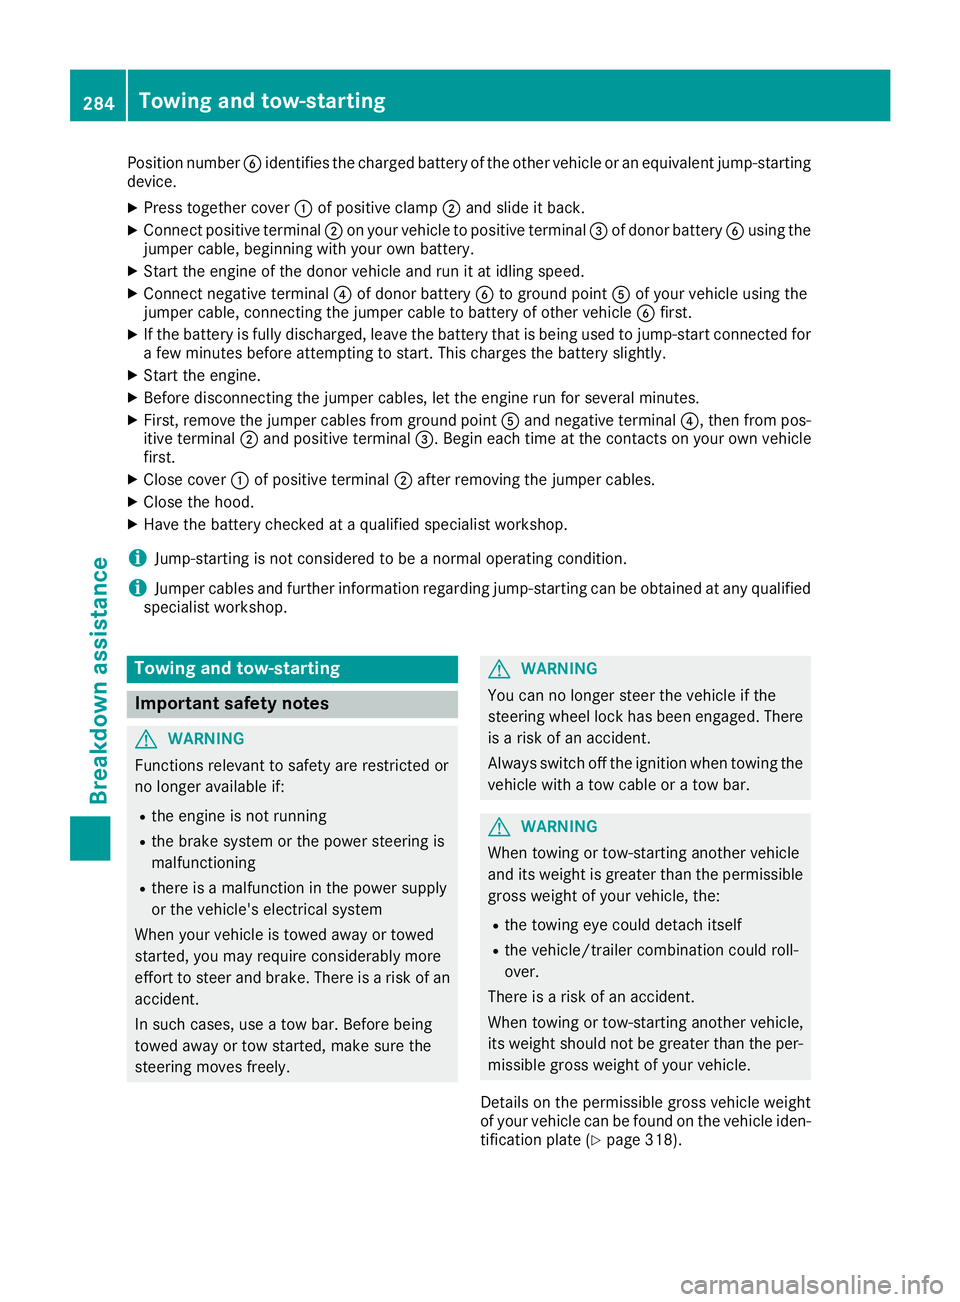
Position
number0084identifies thecharged batteryofthe other vehicle oran equivalent jump-starting
device.
X Press togethercover 0043ofpositive clamp0044and slide itback.
X Connec tpositive terminal0044 onyour vehicle topositive terminal0087 ofdonor battery 0084using the
jumper cable,beginnin gwith your ownbattery.
X Start theengine ofthe donor vehicle andrunitat idling speed.
X Connec tnegative terminal0085 ofdonor battery 0084toground point0083ofyour vehicle usingthe
jumper cable,connectin gthe jumper cabletobattery ofother vehicle 0084first.
X Ifthe battery isfully discharged, leavethebattery thatisbeing usedtojump-st artconn ected for
a few minutes beforeattemptingtostart .This charges thebattery slightly.
X Start theengine.
X Before disconn ectingthe jumper cables,letthe engine runforseveral minutes.
X First ,remove thejumper cablesfromground point0083and negative terminal0085, then from pos-
itive termin al0044 and positive terminal0087. Begin eachtimeatthe cont acts onyour ownvehicle
first.
X Close cover0043ofpositive terminal0044 after removin gthe jumper cables.
X Close thehood.
X Have thebattery checkedataqualified specialist workshop.
i Jump-start
ingisnot cons idered tobe anormal operating condition.
i Jumper
cablesandfurther informationregarding jump-startingcanbeobtained atany qualified
specialist workshop. Towing
andtow-sta rting Impor
tantsafety notes G
WARNIN
G
Funct ionsrelevant tosafety arerestr icted or
no longer availabl eif:
R the engine isnot runnin g
R the brake system orthe power steerin gis
malfunct ioning
R there isamalfunct ioninthe power supply
or the vehicle's electricalsystem
When yourvehicle istowed awayortowed
start ed,you may require considerably more
effort tosteer andbrake. Thereisarisk ofan
accident .
In such cases, useatow bar. Before being
towed awayortow start ed,make surethe
steerin gmoves freely. G
WARNIN
G
You cannolonger steerthevehicle ifthe
steerin gwheel lockhasbeen engaged. There
is arisk ofan accident .
Always switchoffthe ignition whentowing the
vehicle withatow cable oratow bar. G
WARNIN
G
When towing ortow-st arting another vehicle
and itsweight isgreater thanthepermissible
gross weight ofyour vehicle, the:
R the towing eyecould detach itself
R the vehicle/t railercombinat ioncould roll-
over.
There isarisk ofan accident .
When towing ortow-st arting another vehicle,
its weight should notbegreater thantheper-
missible grossweight ofyour vehicle.
Det ails onthe permissible grossvehicle weight
of your vehicle canbefound onthe vehicle iden-
tificat ionplate (Ypage 318). 284
Towing
andtow-sta rtingBr eakdown assistance
Page 289 of 330
Permit
tedtowing method s
Mercedes-B enzrecommen dstransport ingyour
vehicle inthe case ofabreakdown, ratherthan
towing itaway .
When towing away,use atowing ropeoratow-
ing bar with both axles onthe ground. Donot use
any tow barsystems. Tr
ansport ingthe vehicle
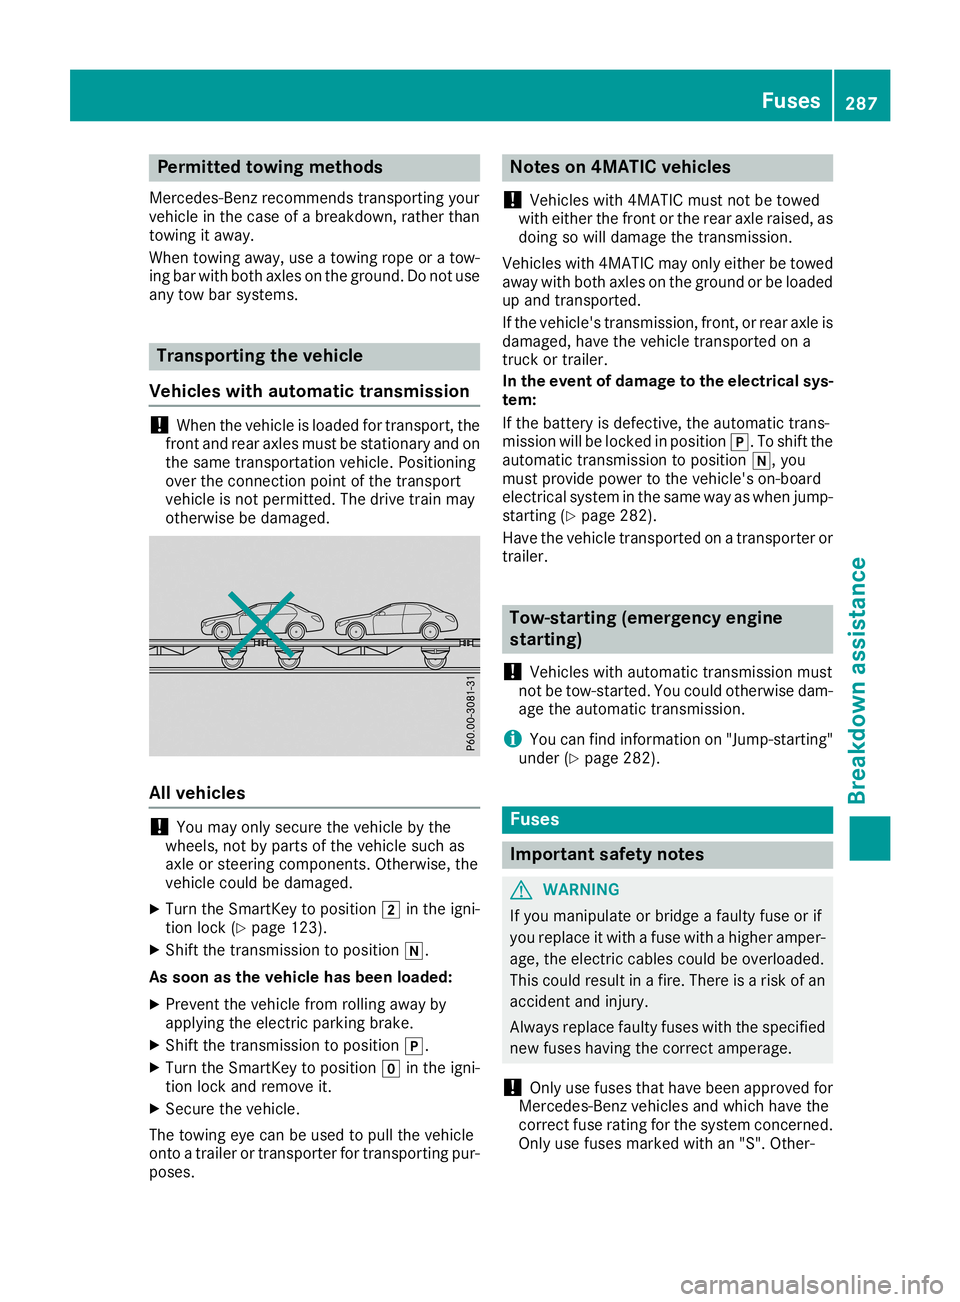
Vehicles withautom atictransmission !
When
thevehicle isloaded fortransport ,the
front andrear axles mustbestationary andon
the same transport ationvehicle. Positioning
over theconn ection pointofthe transport
vehicle isnot permitted. Thedrive trainmay
otherwise bedamaged. All
vehicle s !
You
may onlysecure thevehicle bythe
wheels, notbyparts ofthe vehicle suchas
axle orsteering componen ts.Otherwise, the
vehicle couldbedamaged.
X Turn theSmartK eytoposition 0048inthe igni-
tion lock (Ypage 123).
X Shift thetransm issiontoposition 005C.
As soon asthe vehicle hasbeen loaded:
X Prevent thevehicle fromrolling awayby
apply ingthe electric parking brake.
X Shift thetransm issiontoposition 005D.
X Turn theSmartK eytoposition 005Ainthe igni-
tion lock andremove it.
X Secure thevehicle.
The towing eyecan beused topull thevehicle
onto atrailer ortransport erfor transport ingpur-
poses. Notes
on4MATIC vehicles
! Vehicles
with4MATIC mustnotbetowed
with either thefront orthe rear axle raised, as
doing sowill damage thetransm ission.
Vehicles with4MATIC mayonlyeither betowed
away withboth axles onthe ground orbe loaded
up and transport ed.
If the vehicle's transmission,front,or rear axle is
damaged, havethevehicle transport edon a
truck ortrailer.
In the event ofdam agetothe elec trical sys-
tem:
If the battery isdefective, theautomatic trans-
mission willbelocked inposition 005D.Toshift the
automatic transmissiontoposition 005C,you
must provide powertothe vehicle's on-board
electrical systeminthe same wayaswhen jump-
startin g(Y page 282).
Have thevehicle transport edon atransport eror
trailer. Tow-star
ting(emergency engine
star ting)
! Vehicles
withautomatic transmissionmust
not betow-st arted. Youcould otherwise dam-
age theautomatic transmission.
i You
canfind information on"Jump-starting"
under (Ypage 282). Fuses
Import
antsafety notes G
WARNING
If you manipulate orbridge afaulty fuseorif
you replace itwith afuse withahigher amper-
age, theelectric cablescouldbeoverloaded.
This could result inafire. There isarisk ofan
accident andinjury.
Always replace faultyfuseswiththespecified
new fuses having thecorrect amperage.
! Only
usefuses thathave been approved for
Mercedes-B enzvehicles andwhich havethe
correct fuserating forthe system concerned.
Only usefuses marked withan"S". Other- Fuses
287Breakdown assistance Z
Page 290 of 330
wise,
componentsor syst ems could bedam-
aged.
! Make
surethat no mois turecan enterthe
fuse boxwhen thecov erisopen .
! When
closingthecov er,mak esure that itis
lying correctlyon thefuse box.Moist ureseep-
ing inor dirt could otherwise impairtheoper -
ation ofthefuses .
The fuses inyour vehic leserv eto clos edown
fault ycir cuit s.Ifafuse blows, allthecom po-
nen tson thecir cuit andtheir fun ctions stop
oper ating.
Blown fusesmustbereplac edwith fuses ofthe
same rating, which youcan recogn izebythe
colo rand value. Thefuse ratings arelistedinthe
fuse allocat ionchar t.
The fuse allocat ionchar tis in thefuse boxinthe
fro nt-pas senger foot well (Ypage 289).
If anewly inserted fuse alsoblows, havethe
cause traced andrectified ataqualified special-
ist work shop, e.g.an autho rized Merc edes- Benz
Cent er. Bef
ore chan ging afus e
X Sec ure thevehic leagains trollin gaway
(Y page 142).
X Swit choff allelec trical consumer s.
X Veh icles withoutKEYLESS-G O:rem ove the
Sm artKey fromtheigni tionlock .
X Veh
icles withKEYLESS-G Osta rt-fu nction
or KEYLESS-G O:open thedriv er's door .
The vehic leelec tronic sare now inposit ion
005A. This corresp ondsto theSm artKey being
rem oved fromtheigni tion.
The fuses arelocat edinvario usfuse boxes:
R Fuse boxintheeng inecom partmen ton the
left -han dside ofthevehic le,when viewed in
th edirec tionof travel
R Fuse boxinthefro nt-pas senger foot well
The fuse allocat ionchar tis on thefuse boxinthe
fro nt-pas senger foot well (Ypage 289). Fuse
boxintheengine compartm ent G
WAR
NING
When thehood isopen andthewinds hield
wipers aresetinmot ion, youcan beinjured by
th ewiper linkage. Thereis arisk ofinjury.
Always switchoff thewinds hieldwipers and
th eigni tionbefo reopen ingthehood. X
Open thehood.
X Use adry clothto rem ove anymois turefro m
th efuse box.
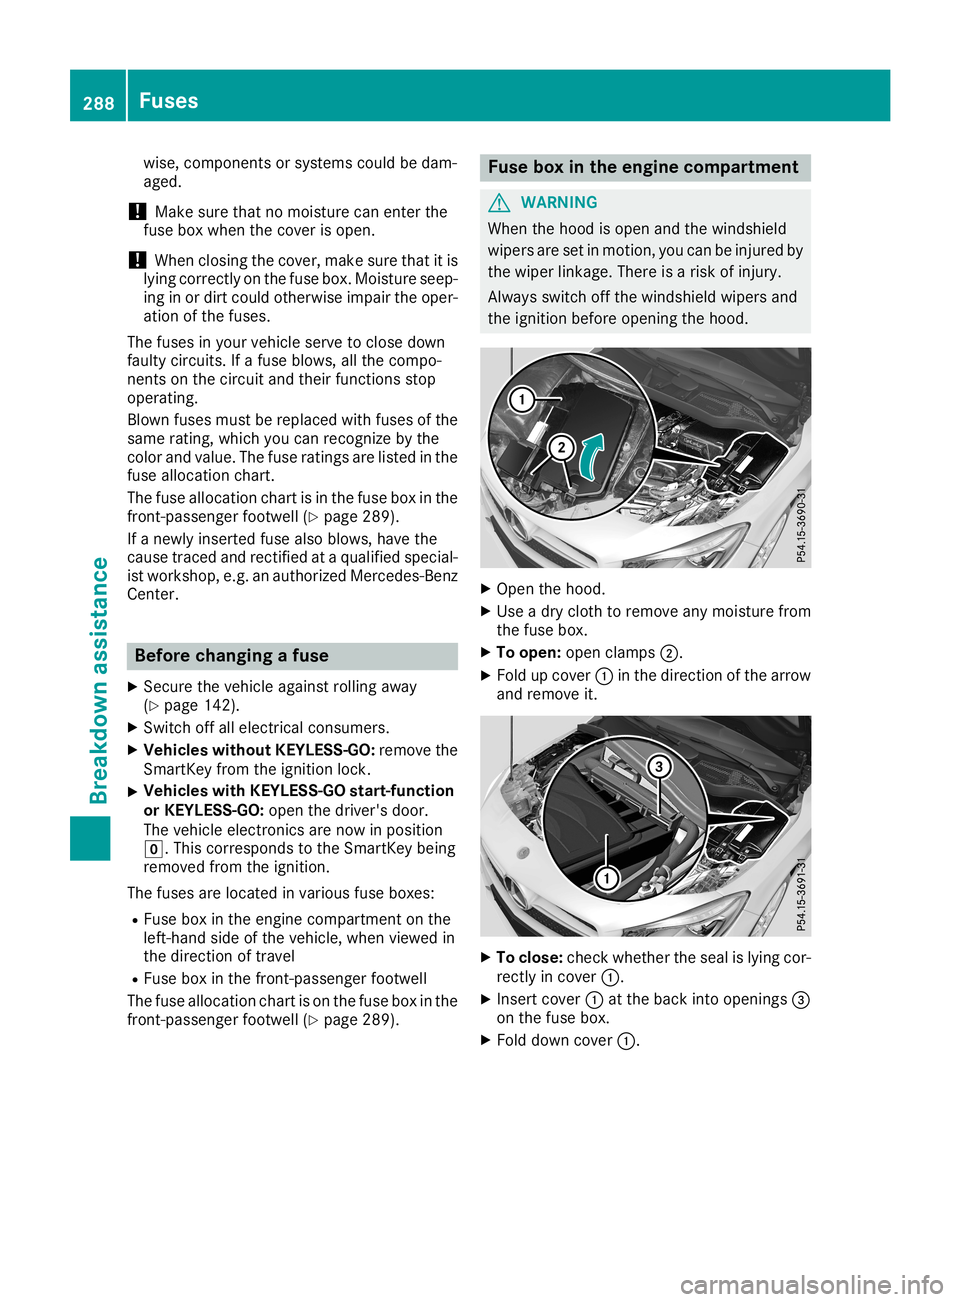
X To open: openclamps0044.
X Fold upcov er0043 inthedirec tionof thearro w
and remove it. X
To close: checkwhet hertheseal islying cor-
rec tlyincov er0043.
X Insert cover0043 attheback intoopen ings0087
on thefuse box.
X Fold down cover0043. 288
FusesBr
eakd ownassis tance
Page 313 of 330

Tire-mount
ingtools should notbeused near
the valve. Thiscould damage theelectron ic
compon ents.
Only have tireschanged ataqualified spe-
cialist workshop.
Observe theinstr uctions andsafety notesinthe
"Changing awheel" section (Ypage 310).
The wear pattern son the front andrear tires
differ, depending onthe operating conditions.
Rotate thewheels beforeaclear wearpattern
has formed onthe tires. Fronttires typically
wear more onthe shoulders andtherear tires in
the cent er.
On vehicles thathave thesame sizefront and
rear wheels, youcan rotat ethe wheels accord-
ing tothe inter valsinthe tire manufact urer's
warranty bookinyour vehicle document s.Ifno
warranty bookisavailabl e,the tires should be
rotat edevery 3,000 to6,000 miles(5,000 to
10,00 0km ).Dependin gon tire wear, thismay
be required earlier.Donot change thedirection
of wheel rotation.
Clean thecont actsurfaces ofthe wheel andthe
brake discthoroughly everytimeawheel isrota-
ted. Check thetire pressure and,ifnecessary,
restart thetire pressure losswarning system
(Canada only)orthe tire pressure monitor(USA
only). Direction
ofrota tion
Tires withaspecified directionofrotat ionhave
additional benefits,e.g. ifthere isarisk ofhydro-
planing. Theseadvantages canonly begained if
the tires areinstalled correspon dingtothe
direction ofrotat ion.
An arrow onthe sidewall ofthe tire indicates its
correc tdirection ofrotat ion. Storing
wheels
Stor ewheels thatarenot being usedinacool,
dry and preferably darkplace. Protectthe tires
from oil,grease, gasoline anddiesel. Mounting
awheel
Prepa ringthevehicle X
Stop thevehicle onsolid, non-slippery and
level ground.
X Apply theelectric parking brakemanually.
X Bring thefront wheels intothestraight- ahead
position.
X Shift thetrans mission toposition 005D.
X Switch offthe engine.
X Vehicles withoutKEYLESS-GO: removethe
Smart Keyfrom theignition lock.
X Vehicles
withKEYL ESS-GO start-function
or KEYL ESS-GO: openthedriver's door.
The vehicle electron icsare now inposition
0092. This isthe same as“key removed”.
X Vehicles
withKEYL ESS-GO start-function
or KEYL ESS-GO: removetheStart /Stopbut-
ton from theignition lock(Ypage 123).
X Make surethattheengine cannotbe start ed
via your smartphon e(Y page 83).
X Ifincluded inthe vehicle equipment, remove
the tire- change toolkitfrom thevehicle.
X Safeguard thevehicle against rollingaway
(Y page 142).
i Apart
fromcertaincount ry-specific varia-
tions, thevehicles arenot equipped witha
tire- change toolkit.Some toolsforchanging a
wheel arespecific tothe vehicle. Formore
inform ationonwhich toolsarerequired to
perform awheel change onyour vehicle, con-
sult aqualified specialist workshop.
Necessary tire-changing toolscaninclude, for
example:
R Jack
R Wheel chock
R Lug wrench Changing
awheel
311Wheels andtires Z
Page 314 of 330
Securing
thevehicle toprevent itfrom
rolling away If
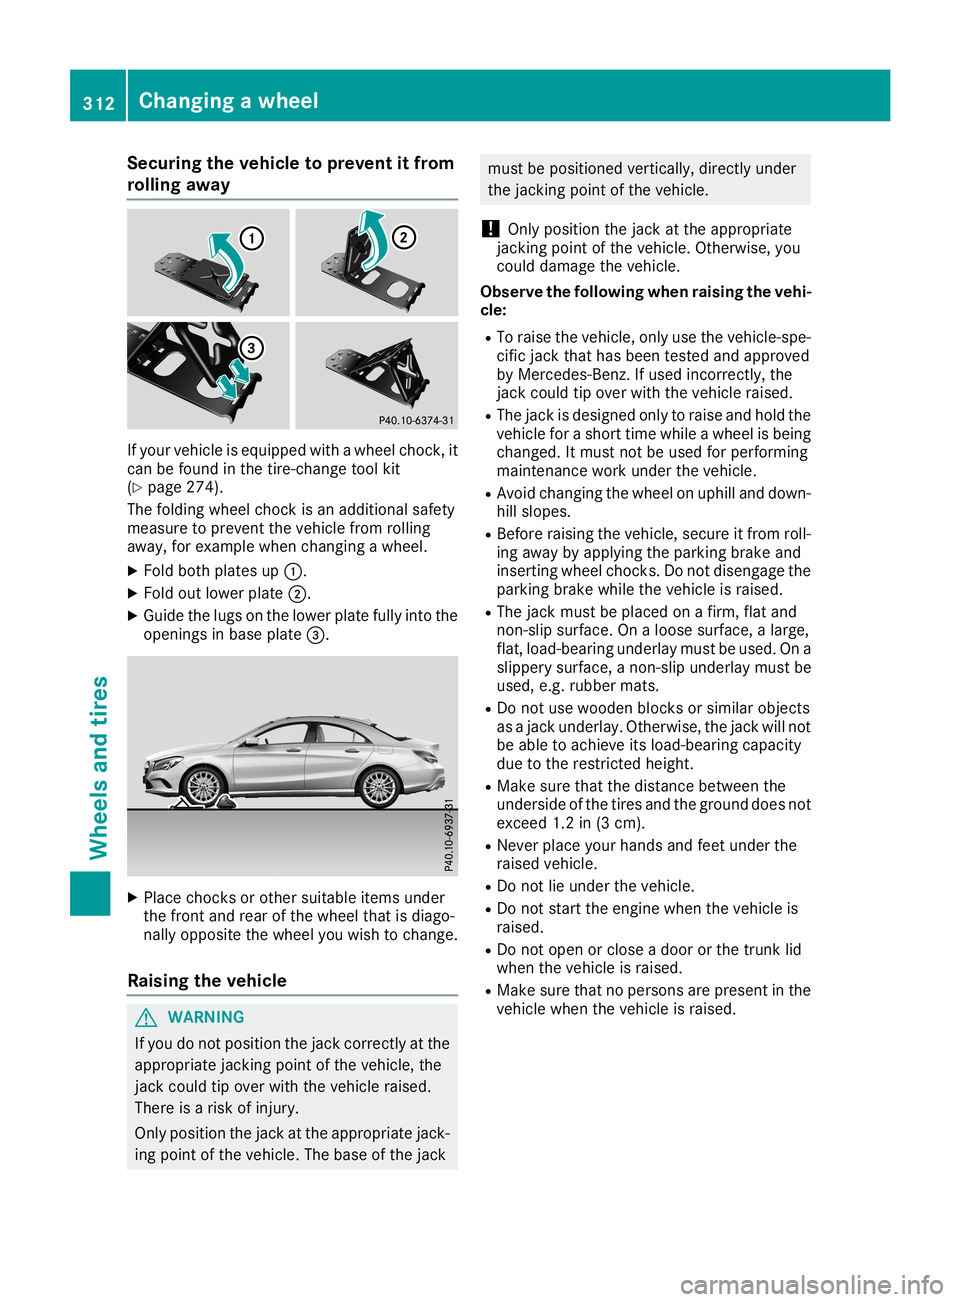
your vehicle isequippe dwith awheel chock,it
can befound inthe tire-c hange toolkit
(Y page 274).
The folding wheelchock isan additional safety
measure toprevent thevehicle fromrolling
away ,for example whenchanging awheel.
X Fold both plates up0043.
X Fold outlower plate0044.
X Guide thelugs onthe lower platefullyintothe
openings inbase plate 0087. X
Place chocksor other suitable itemsunder
the front andrear ofthe wheel thatisdiago-
nally opposite thewheel youwish tochange.
Raising thevehicle G
WARNING
If you donot position thejack correct lyat the
appropriate jackingpoint ofthe vehicle, the
jack could tipover withthevehicle raised.
There isarisk ofinjury.
Only position thejack atthe appropriate jack-
ing point ofthe vehicle. Thebase ofthe jack must
bepositioned vertically,directlyunder
the jackin gpoint ofthe vehicle.
! Only
position thejack atthe appropriate
jackin gpoint ofthe vehicle. Otherwise, you
could damage thevehicle.
Observe thefollow ingwhen raising thevehi-
cle:
R To raise thevehicle, onlyusethevehicle-spe-
cific jack thathasbeen tested andapproved
by Mercedes-B enz.Ifused incorrec tly,the
jack could tipover withthevehicle raised.
R The jack isdesigned onlytoraise andhold the
vehicle forashort timewhile awheel isbeing
changed. Itmust notbeused forperforming
maintenan cework under thevehicle.
R Avoid changing thewheel onuphill anddown-
hill slopes.
R Before raising thevehicle, secureitfrom roll-
ing away byapply ingthe parking brakeand
insertin gwheel chocks.Do not disengage the
parking brakewhilethevehicle israised.
R The jack must beplaced onafirm, flatand
non- slipsurface. Onaloose surface, alarge,
flat, load-bearing underlaymustbeused. Ona
slippery surface, anon- slipunderlay mustbe
used, e.g.rubber mats.
R Do not use wooden blocksorsimilar objects
as ajack underlay. Otherwise, thejack willnot
be able toachieve itsload-bearing capacity
due tothe restrict edheight.
R Make surethatthedistance between the
underside ofthe tires andtheground doesnot
exceed 1.2in(3 cm).
R Never placeyourhands andfeet under the
raised vehicle.
R Do not lieunder thevehicle.
R Do not start theengine whenthevehicle is
raised.
R Do not open orclose adoor orthe trunk lid
when thevehicle israised.
R Make surethatnopersons arepresent inthe
vehicle whenthevehicle israised. 312
Changing
awheelWheels andtires
Page 321 of 330

differen
tfor every vehicle andcandeviate
from thedata shown here.Youcanfind the
data applicable toyour vehicle onthe vehicle
ident ification plate. Vehicle
identification number(VIN) X
Slide theright -handfron tseat toits rearmost
position .
X Fold floor cover ing0043upwards.
You willsee VIN 0044.
The VINcanalso befound onthe vehicle iden-
tific ation plate(Ypage 318).
The VINcanalso befound atthe lower edgeof
the windshield (Ypage 319). Engine
number 0043
Emiss ioncontrol infor mation plate,includ-
ing the cert ification ofboth federal andCali-
forn ianemission sstan dards
0044 VIN (onthe lower edgeofthe windshield)
0087 Engine number (stamped intothe cran k-
case) Service
product sand filling capaci-
ties Impor
tantsafet ynotes G
WARN
ING
Serv iceproduct smay bepoisonous andhaz-
ardous tohealth. Thereisarisk ofinjury.
Comply withinstruct ions onthe use, storage
and disposal ofservic eproduct son the labels
of the respect iveoriginal container s.Always
stor eservic eproduct ssealed intheir original
con tainer s.Always keepservic eproduct sout
of the reach ofchildren . H
Environm
entalnote
Dispose ofservic eproduct sin an envir on-
ment allyrespon siblemann er.
Serv iceproduct sinclude thefollowing:
R Fuels
R Lubrican ts(e.g. engin eoil, tran smission oil)
R Coolant
R Brak efluid
R Windshield washerfluid
R Climate control system refrigerant
Componen tsand servic eproduct smust match.
Only useproduct srecom mended byMercedes -
Ben z.Damage whichiscaused bythe use of
product swhich havenotbeen recom mended is
not cover edbythe Mercedes -Benzwarrant yor
goodwill gestures.Product sapproved by
Mercedes -Benzare listed inthis Operator 's
Manual inthe appropriate section.
Inf ormat ionontest edand approved products
can beobtained ataMercedes -BenzServ ice
Center oron the Internet at
htt p:// bevo.m ercedes- benz.com.
You canrecogniz eserv iceproduc tsapprove dby
Merc edes- Benzby the followin ginsc ription on
the contain ers:
R MB- Freigabe (e.g.MB-Freigabe 229.51)
R MB- Appr oval(e.g. MB-Appr oval229.51)
Oth erdesign ationsor rec omme ndations indi-
cat ealevel ofquality oraspecif ication in
acco rdanc ewith anMB Shee tNumber (e.g.MB
229 .5).They have notnecessarily been
approve dby Merc edes- Benz. Serv
iceproduct sand filling capacities
319Technical data Z