2019 MERCEDES-BENZ AMG GT ROADSTER door lock
[x] Cancel search: door lockPage 221 of 298
Glove compartment
X
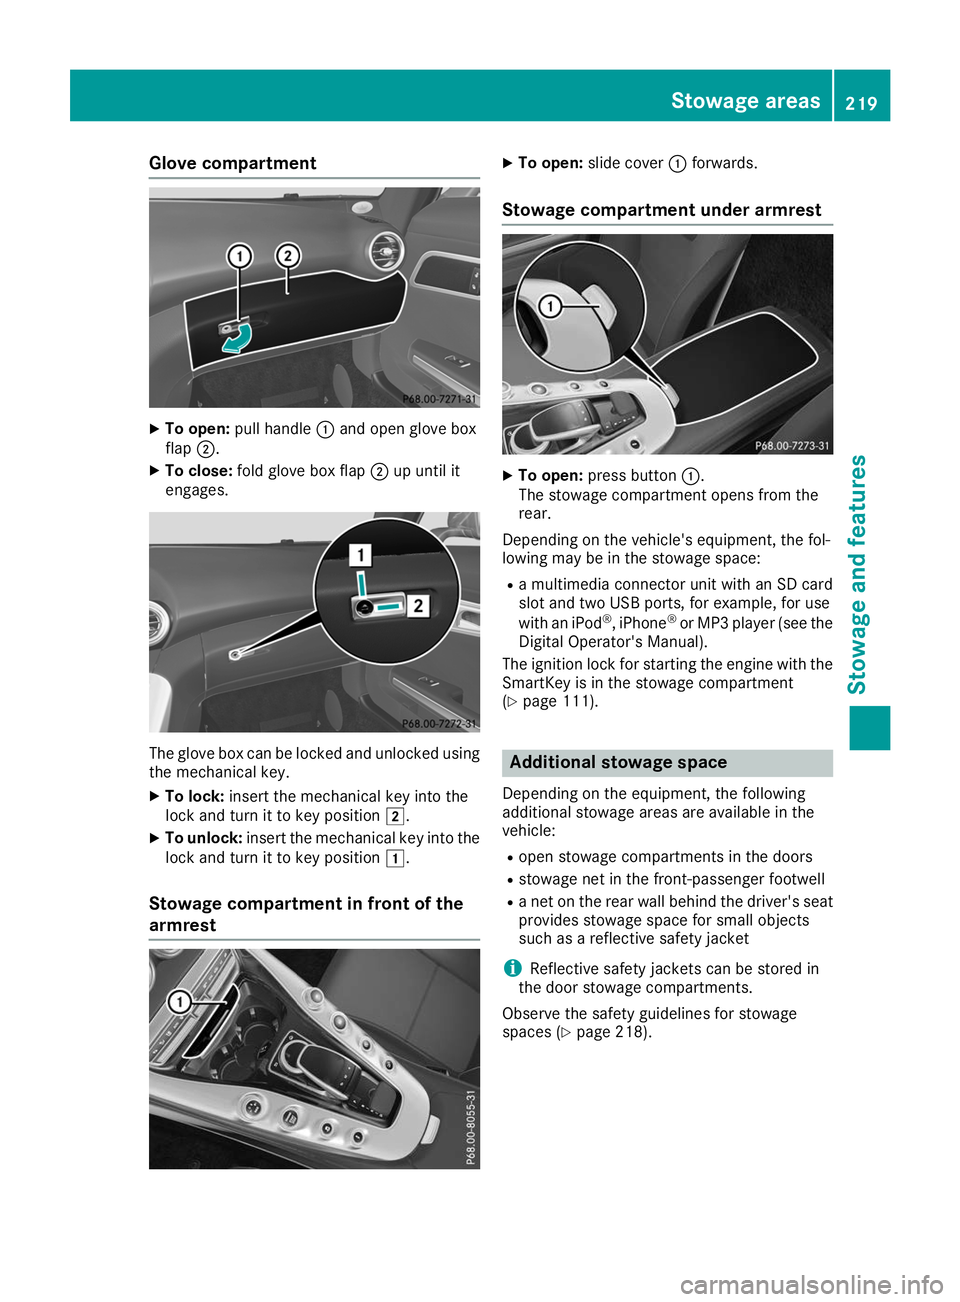
To open: pull handle 0043and open glove box
flap 0044.
X To close: fold glove box flap 0044up until it
engages. The glove box can be locked and unlocked using
the mechanical key.
X To lock: insert the mechanical key into the
lock and turn it to key position 0048.
X To unlock: insert the mechanical key into the
lock and turn it to key position 0047.
Stowage compartment in front of the
armrest X
To open: slide cover 0043forwards.
Stowage compartment under armrest X
To open: press button 0043.
The stowage compartment opens from the
rear.
Depending on the vehicle's equipment, the fol-
lowing may be in the stowage space: R a multimedia connector unit with an SD card
slot and two USB ports, for example, for use
with an iPod ®
, iPhone ®
or MP3 player (see the
Digital Operator's Manual).
The ignition lock for starting the engine with the
SmartKey is in the stowage compartment
(Y page 111). Additional stowage space
Depending on the equipment, the following
additional stowage areas are available in the
vehicle:
R open stowage compartments in the doors
R stowage net in the front-passenger footwell
R a net on the rear wall behind the driver's seat
provides stowage space for small objects
such as a reflective safety jacket
i Reflective safety jackets can be stored in
the door stowage compartments.
Observe the safety guidelines for stowage
spaces (Y page 218). Stowage areas
219Stowage and features Z
Page 230 of 298
Mercedes-Benz Customer Assistance Center
at 1-800 FOR-MERCEDES (1-800-367-6372)
or 1-866-990-9007
You will be asked for your password.
The next time you are inside the vehicle and you switch on the ignition, the Doors Locked
Doors Locked
Remotely Remotely message appears in the multifunction
display.
Alternatively, the vehicle can be locked via:
R the Internet, under the "Owners Online" sec-
tion
R telephone applications (e.g. for iPhone ®
,
Android™)
To do this, you will need your identification num-
ber and password.
Stolen vehicle recovery service If your vehicle has been stolen:
X Notify the police.
The police will issue a numbered incident
report.
X Forward this number to the Mercedes-Benz
Customer Assistance Center along with your
PIN.
The Mercedes-Benz Customer Assistance
Center then tries to locate the system. The
Mercedes-Benz Customer Assistance Center
contacts you and the local law enforcement
agency if the vehicle is located.
However, only the law enforcement agency is
informed of the location of the vehicle.
If the anti-theft alarm system is activated for
longer than 30 seconds, mbrace automatically
notifies the Mercedes-Benz Customer Assis-
tance Center.
Vehicle Health Check With the Vehicle Health Check, the Customer
Assistance Center can provide improved sup-
port for problems with your vehicle. During an
existing call, vehicle data is transferred to the
Customer Assistance Center.
The customer service representative can use
the received data to decide what kind of assis-
tance is required. You are then, for example,
guided to the nearest Mercedes-Benz Service
Center or a recovery vehicle is called.
If vehicle data need to be transferred during an
Info call or a Roadside Assistance call, this is
initiated by the Customer Assistance Center. The
Roadside Assistance Connected
Roadside Assistance Connected mes-
sage appears in the display. If the Vehicle Health
Check can be started, the Request Requestfor
forVehi‐
Vehi‐
cle Diagnostics Received Start vehi‐
cle Diagnostics Received Start vehi‐
cle diagnostics? cle diagnostics? message appears in the
display.
X Press the Yes
Yesbutton to confirm the message.
X If the Vehicle Diagnostics Please
Vehicle Diagnostics Please
Start Ignition
Start Ignition message appears: turn the
SmartKey to key position 0048in the ignition
lock (Y page 111).
X If the Please follow the instructions
Please follow the instructions
received
received by
byphone
phone and
andmove
move your
yourvehi‐
vehi‐
cle to a safe position.
cle to a safe position. message
appears: please follow the instructions
received by phone and move your vehicle to a safe position.
The message in the display disappears.
The vehicle operating state check begins.
During this procedure, you will see the Vehi‐ Vehi‐
cle Diagnostics Active
cle Diagnostics Active message.
If you select Cancel
Cancel, the Vehicle Health
Check is canceled completely.
When the check is complete, the Sending
Sending
vehicle diagnostics data. (Voice con‐
vehicle diagnostics data. (Voice con‐
nection may be interrupted during nection may be interrupted during
data data transfer)
transfer) message appears. The vehicle
data can now be sent.
X Press the OK
OKbutton to confirm the message.
The voice connection with the Customer
Assistance Center is terminated.
The Vehicle Diagnostics: Transfer‐ Vehicle Diagnostics: Transfer‐
ring Data...
ring Data... message appears.
The vehicle data is sent to the Customer
Assistance Center.
Depending on what the customer service rep-
resentative agreed with you, the voice connec-
tion is re-established after the transfer is com-
plete. If necessary, you will be contacted at a
later time by another means, e.g. by e-mail or
phone.
Another function of the Vehicle Health Check is
the transfer of service data to the Customer
Assistance Center. If a service is due, the display shows a message to this effect together with
information about any special offers at your
workshop.
This information can also be called up under
"Owners Online" at http://www.mbusa.com.
Information on the data stored in the vehicle
(Y page 29). 228
FeaturesStowage and features
Page 233 of 298
Problem
Possible causes/consequences and
0050
0050Solutions The rear spoiler cannot
be retracted again after
manually extending it. You have opened the trunk lid while manually extending the rear
spoiler.
X Close the trunk lid. The rear spoiler does not
extend or retract auto-
matically. The rear spoiler's movement is blocked, e.g. by an object jammed
between the body and the rear spoiler.
X Remove the object. Garage door opener
General notes The HomeLink
®
garage door opener integrated
in the rear-view mirror allows you to operate up
to three different door and gate systems.
Use the integrated garage door opener only on
garage doors that:
R they are equipped with a safety stop and
reverse feature
R they conform to the current U.S. safety stand-
ards
When it has been programmed, the integrated
garage door opener in the rear-view mirror will
assume the function of the garage door sys-
tem's remote control. Please also read the oper-
ating instructions for the garage door system.
When programming a garage door opener, park the vehicle outside the garage. Do not leave the
engine running while programming it.
Certain garage door drives are incompatible
with the integrated garage door opener. If you
have difficulty programing the integrated garage
door opener, contact a Mercedes-Benz Service
Center.
Alternatively, you can call the following tele-
phone assistance services:
R USA: Mercedes-Benz Customer Assistance
Center at 1-800-FOR-MERCedes
R Canada: Customer Service at
1-800-387-0100
R HomeLink ®
hotline 1-800-355-3515 (free of
charge)
More information on HomeLink ®
and/or com-
patible products is also available on the Internet
at http://www.homelink.com.
Notes on the declaration of conformity
(Y page 27).
USA: FCC ID: CB2HMIHL4 Canada: IC: 279B-HMIHL4
Important safety notes G
WARNING
When you operate or program the door with
the integrated garage door opener, persons in the range of movement of the door may
become trapped or be struck by the door.
There is a risk of injury.
When using the integrated garage door
opener, always make sure that nobody is
within the range of movement of the door. G
DANGER
Combustion engines emit poisonous exhaust
gases such as carbon monoxide. Inhaling
these exhaust gases is hazardous to health
and can result in poisoning. There is a risk of
fatal injury. Therefore, never leave the engine running an enclosed space without adequate
ventilation.
Programming Programming the buttons
Pay attention to the "Important safety notes"
(Y page 231). Features
231Stowage and features Z
Page 244 of 298

drive for a few minutes after cleaning. By
heating up the brakes, the brake discs and
pads dry. The vehicle can then be parked for a
long period of time.
Regular care of your vehicle is a condition for
retaining the quality in the long term.
Use care products and cleaning agents recom-
mended and approved by Mercedes-Benz. Washing the vehicle and cleaning the
paintwork
Automatic car wash G
WARNING
Braking efficiency is reduced after washing
the vehicle. There is a risk of an accident.
After the vehicle has been washed, brake
carefully while paying attention to the traffic
conditions until full braking power is restored.
! When Active Brake Assist, Active Distance
Assist DISTRONIC or the HOLD function is
activated, the vehicle brakes automatically in
certain situations.
To avoid damage to the vehicle, deactivate
these systems in the following or similar sit-
uations:
R when towing the vehicle
R in the car wash
! Preferably use automatic car washes with
adjustable high-pressure pre-cleaning. This
corresponds with the specification for the
Cabriolet program. In car washes that use
high water pressures, there is a risk that a
small amount of water may leak into the vehi- cle.
! Make sure that the vehicle is not subse-
quently treated with hot wax.
! Never clean your vehicle in a Touchless
Automatic Car Wash as these use special
cleaning agents. These cleaning agents can
damage the paintwork or plastic parts.
If you have your vehicle cleaned in a high-
pressure automatic car wash, small amounts of water may enter the vehicle. !
If the SmartKey is within the rear detection
range of KEYLESS-GO, the following situa-
tions, for example, could lead to the uninten-
tional opening of the trunk lid:
R when using an automatic car wash
R when using a power washer
Make sure that the SmartKey is at least 10 ft
(3 m) away from the vehicle.
! Make sure that:
R the side windows are fully closed
R the blower of the ventilation/heating sys-
tem is switched off
R the windshield wiper switch is at position
003F
R the rear-view camera is deactivated
The vehicle may otherwise be damaged.
! When washing your vehicle in a tow-through
car wash, use the SmartKey instead of the
Start/Stop button.
Start the engine using the SmartKey. Set the
transmission to 005Cwith the E-SELECT selec-
tor lever. Switch the engine off again with the SmartKey by turning the SmartKey to position
0048. Make sure that you then leave the Smart-
Key in position 0048. You may otherwise dam-
age the vehicle, the transmission or the car
wash.
Check the transmission position in the instru-
ment cluster.
! Before switching off the engine, use the
E‑SELECT lever to shift the transmission to
005C. If you open the driver's or front-passenger
door, the transmission remains in this posi-
tion for up to 30 minutes if the key is in the
ignition, even if the engine is switched off. If
you do not shift the transmission to 005Cusing
the E‑SELECT lever beforehand, it shifts auto-
matically to parking position 005Dand locks the
wheels if the driver's or front-passenger door
is opened when the engine is switched off.
This may damage the vehicle, the transmis-
sion or the car wash.
You can wash the vehicle in an automatic car
wash from the very start.
If the vehicle is very dirty, pre-wash it before
cleaning it in an automatic car wash.
After using an automatic car wash, wipe off wax from the windshield and the wiper blades. This
will prevent smears and reduce wiping noises
caused by residue on the windshield. 242
CareMaintenance and care
Page 253 of 298
X
Stop the vehicle on solid, non-slippery and
level ground, as far away as possible from
traffic.
X Switch on the hazard warning lamps.
X Secure the vehicle against rolling away
(Y page 127).
X If possible, bring the front wheels into the
straight-ahead position.
X Switch off the engine.
X With KEYLESS-GO start function or vehi-
cles with KEYLESS-GO: open the driver's
door.
The vehicle electronics are now in key posi-
tion 0092. This is the same as the key having
been removed.
or X Remove the SmartKey from the ignition lock.
X Make sure that the passengers are not endan-
gered as they do so. Make sure that no one is
near the danger area while a wheel is being
changed. Anyone who is not directly assisting in the wheel change should, for example,
stand behind the barrier.
X Get out of the vehicle. Pay attention to traffic
conditions when doing so.
X Close the driver's door. TIREFIT kit
Important safety notes TIREFIT is a tire sealant.
You can use TIREFIT to seal punctures of up to
0.16 in (4 mm), particularly those in the tire
tread. You can use TIREFIT at outside tempera-
tures down to 00F84 ‡ (00F820 †). G
WARNING
In the following situations, the tire sealant is
unable to provide sufficient breakdown assis- tance, as it is unable to seal the tire properly:
R there are cuts or punctures in the tire larger
than those mentioned above.
R the wheel rim is damaged.
R you have driven at very low tire pressures or
on a flat tire.
There is a risk of an accident.
Do not drive the vehicle. Contact a qualified
specialist workshop. G
WARNING
The tire sealant is harmful and causes irrita-
tion. It must not come into contact with your
skin, eyes or clothing or be swallowed. Do not inhale TIREFIT fumes. Keep tire sealant away
from children. There is a risk of injury.
If you come into contact with the tire sealant,
observe the following:
R Rinse off the tire sealant from your skin
immediately with water.
R If the tire sealant comes into contact with
your eyes, immediately rinse them thor-
oughly with clean water.
R If tire sealant is swallowed, immediately
rinse your mouth out thoroughly and drink
plenty of water. Do not induce vomiting,
and seek medical attention immediately.
R Immediately change out of clothing which
has come into contact with tire sealant.
R If an allergic reaction occurs, seek medical
attention immediately.
! Do not operate the tire inflation compressor
for longer than ten minutes at a time without a break. It may otherwise overheat.
The tire inflation compressor can be operatedagain once it has cooled down.
Comply with the manufacturer's safety instruc-
tions on the tire inflation compressor label and
on the tire sealant bottle.
Using the TIREFIT kit X
Do not remove any foreign objects which have
penetrated the tire, e.g. screws or nails.
X Remove the tire sealant bottle, the accompa-
nying TIREFIT sticker and the tire inflation
compressor from the stowage compartment
in the trunk (Y page 249). Flat tire
251Breakdown assistance Z
Page 261 of 298
!
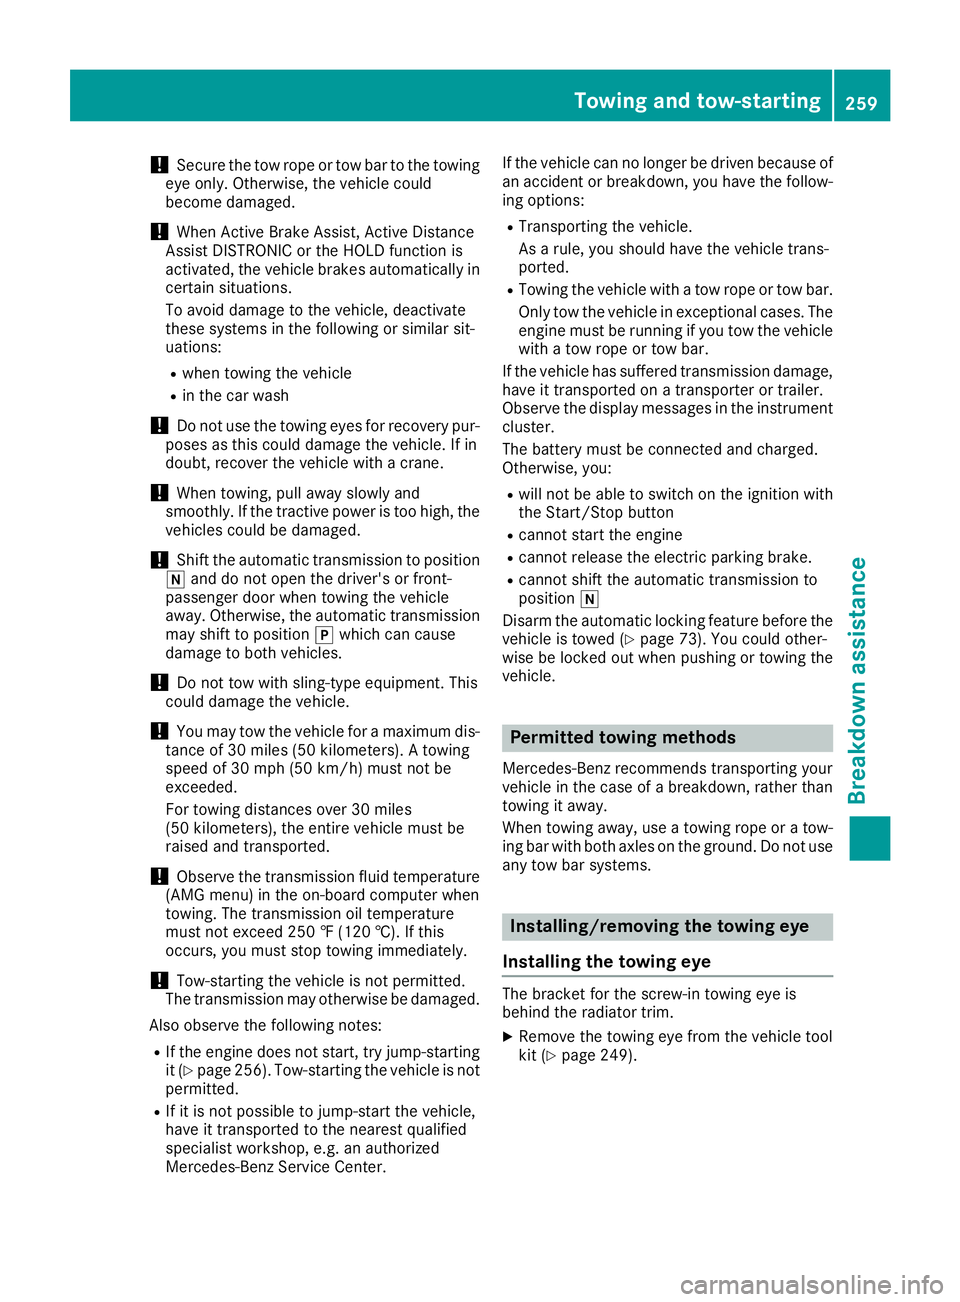
Secure the tow rope or tow bar to the towing
eye only. Otherwise, the vehicle could
become damaged.
! When Active Brake Assist, Active Distance
Assist DISTRONIC or the HOLD function is
activated, the vehicle brakes automatically in
certain situations.
To avoid damage to the vehicle, deactivate
these systems in the following or similar sit-
uations:
R when towing the vehicle
R in the car wash
! Do not use the towing eyes for recovery pur-
poses as this could damage the vehicle. If in
doubt, recover the vehicle with a crane.
! When towing, pull away slowly and
smoothly. If the tractive power is too high, the
vehicles could be damaged.
! Shift the automatic transmission to position
005C and do not open the driver's or front-
passenger door when towing the vehicle
away. Otherwise, the automatic transmission may shift to position 005Dwhich can cause
damage to both vehicles.
! Do not tow with sling-type equipment. This
could damage the vehicle.
! You may tow the vehicle for a maximum dis-
tance of 30 miles (50 kilometers). A towing
speed of 30 mph (50 km/h) must not be
exceeded.
For towing distances over 30 miles
(50 kilometers), the entire vehicle must be
raised and transported.
! Observe the transmission fluid temperature
(AMG menu) in the on-board computer when
towing. The transmission oil temperature
must not exceed 250 ‡ (120 †). If this
occurs, you must stop towing immediately.
! Tow-starting the vehicle is not permitted.
The transmission may otherwise be damaged.
Also observe the following notes:
R If the engine does not start, try jump-starting
it (Y page 256). Tow-starting the vehicle is not
permitted.
R If it is not possible to jump-start the vehicle,
have it transported to the nearest qualified
specialist workshop, e.g. an authorized
Mercedes-Benz Service Center. If the vehicle can no longer be driven because of
an accident or breakdown, you have the follow- ing options:
R Transporting the vehicle.
As a rule, you should have the vehicle trans-
ported.
R Towing the vehicle with a tow rope or tow bar.
Only tow the vehicle in exceptional cases. The
engine must be running if you tow the vehicle with a tow rope or tow bar.
If the vehicle has suffered transmission damage, have it transported on a transporter or trailer.
Observe the display messages in the instrument
cluster.
The battery must be connected and charged.
Otherwise, you:
R will not be able to switch on the ignition with
the Start/Stop button
R cannot start the engine
R cannot release the electric parking brake.
R cannot shift the automatic transmission to
position 005C
Disarm the automatic locking feature before the vehicle is towed (Y page 73). You could other-
wise be locked out when pushing or towing the
vehicle. Permitted towing methods
Mercedes-Benz recommends transporting your
vehicle in the case of a breakdown, rather than
towing it away.
When towing away, use a towing rope or a tow-
ing bar with both axles on the ground. Do not use any tow bar systems. Installing/removing the towing eye
Installing the towing eye The bracket for the screw-in towing eye is
behind the radiator trim.
X Remove the towing eye from the vehicle tool
kit (Y page 249). Towing and tow-starting
259Breakdown assistance Z
Page 262 of 298
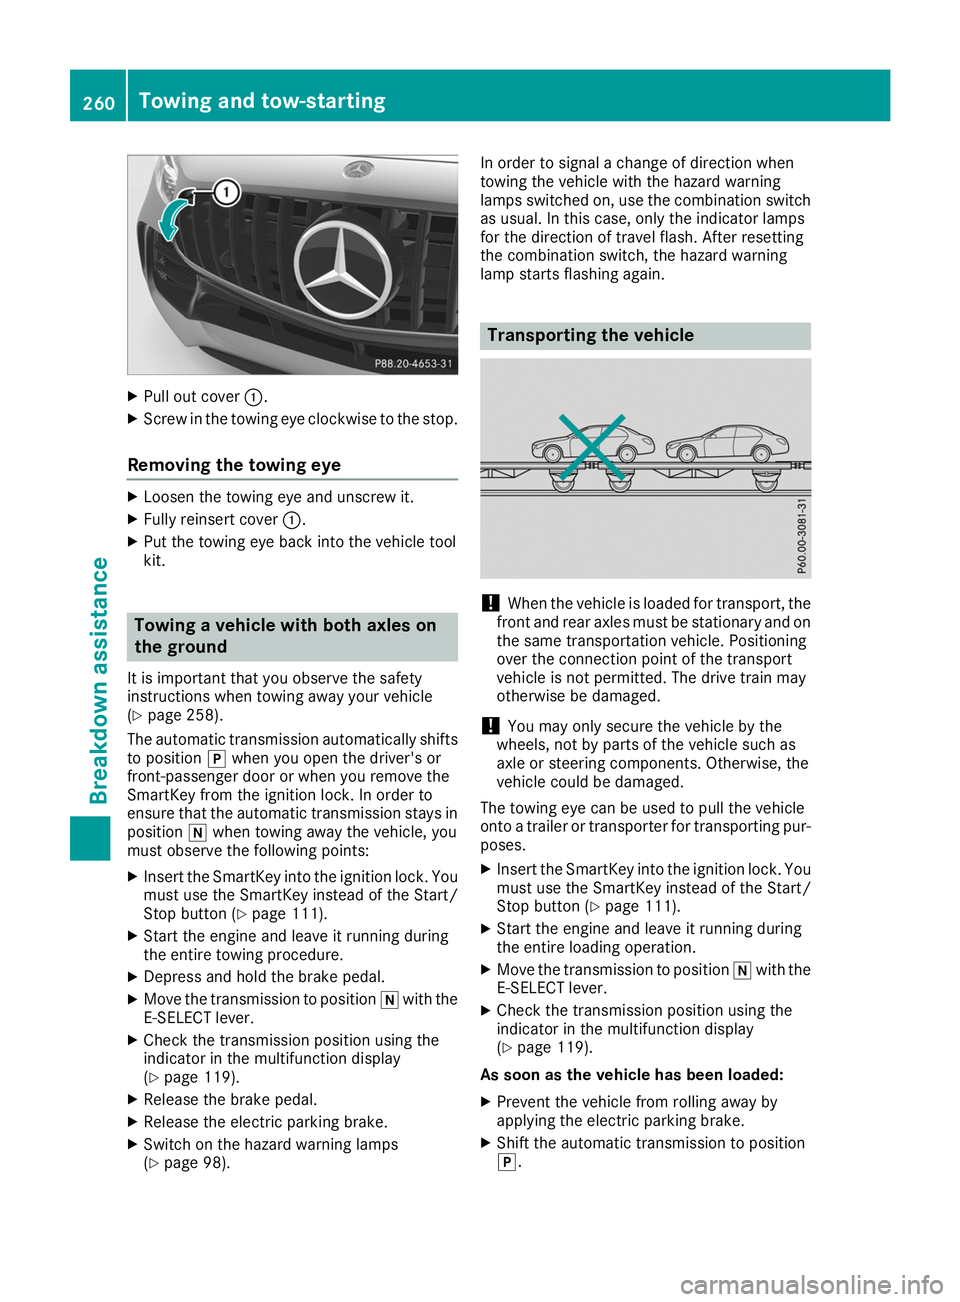
X
Pull out cover 0043.
X Screw in the towing eye clockwise to the stop.
Removing the towing eye X
Loosen the towing eye and unscrew it.
X Fully reinsert cover 0043.
X Put the towing eye back into the vehicle tool
kit. Towing a vehicle with both axles on
the ground
It is important that you observe the safety
instructions when towing away your vehicle
(Y page 258).
The automatic transmission automatically shifts
to position 005Dwhen you open the driver's or
front-passenger door or when you remove the
SmartKey from the ignition lock. In order to
ensure that the automatic transmission stays in position 005Cwhen towing away the vehicle, you
must observe the following points:
X Insert the SmartKey into the ignition lock. You
must use the SmartKey instead of the Start/
Stop button (Y page 111).
X Start the engine and leave it running during
the entire towing procedure.
X Depress and hold the brake pedal.
X Move the transmission to position 005Cwith the
E-SELECT lever.
X Check the transmission position using the
indicator in the multifunction display
(Y page 119).
X Release the brake pedal.
X Release the electric parking brake.
X Switch on the hazard warning lamps
(Y page 98). In order to signal a change of direction when
towing the vehicle with the hazard warning
lamps switched on, use the combination switch as usual. In this case, only the indicator lamps
for the direction of travel flash. After resetting
the combination switch, the hazard warning
lamp starts flashing again. Transporting the vehicle
!
When the vehicle is loaded for transport, the
front and rear axles must be stationary and on the same transportation vehicle. Positioning
over the connection point of the transport
vehicle is not permitted. The drive train may
otherwise be damaged.
! You may only secure the vehicle by the
wheels, not by parts of the vehicle such as
axle or steering components. Otherwise, the
vehicle could be damaged.
The towing eye can be used to pull the vehicle
onto a trailer or transporter for transporting pur- poses.
X Insert the SmartKey into the ignition lock. You
must use the SmartKey instead of the Start/
Stop button (Y page 111).
X Start the engine and leave it running during
the entire loading operation.
X Move the transmission to position 005Cwith the
E-SELECT lever.
X Check the transmission position using the
indicator in the multifunction display
(Y page 119).
As soon as the vehicle has been loaded:
X Prevent the vehicle from rolling away by
applying the electric parking brake.
X Shift the automatic transmission to position
005D. 260
Towing and tow-startingBreakdown assistance
Page 263 of 298
X
Turn the SmartKey to key position 0092in the
ignition lock and remove it.
X Secure the vehicle. Tow-starting (emergency engine
starting)
! Vehicles with automatic transmission must
not be tow-started. You could otherwise dam- age the automatic transmission.
i You can find information on "Jump-starting"
under (Y page 256). Fuses
Important safety notes
G
WARNING
If you manipulate or bridge a faulty fuse or if
you replace it with a fuse with a higher amper- age, the electric cables could be overloaded.
This could result in a fire. There is a risk of an
accident and injury.
Always replace faulty fuses with the specified
new fuses having the correct amperage.
Blown fuses must be replaced with fuses of the
same rating, which you can recognize by the
color and value. The fuse ratings are listed in the
fuse allocation chart.
The fuse allocation chart is on the fuse box in the trunk (Y page 262).
If a newly inserted fuse also blows, have the
cause traced and rectified at a qualified special-
ist workshop, e.g. an authorized Mercedes-Benz Center.
! Only use fuses that have been approved for
Mercedes-Benz vehicles and which have the
correct fuse rating for the system concerned.
Otherwise, components or systems could be
damaged.
! Make sure that no moisture can enter the
fuse box when the cover is open.
! When closing the cover, make sure that it is
lying correctly on the fuse box. Moisture seep-
ing in or dirt could otherwise impair the oper- ation of the fuses. The fuses in your vehicle serve to close down
faulty circuits. If a fuse blows, all the compo-
nents on the circuit and their functions stop
operating. Before changing a fuse
X Switch off the engine.
X Switch off all electrical consumers.
X Open the driver's door.
The on-board electronics are now in key posi-
tion 0092. This is the same as the key having
been removed.
or, if the SmartKey is inserted in the ignition
lock: X Remove the SmartKey from the ignition lock.
X Secure the vehicle against rolling away
(Y page 127).
All indicator lamps in the instrument cluster
must be off. Fuse box in the front passenger foot-
well
! The floor panel must be installed properly,
otherwise moisture or dirt could impair the
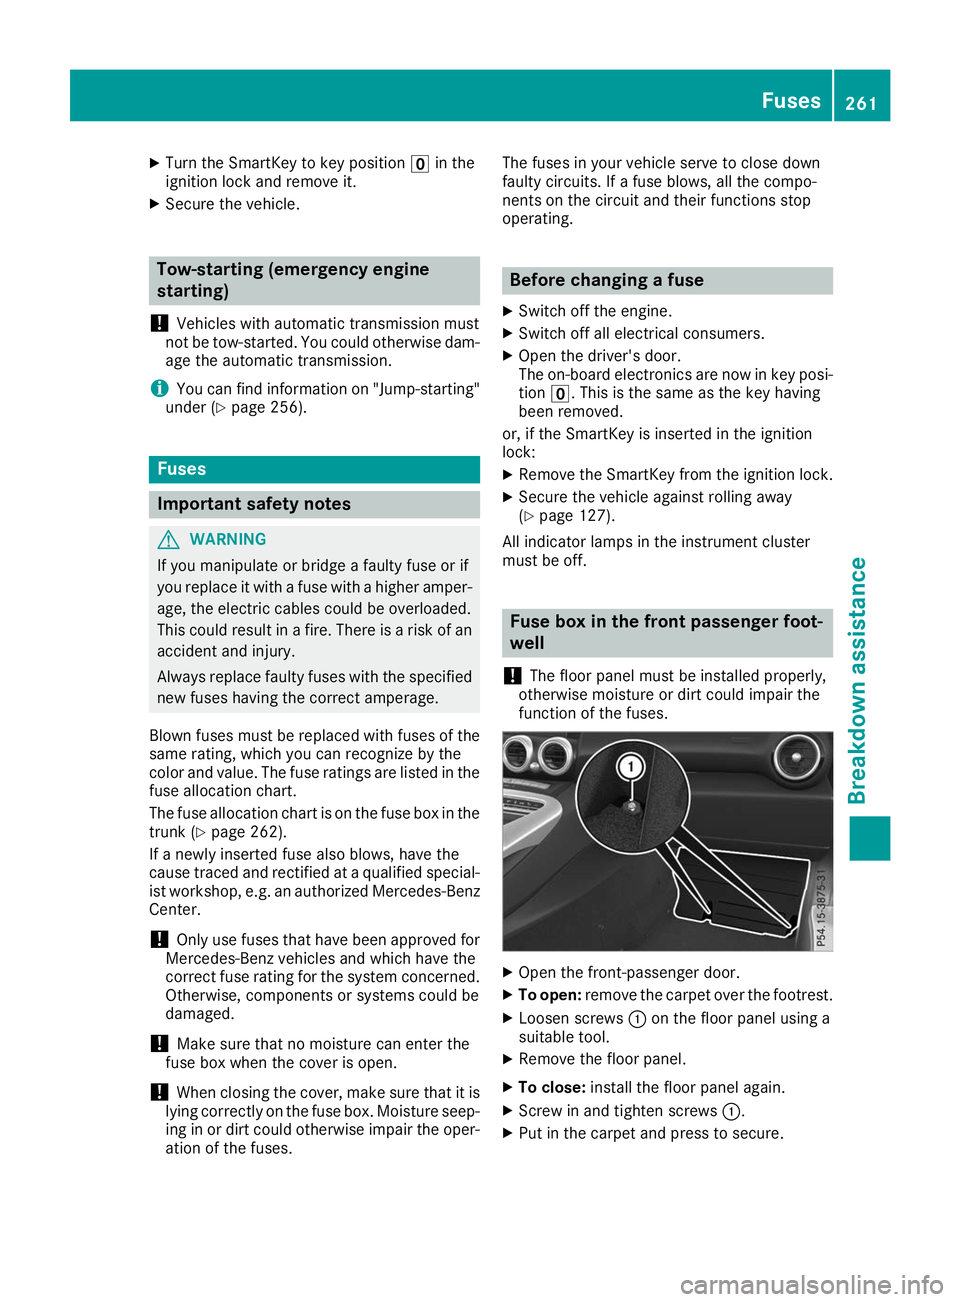
function of the fuses. X
Open the front-passenger door.
X To open: remove the carpet over the footrest.
X Loosen screws 0043on the floor panel using a
suitable tool.
X Remove the floor panel.
X To close: install the floor panel again.
X Screw in and tighten screws 0043.
X Put in the carpet and press to secure. Fuses
261Breakdown assistance Z