2019 MERCEDES-BENZ AMG GT ROADSTER check engine light
[x] Cancel search: check engine lightPage 102 of 298
Automatic interior lighting control
X
To switch on or off: press the0033button.
When the automatic interior lighting control is
activated, the button is flush with the over-
head control panel.
The interior lighting automatically switches on if you:
R unlock the vehicle
R open a door
R switch off the engine with the Start/Stop but-
ton
The interior lighting is activated for a short time
when the engine is switched off with the Start/ Stop button. This delayed switch-off can be
adjusted via the multimedia system (see Digital
Operator's Manual). Replacing bulbs
The front and rear light clusters of your vehicle
are equipped with LED light bulbs. Do not
replace the bulbs yourself. Contact a qualified
specialist workshop which has the necessary
specialist knowledge and tools to carry out the
work required.
Lamps are an important aspect of vehicle safety.
You must therefore make sure that these func-
tion correctly at all times. Have the headlamp
setting checked regularly. Windshield wipers
Switching the windshield wipers
on/off
! Do not operate the windshield wipers when
the windshield is dry, as this could damage
the wiper blades. Moreover, dust that has col- lected on the windshield can scratch the glass
if wiping takes place when the windshield is
dry.
If it is necessary to switch on the windshield
wipers in dry weather conditions, always use
washer fluid when operating the windshield
wipers.
! If the windshield wipers leave smears on the
windshield after the vehicle has been washed
in an automatic car wash, wax or other resi-
dues may be the reason for this. Clean the windshield using washer fluid after washing
the vehicle in an automatic car wash.
! Intermittent wiping with rain sensor: due to
optical influences and the windshield becom- ing dirty in dry weather conditions, the wind-
shield wipers may be activated inadvertently.
This could then damage the windshield wiper blades or scratch the windshield.
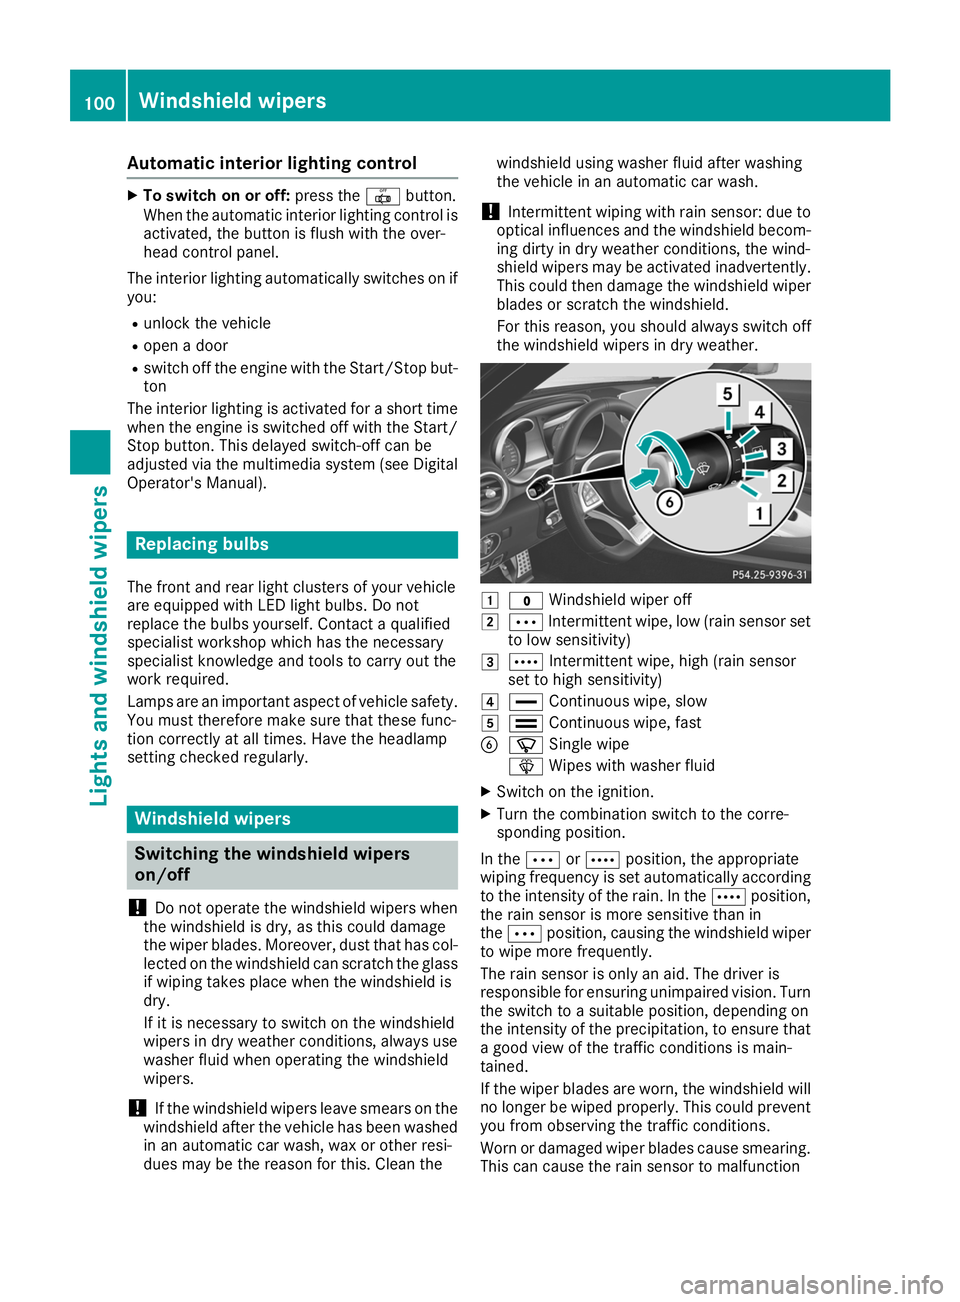
For this reason, you should always switch offthe windshield wipers in dry weather. 0047
003F Windshield wiper off
0048 0062 Intermittent wipe, low (rain sensor set
to low sensitivity)
0049 0063 Intermittent wipe, high (rain sensor
set to high sensitivity)
004A 00AA Continuous wipe, slow
004B 00A9 Continuous wipe, fast
0084 00D3 Single wipe
00D4 Wipes with washer fluid
X Switch on the ignition.
X Turn the combination switch to the corre-
sponding position.
In the 0062or0063 position, the appropriate
wiping frequency is set automatically according
to the intensity of the rain. In the 0063position,
the rain sensor is more sensitive than in
the 0062 position, causing the windshield wiper
to wipe more frequently.
The rain sensor is only an aid. The driver is
responsible for ensuring unimpaired vision. Turn
the switch to a suitable position, depending on
the intensity of the precipitation, to ensure that a good view of the traffic conditions is main-
tained.
If the wiper blades are worn, the windshield willno longer be wiped properly. This could preventyou from observing the traffic conditions.
Worn or damaged wiper blades cause smearing. This can cause the rain sensor to malfunction 100
Windshield wipersLights and windshield wipers
Page 104 of 298
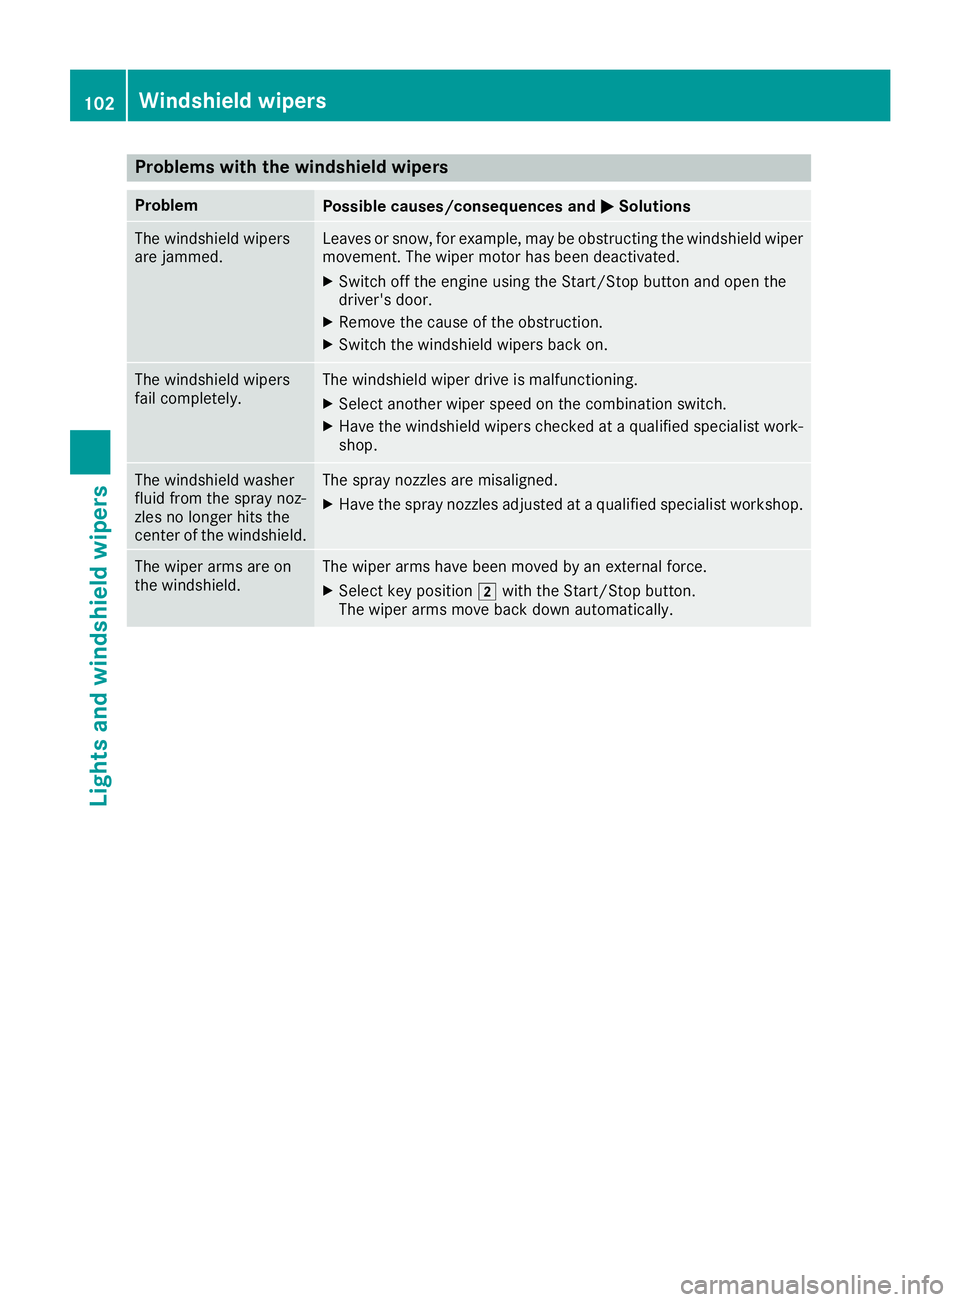
Problems with the windshield wipers
Problem
Possible causes/consequences and
0050
0050Solutions The windshield wipers
are jammed. Leaves or snow, for example, may be obstructing the windshield wiper
movement. The wiper motor has been deactivated.
X Switch off the engine using the Start/Stop button and open the
driver's door.
X Remove the cause of the obstruction.
X Switch the windshield wipers back on. The windshield wipers
fail completely. The windshield wiper drive is malfunctioning.
X Select another wiper speed on the combination switch.
X Have the windshield wipers checked at a qualified specialist work-
shop. The windshield washer
fluid from the spray noz-
zles no longer hits the
center of the windshield. The spray nozzles are misaligned.
X Have the spray nozzles adjusted at a qualified specialist workshop. The wiper arms are on
the windshield. The wiper arms have been moved by an external force.
X Select key position 0048with the Start/Stop button.
The wiper arms move back down automatically. 102
Windshield wipersLights and windshield wipers
Page 112 of 298
!
Do not warm up the engine while stationary.
Pull away immediately. Avoid high engine
speeds and full throttle until the engine has
reached its operating temperature.
In vehicles with automatic transmission,
engage positions P and R only when the vehi-
cle is stationary.
Where possible, avoid spinning the drive
wheels when pulling away on slippery roads.
You could otherwise damage the drive train.
! During a cold start with low engine oil tem-
peratures (below 32 ‡) (0 †), the maximum
engine speed is restricted in order to protect
the engine. To protect the engine and main-
tain smooth engine operation, avoid driving at full throttle when the engine is cold. Key positions
Start/Stop button General notes
All vehicles are equipped with a Start/Stop but-
ton.
The Start/Stop button is located in the center
console and is illuminated when the vehicle is
unlocked.
The SmartKey must be in the vehicle.
Pressing the Start/Stop button several times in succession corresponds to the different Smart-
Key positions in the ignition lock. This is only the
case if you are not depressing the brake pedal.
If you depress the brake pedal and press the
Start/Stop button, the engine starts immedi-
ately.
A check which periodically establishes a radio
connection between the vehicle and the Smart-
Key determines whether a valid SmartKey is in
the vehicle. This occurs, for example, when
starting the engine.
If there is a SmartKey in the ignition lock, this
takes precedence over the KEYLESS-GO start
function.
To start the vehicle without actively using the
SmartKey:
R the SmartKey must be in the vehicle
R the vehicle must not be locked with the
SmartKey or KEYLESS-GO (Y page 67)Do not keep the SmartKey:
R with electronic devices, e.g. a mobile phone
or another SmartKey
R with metallic objects, e.g. coins or metal foil
R inside metallic objects, e.g. a metal case
This can affect the functionality of the Smart-
Key.
If you lock the vehicle with the SmartKey remote control or with KEYLESS-GO, after a short time:
R you will not be able to switch on the ignition
with the Start/Stop button
R you will no longer be able to start the engine
with the Start/Stop button until the vehicle is
unlocked again
If you lock the vehicle centrally using the button
on the driver's door (Y page 72), you can con-
tinue to start the engine with the Start/Stop
button.
The engine can be switched off while the vehicle
is in motion by pressing and holding the Start/
Stop button for three seconds. This function
operates independently of the ECO start/stop
automatic engine switch-off function.
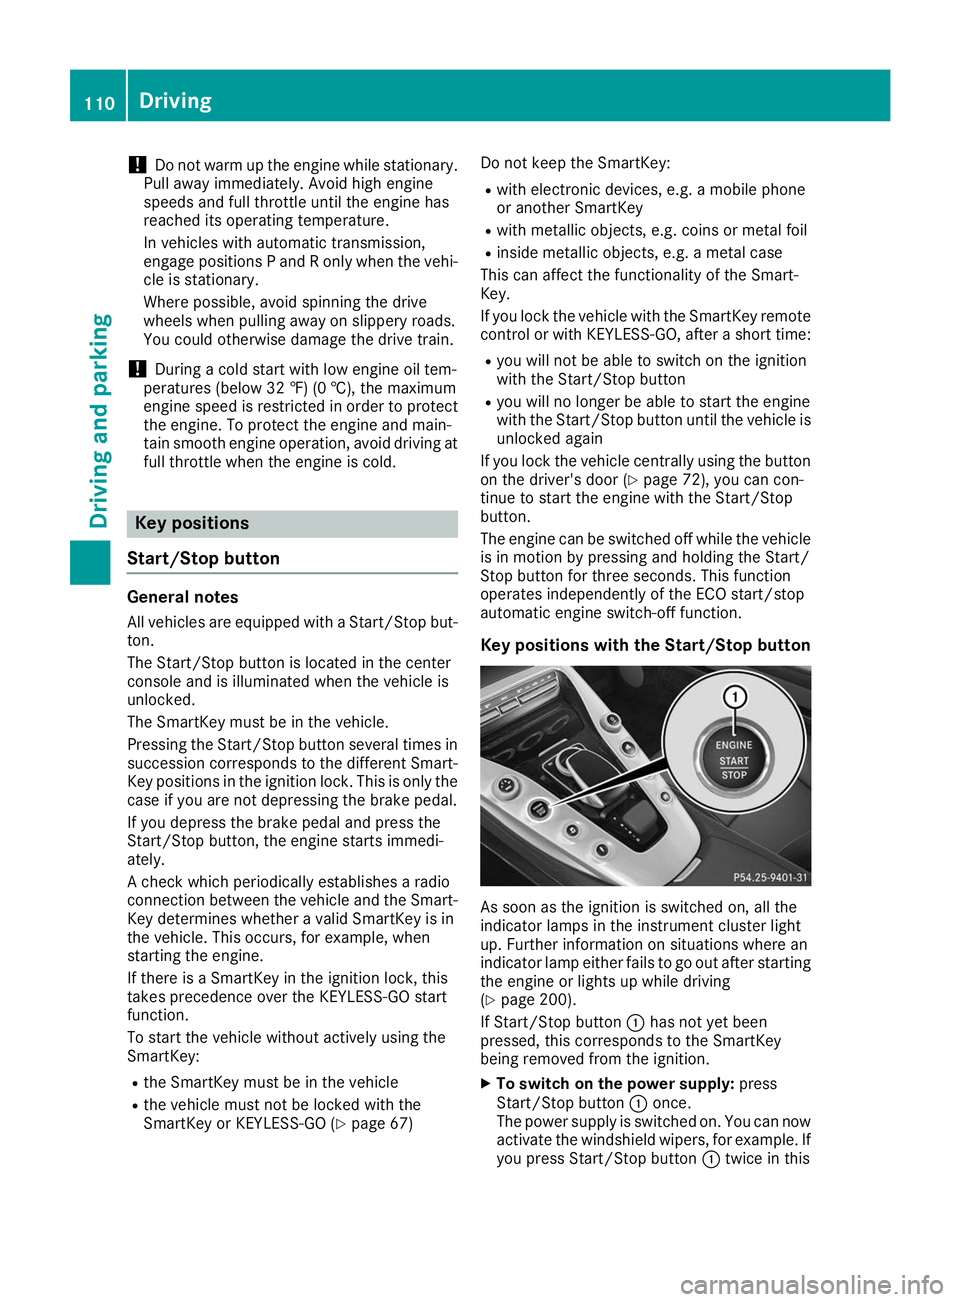
Key positions with the Start/Stop button As soon as the ignition is switched on, all the
indicator lamps in the instrument cluster light
up. Further information on situations where an
indicator lamp either fails to go out after starting the engine or lights up while driving
(Y page 200).
If Start/Stop button 0043has not yet been
pressed, this corresponds to the SmartKey
being removed from the ignition.
X To switch on the power supply: press
Start/Stop button 0043once.
The power supply is switched on. You can now
activate the windshield wipers, for example. If you press Start/Stop button 0043twice in this 110
DrivingDriving and parking
Page 118 of 298
Problem
Possible causes/consequences and
0050
0050Solutions The engine is not running
smoothly and is misfir-
ing. There is a malfunction in the engine electronics or in a mechanical
component of the engine management system.
X Only depress the accelerator pedal slightly.
Otherwise, non-combusted fuel may get into the catalytic converter
and damage it.
X Have the cause rectified immediately at a qualified specialist work-
shop. The coolant temperature
display shows a value
above 248 ‡ (120 †). The coolant level is too low. The coolant is too hot and the engine is no
longer being cooled sufficiently.
X Stop as soon as possible and allow the engine and the coolant to
cool down.
X Check the coolant level (Y page 239). Observe the warning notes
as you do so and add coolant if necessary. DYNAMIC SELECT controller
General information
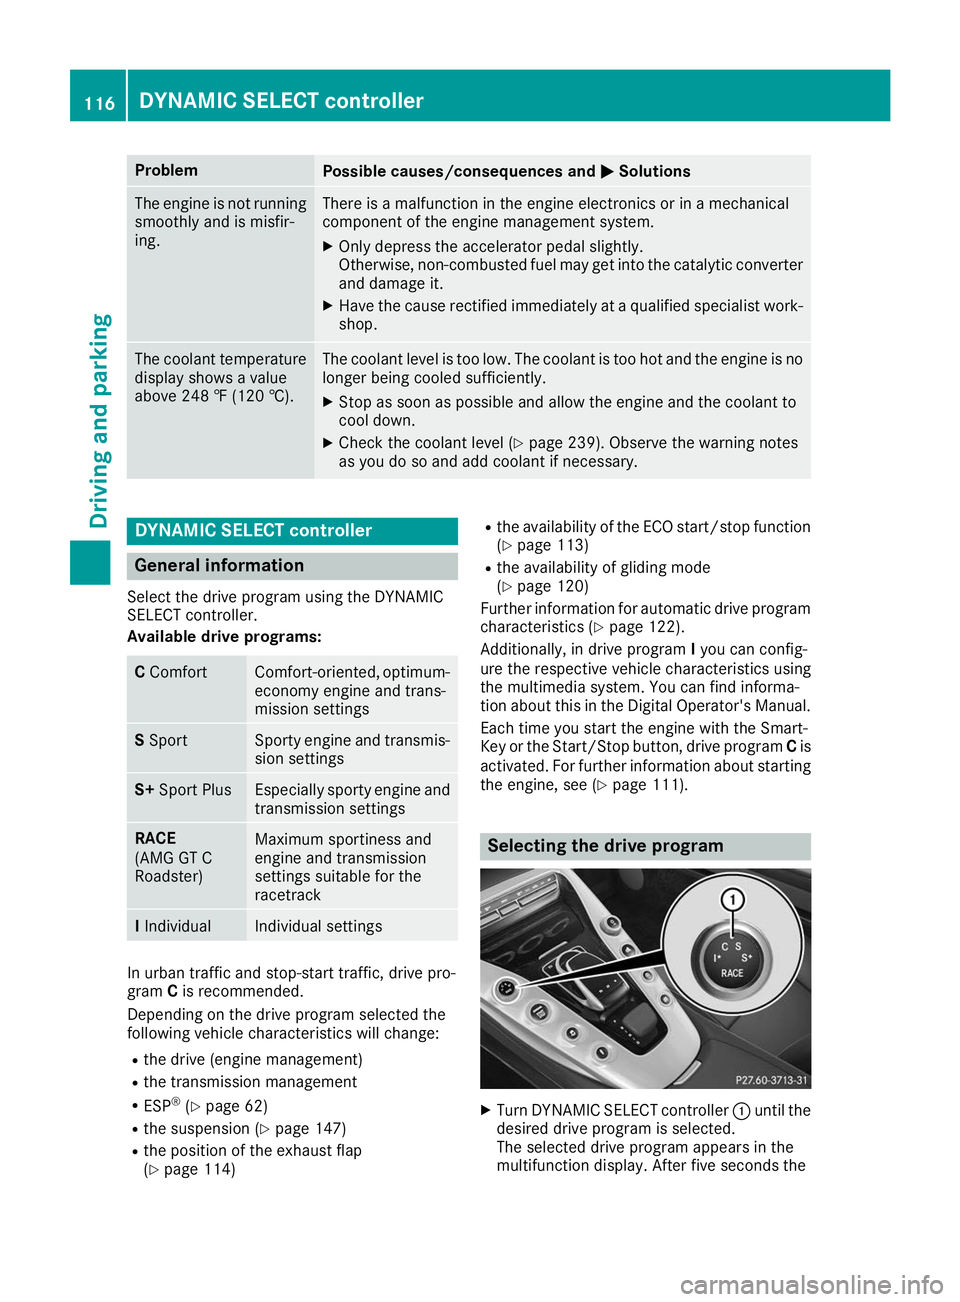
Select the drive program using the DYNAMIC
SELECT controller.
Available drive programs: C
Comfort Comfort-oriented, optimum-
economy engine and trans-
mission settings S
Sport Sporty engine and transmis-
sion settings S+
Sport Plus Especially sporty engine and
transmission settings RACE
(AMG GT C
Roadster)
Maximum sportiness and
engine and transmission
settings suitable for the
racetrack
I
Individual Individual settings
In urban traffic and stop-start traffic, drive pro-
gram
Cis recommended.
Depending on the drive program selected the
following vehicle characteristics will change:
R the drive (engine management)
R the transmission management
R ESP ®
(Y page 62)
R the suspension (Y page 147)
R the position of the exhaust flap
(Y page 114) R
the availability of the ECO start/stop function
(Y page 113)
R the availability of gliding mode
(Y page 120)
Further information for automatic drive program characteristics (Y page 122).
Additionally, in drive program Iyou can config-
ure the respective vehicle characteristics using
the multimedia system. You can find informa-
tion about this in the Digital Operator's Manual.
Each time you start the engine with the Smart-
Key or the Start/Stop button, drive program Cis
activated. For further information about starting
the engine, see (Y page 111). Selecting the drive program
X
Turn DYNAMIC SELECT controller 0043until the
desired drive program is selected.
The selected drive program appears in the
multifunction display. After five seconds the 116
DYNAMIC SELECT controllerDriving and parking
Page 121 of 298
X
Depress the brake pedal and keep it
depressed.
X Shift to neutral 005C.
X Release the brake pedal.
X Release the electric parking brake.
X Switch the ignition off.
X Turn the SmartKey to position 0048and leave it
in the ignition lock.
You can find further information under "Car
wash" (Y page 242).
Shifting to transmission position D X
Start the engine (Y page 112).
X Make sure that the vehicle is stationary.
X Depress the brake pedal and keep it
depressed.
X Push the E-SELECT lever back past the first
point of resistance.
The automatic transmission shifts to 005B.
If the vehicle is braked to a standstill with the
transmission in position 005B, the ECO start/stop
function switches off the engine automatically
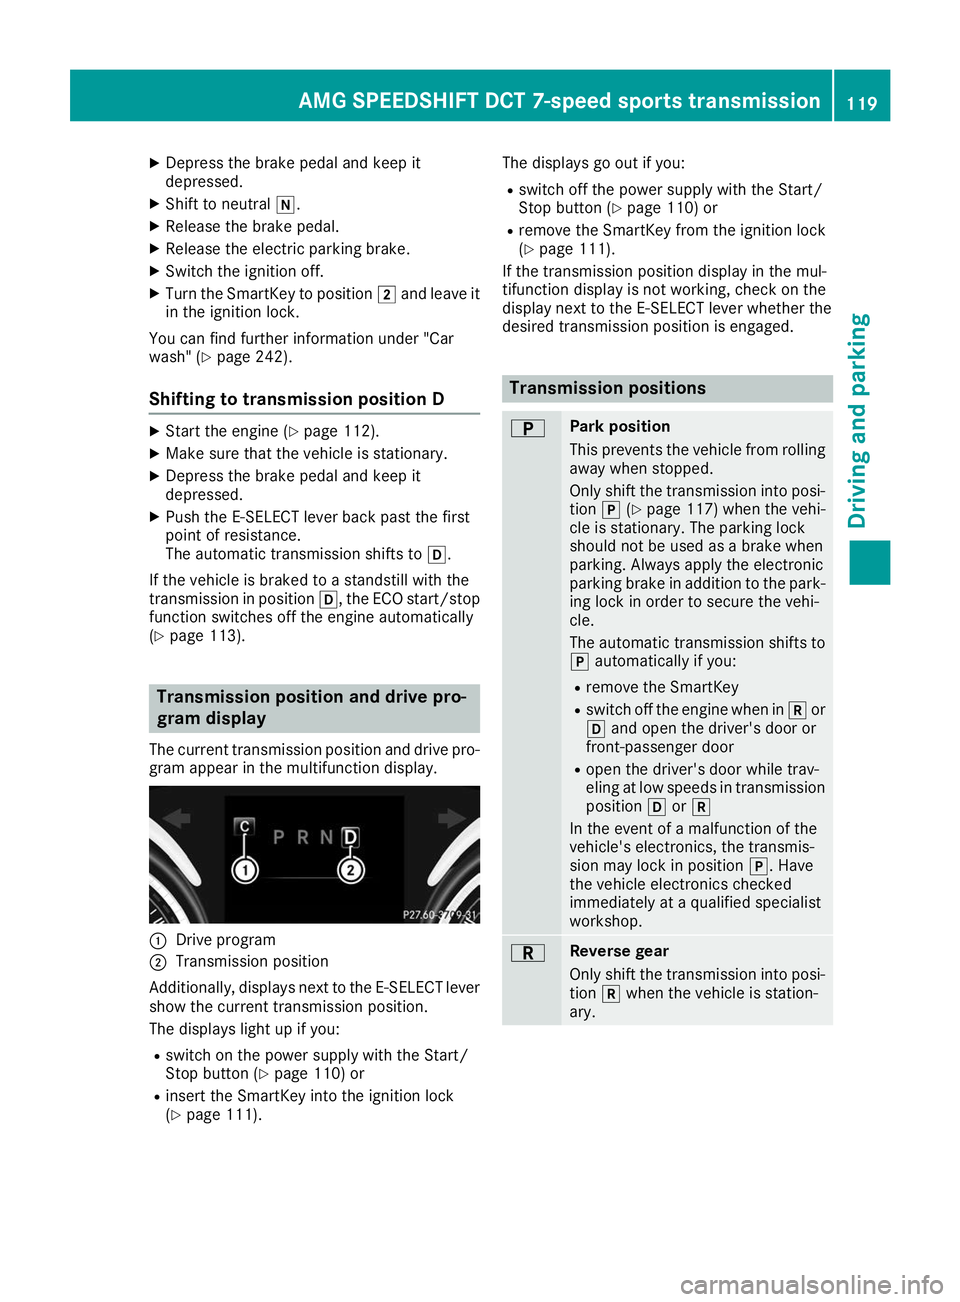
(Y page 113). Transmission position and drive pro-
gram display
The current transmission position and drive pro-
gram appear in the multifunction display. 0043
Drive program
0044 Transmission position
Additionally, displays next to the E ‑SELECT lever
show the current transmission position.
The displays light up if you:
R switch on the power supply with the Start/
Stop button (Y page 110) or
R insert the SmartKey into the ignition lock
(Y page 111). The displays go out if you:
R
switch off the power supply with the Start/
Stop button (Y page 110) or
R remove the SmartKey from the ignition lock
(Y page 111).
If the transmission position display in the mul-
tifunction display is not working, check on the
display next to the E-SELECT lever whether the
desired transmission position is engaged. Transmission positions
0045 Park position
This prevents the vehicle from rolling away when stopped.
Only shift the transmission into posi-
tion 005D(Ypage 117) when the vehi-
cle is stationary. The parking lock
should not be used as a brake when
parking. Always apply the electronic
parking brake in addition to the park-
ing lock in order to secure the vehi-
cle.
The automatic transmission shifts to 005D automatically if you:
R remove the SmartKey
R switch off the engine when in 005Eor
005B and open the driver's door or
front-passenger door
R open the driver's door while trav-
eling at low speeds in transmission
position 005Bor005E
In the event of a malfunction of the
vehicle's electronics, the transmis-
sion may lock in position 005D. Have
the vehicle electronics checked
immediately at a qualified specialist
workshop. 0046 Reverse gear
Only shift the transmission into posi-
tion 005Ewhen the vehicle is station-
ary. AMG SPEEDSHIFT
DCT 7-speed sports transmission
119Driving and parking Z
Page 135 of 298
Observe the following rules when driving on salt-
treated roads:
R In order to prevent any salt build-up, apply the
brakes occasionally while paying attention to
the traffic conditions.
R Carefully depress the brake pedal and the
beginning and end of a journey.
R Maintain a greater distance to the vehicle
ahead.
Servicing the brakes !
The brake fluid level may be too low, if:
R if the red brake warning lamp lights up in
the instrument cluster and
R you hear a warning tone while the engine is
running
Observe additional warning messages in the
multifunction display.
The brake fluid level may be too low due to
brake pad wear or leaking brake lines.
Have the brake system checked immediately. Consult a qualified specialist workshop to
arrange this.
All checks and maintenance work on the brake
system must be carried out at a qualified spe-
cialist workshop.
Have brake pads installed and brake fluid
replaced at a qualified specialist workshop.
If the brake system has only been subject to
moderate loads, you should test the functional-
ity of your brakes at regular intervals.
Information on BAS (Brake Assist) (Y page 59).
For safety reasons, Mercedes-Benz recom-
mends only installing the following brake disks
and brake pads/linings:
R brake disks that have been approved by
Mercedes-Benz
R brake pads/linings that have been approved
by Mercedes-Benz or that are of an equivalent
standard of quality
Other brake disks or brake pads/linings can
compromise the safety of your vehicle.
Always replace all brake disks and brake pads/
linings on an axle at the same time. Always
install new brake pads/linings when replacing
brake disks.
The vehicle is equipped with lightweight brake
disks to which the wheel assembly with rim and threaded connection is matched. The use of brake disks other than those
approved by Mercedes-Benz can change the
track width and is subject to approval, if appli-
cable.
Shock-type loads when handling the brake
discs, such as when changing wheels, can lead
to a reduction in comfort when driving with light-
weight brake discs. Avoid shock-type loads on
the lightweight brake disks, particularly on the
brake plate.
Mercedes-Benz recommends that you only use
brake fluid that has been specially approved for your vehicle by Mercedes-Benz, or which corre-
sponds to an equivalent quality standard. Brake fluid which has not been approved for
Mercedes-Benz vehicles or which is not of an
equivalent quality could affect your vehicle's
operating safety.
AMG high-performance and ceramic
brakes The AMG brake systems are designed for heavy
loads. This may lead to noise when braking. This
will depend on:
R Speed
R Braking force
R Environmental conditions, such as tempera-
ture and humidity
The wear of individual components of the brake system, such as the brake pads/linings or brake
discs, depends on the individual driving style
and operating conditions.
For this reason, it is impossible to state a mile-
age that will be valid under all circumstances. An aggressive driving style will lead to high wear.
You can obtain more information on this from a qualified specialist workshop.
New and replaced brake pads and discs only
reach their optimum braking effect after several
hundred kilometers of driving. Compensate for
this by applying greater force to the brake pedal.
Keep this in mind, and adapt your driving and
braking accordingly during this break-in period.
Excessive heavy braking results in correspond-
ingly high brake wear. Observe the brake wear
warning lamp in the instrument cluster and note
any brake status messages in the multifunction
display. Especially for high performance driving,
it is important to maintain and have the brake
system checked regularly. Driving tips
133Driving and parking Z
Page 161 of 298
Important safety notes
G
WARNING
If you operate information systems and com-
munication equipment integrated in the vehi- cle when driving, you may be distracted from
the traffic situation. You could also lose con-
trol of the vehicle. There is a risk of an acci-
dent.
Only operate this equipment when the traffic
situation permits. If you are not sure that this
is possible, park the vehicle paying attention
to traffic conditions and operate the equip-
ment when the vehicle is stationary.
You must observe the legal requirements for the country in which you are currently driving whenoperating the on-board computer. G
WARNING
If the instrument cluster has failed or mal-
functioned, you may not recognize function
restrictions in systems relevant to safety. The operating safety of your vehicle may be
impaired. There is a risk of an accident.
Drive on carefully. Have the vehicle checked
at a qualified specialist workshop immedi-
ately.
The on-board computer only shows messages or
warnings from certain systems in the multifunc- tion display. You should therefore make sure
your vehicle is operating safely at all times.
If the operating safety of your vehicle is
impaired, pull over as soon as it is safe to do so. Contact a qualified specialist workshop.
For an overview, see the instrument panel illus-
tration (Y page 34). Displays and operation
Speedometer with segments
The segments in the speedometer indicate
which speed range is available:
R Cruise control activated (Y page 134):The segments light up from the stored speed
to the type-tested maximum speed.
R Active Distance Assist DISTRONIC activated
(Y page 136):
One or two segments in the set speed range
light up.
R Active Distance Assist DISTRONIC detects a
vehicle in front moving more slowly than the
stored speed:
The segments between the speed of the vehi-
cle in front and the stored speed light up. Tachometer
! Do not drive in the overrevving range, as this
could damage the engine.
The red band in the tachometer indicates the
engine's overrevving range.
The fuel supply is interrupted to protect the
engine when the red band is reached. Outside temperature display
You should pay special attention to road condi-
tions when temperatures are around freezing
point.
Bear in mind that the outside temperature dis-
play indicates the measured air temperature
and not the road surface temperature.
The outside temperature display is in the multi-
function display (Y page 161).
Changes in the outside temperature are dis-
played after a short delay. Coolant temperature gauge
G
WARNING
Opening the hood when the engine is over-
heated or when there is a fire in the engine
compartment could expose you to hot gases
or other service products. There is a risk of
injury.
Let an overheated engine cool down before
opening the hood. If there is a fire in the
engine compartment, keep the hood closed
and contact the fire department. Displays and operation
159On-board computer and displays Z
Page 170 of 298
R
Active Distance Assist DISTRONIC
(Y page 136)
R Distance warning function of Active Brake
Assist (Y page 59)
R Blind Spot Assist (Y page 155)
R ATTENTION ASSIST (Y page 154)
R Lane Keeping Assist (Y page 157)
X Press 0064to display the ATTENTION ASSIST
assessment. Service menu
Depending on the equipment installed in the
vehicle, you have the following options in the
Service
Service menu:
R calling up display messages in message mem-
ory (Y page 174)
R checking the tire pressure electronically
(Y page 270).
R calling up the service due date (Y page 241).
R checking the engine oil level using the on-
board computer (Y page 237).Settings menu
Introduction Depending on the equipment installed in the
vehicle, you have the following options in the
Settings Settings menu:
R changing assistance settings (Y page 168).
R changing the light settings (Y page 169).
R changing the instrument cluster settings
(Y page 169).
R restoring the factory settings (Y page 170).
Assistance submenu Activating/deactivating Active Brake
Assist
X Press 00E2on the steering wheel to open the
menu list.
X Press 0064or0063 on the steering wheel to
select the Settings
Settings menu.
X Confirm by pressing 0076on the steering
wheel.
X Press 0064or0063 to select the DriveAs‐ DriveAs‐
sist
sist submenu. X
Press 0076to confirm.
X Press 0063or0064 to select Brake BrakeAssist Assist.
X Press 0076to confirm.
The current selection appears.
X To activate/deactivate: press the0076but-
ton again.
When Active Brake Assist is deactivated, the
00D4 symbol appears in the Assistance Assistance
Graphic
Graphic menu of the multifunction display.
Further information on Active Brake Assist
(Y page 59).
Activating/deactivating Blind Spot Assist
X Press 00E2on the steering wheel to open the
menu list.
X Press 0064or0063 on the steering wheel to
select the Settings
Settings menu.
X Confirm by pressing 0076on the steering
wheel.
X Press 0064or0063 to select the DriveAs‐
DriveAs‐
sist
sist submenu.
X Press 0076to confirm.
X Press 0064or0063 to select Blind Spot
Blind Spot
Assist
Assist .
X Press 0076to confirm.
The current selection appears.
X To activate/deactivate: press the0076but-
ton again.
When Blind Spot Assist is activated, gray
radar waves propagating backwards appear
next to the vehicle in the Assistance
Assistance
Graphic Graphic menu in the multifunction display.
For further information about Blind Spot Assist,
see (Y page 155).
Setting ATTENTION ASSIST X Press 00E2on the steering wheel to open the
menu list.
X Press 0064or0063 on the steering wheel to
select the Settings
Settings menu.
X Confirm by pressing 0076on the steering
wheel.
X Press 0064or0063 to select the DriveAs‐
DriveAs‐
sist
sist submenu.
X Press 0076to confirm.
X Select Attention Assist
Attention Assist with0064 or
0063.
X Press 0076to confirm. 168
Menus and submenusOn-board computer and displays