2019 MASERATI QUATTROPORTE climate control
[x] Cancel search: climate controlPage 212 of 396

relevant soft-key button to activate
the two different functionalities.
The recirculation function, that allows
to open/close the A/C air inlet by
operating the
button on the
climate control panel or the MTC+ soft
key, is integrated with the Air Quality
Sensor.
This sensor, positioned upstream of the
A/C filter, in front of the air intake of
the A/C system, detects the presence of
polluting substances and submits an
electric signal to the A/C control unit,
that closes the intake of the external
air by activating the air recirculation.
The
button or the MTC+ soft-key
can therefore enable three operating
modes, switchable in sequence.
Starting from the outside air condition
with LED on the button off and MTC+
soft-key not highlighted, in which the
external air is aspirated by the A/C
system and treated to be introduced
into the passenger compartment,
subsequent actuations of the
button or the MTC+ soft-key
change the state as follows.
• First press: the A/C system activates
the automatic recirculation control
by using the signal transmitted from
the AQS. The symbol “A” on the
button and the MTC+ soft-key
lights up. • Second press: the A/C system
activates the recirculation, the LED
on the button or the MTC+ soft-key
light up. The A/C system will stay this
way up to a new actuation, or until
the increased humidity could lead to
windshield fogging: in this case the
recirculation automatically switches
to external air.
• Third press: the A/C system switches
back to external air (default
operating mode).
The next press of the
button or
the MTC+ soft-key restarts the
operating cycle just described.
NOTE:
To avoid the risk of fogging, the AQS is
disabled when the external
temperature falls below 35 °F (2 °C). NOTE:
In cold weather, use of recirculation
mode may lead to window fogging.
Select the MIX mode and increase
the blower speed to prevent fogging.
MAX A/C
Activating this function, the system
switches to exit “AUTO”, enter “A/C”
and recirculation. The minimum
temperature (LO) in both zones, the
maximum blower speed and the
“Dashboard” air distribution mode
are also selected.
The blower speed can be adjusted and
the air distribution can be modified
without exiting “MAX A/C”. To exit
“MAX A/C” touch the relevant MTC+
soft-key or exit A/C or recirculation.Dashboard Instruments and Controls
4
208
Page 213 of 396
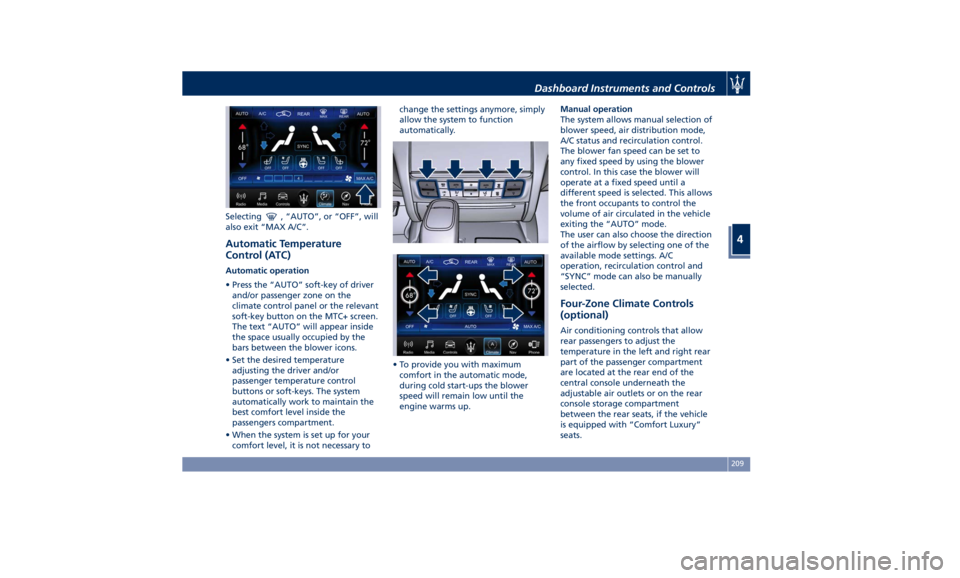
Selecting , “AUTO”, or “OFF”, will
also exit “MAX A/C”.
Automatic Temperature
Control (ATC) Automatic operation
• Press the “AUTO” soft-key of driver
and/or passenger zone on the
climate control panel or the relevant
soft-key button on the MTC+ screen.
The text “AUTO” will appear inside
the space usually occupied by the
bars between the blower icons.
• Set the desired temperature
adjusting the driver and/or
passenger temperature control
buttons or soft-keys. The system
automatically work to maintain the
best comfort level inside the
passengers compartment.
• When the system is set up for your
comfort level, it is not necessary to change the settings anymore, simply
allow the system to function
automatically.
• To provide you with maximum
comfort in the automatic mode,
during cold start-ups the blower
speed will remain low until the
engine warms up. Manual operation
The system allows manual selection of
blower speed, air distribution mode,
A/C status and recirculation control.
The blower fan speed can be set to
any fixed speed by using the blower
control. In this case the blower will
operate at a fixed speed until a
different speed is selected. This allows
the front occupants to control the
volume of air circulated in the vehicle
exiting the “AUTO” mode.
The user can also choose the direction
of the airflow by selecting one of the
available mode settings. A/C
operation, recirculation control and
“SYNC” mode can also be manually
selected.
Four-Zone Climate Controls
(optional) Air conditioning controls that allow
rear passengers to adjust the
temperature in the left and right rear
part of the passenger compartment
are located at the rear end of the
central console underneath the
adjustable air outlets or on the rear
console storage compartment
between the rear seats, if the vehicle
is equipped with “Comfort Luxury”
seats.Dashboard Instruments and Controls
4
209
Page 214 of 396
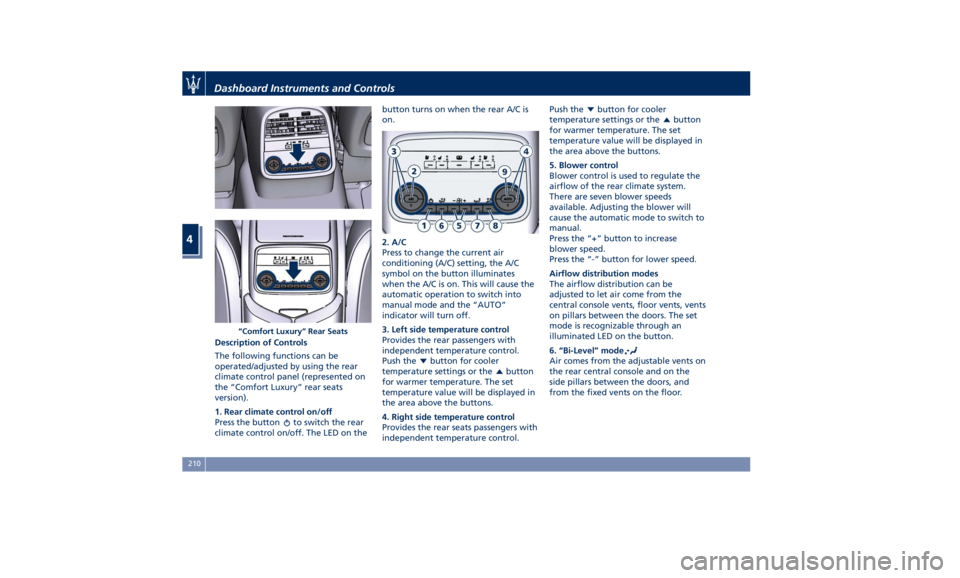
Description of Controls
The following functions can be
operated/adjusted by using the rear
climate control panel (represented on
the “Comfort Luxury” rear seats
version).
1. Rear climate control on/off
Press the button
to switch the rear
climate control on/off. The LED on the button turns on when the rear A/C is
on.
2. A/C
Press to change the current air
conditioning (A/C) setting, the A/C
symbol on the button illuminates
when the A/C is on. This will cause the
automatic operation to switch into
manual mode and the “AUTO”
indicator will turn off.
3. Left side temperature control
Provides the rear passengers with
independent temperature control.
Push the
button for cooler
temperature settings or the
button
for warmer temperature. The set
temperature value will be displayed in
the area above the buttons.
4. Right side temperature control
Provides the rear seats passengers with
independent temperature control. Push the
button for cooler
temperature settings or the
button
for warmer temperature. The set
temperature value will be displayed in
the area above the buttons.
5. Blower control
Blower control is used to regulate the
airflow of the rear climate system.
There are seven blower speeds
available. Adjusting the blower will
cause the automatic mode to switch to
manual.
Press the “+” button to increase
blower speed.
Press the “-” button for lower speed.
Airflow distribution modes
The airflow distribution can be
adjusted to let air come from the
central console vents, floor vents, vents
on pillars between the doors. The set
mode is recognizable through an
illuminated LED on the button.
6. “Bi-Level” mode
Air comes from the adjustable vents on
the rear central console and on the
side pillars between the doors, and
from the fixed vents on the floor.“Comfort Luxury” Rear SeatsDashboard Instruments and Controls
4
210
Page 215 of 396
NOTE:
The Bi-Level mode is designed to
provide comfort by sending cooler air
out of the central console and side
pillars vents and warmer air from the
floor vents.
7. “Floor” mode
Air comes from the floor vents under
the front seats.
8. “Torso” mode
Air comes from the adjustable vents
on the central console and the ones
on the pillars between the doors. Each
of these vents can be singly adjusted.
The air grids of the vents can be
moved up/down and right/left to
adjust the airflow direction. A setting
wheel, placed near each vent, allows
to regulate the airflow or to close the
vent.
9. AUTO
This function automatically controls
the interior temperature by adjusting
the air flow rate and the air
distribution.
• Press the AUTO button: the
automatic rear climate control
switches from manual to automatic
mode and vice-versa. The AUTO
symbol on the button illuminates
when this function is activated. • Adjust then the temperature you
wish to maintain by regulating the
left and/or right side temperature
control buttons. Once the desired
temperature is set, the system will
achieve and automatically maintain
that comfort level.
• When the system is set up for your
comfort level, it is not necessary to
change the settings anymore: simply
allow the system to function
automatically.
To provide you with maximum
comfort in the automatic mode,
during cold start-ups the blower speed
will remain low until the engine
warms up.
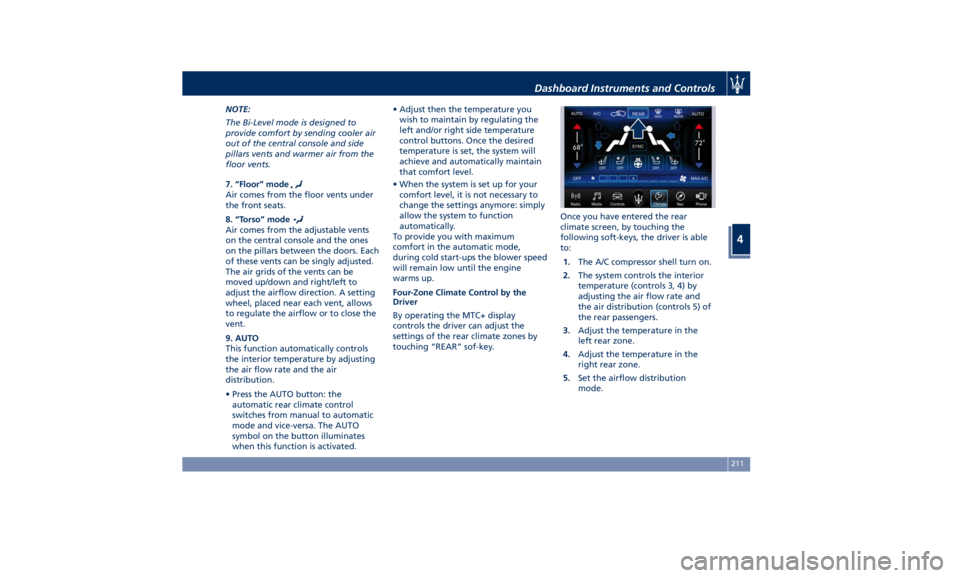
Four-Zone Climate Control by the
Driver
By operating the MTC+ display
controls the driver can adjust the
settings of the rear climate zones by
touching “REAR” sof-key. Once you have entered the rear
climate screen, by touching the
following soft-keys, the driver is able
to:
1. The A/C compressor shell turn on.
2. The system controls the interior
temperature (controls 3, 4) by
adjusting the air flow rate and
the air distribution (controls 5) of
the rear passengers.
3. Adjust the temperature in the
left rear zone.
4. Adjust the temperature in the
right rear zone.
5. Set the airflow distribution
mode.Dashboard Instruments and Controls
4
211
Page 216 of 396
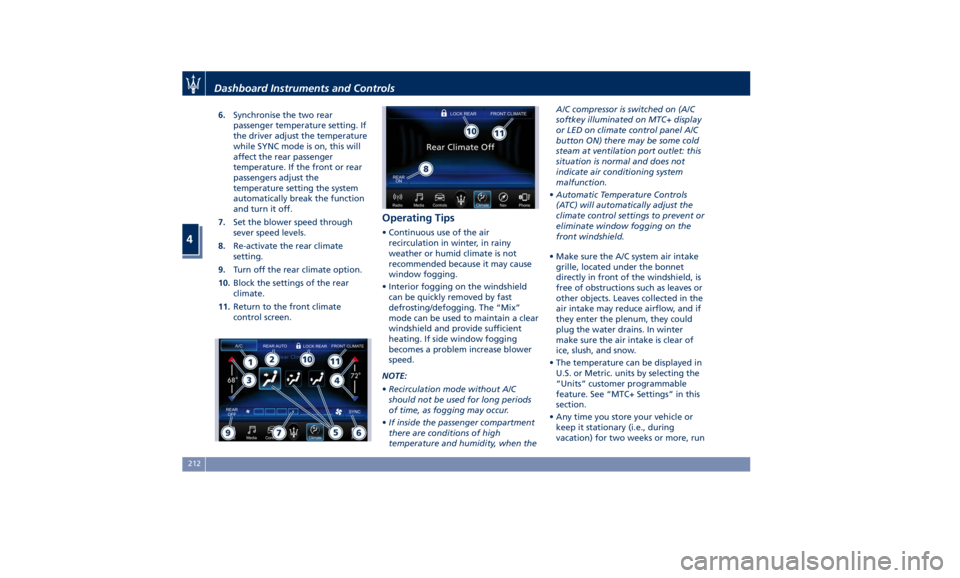
6. Synchronise the two rear
passenger temperature setting. If
the driver adjust the temperature
while SYNC mode is on, this will
affect the rear passenger
temperature. If the front or rear
passengers adjust the
temperature setting the system
automatically break the function
and turn it off.
7. Set the blower speed through
sever speed levels.
8. Re-activate the rear climate
setting.
9. Turn off the rear climate option.
10. Block the settings of the rear
climate.
11. Return to the front climate
control screen. Operating Tips • Continuous use of the air
recirculation in winter, in rainy
weather or humid climate is not
recommended because it may cause
window fogging.
• Interior fogging on the windshield
can be quickly removed by fast
defrosting/defogging. The “Mix”
mode can be used to maintain a clear
windshield and provide sufficient
heating. If side window fogging
becomes a problem increase blower
speed.
NOTE:
• Recirculation mode without A/C
should not be used for long periods
of time, as fogging may occur.
• If inside the passenger compartment
there are conditions of high
temperature and humidity, when the A/C compressor is switched on (A/C
softkey illuminated on MTC+ display
or LED on climate control panel A/C
button ON) there may be some cold
steam at ventilation port outlet: this
situation is normal and does not
indicate air conditioning system
malfunction.
• Automatic Temperature Controls
(ATC) will automatically adjust the
climate control settings to prevent or
eliminate window fogging on the
front windshield.
• Make sure the A/C system air intake
grille, located under the bonnet
directly in front of the windshield, is
free of obstructions such as leaves or
other objects. Leaves collected in the
air intake may reduce airflow, and if
they enter the plenum, they could
plug the water drains. In winter
make sure the air intake is clear of
ice, slush, and snow.
• The temperature can be displayed in
U.S. or Metric. units by selecting the
“Units” customer programmable
feature. See “MTC+ Settings” in this
section.
• Any time you store your vehicle or
keep it stationary (i.e., during
vacation) for two weeks or more, runDashboard Instruments and Controls
4
212
Page 217 of 396
the air conditioning system at idle
for about five minutes in the fresh
air by high blower setting. This will
ensure adequate system lubrication
and minimize the possibility of
compressor damage when the
system is started again.
A/C Filter The climate control system filters
outside air containing dust, pollen and
some odors. Strong odors cannot be
totally removed by A/C filter at the
entrance of the air climate system. See
“Maintenance Procedures” in section
“Maintenance and Care” for filter
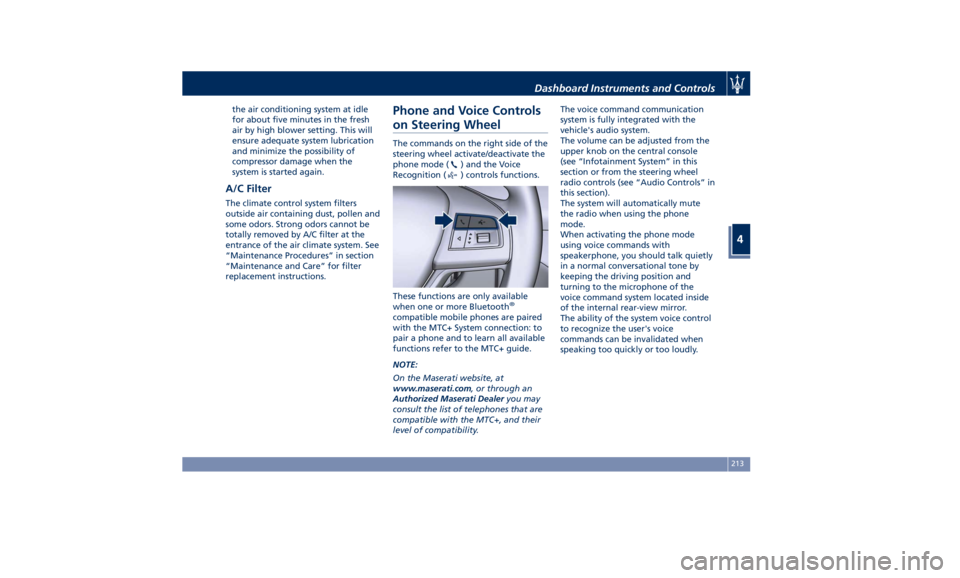
replacement instructions. Phone and Voice Controls
on Steering Wheel The commands on the right side of the
steering wheel activate/deactivate the
phone mode (
) and the Voice
Recognition (
) controls functions.
These functions are only available
when one or more Bluetooth ®
compatible mobile phones are paired
with the MTC+ System connection: to
pair a phone and to learn all available
functions refer to the MTC+ guide.
NOTE:
On the Maserati website, at
www.maserati.com , or through an
Authorized Maserati Dealer you may
consult the list of telephones that are
compatible with the MTC+, and their
level of compatibility. The voice command communication
system is fully integrated with the
vehicle's audio system.
The volume can be adjusted from the
upper knob on the central console
(see “Infotainment System” in this
section or from the steering wheel
radio controls (see “Audio Controls” in
this section).
The system will automatically mute
the radio when using the phone
mode.
When activating the phone mode
using voice commands with
speakerphone, you should talk quietly
in a normal conversational tone by
keeping the driving position and
turning to the microphone of the
voice command system located inside
of the internal rear-view mirror.
The ability of the system voice control
to recognize the user's voice
commands can be invalidated when
speaking too quickly or too loudly.Dashboard Instruments and Controls
4
213
Page 256 of 396
whenever the brake pads and/or brake
discs are replaced.
Brake Overheating Driving on mountain roads with steep
slopes or a sports use of the vehicle
could overheat the brake system
components. In these conditions, the
parking brake must not be used since
the push of the power actuator might
not be sufficient to ensure vehicle
braking, especially on a slope.
Drive normally without braking to
allow the brakes to cool down a few
minutes before stopping. The
automatic or manual activation of the
parking brake will ensure vehicle
braking.
Brake overheating could also cause
“squeals” and “vibration”. Use of the Engine Breaking-In Today's most modern production
methods are designed to provide
extremely precise construction and
assembly of components. However,
moving parts do undergo a settling
process, basically in the first hours of
vehicle operation.
Do not drive keeping at a constant
high speed rate for a prolonged time.
While cruising, brief full-throttle
acceleration within the limits of local
traffic laws contributes to a good
break-in. Wide-open throttle
acceleration in low gear can be
detrimental and should be avoided.
The engine oil installed in the engine
at the factory is a high-quality energy
conserving type lubricant. Oil changes
should be consistent with anticipated
climate conditions under which vehicle
operations will occur. For the
recommended viscosity and quality
grades, see “Refillings” in section
“Features and Specifications”.
A new engine may consume some oil
during its first few thousand
miles/kilometers of operation. This
should be considered as a normal part of the break-in and not interpreted as
an indication of malfunction.
Specific Requirements
Avoid exceeding 5000 rpm for the first
620 mi trip (1000 km).
After starting the vehicle, do not
exceed 4000 rpm until the engine has
warmed up sufficiently (coolant
temperature: 149-158°F /65 70°).
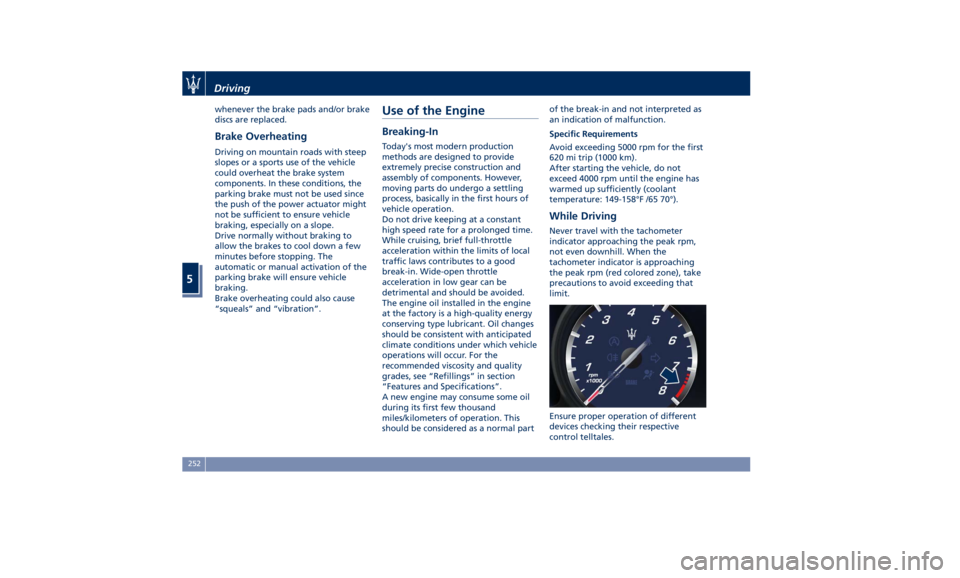
While Driving Never travel with the tachometer
indicator approaching the peak rpm,
not even downhill. When the
tachometer indicator is approaching
the peak rpm (red colored zone), take
precautions to avoid exceeding that
limit.
Ensure proper operation of different
devices checking their respective
control telltales.Driving
5
252
Page 300 of 396

Department of Transportation
Uniform Tire Quality Grades The following tire grading categories
were established by the National
Highway Traffic Safety Administration.
The specific grade rating assigned by
the tire's manufacturer in each
category is shown on the sidewall of
the tires on your vehicle.
All passenger car tires must conform to
Federal safety requirements in
addition to these grades.
Treadwear
The Treadwear grade is a comparative
rating, based on the wear rate of the
tire when tested under controlled
conditions on a specified government
test course. For example, a tire graded
150 would wear one and one-half
times as well on the government
course as a tire graded 100. The
relative performance of tires depends
upon the actual conditions of their
use, however, and may depart
significantly from the norm due to
variations in driving habits, service
practices, and differences in road
characteristics and climate.
Traction Grades
The Traction grades, from highest to
lowest, are AAA, A, B, and C. These grades represent the tire's ability to
stop on wet pavement, as measured
under controlled conditions on
specified government test surfaces of
asphalt and concrete. A tire marked C
may have poor traction performance.
WARNING!
The traction grade assigned to this tire
is based on straight-ahead braking
traction tests, and does not include
acceleration, cornering, hydroplaning,
or peak traction characteristics.
Temperature Grades
The
temperature grades are A (the
highest), B, and C, representing the
tire's resistance to the generation of
heat and its ability to dissipate heat,
when tested under controlled
conditions on a specified indoor
laboratory test wheel. Sustained high
temperature can cause the material of
the tire to degenerate and reduce tire
life, and excessive temperature can
lead to sudden tire failure. The grade
C corresponds to a level of
performance, which all passenger car
tires must meet under the Federal
Motor Vehicle Safety Standard No.
109. Grades B and A represent higher levels of performance on the
laboratory test wheel, than the
minimum required by law.
WARNING!
The temperature grade for this tire is
established for a tire that is properly
inflated and not overloaded. Excessive
speed, under-inflation, or excessive
loading, either separately or in
combination, can cause heat buildup
and possible tire failure.
Tire Pressure Proper tire inflation pressure is
essential for safety and best
performance of your vehicle. The tire
pressure monitoring system “TPMS”
setup on the vehicle (see “Tire Pressure
Monitoring System” in this section)
may alert the driver about insufficient
tire pressure even though the driver is
responsible for regularly checking the
tire pressure.
Radial tires fitted on the vehicle may
look properly inflated even when they
actually are under inflated. Do not
make a visual judgment when
determining proper inflation.
Three primary driving aspects are
affected by improper tire pressure:Driving
5
296