2019 MASERATI LEVANTE warning light
[x] Cancel search: warning lightPage 86 of 436

Front Sensors - Warning Alerts
Front distance More than 50 in
(120 cm) 50-40 in
(120-101 cm) 40-24 in
(100-61 cm) 23.6-12.2 in
(60-31 cm) Less than 12 in
(30 cm)
Audible Alert None None Slow Fast Continuous
Arc in left and
right areas None 4 th
3 rd
2 nd
1 st
(inner most)
Light type None Solid Solid Flash Flash
Arc color - Green Amber Amber Red
Radio sound Active Active Mute Mute Mute
Rear Sensors - Warning Alerts
Rear
distance More than 78 in
(200 cm) 78-59.4 in
(200-151 cm) 60-40 in
(150-101 cm) 40-24 in
(100-61 cm) 23.6-12.2 in
(60-31 cm) Less than 12 in
(30 cm)
Audible
Alert None Single Slow Slow Fast Continuous
Arc in left
and right
areas None 5 th
4 th
3 rd
2 nd
1 st
(inner most)
Light type None Solid Solid Solid Flash Flash
Arc color – Green Amber Amber Amber Red
Radio sound Active Mute Mute Mute Mute Mute
NOTE:
• Maserati reserves the right to change specifications without prior notification.
• Park Assist will turn off the front park assist audible alert (chime) after approximately 4 seconds when an obstacle has
been detected, the vehicle is stationary, and brake pedal is applied.Before Starting
2
82
Page 92 of 436
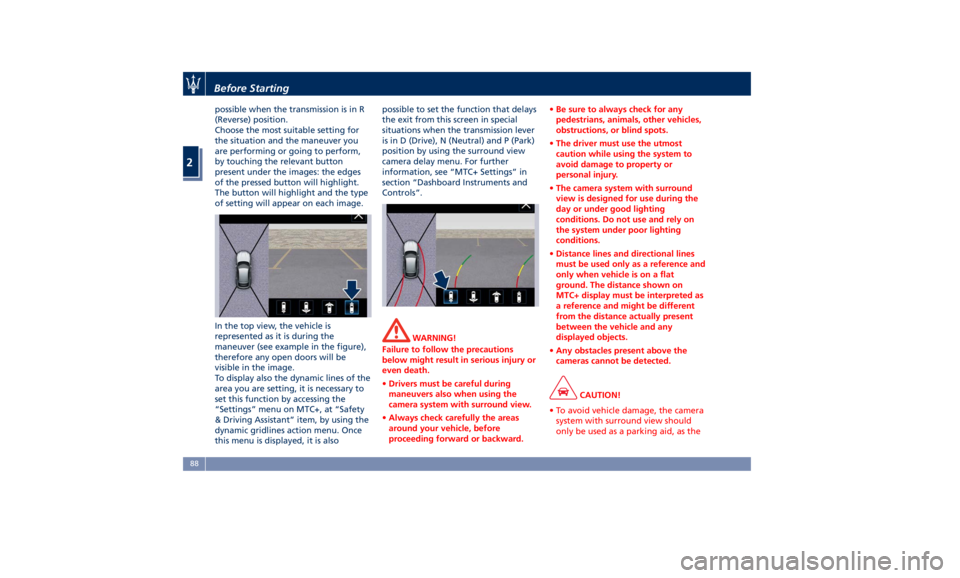
possible when the transmission is in R
(Reverse) position.
Choose the most suitable setting for
the situation and the maneuver you
are performing or going to perform,
by touching the relevant button
present under the images: the edges
of the pressed button will highlight.
The button will highlight and the type
of setting will appear on each image.
In the top view, the vehicle is
represented as it is during the
maneuver (see example in the figure),
therefore any open doors will be
visible in the image.
To display also the dynamic lines of the
area you are setting, it is necessary to
set this function by accessing the
“Settings” menu on MTC+, at “Safety
& Driving Assistant” item, by using the
dynamic gridlines action menu. Once
this menu is displayed, it is also possible to set the function that delays
the exit from this screen in special
situations when the transmission lever
is in D (Drive), N (Neutral) and P (Park)
position by using the surround view
camera delay menu. For further
information, see “MTC+ Settings” in
section “Dashboard Instruments and
Controls”.
WARNING!
Failure to follow the precautions
below might result in serious injury or
even death.
• Drivers must be careful during
maneuvers also when using the
camera system with surround view.
• Always check carefully the areas
around your vehicle, before
proceeding forward or backward. • Be sure to always check for any
pedestrians, animals, other vehicles,
obstructions, or blind spots.
• The driver must use the utmost
caution while using the system to
avoid damage to property or
personal injury.
• The camera system with surround
view is designed for use during the
day or under good lighting
conditions. Do not use and rely on
the system under poor lighting
conditions.
• Distance lines and directional lines
must be used only as a reference and
only when vehicle is on a flat
ground. The distance shown on
MTC+ display must be interpreted as
a reference and might be different
from the distance actually present
between the vehicle and any
displayed objects.
• Any obstacles present above the
cameras cannot be detected.
CAUTION!
• To avoid vehicle damage, the camera
system with surround view should
only be used as a parking aid, as theBefore Starting
2
88
Page 94 of 436
Exhaust Gas WARNING!
Exhaust gases can injure. They contain
carbon monoxide (CO), which is
colorless and odorless. Breathing it
can make you unconscious and can
eventually poison you. To avoid
breathing (CO), follow these safety
tips:
• Do not run the engine in a closed
garage or in confined areas any
longer than needed to move your
vehicle in or out of the area.
• If it is necessary to sit in a parked
vehicle with the engine running,
adjust your heating or cooling
controls to force outside air into the
vehicle. Set the blower at high
speed.
• If you are required to drive with the
liftgate open, make sure that all
windows are closed and the climate
control blowers switch is set at high
speed. DO NOT use the recirculation
mode.
The best protection against carbon
monoxide
entry into the
passenger
compartment is a properly maintained
engine exhaust system. Whenever detecting a change in the
sound of the exhaust system or
eventual exhaust fumes inside the
vehicle have the Authorized Maserati
Dealer inspect the complete exhaust
system and adjacent body areas for
broken, damaged, deteriorated, or
mispositioned parts.
Open seams or loose connections could
permit exhaust fumes to seep into the
passenger compartment.
WARNING!
California Proposition 65
Operating, servicing and maintaining
a passenger vehicle or off-road vehicle
can expose you to chemicals including
such as, engine exhaust, carbon
monoxide, phthalates and lead, that
which are known to the State of
California to cause cancer and birth
defects or other reproductive harm. To
minimize exposure, avoid breathing
exhaust, do not idle the engine except
as necessary, service your vehicle in a
well-ventilated area and wear gloves
or wash your hands frequently when
servicing your vehicle. For more
information go to:
www.P65Warnings.ca.gov/passenger-
vehicle Vehicle Safety Checks Seat Belts
• Inspect the belt system periodically,
checking for cuts, frays, and loose
parts. Damaged parts must be
replaced immediately.
• Do not disassemble or modify the
system.
• If the belt has been sharply pulled,
for example as the result of an
accident, the safety belt, together
with the anchoring devices, the
anchoring device mounting screws
and the pretensioner must be
completely replaced. Even if the belt
does not present any exterior signs
of wear or damage, it may have lost
its restraining properties.
Air Bag Warning Light
The
light should illuminate and
remain lit for a few seconds bulb
checking when the ignition switch is
pushed in RUN position (see
“Supplemental Restraint System (SRS)
— Air Bags” chapter in this section).
• If the light
does not illuminate
while starting, contact the
Authorized Maserati Dealer .
• If the light stays on, flickers, or comes
on while driving, have the systemBefore Starting
2
90
Page 96 of 436

• Check the tires (see “Tire Inflation
Pressure” chapter in section
“Features and Specifications”) for
proper cold inflation pressure.
Lights and Indicator Lights
• Have someone observe the operation
of exterior lights while you operate
the controls (see “Lights” chapter in
section “Understanding the
Vehicle”).
• Check turn signal and high beam
indicator lights on the instrument
cluster (see “Instrument Cluster”
chapter in section “Dashboard
Instruments and Controls”).
Door Latches
• Check for positive closing, latching,
and locking of doors and liftgate (see
“Unlock the Vehicle with Key fob”
chapter in this section).
Fluid Leaks
• Check area under vehicle after
overnight parking for recent fluid
leaks (oil, fuel, etc.).
• If gasoline fumes are detected or
fluid leaks are suspected, contact the
Authorized Maserati Dealer . WARNING!
California Proposition 65
Operating, servicing and maintaining
a passenger vehicle or off-road vehicle
can expose you to chemicals including
such as, engine exhaust, carbon
monoxide, phthalates and lead, that
which are known to the State of
California to cause cancer and birth
defects or other reproductive harm. To
minimize exposure, avoid breathing
exhaust, do not idle the engine except
as necessary, service your vehicle in a
well-ventilated area and wear gloves
or wash your hands frequently when
servicing your vehicle. For more
information go to:
www.P65Warnings.ca.gov/passenger-
vehicleBefore Starting
2
92
Page 113 of 436
The heated steering wheel can shut
off early or may not turn on when the
steering wheel is already warm.
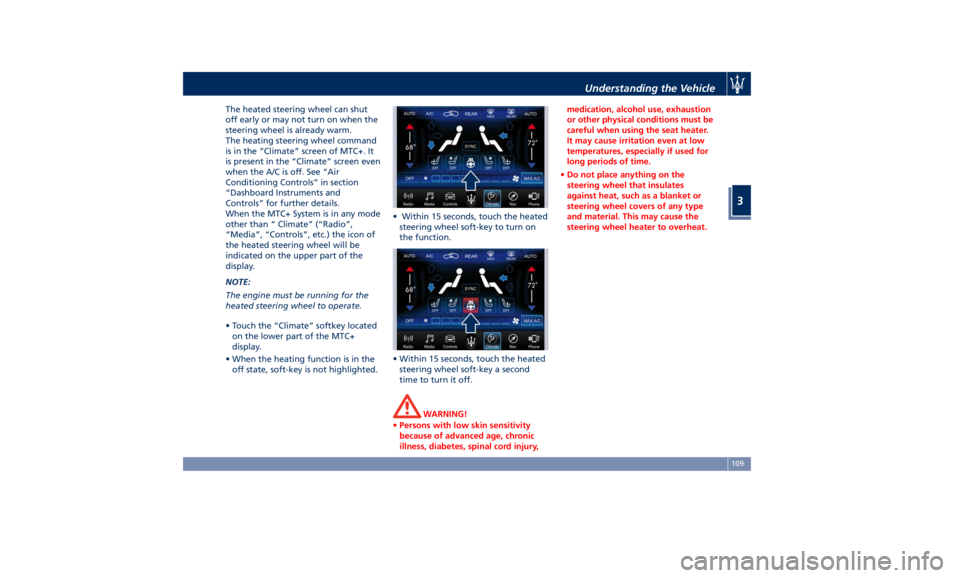
The heating steering wheel command
is in the “Climate” screen of MTC+. It
is present in the “Climate” screen even
when the A/C is off. See “Air
Conditioning Controls” in section
“Dashboard Instruments and
Controls” for further details.
When the MTC+ System is in any mode
other than “ Climate” (“Radio”,
“Media”, “Controls”, etc.) the icon of
the heated steering wheel will be
indicated on the upper part of the
display.
NOTE:
The engine must be running for the
heated steering wheel to operate.
• Touch the “Climate” softkey located
on the lower part of the MTC+
display.
• When the heating function is in the
off state, soft-key is not highlighted. • Within 15 seconds, touch the heated
steering wheel soft-key to turn on
the function.
• Within 15 seconds, touch the heated
steering wheel soft-key a second
time to turn it off.
WARNING!
• Persons with low skin sensitivity
because of advanced age, chronic
illness, diabetes, spinal cord injury, medication, alcohol use, exhaustion
or other physical conditions must be
careful when using the seat heater.
It may cause irritation even at low
temperatures, especially if used for
long periods of time.
• Do not place anything on the
steering wheel that insulates
against heat, such as a blanket or
steering wheel covers of any type
and material. This may cause the
steering wheel heater to overheat.Understanding the Vehicle
3
109
Page 114 of 436
Adjustable Pedals (if
equipped) The adjustable pedals system is
designed to allow greater range of
pedals positions enabling driver
comfort with regard to the steering
wheel tilt and the seat position.
This feature allows the brake and
accelerator pedals to move toward or
away from the driver’s feet.
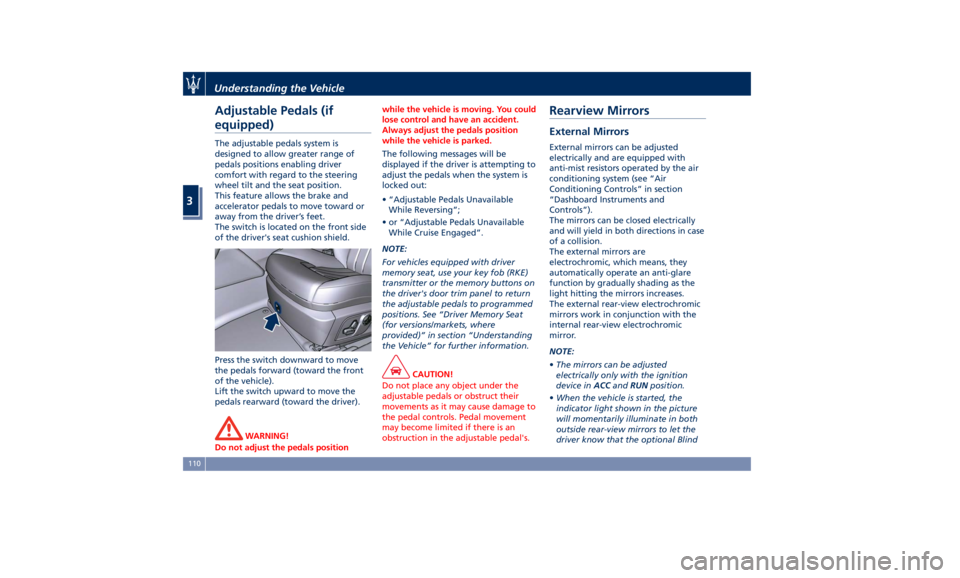
The switch is located on the front side
of the driver's seat cushion shield.
Press the switch downward to move
the pedals forward (toward the front
of the vehicle).
Lift the switch upward to move the
pedals rearward (toward the driver).
WARNING!
Do not adjust the pedals position while the vehicle is moving. You could
lose control and have an accident.
Always adjust the pedals position
while the vehicle is parked.
The following messages will be
displayed
if the driver is attempting to
adjust the pedals when the system is
locked out:
• “Adjustable Pedals Unavailable
While Reversing”;
• or “Adjustable Pedals Unavailable
While Cruise Engaged”.
NOTE:
For vehicles equipped with driver
memory seat, use your key fob (RKE)
transmitter or the memory buttons on
the driver's door trim panel to return
the adjustable pedals to programmed
positions. See “Driver Memory Seat
(for versions/markets, where
provided)” in section “Understanding
the Vehicle” for further information.
CAUTION!
Do not place any object under the
adjustable pedals or obstruct their
movements as it may cause damage to
the pedal controls. Pedal movement
may become limited if there is an
obstruction in the adjustable pedal's.Rearview Mirrors External Mirrors External mirrors can be adjusted
electrically and are equipped with
anti-mist resistors operated by the air
conditioning system (see “Air
Conditioning Controls” in section
“Dashboard Instruments and
Controls”).
The mirrors can be closed electrically
and will yield in both directions in case
of a collision.
The external mirrors are
electrochromic, which means, they
automatically operate an anti-glare
function by gradually shading as the
light hitting the mirrors increases.
The external rear-view electrochromic
mirrors work in conjunction with the
internal rear-view electrochromic
mirror.
NOTE:
• The mirrors can be adjusted
electrically only with the ignition
device in ACC and RUN position.
• When the vehicle is started, the
indicator light shown in the picture
will momentarily illuminate in both
outside rear-view mirrors to let the
driver know that the optional BlindUnderstanding the Vehicle
3
110
Page 115 of 436
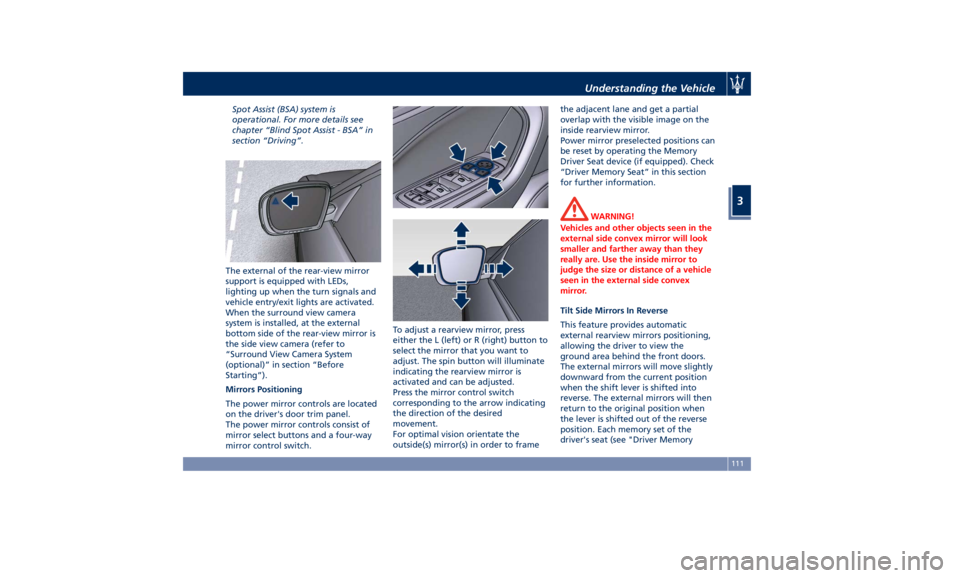
Spot Assist (BSA) system is
operational. For more details see
chapter “Blind Spot Assist - BSA” in
section “Driving”.
The external of the rear-view mirror
support is equipped with LEDs,
lighting up when the turn signals and
vehicle entry/exit lights are activated.
When the surround view camera
system is installed, at the external
bottom side of the rear-view mirror is
the side view camera (refer to
“Surround View Camera System
(optional)” in section “Before
Starting”).
Mirrors Positioning
The power mirror controls are located
on the driver's door trim panel.
The power mirror controls consist of
mirror select buttons and a four-way
mirror control switch. To adjust a rearview mirror, press
either the L (left) or R (right) button to
select the mirror that you want to
adjust. The spin button will illuminate
indicating the rearview mirror is
activated and can be adjusted.
Press the mirror control switch
corresponding to the arrow indicating
the direction of the desired
movement.
For optimal vision orientate the
outside(s) mirror(s) in order to frame the adjacent lane and get a partial
overlap with the visible image on the
inside rearview mirror.
Power mirror preselected positions can
be reset by operating the Memory
Driver Seat device (if equipped). Check
“Driver Memory Seat” in this section
for further information.
WARNING!
Vehicles and other objects seen in the
external side convex mirror will look
smaller and farther away than they
really are. Use the inside mirror to
judge the size or distance of a vehicle
seen in the external side convex
mirror.
Tilt Side Mirrors In Reverse
This
feature provides automatic
external rearview mirrors positioning,
allowing the driver to view the
ground area behind the front doors.
The external mirrors will move slightly
downward from the current position
when the shift lever is shifted into
reverse. The external mirrors will then
return to the original position when
the lever is shifted out of the reverse
position. Each memory set of the
driver's seat (see "Driver MemoryUnderstanding the Vehicle
3
111
Page 119 of 436

Automatic Headlights This system automatically turns the
headlights on or off according to
ambient light intensity detected by
the twilight sensor positioned on the
inner surface of the windshield, over
the rear view mirror. To turn the
system on, rotate the lights switch
clockwise to “AUTO” position.
When the automatic system is
activated, the headlight time delay
feature is activated as well. This means
the headlights will stay on for up to 90
seconds after you place the ignition
device into OFF position.
To turn the automatic system off,
move the lights switch out of “AUTO”
position.
NOTE:
The engine must be running and the
twilight sensor in “NIGHT” mode
before the headlights turn on in
automatic mode.
WARNING!
The responsibility for turning on the
lights, depending on the daylight and
regulations in force in the country of
use, always lies with the driver. The
automatic system for switching on and off the external lights is to be
considered as an aid for the driver. If
necessary, switch the lights including
the front and rear fog lights on and
off manually.
Headlights On with Wipers When this feature is active, the
headlights will turn on approximately
10 seconds after activation of the
wipers, if the lights switch is placed in
the “AUTO” position. The headlights
will additionally turn off by
deactivation of the wipers if
previously activated with this function.
NOTE:
The headlights with wipers feature
may be turned on and off using the
MTC+ System, refer to “MTC+
Settings” in section “Dashboard
Instruments and Controls”.
Headlights Time Delay This safety feature provides headlight
illumination for up to 90 seconds
(programmable) when leaving your
vehicle in an unlit area. To activate the
delay feature, place the ignition
switch in the OFF or ACC position
while the headlights are still on. Then turn off the headlights within 45
seconds.
The delay interval begins when the
lights switch is turned off (position
“0”). If you turn the headlights or
position lights on, or place the
ignition switch in RUN , the system will
cancel the delay.
If you turn the headlights off (“0”
position) before the ignition, they will
turn off in the normal mode.
NOTE:
• To activate this feature the lights
must be turned off (“0” position)
within 45 seconds of placing the
ignition switch in the OFF or ACC
position.
• The headlight delay time is
programmable using the MTC+
System, see “MTC+ Settings” in
section “Dashboard Instruments and
Controls”.
• If the low beam bulbs/LEDs are
active due to “Headlights with
Wipers”, then the headlamps delay
feature will not be activated when
the ignition switch is set in OFF
position.Understanding the Vehicle
3
115