2019 MASERATI LEVANTE air conditioning
[x] Cancel search: air conditioningPage 220 of 436
NOTE:
For vehicles equipped with Remote
Start, the Air Conditioning System will
not function during Remote Start
operation if the climate control is left
in “OFF”.
2. A/C
Touch the "A/C" soft-key to change
the current air conditioning setting;
the soft-key illuminates when the A/C
is on. Operating this function will
cause the automatic feature to switch
into manual mode and the “AUTO”
LED on the buttons and MTC+ soft-key
will turn off.
3. Driver temperature control
Provides the driver with independent
temperature control. Touch the blue
soft-key for cooler temperature.
Touch the red
soft-key for warmer
temperature. The driver's temperature
setting will be displayed on the MTC+
between the soft-key
and . The
MTC+ display can also be used to
adjust the temperature by touching
and sliding the bar towards soft-key
, to increase temperature, or
towards soft-keys
to decrease it.
During this phase, a small pop-up on
the side will show the corresponding
temperature. You can increase or decrease the
temperature using the rocker switch
on the climate control panel.
NOTE:
In “SYNC” mode, this control will also
automatically and simultaneously
adjust the passenger temperature.
4. Passenger temperature control
Provides the passenger with
independent temperature control.
Touch the
soft-key for cooler
temperature. Touch the
soft-key for
warmer temperature. The passenger's
temperature setting will be displayed
on the MTC+ screen between the
soft-keys
and .
You can increase or decrease the
temperature using the rocker switch
on the climate control panel.
NOTE:
Pressing the 4 button/soft-key while in
“SYNC” mode will automatically exit
“SYNC”.
5. Recirculation
Press to change the current setting,
the LED indicator on the button and
the relevant soft-key illuminates to
indicate which recirculation function is
activated. For further details, see paragraph “Dual zone Climate Control
Functions” in this chapter.
6. Blower control
Blower control is used to adjust the
amount of air forced through the
climate system. Eight levels of blower
speed can be selected. Adjusting the
blower will cause automatic mode to
switch to manual.
On the climate control panel, push the
rocker switch up to increase fan speed.
Push the rocker switch down to
decrease fan speed. Pushing down the
rocker switch when set blower is at the
first speed, causes the A/C system
shutdown (OFF condition).
On the MTC+ display, touch the small
icon of the blower to decrease the
speed, or the big icon to increase it.
Between the two icons, bars will
appear to show the number of the
corresponding selected speed.
The blower can also be activated/
regulated by touching the bars
between the two blower icons.
When the MTC+ is displayed in any
mode other than “Climate”, the
blower speed is indicated by the bright
segments in the climate icon.
7-8. AUTO
This function automatically controls
the interior temperature by adjustingDashboard Instruments and Controls
4
216
Page 222 of 436
• “Dashboard” mode
Air flows for each zone from four
adjustable vents of the dashboard,
two vents on the upper part of the
dashboard and two positioned at
the rear end of the central console.
Each of these vents can be singly
adjusted. The air grids or vanes of
the vents can be moved to adjust air
flow direction. A setting wheel,
placed near each vent, allows to
regulate or close the airflow.
• “Bi-Level” mode
Air for each zone comes from the
dashboard and central console
adjustable vents and the fixed floor
vents. A small portion of the airflow
is directed through the
defrost/demist vents to prevent
windows fogging.
NOTE:
Bi-Level mode is designed to let cooler
air come in the dashboard and rear
part of the central console vents and
warmer air from the floor vents.
• “Defrost” mode
Air for each zone comes from the
dashboard defrost/demist vents to
prevent windows fogging. • “Mix” mode
Air for each zone comes from the
defrost/demist vent, the vent under
the dashboard and from floor vent.
This mode is recommended for cold
climates, to improve comfort and
prevent windows fogging.
• “Hi-Level” mode
Air for each zone comes from the
dashboard defrost/demist vents,
from the dashboard and central
console adjustable vents and the
fixed floor vents.
• “Tri-Level” mode
Air for each zone comes from all the
adjustable/fixed and defrost/demist
vents.
14. “SYNC” mode
Touch the “SYNC” soft-key on the
MTC+ to switch the Sync feature
on/off. The “SYNC” soft-key
illuminates when this feature is
selected. This function is used to
synchronise the passenger
temperature setting with the driver
temperature setting.
Changing the passenger temperature
setting while in “SYNC” will
automatically exit this feature. 15. “REAR” mode
This soft-key is present only if the
vehicle is equipped with the additional
dual-zone air conditioning system for
rear passengers. Touching "REAR"
soft-key you enter the screen where
the settings available for rear seat
passengers are displayed. For the
description of these controls, see
paragraph "Four-Zone Climate
Controls (optional)" of this chapter.
Dual Zone Climate Control
Functions Air Conditioning (A/C)
The “A/C” soft-key allows to manually
activate or deactivate the air
conditioning system. When the air
conditioning system is turned on, cool
dehumidified air will flow through the
vents into the cabin. For improved fuel
economy, touch the “A/C” soft-key to
turn off the air conditioning and
manually adjust the blower and
airflow mode settings.
When the “A/C” and “AUTO”
functions are switched off it is not
possible to have air at a lower
temperature than the outside.Dashboard Instruments and Controls
4
218
Page 225 of 436
“SYNC” mode can also be manually
selected.
Four-Zone Climate Controls
(optional) Air conditioning controls that allow
rear passengers to adjust the
temperature in the left and right rear
part of the passenger compartment
are located at the rear end of the
central console underneath the
adjustable air outlets.
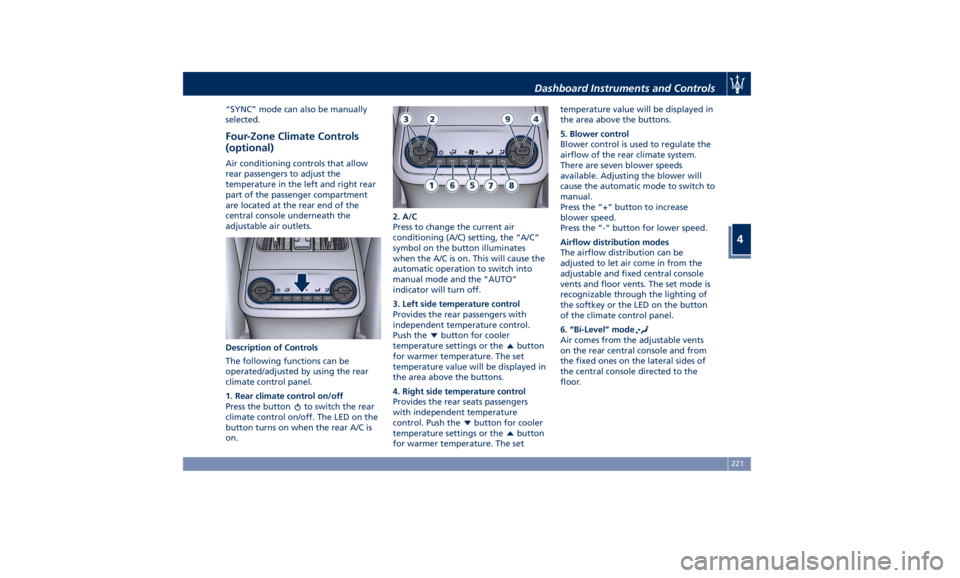
Description of Controls
The following functions can be
operated/adjusted by using the rear
climate control panel.
1. Rear climate control on/off
Press the button
to switch the rear
climate control on/off. The LED on the
button turns on when the rear A/C is
on. 2. A/C
Press to change the current air
conditioning (A/C) setting, the “A/C”
symbol on the button illuminates
when the A/C is on. This will cause the
automatic operation to switch into
manual mode and the “AUTO”
indicator will turn off.
3. Left side temperature control
Provides the rear passengers with
independent temperature control.
Push the
button for cooler
temperature settings or the
button
for warmer temperature. The set
temperature value will be displayed in
the area above the buttons.
4. Right side temperature control
Provides the rear seats passengers
with independent temperature
control. Push the
button for cooler
temperature settings or the
button
for warmer temperature. The set temperature value will be displayed in
the area above the buttons.
5. Blower control
Blower control is used to regulate the
airflow of the rear climate system.
There are seven blower speeds
available. Adjusting the blower will
cause the automatic mode to switch to
manual.
Press the “+“ button to increase
blower speed.
Press the “-“ button for lower speed.
Airflow distribution modes
The airflow distribution can be
adjusted to let air come in from the
adjustable and fixed central console
vents and floor vents. The set mode is
recognizable through the lighting of
the softkey or the LED on the button
of the climate control panel.
6. “Bi-Level” mode
Air comes from the adjustable vents
on the rear central console and from
the fixed ones on the lateral sides of
the central console directed to the
floor.Dashboard Instruments and Controls
4
221
Page 227 of 436
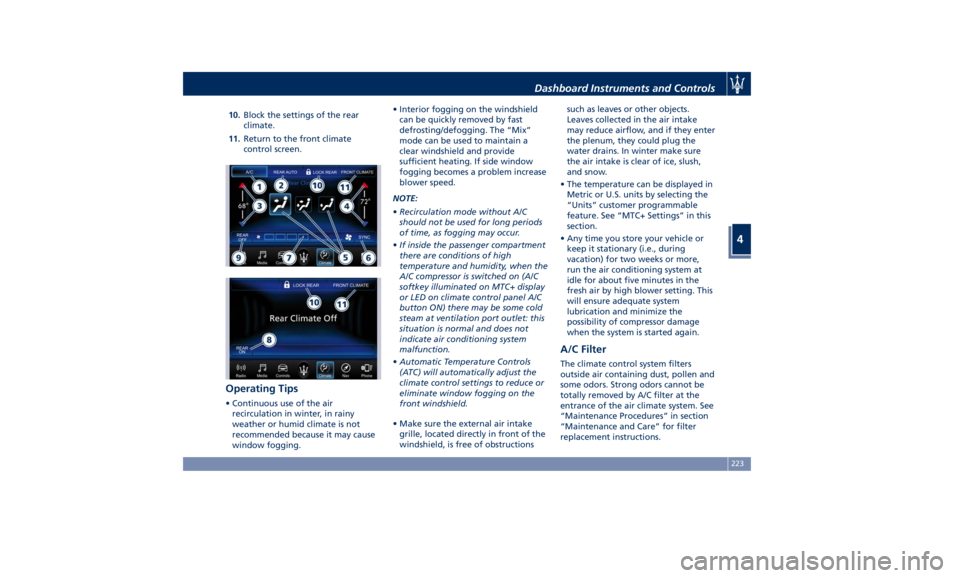
10. Block the settings of the rear
climate.
11. Return to the front climate
control screen.
Operating Tips • Continuous use of the air
recirculation in winter, in rainy
weather or humid climate is not
recommended because it may cause
window fogging. • Interior fogging on the windshield
can be quickly removed by fast
defrosting/defogging. The “Mix”
mode can be used to maintain a
clear windshield and provide
sufficient heating. If side window
fogging becomes a problem increase
blower speed.
NOTE:
• Recirculation mode without A/C
should not be used for long periods
of time, as fogging may occur.
• If inside the passenger compartment
there are conditions of high
temperature and humidity, when the
A/C compressor is switched on (A/C
softkey illuminated on MTC+ display
or LED on climate control panel A/C
button ON) there may be some cold
steam at ventilation port outlet: this
situation is normal and does not
indicate air conditioning system
malfunction.
• Automatic Temperature Controls
(ATC) will automatically adjust the
climate control settings to reduce or
eliminate window fogging on the
front windshield.
• Make sure the external air intake
grille, located directly in front of the
windshield, is free of obstructions such as leaves or other objects.
Leaves collected in the air intake
may reduce airflow, and if they enter
the plenum, they could plug the
water drains. In winter make sure
the air intake is clear of ice, slush,
and snow.
• The temperature can be displayed in
Metric or U.S. units by selecting the
“Units” customer programmable
feature. See “MTC+ Settings” in this
section.
• Any time you store your vehicle or
keep it stationary (i.e., during
vacation) for two weeks or more,
run the air conditioning system at
idle for about five minutes in the
fresh air by high blower setting. This
will ensure adequate system
lubrication and minimize the
possibility of compressor damage
when the system is started again.
A/C Filter The climate control system filters
outside air containing dust, pollen and
some odors. Strong odors cannot be
totally removed by A/C filter at the
entrance of the air climate system. See
“Maintenance Procedures” in section
“Maintenance and Care” for filter
replacement instructions.Dashboard Instruments and Controls
4
223
Page 232 of 436
Normal Starting of the
Engine WARNING!
It is dangerous to run the engine in an
enclosed area. The engine consumes
oxygen and discharges carbon
dioxide, carbon monoxide and other
toxic gases in the atmosphere.
WARNING!
California Proposition 65
Operating, servicing and maintaining
a passenger vehicle or off-road vehicle
can expose you to chemicals including
such as, engine exhaust, carbon
monoxide, phthalates and lead, that
which are known to the State of
California to cause cancer and birth
defects or other reproductive harm. To
minimize exposure, avoid breathing
exhaust, do not idle the engine except
as necessary, service your vehicle in a
well-ventilated area and wear gloves
or wash your hands frequently when
servicing your vehicle. For more
information go to: www.P65Warnings.ca.gov/passenger-
vehicle
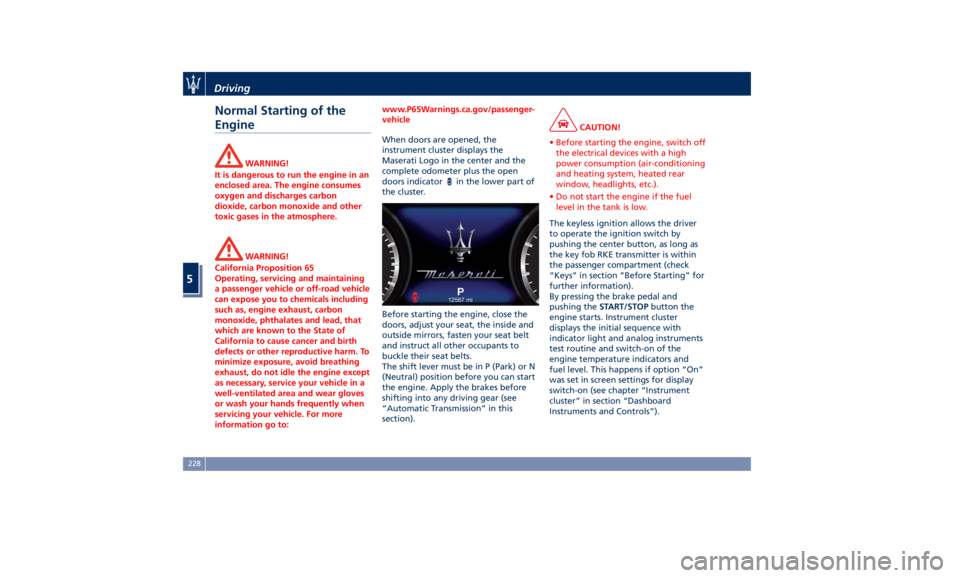
When doors are opened, the
instrument
cluster displays the
Maserati
Logo in the center and the
complete odometer plus the open
doors indicator
in the lower part of
the cluster.
Before starting the engine, close the
doors, adjust your seat, the inside and
outside mirrors, fasten your seat belt
and instruct all other occupants to
buckle their seat belts.
The shift lever must be in P (Park) or N
(Neutral) position before you can start
the engine. Apply the brakes before
shifting into any driving gear (see
“Automatic Transmission” in this
section). CAUTION!
• Before starting the engine, switch off
the electrical devices with a high
power consumption (air-conditioning
and heating system, heated rear
window, headlights, etc.).
• Do not start the engine if the fuel
level in the tank is low.
The keyless ignition allows the driver
to
operate the ignition
switch by
pushing the center button, as long as
the key fob RKE transmitter is within
the passenger compartment (check
“Keys” in section “Before Starting” for
further information).
By pressing the brake pedal and
pushing the START/STOP button the
engine starts. Instrument cluster
displays the initial sequence with
indicator light and analog instruments
test routine and switch-on of the
engine temperature indicators and
fuel level. This happens if option “On”
was set in screen settings for display
switch-on (see chapter “Instrument
cluster” in section “Dashboard
Instruments and Controls”).Driving
5
228
Page 235 of 436

remain in “AutoStop” with engine off.
Pressing the brake pedal and shifting
transmission into D (Drive) or R
(Reverse) will deactivate the
“AutoStop” condition and restart the
engine.
Start&Stop Deactivated Start&Stop function is deactivated
under the following conditions:
• When SPORT drive mode is activated.
• When
(ESC OFF) drive mode is
activated.
• When ride height is set to Off Road 1
or Off Road 2.
• If it has been disabled through the
main menu item “Start & Stop” via
the controls on the right side of the
steering wheel (see chapter
“Instrument cluster” in section
“Dashboard Instruments and
Controls”) or via the MTC+ in the “Controls” page (see “MTC+
"Controls" Screen” in section
“Dashboard Instruments and
Controls”).
Start&Stop Not Active For keeping driving safety, interior
comfort and a correct functioning of
engine and vehicle, the Start&Stop
function does not activate under the
following conditions:
• When the driver’s seat belt is
unbuckled (see example in picture).
• When the driver door is open.
• When the fuel level is too low.
• When the vehicle is stopped on a
very steep road.
• When the vehicle is stopped with
steered wheels (over 135° of steering
wheel angle for each part). • When the vehicle is maneuvering:
shift lever in R (Reverse).
• When the temperature conditions
inside the vehicle do not correspond
to the air conditioning setting.
• When the front and rear “defroster”
function is activated.
• When the engine coolant and the
engine oil temperature are not on
proper functioning level.
• When the external temperature is
too cold.
• When the battery charge is below
safety value.
• When the previous stop had just
happened (few seconds) and the
minimum speed has not yet been
achieved.
• Shortly after R (Reverse) has been set
or when driving under a certain
speed level.
• When the hood is open.
• The sensors managing the
Start&Stop have been damaged.
• Start&Stop system faults are present.
• When Adaptive Cruise Control (ACC)
and/or Highway Assist (HAS) system
are engaged.Driving
5
231
Page 236 of 436
Automatic Restarting of the
Engine The engine may automatically restart,
before the brake pedal has been
released, when one of the following
conditions occurs:
• The SPORT drive mode or
(ESC
OFF) drive mode is being activated.
• If the Start&Stop function has been
disabled through the main menu
voice “Start & Stop” (see chapter
“Instrument cluster” in section
“Dashboard Instruments and
Controls”) or via MTC+ in the
“Controls” page (see “MTC+
“Controls “Screen” in the section
“Dashboard Instruments and
Controls”).
• If shift lever is moved to R (Reverse).
• If the steering wheel is moved to
steer the wheels.
• When the temperature conditions
inside the vehicle do not correspond
to the air conditioning setting.
• When changing the temperature
setting on the air conditioning.
• When the defroster function is being
activated.
• When the battery charge is below
safety value. • When the accelerator pedal is being
pressed (together with the brake
pedal).
• If a long time has passed since the
last automatic stop of the engine.
Occupants Safety Function To enhance occupants safety, the
Start&Stop system monitors if the
driver is present and does not allow
automatic restarting of the engine if
one of the following maneuvers is
being performed while in “AutoStop”
condition:
• The driver unbuckles his/her seat belt
and releases the brake pedal.
• The driver opens the door and
releases the brake pedal.
• The driver unbuckles the seat belt
and opens the door.
• The driver opens the hood.
All the above-mentioned conditions
deactive the Start&Stop function (the
“AutoStart” is deactivated and the
engine remains off) and the
transmission shift automatically in P
(Park).
The
telltale will flash to indicate
the Start&Stop function disabling. To
restart the engine it is necessary to
press the brake pedal and push the
START/STOP button. Move the shift lever to D (Drive) to
drive away.
WARNING!
• Even when the vehicle is stopped in
the “Stop (AutoStop)” phase, the
driver is responsible for the vehicle
and the occupants and shall take
care of what happens inside and
outside the vehicle.
• Even when the vehicle is stopped
within the “Stop (AutoStop)” phase,
the vehicle driver is responsible for
the vehicle, the vehicle’s occupants
and the vehicle’s surrounding area.
Never leave the vehicle unattended
with the engine running; doing so
poses a risk of danger. It is a good
practice to always ensure to set the
parking brake and place the
transmission gear selector lever into
the P (Park) position, thereby
ensuring the vehicle will not move,
when performing any vehicle checks,
maintenance and/or service
procedures on the vehicle.
Start&Stop Function Disabling Under certain driving conditions, when
frequent stops and restarts of the
engine may become annoying, it isDriving
5
232
Page 343 of 436
from moving forward in case of
sudden stops;
• avoid heavy meals before a trip. A
light snack helps keep your reflexes
sharp. In particular, avoid drinking
alcohol.
WARNING!
Passengers must only travel seated in
the vehicle seats, with the seat belts
fastened. Always check that the driver
and all passengers have the seat belts
correctly fastened.
Safe Driving Although the vehicle is equipped with
active and passive safety devices, the
driver's conduct is always a decisive
factor for road safety.
Some simple rules for traveling safely
in different conditions are listed
below. Some of them will probably
already sound familiar but, in any
case, it would be useful to read them
carefully.
Driving at Night
The main guidelines to follow when
driving at night are set out below.
• Drive carefully. Night conditions
demand more focus and attention. • Reduce your speed, especially on
roads with no streetlights.
• Stop at early signs of drowsiness.
Continuing to drive would be a risk
for yourself and for others. Have a
rest before continuing your trip.
• Keep the vehicle at a greater
distance from vehicles in front of
you than you would during the day:
it is difficult to assess the speed of
other vehicles when you only see the
lights.
• Use the high beams only outside of
densely-populated areas and when
you are sure that they will not
disturb other drivers.
• When another vehicle is
approaching, switch from high
beams (if on) to low beams.
• Keep lights and headlights clean.
• Outside of densely-populated areas,
beware of animals crossing the road.
Driving in the Rain
Rain and wet roads are dangerous. On
a wet road all maneuvers are more
difficult since wheel grip on the road
is significantly reduced. This means
that braking distances increase
considerably and road grip decreases.
Some advices for driving in the rain
are listed below. • Reduce your speed and keep a
greater safety distance from the
vehicles in front of you. High speed
may result in a loss of vehicle
control.
• When driving on wet or slushy roads,
it is possible for a wedge of water to
build up between the tire and road
surface. This is known as
aquaplaning and may cause partial
or complete loss of vehicle control
and stopping ability. To reduce this
possibility: slow down if the road has
standing water or puddles.
• Heavy rain substantially reduces
visibility. In these circumstances, even
during the day, turn on the low
beams, to be more visible to other
drivers.
• Set the air conditioning and heating
system controls on the defogging
function, in order to avoid any
visibility problem.
• Periodically check the conditions of
the windshield wiper blades.
• In low grip conditions use “I.C.E.”
driving mode (see chapters “Drive
Mode” and “Off-road Drive” in this
section).
• Avoid driving with ESC OFF as this
will likely cause a loss of control of
the vehicle.Driving
5
339