2019 MASERATI LEVANTE child lock
[x] Cancel search: child lockPage 61 of 436
Occupants Restraint
Systems The listed occupants restraint systems
are some of the most important safety
features in your vehicle:
• Three-point seat belts (also called lap
and shoulder belts) for the driver
and all passengers.
• Advanced front air bags for driver
and passenger.
• Supplemental Side Air Bag Inflatable
Curtains (SABIC) for the driver and
passengers seated next to a window.
• Supplemental seat-mounted side air
bags.
• An energy-absorbing steering
column and steering wheel.
• Front seat belts incorporate dual
pretensioners that may enhance
occupant protection by managing
the energy created during an
impact.
• All seat belt systems (except the
driver’s) include Automatic Locking
Retractors (ALR), which lock the seat
belt webbing into position by
extending the belt all the way out
and then adjusting the belt to the
desired length to restrain a child seat
or secure a large item in a seat. Please pay close attention to the
information in this section. It tells you
how to use your restraint system
properly, to keep you and your
passengers as safe as possible.
If you are carrying children too small
for adult-sized seat belts, the seat
belts or the Lower Anchors and Tether
for CHildren (LATCH) feature also can
be used to hold infant and child
restraint systems. For more
information on LATCH, refer to
“Lower Anchors and Tether for
CHildren (LATCH)” in this section.
WARNING!
To help provide maximum protection,
you are advised to keep the seatback
in the most upright position possible
and the seat belt close to your chest
and pelvis. If the seat belt is loose, in
the event of an accident you could
move too far forward and could be
injured. Travelling with the seatback
too far reclined could also be
dangerous: even if the seat belts are
fastened, they may not work
correctly. In fact, the belt itself may
not be close enough to your body
and, if it is in front of you, it could
cause neck wounds or other injuries in
an accident. Additionally, in an accident, the lower section of the belt
could press against the upper part of
your stomach rather than the pelvic
area, causing serious internal injuries.
NOTE:
The
advanced air bags
have a multi
stage inflator. This allows the air bag
to have different stages of inflation
based on the severity and type of
collision.
Here are some simple steps you can
take to minimize the risk of harm
from a deploying air bag:
• Children 12 years old and under
should always ride buckled up in a
rear seat.
WARNING!
Infants in rear facing child restraints
should never ride in the front seat of
a vehicle with a passenger Advanced
Front Air Bag. An air bag deployment
can cause severe or fatal injury to
infants in that position.
Do not use child seats or child booster
cushions/backrests in the front
passenger seat. Occupants in the front
passenger seat must never sit on the
(Continued)Before Starting
2
57
Page 63 of 436
Everyone in a motor vehicle should be
belted at all times.
Three-Point Seat Belts All seating positions in your vehicle
are equipped with combination lap
and shoulder belts.
The belt retractor is designed to lock
during very sudden stops or impacts.
This feature allows the shoulder part
of the belt to move freely with you
under normal conditions, conforming
to the body of the occupants.
However, in an accident, the belt will
lock and reduce your risk of striking
the inside of the vehicle or being
thrown out.
The driver is responsible for
respecting, and ensuring that all the
other occupants of the car also
observe the local regulations
concerning the use of seat belts.
Always fasten the seat belts before
starting the vehicle.
Seat belts are designed to be used by
persons whose physical characteristics
(age, height, weight) are provided for
by established legislation in each
country. Anyone who does comply
with these provisions may not travel in
the front passenger seat. This also
applies to children. Their heads are
proportionally heavier and larger than those of adults, while their bones and
muscles are relatively undeveloped. To
help protect them in case of a
collision, they must use special
restraint or safety systems, even in the
rear seat area.
WARNING!
• It is forbidden and dangerous to ride
in a cargo area. In an accident,
people riding in these areas are
more likely to be seriously injured or
killed.
• Do not allow any person to ride in
any area of your vehicle that is not
equipped with seats and seat belts.
• Be sure all passengers are in a seat
and using a seat belt properly.
• Wearing your belt improperly could
make your injuries in an accident
much worse. You might suffer
internal injuries, or you could even
slide out of part of the belt. Follow
these instructions to wear your seat
belt properly and to keep your
passengers safe, too.
• Two people should never be belted
into a single seat belt. People belted
together can crash into one another
in an accident, hurting one another severely. Never use a lap/shoulder
belt for more than one person.
• Remember that, in the event of an
accident, the rear seat passengers
not wearing the seat belts are not
only subject to personal injuries but
also represent a serious danger for
the front seat occupants.
Three-Point Seat Belts Use Instructions
•
Enter the vehicle
and close the door.
Sit back and adjust the seat.
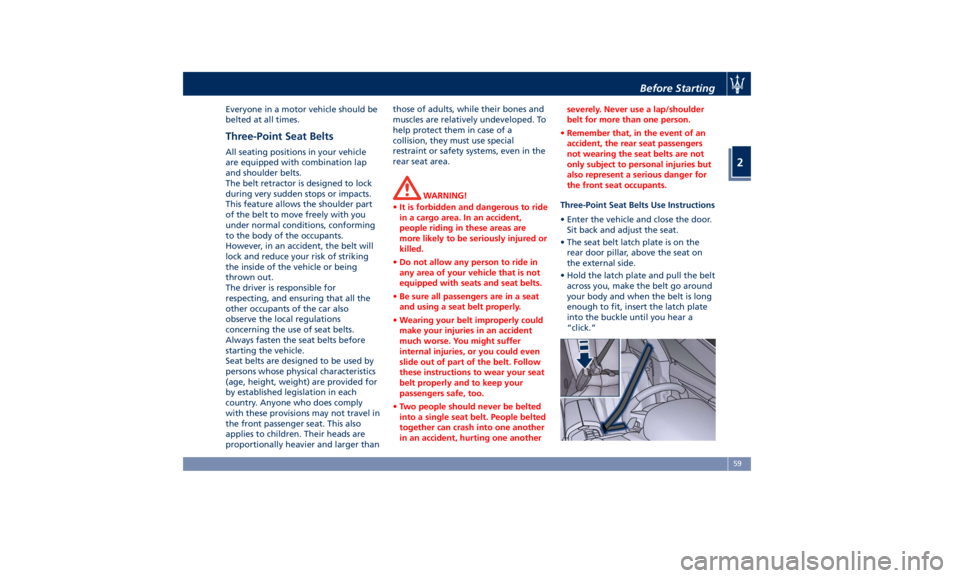
• The seat belt latch plate is on the
rear door pillar, above the seat on
the external side.
• Hold the latch plate and pull the belt
across you, make the belt go around
your body and when the belt is long
enough to fit, insert the latch plate
into the buckle until you hear a
“click.”Before Starting
2
59
Page 65 of 436
Three-Point Seat Belt Height
Adjustment
WARNING!
• Wearing your seat belt incorrectly
could make your injuries in a
collision much worse. You might
suffer internal injuries, or you could
even slide out of the seat belt.
Follow these instructions to wear
your seat belt safely and to keep
your passengers safe, too.
• Position the shoulder belt across the
shoulder and chest with minimal, if
any slack so that it is comfortable
and not resting on your neck. The
retractor will withdraw any slack in
the shoulder belt.
• Misadjustment of the seat belt could
reduce the effectiveness of the
safety belt in a crash.
• Always make all seat belt height
adjustments when the vehicle is
stationary.
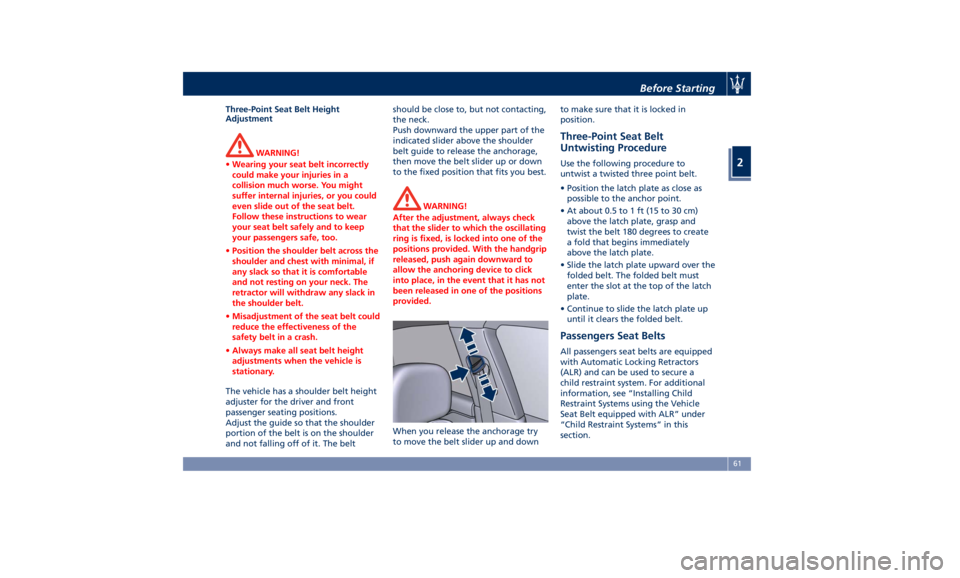
The vehicle has a shoulder belt height
adjuster
for the driver and front
passenger seating positions.
Adjust the guide so that the shoulder
portion of the belt is on the shoulder
and not falling off of it. The belt should be close to, but not contacting,
the neck.
Push downward the upper part of the
indicated slider above the shoulder
belt guide to release the anchorage,
then move the belt slider up or down
to the fixed position that fits you best.
WARNING!
After the adjustment, always check
that the slider to which the oscillating
ring is fixed, is locked into one of the
positions provided. With the handgrip
released, push again downward to
allow the anchoring device to click
into place, in the event that it has not
been released in one of the positions
provided.
When you release the anchorage try
to
move the belt
slider up and down to make sure that it is locked in
position.
Three-Point Seat Belt
Untwisting Procedure Use the following procedure to
untwist a twisted three point belt.
• Position the latch plate as close as
possible to the anchor point.
• At about 0.5 to 1 ft (15 to 30 cm)
above the latch plate, grasp and
twist the belt 180 degrees to create
a fold that begins immediately
above the latch plate.
• Slide the latch plate upward over the
folded belt. The folded belt must
enter the slot at the top of the latch
plate.
• Continue to slide the latch plate up
until it clears the folded belt.
Passengers Seat Belts All passengers seat belts are equipped
with Automatic Locking Retractors
(ALR) and can be used to secure a
child restraint system. For additional
information, see “Installing Child
Restraint Systems using the Vehicle
Seat Belt equipped with ALR” under
“Child Restraint Systems” in this
section.Before Starting
2
61
Page 67 of 436
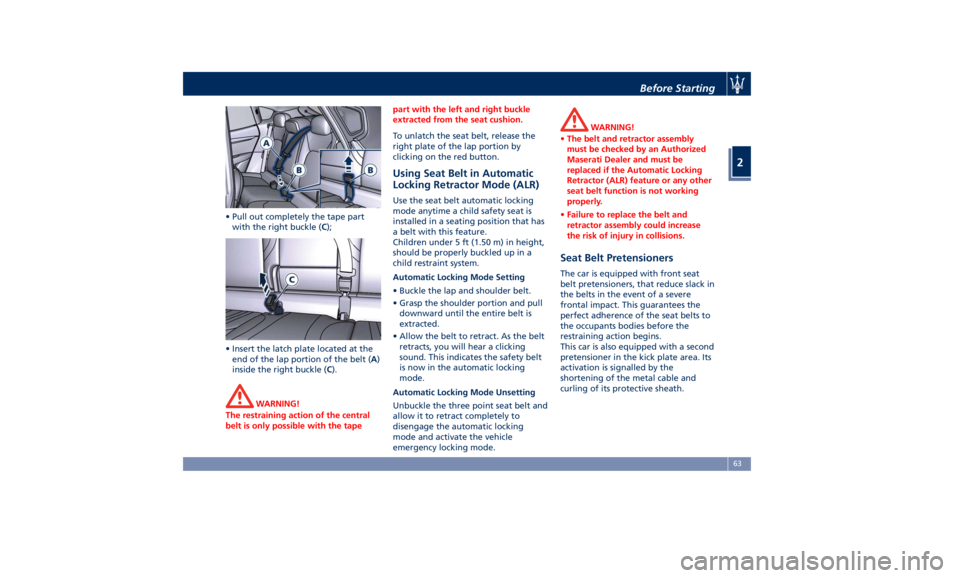
• Pull out completely the tape part
with the right buckle ( C );
• Insert the latch plate located at the
end of the lap portion of the belt ( A )
inside the right buckle ( C ).
WARNING!
The restraining action of the central
belt is only possible with the tape part with the left and right buckle
extracted from the seat cushion.
To unlatch the seat belt, release the
right
plate of the lap portion by
clicking on the red button.
Using Seat Belt in Automatic
Locking Retractor Mode (ALR) Use the seat belt automatic locking
mode anytime a child safety seat is
installed in a seating position that has
a belt with this feature.
Children under 5 ft (1.50 m) in height,
should be properly buckled up in a
child restraint system.
Automatic Locking Mode Setting
• Buckle the lap and shoulder belt.
• Grasp the shoulder portion and pull
downward until the entire belt is
extracted.
• Allow the belt to retract. As the belt
retracts, you will hear a clicking
sound. This indicates the safety belt
is now in the automatic locking
mode.
Automatic Locking Mode Unsetting
Unbuckle the three point seat belt and
allow it to retract completely to
disengage the automatic locking
mode and activate the vehicle
emergency locking mode. WARNING!
• The belt and retractor assembly
must be checked by an Authorized
Maserati Dealer and must be
replaced if the Automatic Locking
Retractor (ALR) feature or any other
seat belt function is not working
properly.
• Failure to replace the belt and
retractor assembly could increase
the risk of injury in collisions.
Seat Belt Pretensioners The car is equipped with front seat
belt pretensioners, that reduce slack in
the belts in the event of a severe
frontal impact. This guarantees the
perfect adherence of the seat belts to
the occupants bodies before the
restraining action begins.
This car is also equipped with a second
pretensioner in the kick plate area. Its
activation is signalled by the
shortening of the metal cable and
curling of its protective sheath.Before Starting
2
63
Page 75 of 436

inflates. This especially applies to
children.
Supplemental Side Air Bag Inflatable
Curtain (SABIC) Inflator Units
During collisions where the impact is
confined to a particular area of the
side of the vehicle, the ORC may
deploy the SABIC air bags, depending
on the severity and type of collision. In
these events, the ORC will deploy the
SABIC only on the impact side of the
vehicle. A quantity of non-toxic gas is
generated to inflate the side curtain
air bag.
The inflating side curtain air bag
pushes the head/s of the occupant/s
seating in the outside seats from the
edge of the headliner out of the way
and covers the window. The air bag
inflates with enough force to possibly
injure you if you are not belted and
seated properly, or if items are
positioned in the area where the side
curtain air bag inflates. This especially
applies to children.
The SABICs may also help reduce the
risk of partial or complete ejection of
vehicle occupants through side
windows in certain rollover events
(because equipped with rollover
sensing). Front and Side Impact Sensors
In front and side impacts, impact
sensors can aid the ORC in
determining appropriate response to
impact events.
Enhanced Accident Response System
In the event of an impact causing air
bag deployment, if the
communication network and the
power remains intact, depending on
the nature of the accident, the ORC
will determine whether the enhanced
accident response system will have to
perform the following functions:
• cut off fuel to the engine;
• turn hazard lights and interior lights
on as long as the battery has power
or until the ignition switch is turned
off;
• unlock the doors automatically;
• disconnect the battery with a
pyrotechnic charge.
Air Bag Deployment Result
The advanced front air bags are
designed to deflate immediately after
deployment.
If you do have a collision which
deploys the air bags, any or all of the
following may occur: • The nylon air bag material may
sometimes cause abrasions and/or
skin reddening to the driver and
front passenger as the air bags
deploy and unfold.
• As the air bags deflate, you may see
some smoke-like particles. The
particles are a normal by-product of
the process that generates the
non-toxic gas used for air bag
inflation. These airborne particles
may irritate the skin, eyes, nose, or
throat. If these particles settle on
your clothing, follow the garment
manufacturer's instructions for
cleaning. Do not drive your vehicle
after an air bag has deployed. If you
are involved in another collision, the
air bags will not be in place to
protect you.
ENVIRONMENTAL!
Air bag inflation releases a small
amount of powder. This powder is not
harmful to the environment.
WARNING!
California Proposition 65
Operating, servicing and maintaining
(Continued)Before Starting
2
71
Page 80 of 436
Here are some tips on getting
the most out of your child
restraint • Before buying any restraint system,
make sure that it has a label
certifying that it meets all applicable
Safety Standards. Maserati also
recommends that you make sure that
you can install the child restraint in
the vehicle where you will use it
before you buy it.
• The restraint system must be
appropriate for your child’s weight
and height.
• Check the label on the restraint
system for weight and height limits.
• Carefully follow the instructions that
come with the restraint system.
• If installed improperly, it may not
work when needed.
• Fit the child into the seat according
to the child restraint manufacturer’s
directions.
WARNING!
When your child restraint system is
not in use, secure it in the vehicle with
the seat belt or remove it from the
vehicle. Do not leave it loose in the
vehicle. In a sudden stop or accident, it could strike the occupants or
seatbacks and cause serious personal
injury.
Installing Child Restraint
Systems using the Vehicle Seat
Belt equipped with ALR Child restraint systems are designed to
be secured in vehicle seats by lap belts
or the lap belt portion of a
lap/shoulder belt.
All the passenger seat belts are
equipped with an Automatic Locking
Retractor (ALR) to secure child
protection through a Child Restraint
System (CRS). These types of seat belts
are designed to keep the lap portion
of the seat belt tight around the child
restraint seat avoiding to use a locking
clip.
The ALR will make a ratcheting noise if
the entire belt is pulled out of the
retractor in order to enable the belt to
retract subsequently. For additional
information on ALR, see “Using Seat
Belt in Automatic Locking Retractor
(ALR) Mode” in “Occupants Restraint
Systems” in this section.
To install a Child Restraint System with
ALR, pull enough of the belt out of the
retractor leading it through the belt
path of the protection device. Slide the latch into the buckle until it clicks,
then remove the entire safety belt
from the retractor in order to
rewound. While rewinding a click will
indicate the safety belt is now in
Automatic Locking mode.
Exert then a traction on the exceeded
lap section of the belt in order to
tighten it around the child restraint
seat. All seat belts will loosen over
time, it is therefore necessary to check
them periodically and set them
properly.
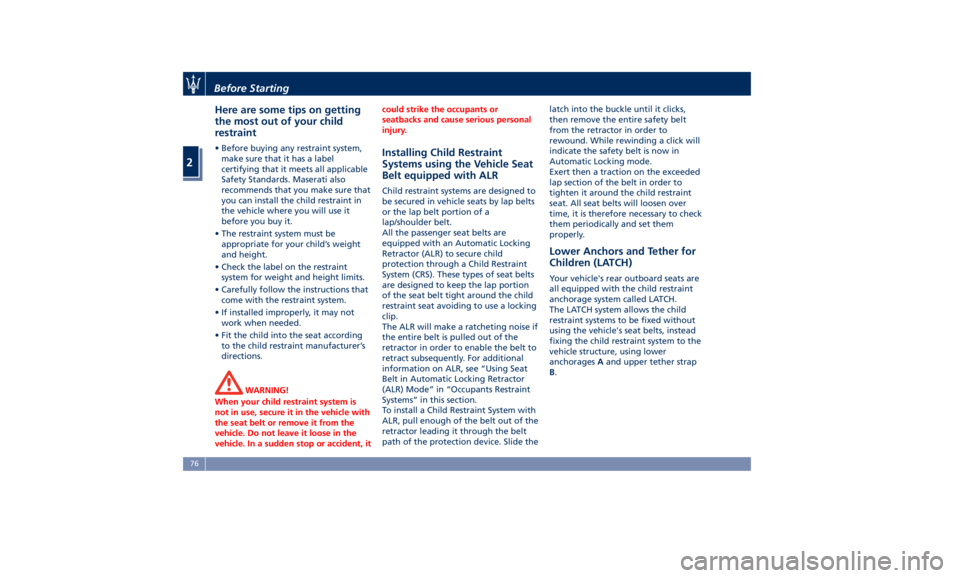
Lower Anchors and Tether for
Children (LATCH) Your vehicle's rear outboard seats are
all equipped with the child restraint
anchorage system called LATCH.
The LATCH system allows the child
restraint systems to be fixed without
using the vehicle's seat belts, instead
fixing the child restraint system to the
vehicle structure, using lower
anchorages A and upper tether strap
B .Before Starting
2
76
Page 101 of 436
13 Door lock button with “Passive
Entry” function.
14 Door outboard opening lock.
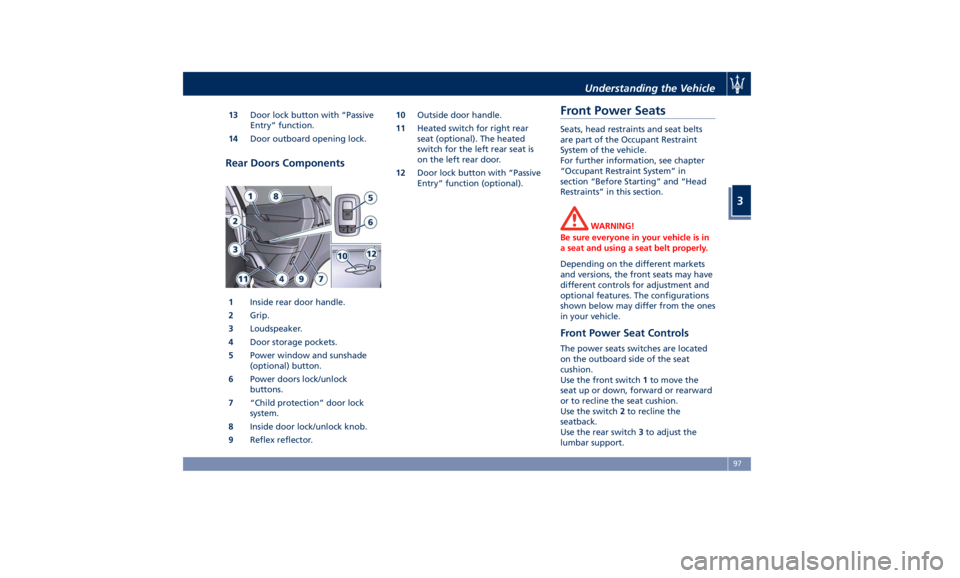
Rear Doors Components
1 Inside rear door handle.
2 Grip.
3 Loudspeaker.
4 Door storage pockets.
5 Power window and sunshade
(optional) button.
6 Power doors lock/unlock
buttons.
7 “Child protection” door lock
system.
8 Inside door lock/unlock knob.
9 Reflex reflector. 10 Outside door handle.
11 Heated switch for right rear
seat (optional). The heated
switch for the left rear seat is
on the left rear door.
12 Door lock button with “Passive
Entry” function (optional).
Front Power Seats Seats, head restraints and seat belts
are part of the Occupant Restraint
System of the vehicle.
For further information, see chapter
“Occupant Restraint System” in
section “Before Starting” and “Head
Restraints” in this section.
WARNING!
Be sure everyone in your vehicle is in
a seat and using a seat belt properly.
Depending on the different markets
and versions, the front
seats may have
different controls for adjustment and
optional features. The configurations
shown below may differ from the ones
in your vehicle.
Front Power Seat Controls The power seats switches are located
on the outboard side of the seat
cushion.
Use the front switch 1 to move the
seat up or down, forward or rearward
or to recline the seat cushion.
Use the switch 2 to recline the
seatback.
Use the rear switch 3 to adjust the
lumbar support.Understanding the Vehicle
3
97
Page 107 of 436
to the driver by moving the seat for
Easy Exit or Easy Entry.
Each stored memory setting will have
an associated easy entry/exit position.
NOTE:
The Easy Entry/Exit feature can be
enabled or disabled using the MTC+
System, refer to “MTC+ Settings” in
section “Dashboard Instruments and
Controls” for further information.
Rear Seats Rear seats can fit three passengers.
Seats, head restraints and seat belts
are parts of the occupant restraint
system of the vehicle.
For further information, see chapter
“Occupants Restraint Systems” in
section “Before Starting” and “Head
Restraints” in this section.
WARNING!
Be sure everyone in your vehicle is in
a seat and using a seat belt properly.
Rear Seat Folding Seatback The 60/40 split-folding seatback of the
rear seat provides for a recliner
feature with three available fixed
positions that can be set using the
lever on seat external side. The LH
lever tilts the long part (60), while the
RH lever tilts the shorter one (40).
The less tilted position (90°) is the one
most suitable when a child seat must
be installed; the other positions tilt
the seatback toward the liftgate up to
23°.
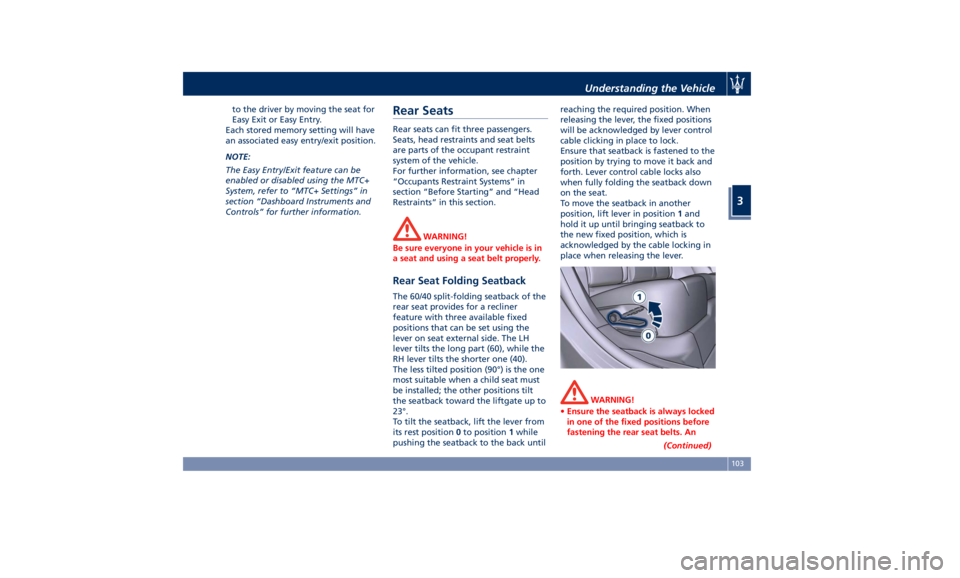
To tilt the seatback, lift the lever from
its rest position 0 to position 1 while
pushing the seatback to the back until reaching the required position. When
releasing the lever, the fixed positions
will be acknowledged by lever control
cable clicking in place to lock.
Ensure that seatback is fastened to the
position by trying to move it back and
forth. Lever control cable locks also
when fully folding the seatback down
on the seat.
To move the seatback in another
position, lift lever in position 1 and
hold it up until bringing seatback to
the new fixed position, which is
acknowledged by the cable locking in
place when releasing the lever.
WARNING!
• Ensure the seatback is always locked
in one of the fixed positions before
fastening the rear seat belts. An
(Continued)Understanding the Vehicle
3
103