2019 MASERATI LEVANTE alarm
[x] Cancel search: alarmPage 42 of 436

The message on the instrument cluster
stays active as long as the ignition
switch is in RUN position.
To enter Remote Start Mode NOTE:
On some versions, the remote start
button on the key fob RKE
transmitter is replaced by the
button.
Press and release the button
on the
key fob RKE transmitter twice within
five seconds. The vehicle doors will
lock, position lights will flash and the
horn will ring twice (if this function is
set using the MTC+ System, refer to
“MTC+ Settings” in section
“Dashboard Instruments and
Controls”). Then, the engine will start
and the vehicle will remain in the
“Remote Start” mode for a 15-minute
cycle.
WARNING!
California Proposition 65
Operating, servicing and maintaining
a passenger vehicle or off-road vehicle
can expose you to chemicals including
such as, engine exhaust, carbon
monoxide, phthalates and lead, that which are known to the State of
California to cause cancer and birth
defects or other reproductive harm. To
minimize exposure, avoid breathing
exhaust, do not idle the engine except
as necessary, service your vehicle in a
well-ventilated area and wear gloves
or wash your hands frequently when
servicing your vehicle. For more
information go to:
www.P65Warnings.ca.gov/passenger-
vehicle
NOTE:
• In
case of an engine fault or low fuel
level, the vehicle will start and then
shut down in 10 seconds.
• The position lights will turn on and
remain lighted up during “Remote
Start” mode.
• For security reasons, power window
and power sunroof operation (if equipped) are disabled when the
vehicle is in the “Remote Start”
mode.
• The engine can be started two
consecutive times (two 15-minute
cycles) with the key fob RKE
transmitter. However, the ignition
must be cycled to the RUN position
before you can repeat the start
sequence for a third cycle.
To exit Remote Start Mode
without Driving the Vehicle Press and release the button one
time or allow the engine to run for the
entire 15-minute cycle.
NOTE:
To avoid unintentional shutdowns, the
system will disable the one time press
of the button
for two seconds after
receiving a valid “Remote Start”
request.
To exit Remote Start Mode and
Drive the Vehicle Before the end of the 15-minute cycle,
press and release the button
on the
key fob RKE transmitter to unlock the
doors and disarm the vehicle security
alarm. Then, prior to the end of theBefore Starting
2
38
Page 48 of 436

(Continued)
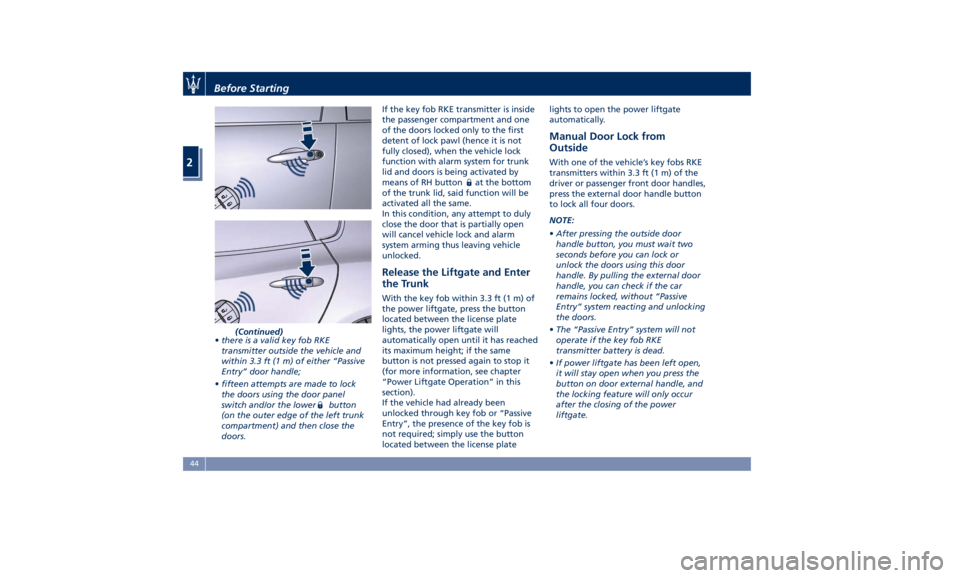
• there is a valid key fob RKE
transmitter outside the vehicle and
within 3.3 ft (1 m) of either “Passive
Entry” door handle;
• fifteen attempts are made to lock
the doors using the door panel
switch and/or the lower
button
(on the outer edge of the left trunk
compartment) and then close the
doors. If the key fob RKE transmitter is inside
the passenger compartment and one
of the doors locked only to the first
detent of lock pawl (hence it is not
fully closed), when the vehicle lock
function with alarm system for trunk
lid and doors is being activated by
means of RH button
at the bottom
of the trunk lid, said function will be
activated all the same.
In this condition, any attempt to duly
close the door that is partially open
will cancel vehicle lock and alarm
system arming thus leaving vehicle
unlocked.
Release the Liftgate and Enter
the Trunk With the key fob within 3.3 ft (1 m) of
the power liftgate, press the button
located between the license plate
lights, the power liftgate will
automatically open until it has reached
its maximum height; if the same
button is not pressed again to stop it
(for more information, see chapter
“Power Liftgate Operation” in this
section).
If the vehicle had already been
unlocked through key fob or “Passive
Entry”, the presence of the key fob is
not required; simply use the button
located between the license plate lights to open the power liftgate
automatically.
Manual Door Lock from
Outside With one of the vehicle’s key fobs RKE
transmitters within 3.3 ft (1 m) of the
driver or passenger front door handles,
press the external door handle button
to lock all four doors.
NOTE:
• After pressing the outside door
handle button, you must wait two
seconds before you can lock or
unlock the doors using this door
handle. By pulling the external door
handle, you can check if the car
remains locked, without “Passive
Entry” system reacting and unlocking
the doors.
• The “Passive Entry” system will not
operate if the key fob RKE
transmitter battery is dead.
• If power liftgate has been left open,
it will stay open when you press the
button on door external handle, and
the locking feature will only occur
after the closing of the power
liftgate.Before Starting
2
44
Page 56 of 436

unlocked by the key fob or by the
“Passive Entry” function.
By pressing this button when the
power liftgate is closed, you can open
it completely, or by pressing the
button again stop the opening
process, or by pressing the button
again invert the movement and close it
completely.
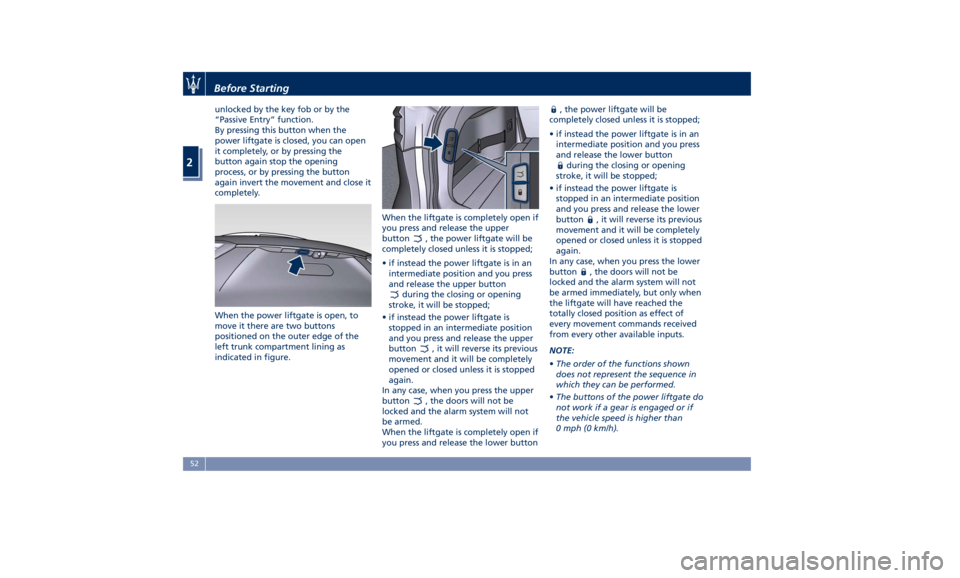
When the power liftgate is open, to
move it there are two buttons
positioned on the outer edge of the
left trunk compartment lining as
indicated in figure. When the liftgate is completely open if
you press and release the upper
button
, the power liftgate will be
completely closed unless it is stopped;
• if instead the power liftgate is in an
intermediate position and you press
and release the upper button
during the closing or opening
stroke, it will be stopped;
• if instead the power liftgate is
stopped in an intermediate position
and you press and release the upper
button
, it will reverse its previous
movement and it will be completely
opened or closed unless it is stopped
again.
In any case, when you press the upper
button
, the doors will not be
locked and the alarm system will not
be armed.
When the liftgate is completely open if
you press and release the lower button , the power liftgate will be
completely closed unless it is stopped;
• if instead the power liftgate is in an
intermediate position and you press
and release the lower button
during the closing or opening
stroke, it will be stopped;
• if instead the power liftgate is
stopped in an intermediate position
and you press and release the lower
button
, it will reverse its previous
movement and it will be completely
opened or closed unless it is stopped
again.
In any case, when you press the lower
button
, the doors will not be
locked and the alarm system will not
be armed immediately, but only when
the liftgate will have reached the
totally closed position as effect of
every movement commands received
from every other available inputs.
NOTE:
• The order of the functions shown
does not represent the sequence in
which they can be performed.
• The buttons of the power liftgate do
not work if a gear is engaged or if
the vehicle speed is higher than
0 mph (0 km/h).Before Starting
2
52
Page 154 of 436

open, then adjust the sunroof opening
to minimize the buffeting.
Ignition Off Operation The power sunroof controls will
remain active for up to approximately
ten minutes after the ignition switch is
in OFF position. Opening either front
door will cancel this feature. The
ignition system timing can be set using
the MTC+ System (see “MTC+ Settings”
in section “Dashboard Instruments and
Controls”).
Sunroof Maintenance Use only a nonabrasive cleaner and a
soft cloth to clean the glass panel. HomeLink ®
(optional) HomeLink ®
replaces up to three
hand-held transmitters operating the
automatic devices that open garage
doors and gates, enable/disable the
lighting or security systems. The
HomeLink ®
unit is powered by your
vehicle's 12 Volt battery. The
HomeLink ®
buttons that are located in
the overhead console designate the
three different HomeLink ®
channels.
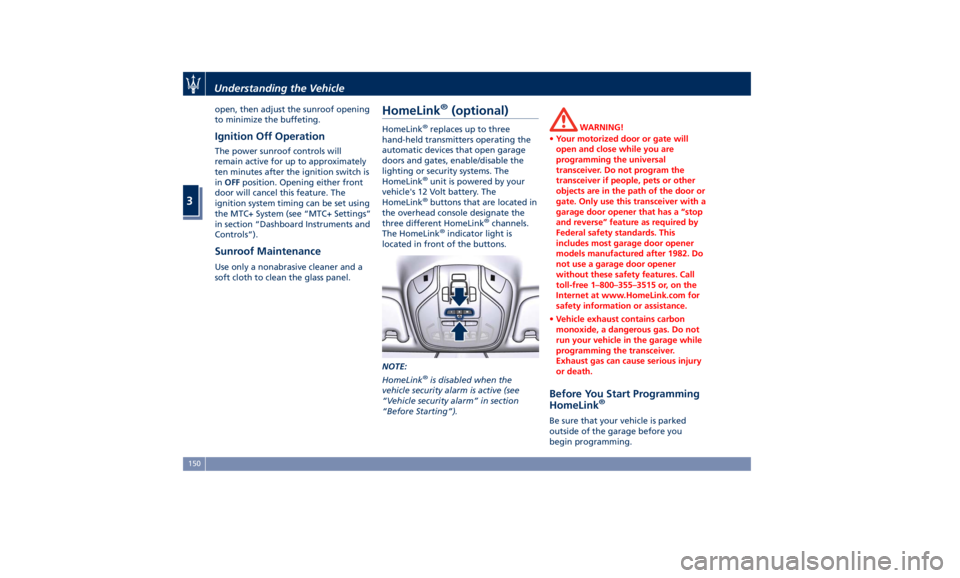
The HomeLink ®
indicator light is
located in front of the buttons.
NOTE:
HomeLink ®
is disabled when the
vehicle security alarm is active (see
“Vehicle security alarm” in section
“Before Starting”). WARNING!
• Your motorized door or gate will
open and close while you are
programming the universal
transceiver. Do not program the
transceiver if people, pets or other
objects are in the path of the door or
gate. Only use this transceiver with a
garage door opener that has a “stop
and reverse” feature as required by
Federal safety standards. This
includes most garage door opener
models manufactured after 1982. Do
not use a garage door opener
without these safety features. Call
toll-free 1–800–355–3515 or, on the
Internet at www.HomeLink.com for
safety information or assistance.
• Vehicle exhaust contains carbon
monoxide, a dangerous gas. Do not
run your vehicle in the garage while
programming the transceiver.
Exhaust gas can cause serious injury
or death.
Before You Start Programming
HomeLink ®
Be sure that your vehicle is parked
outside of the garage before you
begin programming.Understanding the Vehicle
3
150
Page 157 of 436

hand-held transmitters” from second
step and follow all remaining steps.
Using HomeLink ®
To operate, press and release the
programmed HomeLink ®
button.
Activation will now occur for the
programmed device (i.e., garage door
opener, gate operator, security system,
entry door lock, home/office lighting,
etc.). The hand-held transmitter of the
device may also be used at any time.
Security It is advisable to erase all channels
before you sell or turn in your vehicle.
To erase the channels press and hold
the two outside HomeLink ®
buttons (I
and III) until the indicator light starts
flashing (after approximately 20
seconds).
The HomeLink ®
Universal Transceiver
is disabled when the vehicle security
alarm is active (see “Vehicle security
alarm” in section “Before Starting”).
Troubleshooting Tips If you are having trouble while
programming HomeLink ®
, here are
some of the most common solutions:
• Replace the battery in the original
hand-held transmitter. • Press the LEARN button on the
garage door opener to complete the
training for a rolling code.
• Did you unplug the device for
programming and forgot to plug it
back in?
If you have any problems, or require
assistance, please call toll-free
1–800–355–3515 or, on the Internet at
www.HomeLink.com for information
or assistance.
Radio Frequency Device -
Regulatory Information The “Regulatory Information” for all
the radio frequency and radar devices
can be consulted by accessing the
"Services" section on the website
www.maserati.com. Understanding the Vehicle
3
153
Page 266 of 436

“NORMAL”, “SPORT ”, “
(Suspension)“ or “I.C.E.” After
selecting this height, once the vehicle
speed goes below 15 mph (24 km/h),
the vehicle height will begin to
lower. To exit “Entry/Exit” mode,
move selector to another position or
drive the vehicle over 15 mph (24
km/h). Automatic lowering of the
vehicle into “Entry/Exit” mode can be
enabled through the MTC+ (refer to
“MTC+ Settings” in section
“Dashboard Instruments and
Controls”). If this feature is enabled,
the vehicle will only lower if the
gearshift lever is in P (Park), the
engine is running, doors and liftgate
are closed and the Pneumatic
Suspension System should be either
in “NORMAL” or “Aero”. The Vehicle
will not automatically lower if the
pneumatic suspension system is in
“Off Road 2” or “Off Road 1” mode.
The lowering will be suppressed
when the ignition is switched off and
a door is opened to prevent setting
the alarm off.
Lowering Vehicle Height for Inactivity
Lowering of vehicle ground clearance
after a long period of inactivity should
be considered normal since it is due to a drop of pressure in the pneumatic
suspension system.
Approximately, after one week of
inactivity, vehicle ground clearance will
lower by 0.4 in (10 mm). To set off the
drop of pressure due to inactivity, it is
necessary to start the engine and allow
some time until system reaches
operating pressure and lifts the vehicle
to set ride height. A message on
instrument cluster display will warn
driver when set ride height is reached.
Driving vehicle before the set riding
height is reached is not safe and could
damage suspension components.
WARNING!
After a long period of vehicle
inactivity, drive only when vehicle
reaches set ride height to prevent any
problems of the pneumatic suspension system from limiting occupants'
safety.
"Launch Control" Mode
(TROFEO version only) "Launch Control" mode is a
performance start procedure.
By activating this procedure you get
the best possible acceleration from
standstill of the car.
This mode allows you to ground the
torque necessary to prevent the
wheels from slipping during
acceleration performance.
To make a performance start in
"Launch Control" mode, the following
conditions must be met:
• Water and transmission temperature
in proper range.
• No engine, AWD and on board
systems faults.
• The vehicle must be traveled at least
440 mi (700 km).
• "CORSA" drive mode on.
• Shift lever in "D" or"M +/-" position.
• The vehicle must be stationary on a
level road surface.
• The driver door closed and the safety
belt fastened.Driving
5
262
Page 312 of 436

(Continued)
• The BSA system is not designed to
detect pedestrians, cyclists, or
animals.
• Even if your vehicle is equipped with
the BSA system, always check your
vehicle’s outside and rearview
mirrors for any vehicles approaching
from behind or overtaking.
• Use your turn signal before changing
lanes.
RCP - Rear Cross Path The Rear Cross Path (RCP) feature is
intended to aid the drivers when gear
in reverse of parking spaces where
their vision of oncoming vehicles may
be blocked.
The RCP system monitors the rear
detection zones on both sides of the
vehicle. Using sensors located on either
side of the rear bumper, it detects any
vehicles or objects that are moving
toward the side of the vehicle with a
minimum speed of approximately 1 to
2 mph (1 km/h to 3 km/h) to a
maximum of approximately 10 mph
(16 km/h), such as in parking lot
situations. NOTE:
In a parking lot situation, oncoming
vehicles can be obscured by vehicles
parked on either side. If the sensors
are blocked by other structures or
vehicles, the system will not be able to
alert the driver.
Proceed slowly and cautiously out of
the parking space until the rear end of
the vehicle is moderately exposed.
The RCP system will then have a clear
view of the cross traffic. If an
oncoming vehicle is detected, the RCP
system will alert the driver using both
the visual and audible alarms. If the
radio is on, it will also reduce the radio
volume.
WARNING!
RCP is not a Back Up Aid system. More specifically, it is intended to be used to
help a driver detect an oncoming
vehicle in a parking lot situation.
Drivers must be careful when backing
up, even when using RCP. Always
check carefully behind your vehicle,
look behind you, and be sure to check
for pedestrians, animals, other
vehicles, obstructions, and blind spots
before backing up. Failure to do so can
result in serious injury or death.
BSA and RCP Setting Setting modes can be selected from
the MTC+ System.
Touch “Controls” soft-key and then
“Blind Spot Assist” soft-key to enter
the setting page.
Refer to chapter “MTC+ “Controls”
Screen” in section “Dashboard
Instruments and Controls” for further
information.Driving
5
308
Page 391 of 436

• on the fuse and relay box located in
a covered area, under the dashboard
left side.
Integrated Power Module • To access the module it is necessary
to lift the hood (see “Hood
Operation” in section “Before
Starting”).
• To access the fuses remove the
module cover unhooking the lateral
locks as shown in the picture. The table points out the position as
featured in the figure, the type and
function of the fuses included in the
integrated power module.
CAUTION!
• After replacement, refit the
protective cover of the module.
• If you need to wash the engine
compartment, do not direct the
water for too long directly on the
module.
Ref. Type Function
2 Maxi – 50A Secondary air
pump relay input
(V8 engines only)
3––
4 Maxi – 30A Starter motor
relay input Ref. Type Function
5 Maxi – 40A ABS-ESP pump
feed
6 Maxi – 30A AWD module
relay input
7––
8 Maxi – 40A ABS-ESP valve
feed
9––
10 – –
11 Mini – 20A Horn relay input
12 Mini – 10A AC compressor
feed relay input
13 – –
14 Mini – 7,5A Alarm siren
15 Mini – 5A Washer heated
nozzles relay
input
16 Mini – 10A Enable cooling
fan relay input
and enable
cooling oil pump
relay input
18 – –
19 Maxi – 30A Headlamp
washer relay
inputMaintenance and Care
7
387