2019 MASERATI GRANTURISMO CONVERTIBLE rims
[x] Cancel search: rimsPage 105 of 296
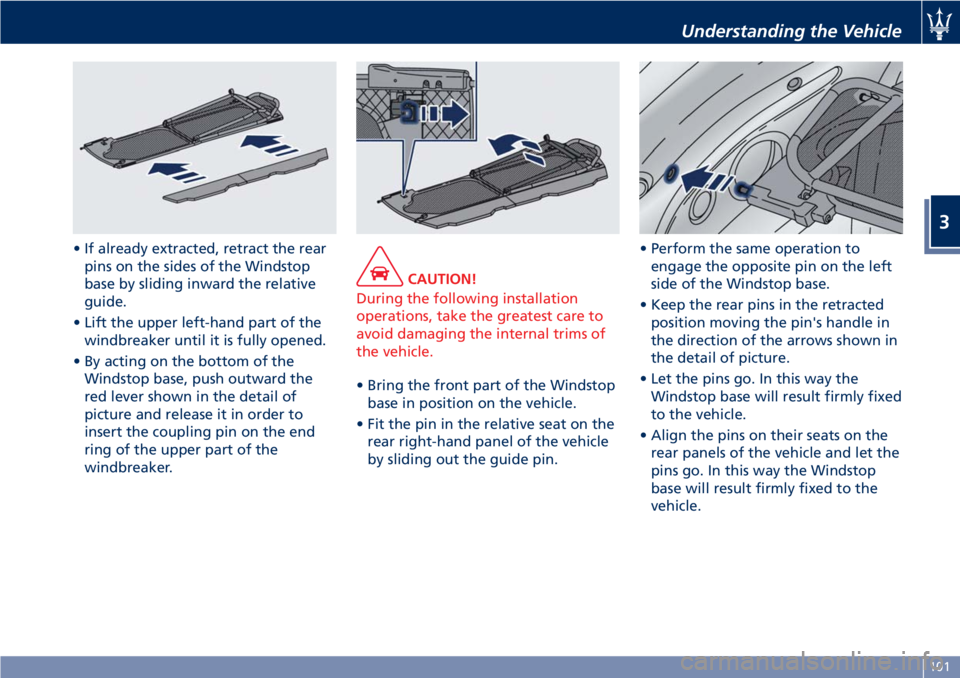
• If already extracted, retract the rear
pins on the sides of the Windstop
base by sliding inward the relative
guide.
• Lift the upper left-hand part of the
windbreaker until it is fully opened.
• By acting on the bottom of the
Windstop base, push outward the
red lever shown in the detail of
picture and release it in order to
insert the coupling pin on the end
ring of the upper part of the
windbreaker. CAUTION!
During the following installation
operations, take the greatest care to
avoid damaging the internal trims of
the vehicle.
• Bring the front part of the Windstop
base
in position on the vehicle.
• Fit the pin in the relative seat on the
rear right-hand panel of the vehicle
by sliding out the guide pin. • Perform the same operation to
engage the opposite pin on the left
side of the Windstop base.
• Keep the rear pins in the retracted
position moving the pin's handle in
the direction of the arrows shown in
the detail of picture.
• Let the pins go. In this way the
Windstop base will result firmly fixed
to the vehicle.
• Align the pins on their seats on the
rear panels of the vehicle and let the
pins go. In this way the Windstop
base will result firmly fixed to the
vehicle.Understanding the Vehicle
3
101
Page 199 of 296

that prevent the TPMS from
functioning properly. Always check the
TPMS malfunction telltale after
replacing one or more tires or wheels
on your vehicle to ensure that the
replacement or alternate tires and
wheels allow the TPMS to continue to
function properly.
General Information
The Tire Pressure Monitoring System
(TPMS) will warn the driver of a low
tire pressure according to the vehicle
recommended cold pressure indicated
on the table “Tire Inflation Pressure”
in section “Features and
Specifications” and on the label
applied on the driver's side at the base
of the rear door pillar.
The cold tire inflation pressure must
not exceed the maximum inflation
pressure molded into the tire sidewall.
Check “Tires – General Information” in
section “Driving” for information on
how to properly inflate the tires.
The tire pressure will also increase as
the vehicle is driven - this is normal
and there is no adjustment required
when this occurs.
The TPMS will warn the driver of a low
tire pressure if the tire pressure falls
below the low-pressure warning limit
for any reason, including lowtemperature effects and natural
pressure loss of the tire.
The TPMS will continue to warn the
driver of low tire pressure as long as
the condition persists and will not turn
off until the tire pressure is equal or
above the recommended cold
inflation pressure.
The TPMS monitors the tire pressure
by means of special sensors fitted
inside the wheel rims, in position with
the inflation valve.
These sensors transmit a signal that is
detected by the antenna integrated in
the ECU.
The ECU processes this information
and, via the CAN line, transmits a
series of tire pressure data and system
errors, if any, to the instrument cluster.
The display may show the information
received by means of specific screen
pages, which can be recalled by
pressing briefly the "MODE" button
(see "TFT Display: Controls" in chapter
"Instrument Cluster" of the section
Dashboard Instruments and
Controls").
WARNING!
The TPMS warns the driver that the
tire pressure has decreased. This
warning does not exempt the driver
from periodically checking the tires
and from complying with the
prescribed tire pressure levels.
CAUTION!
• The TPMS has been optimized for the original equipment tires and
wheels. TPMS pressures and warning
have been established for the tire
size equipped on your vehicle.
Undesirable system operation or
sensor damage may occur when
using replacement equipment that is
not of the same size, type, and/or
(Continued)
Driving
5
195
Page 210 of 296
with the key removed to the ignition
switch.
• Remember that passing other vehicles when driving uphill is slower
and thus requires more free distance
on the road. If you are being
overtaken on a hill, slow down and
allow the other vehicle to pass.
Driving on Snow or Ice
Please consider some general advice
for driving in these conditions, listed
below.
• Maintain a very moderate speed.
• Fit snow chains or specific tires if the road is covered with snow: see the
paragraphs “Tires – General
Information” in this section.
• We recommend you to activate the “ICE” drive mode (see chapters
“Drive Mode” in this section).
• During the winter season, even apparently dry roads can have icy
sections. Be careful when crossing
bridges, viaducts and roads that have
little exposure to the sun and are
bordered by trees and rocks. They
may be icy.
• Keep an ample safe distance from the vehicles in front of you.
• Avoid sharp braking, sharp changes in direction and rapid acceleration. Rapid acceleration on snow covered
or icy surfaces may cause the driving
wheels to pull erratically to the right
or left. This phenomenon occurs
when there is a difference in the
surface traction under the rear
(driving) wheels.
WARNING!
Rapid acceleration on slippery surfaces
is dangerous. Unequal traction can
cause sudden pulling of the rear
driving wheels. You could lose control
of the vehicle and possibly have a
collision. Accelerate slowly and
carefully whenever there is likely to be
poor traction (ice, snow, wet mud,
loose sand, etc.).
Driving through Flooded
Sections
Driving through more than a
centimeters deep shallow standing
water section will require extra
caution to ensure passenger safety and
prevent damage to your vehicle.
WARNING!
Do not drive on or across a road or
path where water is flowing and/or
rising (as in storm run-off). Flowing
water can wear away the road or path
surface and cause your vehicle to sink
into deeper water. Furthermore,
flowing and/or rising water can carry
your vehicle away swiftly. Failure to
follow this warning may result in
injuries that are serious or fatal to
you, your passengers, and others
around you.
Although your vehicle is capable of
driving
through shallow standing
water, consider the following Caution
and Warning before doing so.
CAUTION!
• Always check the depth of the standing water before driving
through it. Never drive through
standing water that is deeper than
the bottom of the tire rims mounted
on the vehicle.
• Determine the condition of the road or the path that is under water and if
there are any obstacles in the way
Driving
5
206
Page 269 of 296
NOTE:
•We recommend fitting winter tires
on the vehicle at temperatures 45 °F
(7 °C) since the driving performance
of summer tires is reduced at low
temperatures. Summer tires may be
permanently damaged at extremely
low temperatures.
• Comply with all state and local laws
governing snow tire and tread depth
requirements.
Wheel Rims Maintenance
All wheel trims should be cleaned
regularly with a mild soap and water.
To remove heavy soil and/or excessive
brake dust, use a nonabrasive,
non-acidic cleaner.
Do not use scouring pads, steel wool,
a bristle brush, or metal polishes.
Do not use oven cleaner that may
affect and damage the brake calipers.
Avoid automatic car washes that use
acidic solutions or harsh brushes that
may damage the wheel rim protective
finish.
Bodywork Maintenance
and Care
Protection from Atmospheric
Agents
The main causes of corrosion are:
• atmospheric pollution;
• salinity and humidity in the
atmosphere (marine areas or a damp
climate);
• seasonal environmental conditions;
• salt scattered on the roadbed to melt ice and snow.
The abrasive action of wind-carried
atmospheric dust and sand, mud and
stones should not be underestimated.
On this vehicle, Maserati has adopted
the best technological solutions to
protect the bodywork from corrosion.
The main measures are:
• paint products and systems that give the vehicle particular resistance to
corrosion and abrasion;
• use of galvanized (or pre-treated) metal sheets which are highly
resistant to corrosion in the most
exposed parts;
• spraying of the underbody, engine compartment, insides of wheel
housings, and other structures with wax products having high protective
power;
• spraying of plastic materials, with a protective function, in the most
exposed points: underneath the
doors, inside part of the mud guards,
edges, etc.;
• use of ventilated box sections, coated with protective wax products,
to avoid condensation and trapped
water which could encourage the
formation of internal rust.
Useful Advice to Keep the
Bodywork in Good Condition
Paint
The paintwork does not only have an
aesthetic function but also protects
the underlying metal sheets. In the
event of abrasions or deep scratches,
we recommend to have the necessary
touch-ups made immediately, to avoid
any rust formation. Touch-ups do not
feature particular difficulties, even on
metallic finishes.
For all paint touch-ups, use only
original products indicated on the
plate applied inside the hood.
Maintenance and Care
7
265
Page 271 of 296
symbol with tape, to prevent it from
being detached by the revolving
brushes.
Glass Surfaces
All
glass surfaces should be cleaned on
a regular basis with any commercial
household-type glass cleaner.
Never use an abrasive type cleaner.
Use caution when cleaning the inside
rear window equipped with electric
defrosters. Do not use scrapers or
other sharp instrument that may
scratch the electric elements.
When cleaning the rearview mirror,
spray cleaner on the towel or rag that
you are using. Do not spray cleaner
directly on the mirror.
Labels can be peeled off after soaking
with warm water.
Keep all objects a safe distance from
the window.
Cleaning Headlights
Your vehicle has plastic headlights that
are lighter and less susceptible to
stone breakage than glass headlights.
Plastic is not as scratch resistant as
glass and therefore different lens
cleaning procedures must be followed.
To minimize the possibility of
scratching the lenses and reducing
light output, avoid wiping with a dry cloth. To remove road dirt, wash with
a mild soap solution followed by
rinsing.
Do not use abrasive cleaning
components, solvents, steel wool or
other aggressive material to clean the
lenses.
Moldings and Aluminum Trims
• For cleaning moldings and aluminum
trims, avoid the use of acidic or
alkaline cleaning agents that can
destroy the protecting surface
treatment.
• After washing aluminum trim with warm water, apply the cleaning
agent with a clean tissue or a soft
sponge on the surface. Do not use
any other equipment such as
brushes, steel wool, abrasives or any
other equipment for cleaning.
• After cleaning, please rinse the aluminum trim with a lot of clear
water.
• While cleaning in the car, please make sure that the moldings and
aluminum trims only get in contact
with soft brushes or textiles.
Engine Compartment
At the end of each winter season,
carefully wash the engine
compartment, remembering to avoid directing the jet of water for too long
on the ECUs and other electric parts.
To perform this operation, you must
contact an
Authorized Maserati
Dealer.
Maintenance and Care
7
267
Page 285 of 296
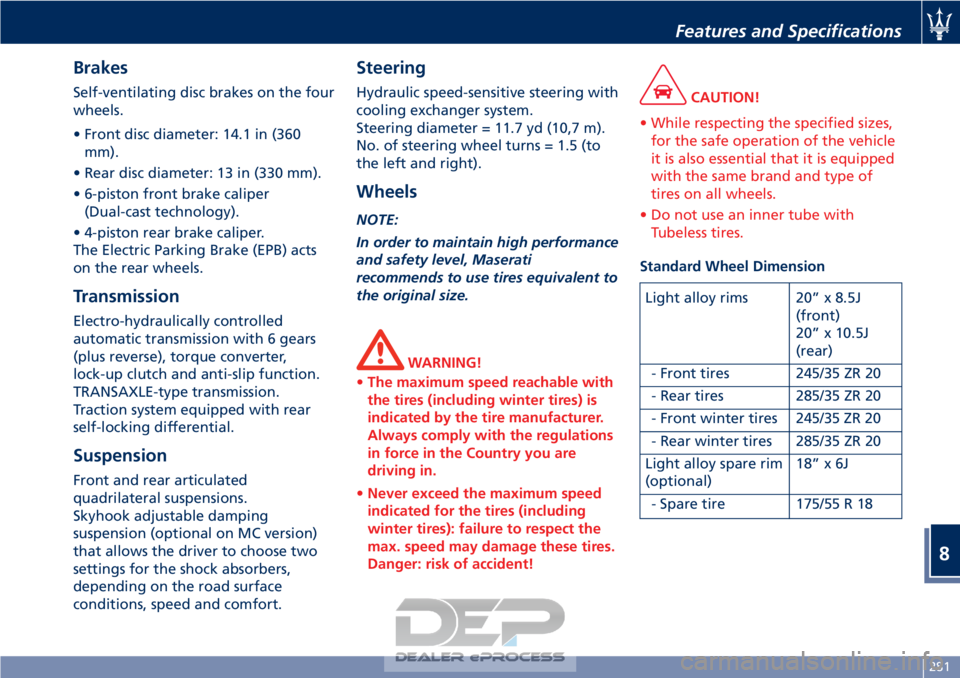
Brakes
Self-ventilating disc brakes on the four
wheels.
• Front disc diameter: 14.1 in (360mm).
• Rear disc diameter: 13 in (330 mm).
• 6-piston front brake caliper (Dual-cast technology).
• 4-piston rear brake caliper.
The Electric Parking Brake (EPB) acts
on the rear wheels.
Transmission
Electro-hydraulically controlled
automatic transmission with 6 gears
(plus reverse), torque converter,
lock-up clutch and anti-slip function.
TRANSAXLE-type transmission.
Traction system equipped with rear
self-locking differential.
Suspension
Front and rear articulated
quadrilateral suspensions.
Skyhook adjustable damping
suspension (optional on MC version)
that allows the driver to choose two
settings for the shock absorbers,
depending on the road surface
conditions, speed and comfort.
Steering
Hydraulic speed-sensitive steering with
cooling exchanger system.
Steering diameter = 11.7 yd (10,7 m).
No. of steering wheel turns = 1.5 (to
the left and right).
Wheels
NOTE:
In order to maintain high performance
and safety level, Maserati
recommends to use tires equivalent to
the original size.
WARNING!
• The maximum speed reachable with
the tires (including winter tires) is
indicated by the tire manufacturer.
Always comply with the regulations
in force in the Country you are
driving in.
• Never exceed the maximum speed
indicated for the tires (including
winter tires): failure to respect the
max. speed may damage these tires.
Danger: risk of accident!
CAUTION!
• While respecting the specified sizes, for the safe operation of the vehicle
it is also essential that it is equipped
with the same brand and type of
tires on all wheels.
• Do not use an inner tube with Tubeless tires.
Standard Wheel Dimension
Light alloy rims 20” x 8.5J (front)
20” x 10.5J
(rear)
- Front tires 245/35 ZR 20
- Rear tires 285/35 ZR 20
- Front winter tires 245/35 ZR 20
- Rear winter tires 285/35 ZR 20
Light alloy spare rim
(optional) 18”x6J
- Spare tire 175/55 R 18
Features and Specifications
8
281
Page 293 of 296

TiresDepartment of Transportation
Uniform Tire Quality Grades. . . .189
General Information .........187
Inflation Pressure ...........284
Punctured Tire .............214
Replacement Tires ..........192
Snow Chains ..............193
Tire Pressure ..............190
Tire Pressure Checkup ........191
Tire Repair Kit .............214
Tire Safety Information .......187
Tires Durability .............192
TPMS - Tire Pressure Monitoring
System ..................194
Tread Wear Indicators ........191
Winter Tires ...............193
ToolKit ...................212
Towing the Vehicle ...........228
TPMS System ................194
Transmission, Automatic Automatic Transmission Lever . .160
Malfunction and Overheating
Conditions ................166
Transmission Manual Release of
P (Park) Position ............221
Trip - Onboard Computer .......167
Trunk Trunk Safety ...............37
Trunk Compartment Lid .........35Trunk Lid
Trunk Lid Emergency Release from
inside the Trunk .............37
Updating ....................7
USB, AUX and SD Memory Card Ports ....................132
Vehicle Identification Data Homologation Labels .........18
Vehicle Identification Number
(VIN) ....................17
Warning and Information Labels .18
Voice Commands .............156
Warning Icons .................6
Warning/Indicator Lights on TFT Display ...................126
Warnings when Driving .........14
Warranty and Service ............8
Warranty Information ..........10
Wheels Tires Maintenance ..........263
Wheels Rims Maintenance ....
.265
Windows Auto
Down/Auto Up Feature ....34
Reset Auto-Up/Down .........35
Windshield Wipers and Washers . . .89 Adding Washer, Headlight Washer
Fluid ....................243
Rain Sensing Wipers ..........90
Windshield and Headlight
Washers ..................91 Windshield Wipers
...........89
Wiper Maintenance and Blades
Replacement ..............245
Index
9
289