2019 MASERATI GRANTURISMO CONVERTIBLE light
[x] Cancel search: lightPage 38 of 296
WARNING!
• When the door is opened, the
window is automatically lowered
slightly; when the door is closed
again, the window is automatically
raised. Always ensure that
passengers (especially children) are
clear of the windows when
opening/closing the doors.
• Improper use of the power windows
can be dangerous. Ensure that
passengers are clear of the windows
before closing them. When leaving
the vehicle, always remove the key
from the ignition switch to prevent
the power windows from being
accidentally activated: this could
endanger any passengers remaining
in the vehicle.
• Never leave unattended children in a
vehicle.
• Failure of the soft top temporarily
(for approx. 10 mins) prevents
movement of the electric windows.
Once this period has elapsed, the
windows function normally. Auto-Down Feature The driver door power window switch
and some model passenger door
power window switches have an
auto-down feature.
Press the window switch to the second
detent, release, and the window will
go completely down automatically.
To open the window part way, press
the window switch to the first detent
and release it when you want the
window to stop.
To stop the window from going all the
way down during the auto-down
operation, pull up on the switch
briefly. Auto-Up Feature Lift the window switch to the second
detent, release, and the window will
go all the way up automatically.
To stop the window from going all the
way up during the auto-up operation,
push down on the switch briefly.
To close the window part way, lift the
window switch to the first detent and
release it when you want the window
to stop.
NOTE:
• Any impact due to rough road
conditions may trigger the auto
reverse function unexpectedly during
auto-closure. If this happens, pull the
switch lightly to the first detent and
hold to close the window manually.
• Before activating the alarm, ensure
that all the windows are closed; this
will help prevent the alarm being
triggered accidentally.Before Starting
2
34
Page 39 of 296
Reset Auto-Up/Down Should the auto-up/down feature stop
working, the window probably needs
to be reset.
To reset auto-up/down, pull the
window switch up to close the
window completely and push the
window switch down to open the
window completely.
If You have to Disconnect the
Battery Before disconnecting the battery,
lower the side windows by at least 1-2
in (4-5 cm) to avoid damaging the soft
top strip when opening and closing
the door.
When the battery is connected, this
operation is performed automatically
when the door is opened and closed.
The windows must remain lowered
until the charged battery is
reconnected. If the battery is
completely discharged when the
windows are fully raised, only open
the door if absolutely necessary, with
the utmost care; do not close the door
again until it is possible to lower the
window. Open and Close the Trunk
Lid Opening The trunk compartment lid can be
opened from inside or outside the
vehicle.
Button which opens the lid from
inside, is located to the left of the
steering wheel.
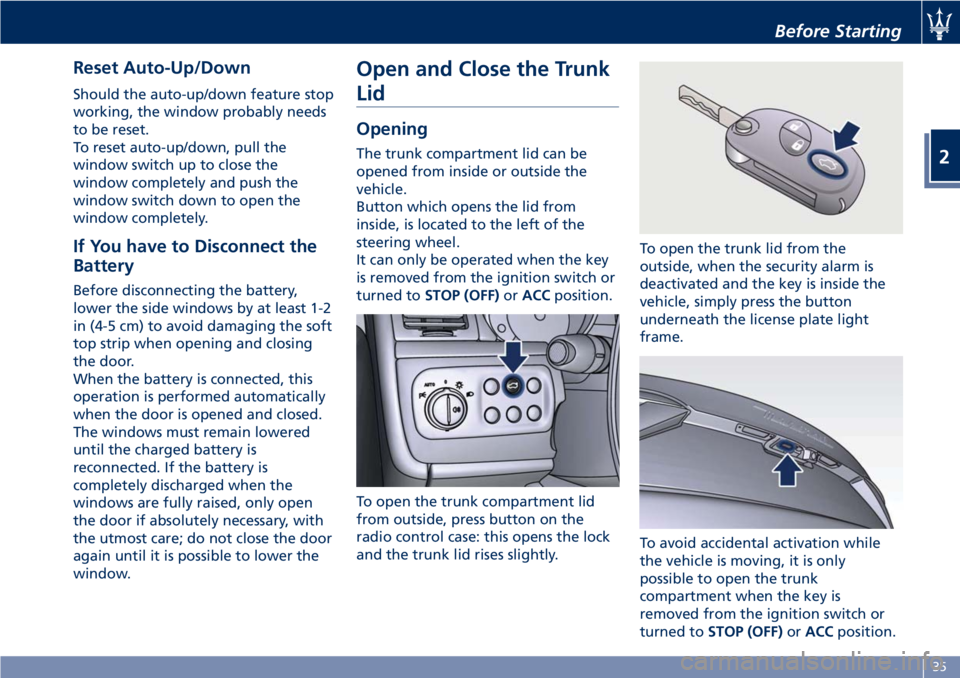
It can only be operated when the key
is removed from the ignition switch or
turned to STOP (OFF) or ACC position.
To open the trunk compartment lid
from outside, press button on the
radio control case: this opens the lock
and the trunk lid rises slightly. To open the trunk lid from the
outside, when the security alarm is
deactivated and the key is inside the
vehicle, simply press the button
underneath the license plate light
frame.
To avoid accidental activation while
the vehicle is moving, it is only
possible to open the trunk
compartment when the key is
removed from the ignition switch or
turned to STOP (OFF) or ACC position.Before Starting
2
35
Page 40 of 296

Two gas struts facilitate the lid
opening. The struts are calibrated to
ensure they function correctly with the
weights specified by the manufacturer.
The arbitrary addition of objects
(spoiler, luggage rack etc.) may impair
the lid’s correct operation and safety.
WARNING!
When using the trunk compartment,
never exceed the maximum loads
allowed (see “Technical Data" in
section "Features and Specifications”).
Also check that the objects contained
in the luggage compartment are
arranged properly.
The trunk compartment is illuminated
by
a light that comes on automatically
when the lid is opened; switching off is
timed.
If the trunk compartment lid is left
open, the light switches off after a few
minutes. To turn it on again, close the
lid and then reopen it.
NOTE:
The soft top automatic movement is
disabled when the trunk compartment
is open. Closing To close the trunk lid grasp one of the
handles as indicated on the inner
covering and lower the lid.
Then press gently on the outside of
the lid, in correspondence of the lock,
until hearing it click in place.
Emergency Opening If necessary, the trunk compartment lid
can be opened by pulling the small
cable, located underneath the left rear
seat. Once you have located the cable and
pulled it out from the seat, pull it
forward to open the trunk
compartment lid.
Independent Trunk Lid
Unlocking To allow the user to hold only the
trunk lid unlocked compared to the
doors condition, there is a dedicated
feature which can be activated by
MTC+ in “Doors & Locks” menu (see
"MTC+ Settings" in section
"Dashboard Instruments and
Controls".Before Starting
2
36
Page 41 of 296
Trunk Safety WARNING!
Do not allow children to have access
to the trunk. Always close the trunk
lid when your vehicle is unattended.
Once in the trunk, young children may
not be able to escape. If trapped in
the trunk, children can die from
suffocation or heat stroke.
Trunk Lid Emergency Release
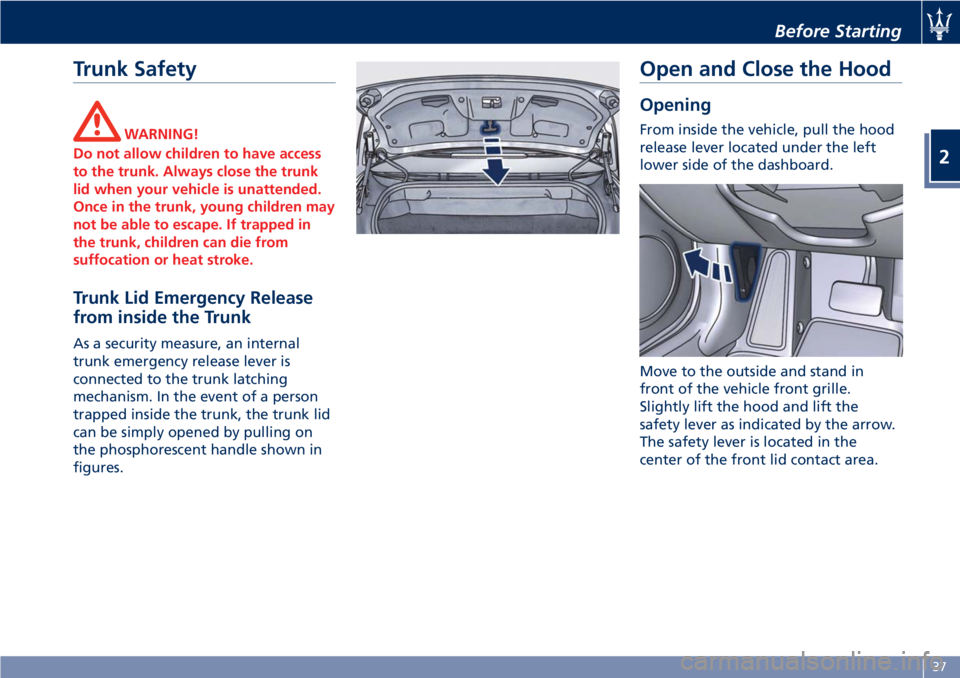
from inside the Trunk As a security measure, an internal
trunk emergency release lever is
connected to the trunk latching
mechanism. In the event of a person
trapped inside the trunk, the trunk lid
can be simply opened by pulling on
the phosphorescent handle shown in
figures. Open and Close the Hood Opening From inside the vehicle, pull the hood
release lever located under the left
lower side of the dashboard.
Move to the outside and stand in
front of the vehicle front grille.
Slightly lift the hood and lift the
safety lever as indicated by the arrow.
The safety lever is located in the
center of the front lid contact area.Before Starting
2
37
Page 42 of 296
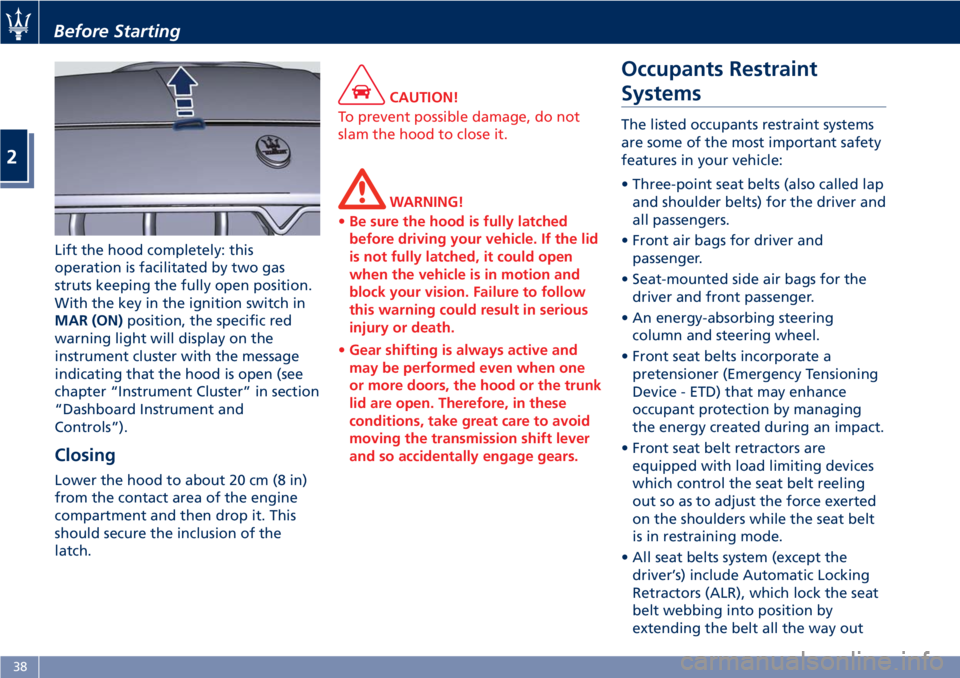
Lift the hood completely: this
operation is facilitated by two gas
struts keeping the fully open position.
With the key in the ignition switch in
MAR (ON) position, the specific red
warning light will display on the
instrument cluster with the message
indicating that the hood is open (see
chapter “Instrument Cluster” in section
“Dashboard Instrument and
Controls”).
Closing Lower the hood to about 20 cm (8 in)
from the contact area of the engine
compartment and then drop it. This
should secure the inclusion of the
latch. CAUTION!
To prevent possible damage, do not
slam the hood to close it.
WARNING!
• Be sure the hood is fully latched
before driving your vehicle. If the lid
is not fully latched, it could open
when the vehicle is in motion and
block your vision. Failure to follow
this warning could result in serious
injury or death.
• Gear shifting is always active and
may be performed even when one
or more doors, the hood or the trunk
lid are open. Therefore, in these
conditions, take great care to avoid
moving the transmission shift lever
and so accidentally engage gears. Occupants Restraint
Systems The listed occupants restraint systems
are some of the most important safety
features in your vehicle:
• Three-point seat belts (also called lap
and shoulder belts) for the driver and
all passengers.
• Front air bags for driver and
passenger.
• Seat-mounted side air bags for the
driver and front passenger.
• An energy-absorbing steering
column and steering wheel.
• Front seat belts incorporate a
pretensioner (Emergency Tensioning
Device - ETD) that may enhance
occupant protection by managing
the energy created during an impact.
• Front seat belt retractors are
equipped with load limiting devices
which control the seat belt reeling
out so as to adjust the force exerted
on the shoulders while the seat belt
is in restraining mode.
• All seat belts system (except the
driver’s) include Automatic Locking
Retractors (ALR), which lock the seat
belt webbing into position by
extending the belt all the way outBefore Starting
2
38
Page 45 of 296
• Two people should never be belted
into a single seat belt. People belted
together can crash into one another
in an accident, hurting one another
severely. Never use a lap/shoulder
belt for more than one person.
• Remember that, in the event of an
accident, the rear seat passengers
not wearing the seat belts are not
only subject to personal injuries but
also represent a serious danger for
the front seat occupants.
Three-Point Seat Belts Use Instructions
•
Enter the vehicle and close the door.
Sit back and adjust the seat.
• The seat belt latch plate is on the
rear door pillar, above the seat on
the external side (for front seats) or
on the internal side (for rear seats).
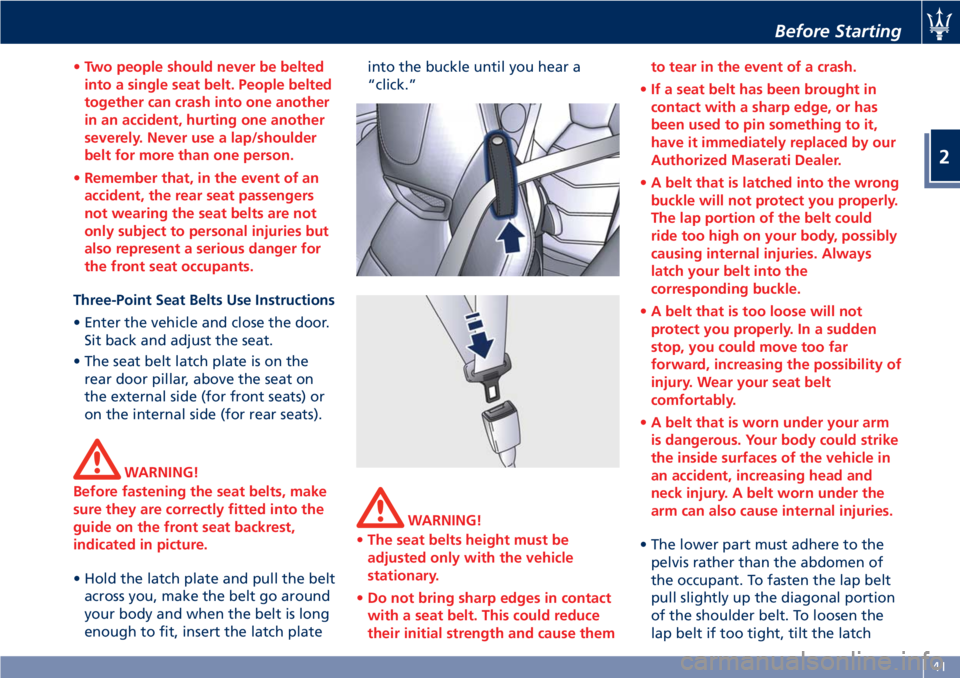
WARNING!
Before fastening the seat belts, make
sure they are correctly fitted into the
guide on the front seat backrest,
indicated in picture.
• Hold the latch plate and pull the belt
across
you, make the belt go around
your body and when the belt is long
enough to fit, insert the latch plate into the buckle until you hear a
“click.”
WARNING!
• The seat belts height must be
adjusted only with the vehicle
stationary.
• Do not bring sharp edges in contact
with a seat belt. This could reduce
their initial strength and cause them to tear in the event of a crash.
• If a seat belt has been brought in
contact with a sharp edge, or has
been used to pin something to it,
have it immediately replaced by our
Authorized Maserati Dealer.
• A belt that is latched into the wrong
buckle will not protect you properly.
The lap portion of the belt could
ride too high on your body, possibly
causing internal injuries. Always
latch your belt into the
corresponding buckle.
• A belt that is too loose will not
protect you properly. In a sudden
stop, you could move too far
forward, increasing the possibility of
injury. Wear your seat belt
comfortably.
• A belt that is worn under your arm
is dangerous. Your body could strike
the inside surfaces of the vehicle in
an accident, increasing head and
neck injury. A belt worn under the
arm can also cause internal injuries.
• The lower part must adhere to the
pelvis
rather than the abdomen of
the occupant. To fasten the lap belt
pull slightly up the diagonal portion
of the shoulder belt. To loosen the
lap belt if too tight, tilt the latchBefore Starting
2
41
Page 49 of 296

force exerted on the shoulders while
the seat belt is in restraining mode.
Seat Belt Reminder System
(SBR) The SBR system has the function to
remind the driver and the front
passenger to fasten the seat belts.
The function activates with engine
running. If the driver or front seat
passenger is unbelted, the seat belt
reminder light
and related message
will turn on in the instrument cluster
and remain on until both front seat
belts are fastened.
The warning sequence begins after
the vehicle speed is over 5 mph
(8 km/h) for more than 19 seconds, by
blinking the seat belt reminder light
and by sounding an intermittent
chime. Once the sequence starts, it will
continue for the entire duration. After
the sequence completes, the seat belt
reminder light
remain illuminated
until the respective seat belts are
fastened.
If the opened door on the driver or
passenger side is closed and the
occupant presence sensor detects a
status change from occupant not
present to occupant present the
system will repeat the warning
sequence.
The driver should instruct all other
occupants to fasten their seat belts.
If a front seat belt is unbuckled while
traveling at speeds greater than
5 mph (8 km/h), SBR system will
provide both audio and visual
notification on the instrument cluster.
The front passenger seat SBR is not
active when the front passenger seat
is not occupied. SBR may be triggered
when an animal or heavy object is on
the front passenger seat. It is
recommended to restrain pets in the
rear seat, in pet harnesses or pet
carriers that are secured by seat belts,
and properly stow cargo.
Maintaining the Seat Belts
• Always use the seat belts with the
belt completely flat, not twisted. Make sure that the belt can move
freely without jamming.
• The seat belts must be replaced
following every pretensioner
activation and whenever the belt
itself shows visible damages or
abrasions.
• Wash the seat belts by hand using
water and neutral soap, rinse them
and let them dry in the shade. Do
not use strong detergents, bleaches
or colorants and any other chemical
substance that may weaken the
fibers.
• Make sure the seat belt retractors do
not get wet: they will operate
properly only if they do not undergo
water infiltration.
Seat Belts and Pregnant
Women Seat belts should also be worn by
pregnant women: the risk of injury in
the event of an accident is greatly
reduced for them and the unborn
child if they are wearing a seat belt.
The best way to protect the fetus is to
protect the mother.
Pregnant women must position the
lower part of the belt very low down
so that it passes over the pelvis and
under the abdomen (see figure).Before Starting
2
45
Page 50 of 296

When a safety belt is worn properly, it
is more likely that baby will not be
hurt in a crash. For pregnant women,
as for anyone, the key to making
safety belts effective is wearing them
properly.
WARNING!
Pregnant women must carefully
observe the above indications, as well
as local regulation concerning the use
of seat belts. Supplemental Restraint
System - Air bags This vehicle has front and side air bags
for both the driver and front
passenger as a supplement to the seat
belt restraint systems.
The driver's front air bag is mounted in
the center of the steering wheel in the
area shown in the picture. The word
“AIRBAG” is embossed on this area for
easier recognition.
The passenger's front air bag is
mounted in the dashboard, above the
glove compartment in the area shown
in the picture. The word “AIRBAG” is
embossed on this area for easier
recognition.
This vehicle is also equipped with side
air bag for driver and passenger
chest-head protection during a side impact. The side air bags are mounted
in the front seat backrests.
The word “AIRBAG” is embossed on
this area for easier recognition.
NOTE:
After any accident, the vehicle should
be taken to an Authorized Maserati
Dealer immediately.
Air bag System Components Your vehicle is equipped with the
following air bag system components:
• Occupant Restraint Controller (ORC).
• Driver and passenger front air bag.
• Pretensioner for front seat belts.
• Driver and passenger side bag.
• Front and side impact sensors.
• Air bag system failure warning light.
• Diagnostic socket.
• Fuel cut-out inertia switch.Before Starting
2
46