2019 MASERATI GHIBLI oil
[x] Cancel search: oilPage 326 of 384

Heavy-Duty Vehicle Use If the car is mainly used under one of
the following conditions:
• off-road;
• short, repeated journeys (less than
4–5 mi/7-8 km) at sub-zero outside
temperatures;
• engine often idling or driving long
distances at low speeds or long
periods of idleness;
you should perform the following
inspections more frequently than
recommended on the “Scheduled
Service Plan”:
• check front disc brake pad conditions
and wear;
• check cleanliness of hood and trunk
locks, cleanliness and lubrication of
linkage;
• visually inspect conditions of: engine,
transmission, pipes and hoses
(exhaust - fuel system - brakes) and
rubber elements (boots - sleeves -
bushes - etc.);
• check battery charge;
• visually inspect condition of the
accessory drive belts;
• check and, if necessary, change
engine oil and replace oil filter; • check and, if necessary, replace
pollen filter of the A/C system;
• check and, if necessary, replace air
cleaner filter.
CAUTION!
All maintenance operations for the
vehicle must be carried out by an
Authorized Maserati Dealer . For
routine and minor maintenance
operations which you can carry out
yourself, make sure that you have the
necessary experience and always use
suitable equipment, original Maserati
spare parts and the prescribed fluids.
Shall this not be the case, do not carry
any operation on your own and
contact an Authorized Maserati
Dealer .
On Board Diagnostic System Your vehicle is equipped with a
sophisticated on board diagnostic
system called OBD II. This system
monitors the performance of the
emissions, engine, and automatic
transmission control systems. When
these systems are operating properly,
your vehicle will provide excellent
performance and fuel economy, as well as engine emissions suited to
current government regulations.
If any of these systems require service,
the OBD II system will turn on the
Malfunction Indicator Light
on the
instrument cluster display (refer to
“Instrument Cluster” in section
“Dashboard Instruments and
Controls”). The system stores as well
diagnostic codes and other
information to assist your service
technician by performing repairs.
Although the vehicle will be driveable
and will not need towing, contact an
Authorized Maserati Dealer for service
as soon as possible.
CAUTION!
• Prolonged driving with the MIL
on could cause further damage to
the emissions control system. It could
also affect fuel economy and
driveability. The vehicle must be
serviced before any emissions tests
can be performed.
• If the MIL
is flashing while the
engine is running, severe catalytic
converter damage and power loss
will soon occur. Immediate service at
an Authorized Maserati Dealer is
required.Maintenance and Care
7
322
Page 329 of 384

Maintenance Service
Components 1 Engine oil dipstick.
2 Engine oil filler neck.
3 Air cleaner filters.
4 Engine coolant expansion
reservoir cap. 5 Coolant reservoir cap for
transmission cooling system.
6 Washer fluid reservoir cap.
7 Brake fluid reservoir access
cover.
8 A/C pollen filter access cover.
9 Integrated power module
(fuses). Level Checks ENVIRONMENTAL!
• The engine oils and fluids used
contain substances that are
dangerous to the environment. For
replacement you are advised to
contact the Authorized Maserati
Dealer, where all the necessary
equipment is available to dispose of
the used oil and fluids in compliance
with the regulations in force and in
an environment-friendly manner.
• All equipment used for fluids
replacement (gloves, cloths,
containers, etc) must be disposed of
in compliance with the regulations
in force.
Engine Coolant Level Check
Your vehicle has been equipped with
an improved engine coolant
(antifreeze) that offers high
protection against corrosion, freezing
and allows extended maintenance
intervals. To prevent reducing
extended maintenance periods, it is
important to use original engine
coolant (antifreeze) when adding
coolant throughout the life of your
vehicle.Maintenance and Care
7
325
Page 332 of 384

The fluid reservoir may contain nearly
3.7 Quarts (3.5 litres) of washer fluid.
• Remove the reservoir cap in the
engine compartment and lift the
filler neck.
• Fill the reservoir with windshield
washer solvent (refer to “Refillings”
in section “Features and
Specifications”) and operate the
system for a few seconds to flush out
the residual water. • When refilling the washer fluid
reservoir, apply some washer fluid to
a cloth or towel and wipe the wiper
blades clean. This will help blade
performance.
To prevent freeze-up of your
windshield washer system in cold
weather, select a solution or mixture
that meets or exceeds the temperature
range of your climate. This rating
information can be found on most
washer fluid containers.
NOTE:
The Authorized Maserati Dealer can
provide you with information about
the Maserati recommended
“Windshield Washer Fluid” with
antifreeze, available in the “Genuine
Accessories” catalog.
WARNING!
• Commercially available windshield
washer solvents are flammable. They
could ignite and burn you. Care must
be exercised when filling or when
working around the windshield
washer system.
• Do not drive with the windshield
washer reservoir empty: the action
of the washer is essential for improving visibility when driving.
WARNING!
California Proposition 65
Operating, servicing and maintaining
a passenger vehicle or off-road vehicle
can expose you to chemicals including
such as, engine exhaust, carbon
monoxide, phthalates and lead, that
which are known to the State of
California to cause cancer and birth
defects or other reproductive harm. To
minimize exposure, avoid breathing
exhaust, do not idle the engine except
as necessary, service your vehicle in a
well-ventilated area and wear gloves
or wash your hands frequently when
servicing your vehicle. For more
information go to:
www.P65Warnings.ca.gov/passenger-
vehicle
Engine Oil Level Check
T
o assure
proper lubrication of your
vehicle's engine, the engine oil must
be maintained at the correct level.
If the
warning light illuminates
and the related message of low oil
level displays, or during scheduled
services (see “Scheduled MaintenanceMaintenance and Care
7
328
Page 333 of 384

Service” in this section) it is necessary
to check the engine oil level.
The best time to check the engine oil
level is about five minutes after a fully
warmed up engine is shut off or
before starting the engine after it has
sat overnight. In both cases the vehicle
should be parked on level ground to
improve the accuracy of the oil level
readings.
CAUTION!
• Do not top up with oil with different
characteristics than the engine one
(refer to “Refillings” in section
“Features and Specifications”).
• Overfilling or underfilling the oil pan
will cause aeration or loss of oil
pressure. This could damage your
engine.
• Do not add any supplemental
materials to the engine oil. Engine
oil is an engineered product, and its
performance may be impaired by
supplemental additives.
• Remove the dipstick and clean it
with
a dry
and clean cloth. • Re-insert the dipstick completely and
remove: the oil level should maintain
between the “MIN” and “MAX”
reference ranges (SAFE range).
• If a refilling is necessary: unscrew the
filler neck cap. • Adding 1.1 Quart (1 liter) of oil
when the level is at the bottom of
the SAFE range will result in the
level being at the top of the SAFE
range.
• Return the cap and dipstick to their
position and wait for a few minutes
to allow the oil to reach the oil pan.
• Check the level again.
Engine Oil Filter Replacement
The engine oil filter should be
replaced with a new filter at every oil
change.
Contact the Authorized Maserati
Dealer to perform this service.
Automatic Transmission Oil Check
Contact the Authorized Maserati
Dealer for the oil level check.Maintenance and Care
7
329
Page 335 of 384

CAUTION!
Failure to replace the filter may
considerably reduce the air
conditioning and heating system
efficiency.
Wiper Maintenance and Blades
Replacement Windshield Wiper Arms Lifting
When the windshield wiper arms are
in rest position it is not possible to
check or replace the blades as they
remain under the engine hood.
To service the blades it is necessary to
move the wiper arms in “Service”
position (see chapter “Wipers and
Washers” in section “Understanding
the Vehicle”). In this way it is possible
to lift the arms for cleaning or
replacing the wiper blades.
WARNING!
It is dangerous to operate or service
the wiper blades with the windshield
wipers in an active position (any
position different from “OFF”) and
with the ignition switch in the RUN
position. The rain sensors may
suddenly activate the wipers. Always use the “Service” position for any
intervention on the windshield wiper
blades.
Windshield Wiper Maintenance
Life
expectancy of
wiper blades varies
depending on the geographical area’s
weather conditions where the car is
used and frequency of use. Poor
performance of blades may be present
with chattering, marks on the glass,
water lines or wet spots. If any of
these conditions are present, clean the
wiper blades or replace if necessary.
Clean the rubber edges of the wiper
blades and the windshield/rear
window glasses periodically with a
sponge or soft cloth and a mild
nonabrasive cleaner. This will remove
accumulations of salt or road film.
Operation of the wipers on dry glass
for long periods may cause
deterioration of the wiper blades.
Always use washer fluid when using
the wipers to remove salt or dirt from
a dry windshield.
Avoid using the wiper blades to
remove frost or ice from the
windshield. Keep the blade rubber out
of contact with petroleum products
such as engine oil, gasoline, etc. Spray nozzles
If the jet does not work, first check
that there is fluid in the tank (see
paragraph “Level checks” in this
section) then check that the nozzles
are not clogged.
Windshield Wiper Blades Replacement
• Move the wiper arms into “Service”
position, (see chapter “Windshield
Wipers and Washers” in section
“Understanding the Vehicle”) and
lift them.
• Press the indicated button, slip off
the blade support from the arm and
replace it.
• Return the blade to its original
position on the windshield.
• Turn the multifunction lever to one
of the automatic settings (see
chapter “Windshield Wipers and
Washers” in section “UnderstandingMaintenance and Care
7
331
Page 343 of 384
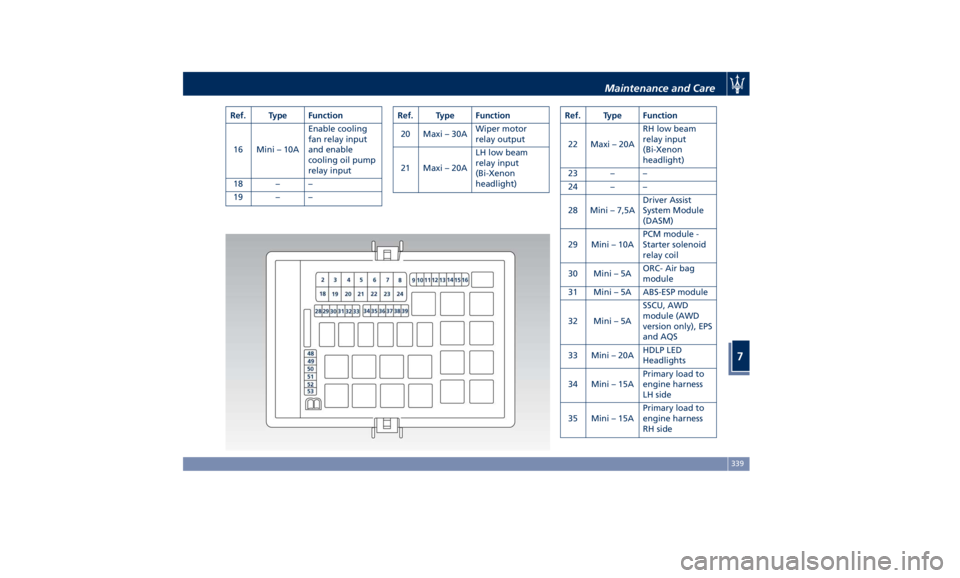
Ref. Type Function
16 Mini – 10A Enable cooling
fan relay input
and enable
cooling oil pump
relay input
18 – –
19 – – Ref. Type Function
20 Maxi – 30A Wiper motor
relay output
21 Maxi – 20A LH low beam
relay input
(Bi-Xenon
headlight) Ref. Type Function
22 Maxi – 20A RH low beam
relay input
(Bi-Xenon
headlight)
23 – –
24 – –
28 Mini – 7,5A Driver Assist
System Module
(DASM)
29 Mini – 10A PCM module -
Starter solenoid
relay coil
30 Mini – 5A ORC- Air bag
module
31 Mini – 5A ABS-ESP module
32 Mini – 5A SSCU, AWD
module (AWD
version only), EPS
and AQS
33 Mini – 20A HDLP LED
Headlights
34 Mini – 15A Primary load to
engine harness
LH side
35 Mini – 15A Primary load to
engine harness
RH sideMaintenance and Care
7
339
Page 344 of 384

Ref. Type Function
36 Mini – 30A PCM module
primary load
37 Mini – 15A Engine secondary
load
38 Mini – 15A Lambda sensor
39 Mini – 7,5A Flow meters,
tank lackage,
canister, exhaust
by-pass valve and
relay coil
48 – –
49 Mini – 10A Pedal brake
switch - TCM
module
50 Mini – 15A +30 PCM module
51 Mini – 30A Fuel pump relay
input
52 Mini – 5A Starter solenoid
signal for PCM
and voltage
stabilizer
53 Mini – 10A AWD module
(AWD version
only) Rear Power Distribution Center • To access the center it is necessary to
lift the ground coverage of the trunk
compartment and remove the access
cover (refer “Maintenance Free
Battery” in this section).
• To access the fuses, unhooking the
cover lock shown in picture.
• Press the release latch and lift the lid
from this side.
• Push the lid toward the right side to
release the indicated latches on the
unit. The table points out the position as
featured in the figure, the type and
function of the fuses on the rear area
distribution control unit.
Ref. Type Function
2 Maxi – 40A BCM module
3 Maxi – 40A BCM module
4 Maxi – 30A BCM module
5 Maxi – 30A BCM module
6 Maxi – 20A Sunroof module
7 Maxi – 30A Driver door
module
8 Maxi – 30A Passenger door
module
9 Maxi – 40A Start&Stop:
voltage stabilizer,
dashboardMaintenance and Care
7
340
Page 345 of 384

Ref. Type Function
10 Maxi – 40A Start&Stop:
voltage stabilizer,
body Ref. Type Function
11 Maxi – 40A “High Premium”
stereo amplifier
unit
Maxi – 20A “Premium”
stereo amplifier
unit (1)
15 Maxi – 40A HVAC front
blower relay coil Ref. Type Function
16 Maxi – 40A Rear window
defrost relay coil
(HVAC module)
17 Maxi – 30A Rear LH door
module
18 Maxi – 30A Rear RH door
module
19 – –
20 Maxi – 20A “Premium”
stereo amplifier
unit (2)
21 – –
22 – –
23 Mini – 10A Fuel door relay
and RF Hub
module
24 Mini – 10A ITM module,
ceiling light units
(front and rear),
rain/lights sensor
25 – –
26 – –
27 – –
31 Mini – 25A LH front seat
movement
32 – –
33 – –Maintenance and Care
7
341