Page 133 of 627

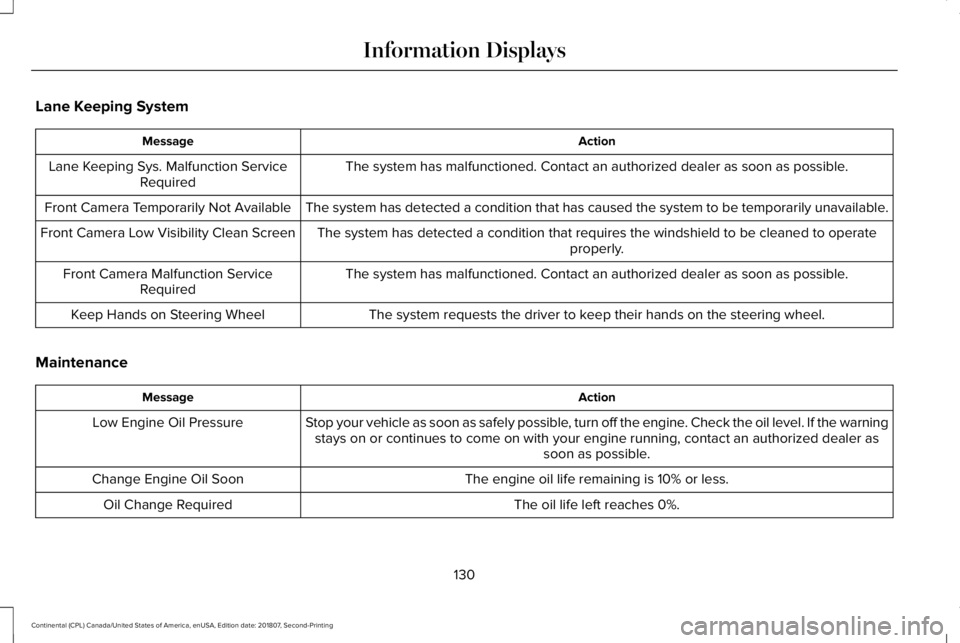
Lane Keeping System
Action
Message
The system has malfunctioned. Contact an authorized dealer as soon as po\
ssible.
Lane Keeping Sys. Malfunction Service
Required
The system has detected a condition that has caused the system to be tem\
porarily unavailable.
Front Camera Temporarily Not Available
The system has detected a condition that requires the windshield to be c\
leaned to operateproperly.
Front Camera Low Visibility Clean Screen
The system has malfunctioned. Contact an authorized dealer as soon as po\
ssible.
Front Camera Malfunction Service
Required
The system requests the driver to keep their hands on the steering wheel.
Keep Hands on Steering Wheel
Maintenance Action
Message
Stop your vehicle as soon as safely possible, turn off the engine. Check the oil level. If the warningstays on or continues to come on with your engine running, contact an au\
thorized dealer as soon as possible.
Low Engine Oil Pressure
The engine oil life remaining is 10% or less.
Change Engine Oil Soon
The oil life left reaches 0%.
Oil Change Required
130
Continental (CPL) Canada/United States of America, enUSA, Edition date: 201807, Second-Printing Information Displays
Page 136 of 627

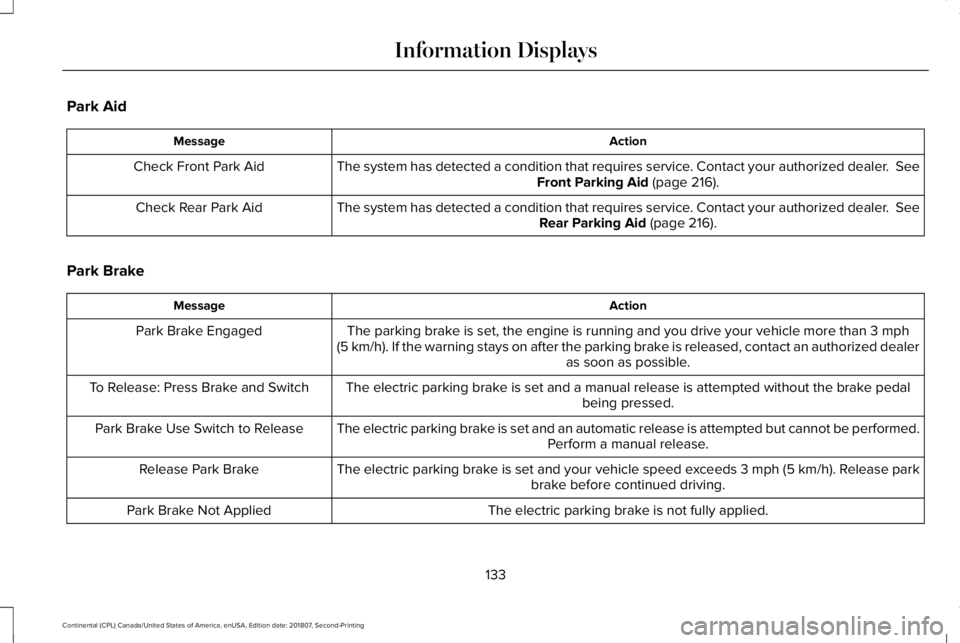
Park Aid
Action
Message
The system has detected a condition that requires service. Contact your authorized dealer. See
Front Parking Aid (page 216).
Check Front Park Aid
The system has detected a condition that requires service. Contact your authorized dealer.
See
Rear Parking Aid (page 216).
Check Rear Park Aid
Park Brake Action
Message
The parking brake is set, the engine is running and you drive your vehicle more than
3 mph
(5 km/h). If the warning stays on after the parking brake is released, contact an authorized dealer as soon as possible.
Park Brake Engaged
The electric parking brake is set and a manual release is attempted without the brake pedal being pressed.
To Release: Press Brake and Switch
The electric parking brake is set and an automatic release is attempted but cannot be performed.Perform a manual release.
Park Brake Use Switch to Release
The electric parking brake is set and your vehicle speed exceeds 3 mph (5 km/h)
. Release park
brake before continued driving.
Release Park Brake
The electric parking brake is not fully applied.
Park Brake Not Applied
133
Continental (CPL) Canada/United States of America, enUSA, Edition date: 201807, Second-Printing Information Displays
Page 140 of 627

Tire Pressure Monitoring System
Action
Message
One or more tires on your vehicle have low tire pressure. See Tire Pressure Monitoring System (page 357).
Tire Pressure Low
The tire pressure monitoring system is malfunctioning. If the warning st\
ays on or continues tocome on, contact an authorized dealer.
See Tire Pressure Monitoring System (page 357).
Tire Pressure Monitor Fault
A tire pressure sensor is malfunctioning, or your spare tire is in use. For more information on
how the system operates under these conditions, See Tire Pressure Monitoring System (page
357
). If the warning stays on or continues to come on, contact an authorized \
dealer as soon as possible.
Tire Pressure Sensor Fault
Transmission Action
Message
You switched the engine off and shift select lever is in any position oth\
er than park (P).
Shift to Park
Transmission is too cold. Wait for it to warm up before you drive.
Transmission Warming Up Please Wait
Displays when the brake pedal needs to be depressed.
Press Brake Pedal
The transmission is overheating and needs to cool. Stop in a safe place as soon as it’ s possible.
Transmission Over Temperature Stop
Safely
See an authorized dealer.
Transmission Service Required
137
Continental (CPL) Canada/United States of America, enUSA, Edition date: 201807, Second-Printing Information Displays
Page 143 of 627

Navigation Display Area.
D
Status Bar.
E
Speedometer Display Area.
F
Signaling and Traffic Indication
Displays direction indicators, blind spot
information (if direction indicators are active)
and cross traffic alert.
Left Information Group
Displays incoming call information.
ADAS Display Area
Displays ACC and lane keeping system
status and warnings.
Navigation Display Area
Displays navigation next turn instructions. Status Bar
Displays distance to empty (DTE), time and
outside air temperature. Next to DTE, the
fuel gauge fill color changes to yellow in low
fuel conditions. You can switch off the status
bar in the HUD settings menu.
Speedometer Display Area
Displays current vehicle speed, speed limit
(if available in the map database) and your
transmission gear selection.
Configuring The Head Up Display
You can control the system's options through
the information display by using the HUD,
OK and arrow buttons on the right-hand side
of your steering wheel.
See General
Information (page 112). You can adjust the
display according to your height to make
viewing the content easier. You can also
adjust what content displays and the
brightness of the content. The system's
options appear in the instrument cluster
while the updates happen in the HUD. Note:
If HUD On is unchecked, other options
of the system are hidden.
Note: The HUD menu automatically closes
after a certain period of inactivity.
Note: The HUD image brightness
automatically adjusts to the brightness of
the ambient environment. You have the
ability to adjust the brightness further
according to your preference.
Note: In some instances, sunlight can cause
some reflections in and around the HUD
image.
140
Continental (CPL) Canada/United States of America, enUSA, Edition date: 201807, Second-Printing Information Displays
Page 153 of 627

SITTING IN THE CORRECT
POSITION
WARNING: Sitting improperly, out of
position or with the seatback reclined too
far can take weight off the seat cushion
and affect the decision of the passenger
sensing system, resulting in serious injury
or death in the event of a crash. Always sit
upright against your seat back, with your
feet on the floor. WARNING:
Do not recline the
seatback too far as this can cause the
occupant to slide under the seatbelt,
resulting in serious injury in the event of a
collision. WARNING:
Do not place objects
higher than the top of the seat backrest.
Failure to follow this instruction could result
in personal injury or death in the event of
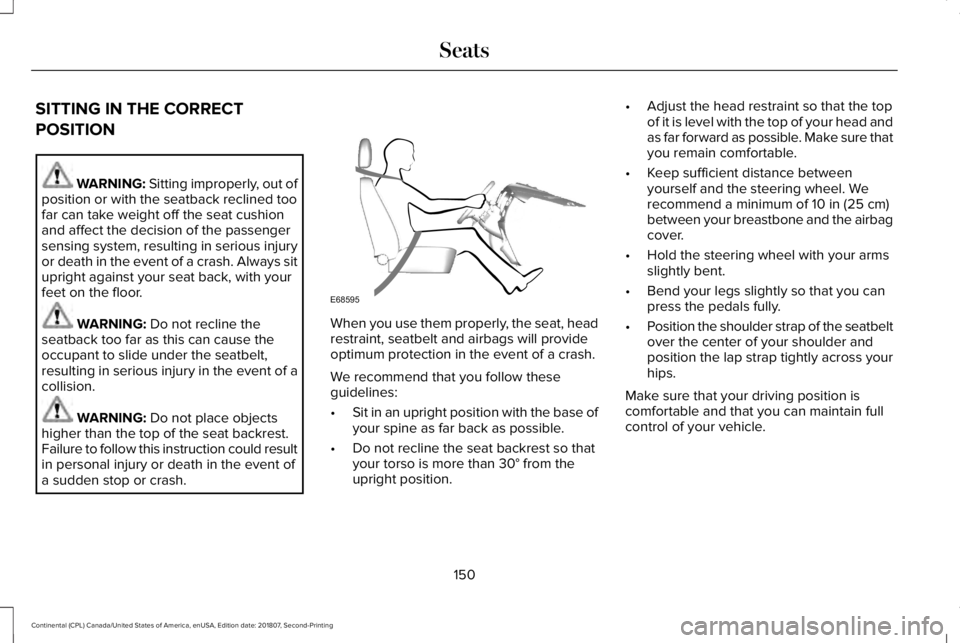
a sudden stop or crash. When you use them properly, the seat, head
restraint, seatbelt and airbags will provide
optimum protection in the event of a crash.
We recommend that you follow these
guidelines:
•
Sit in an upright position with the base of
your spine as far back as possible.
• Do not recline the seat backrest so that
your torso is more than
30° from the
upright position. •
Adjust the head restraint so that the top
of it is level with the top of your head and
as far forward as possible. Make sure that
you remain comfortable.
• Keep sufficient distance between
yourself and the steering wheel. We
recommend a minimum of
10 in (25 cm)
between your breastbone and the airbag
cover.
• Hold the steering wheel with your arms
slightly bent.
• Bend your legs slightly so that you can
press the pedals fully.
• Position the shoulder strap of the seatbelt
over the center of your shoulder and
position the lap strap tightly across your
hips.
Make sure that your driving position is
comfortable and that you can maintain full
control of your vehicle.
150
Continental (CPL) Canada/United States of America, enUSA, Edition date: 201807, Second-Printing SeatsE68595
Page 154 of 627

HEAD RESTRAINTS
WARNING: Fully adjust the head
restraint before you sit in or operate your
vehicle. This will help minimize the risk of
neck injury in the event of a crash. Do not
adjust the head restraint when your vehicle
is moving. WARNING:
The head restraint is a
safety device. Whenever possible it should
be installed and properly adjusted when
the seat is occupied. Failure to adjust the
head restraint properly could reduce its
effectiveness during certain impacts.
Note: Adjust the seat backrest to an upright
driving position before adjusting the head
restraint. Adjust the head restraint so that
the top of it is level with the top of your head
and as far forward as possible. Make sure
that you remain comfortable. If you are
extremely tall, adjust the head restraint to
its highest position. Front Seat Manual Head Restraints
(If
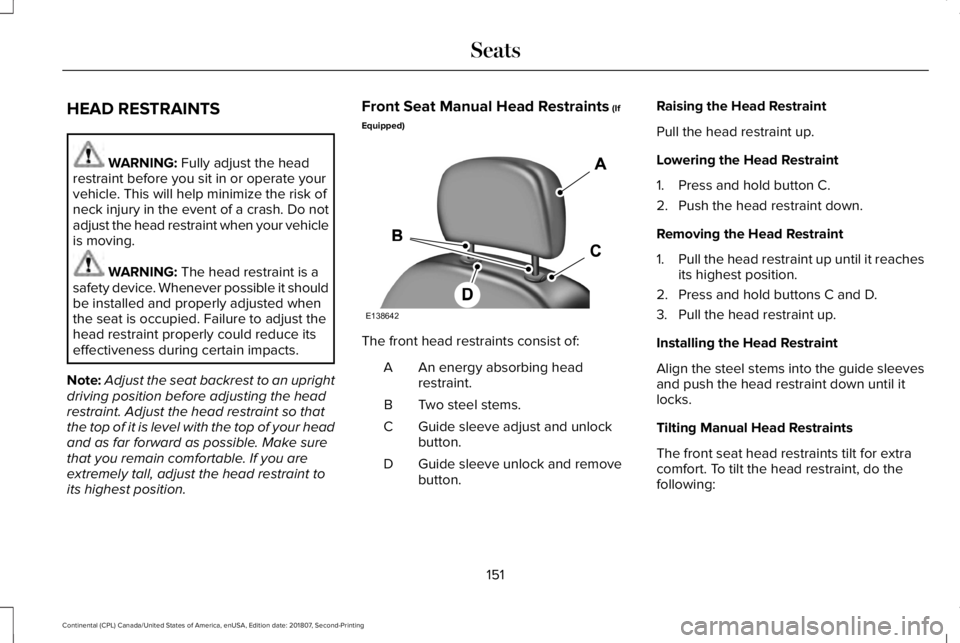
Equipped) The front head restraints consist of:
An energy absorbing head
restraint.
A
Two steel stems.
B
Guide sleeve adjust and unlock
button.
C
Guide sleeve unlock and remove
button.
D Raising the Head Restraint
Pull the head restraint up.
Lowering the Head Restraint
1. Press and hold button C.
2. Push the head restraint down.
Removing the Head Restraint
1.
Pull the head restraint up until it reaches
its highest position.
2. Press and hold buttons C and D.
3. Pull the head restraint up.
Installing the Head Restraint
Align the steel stems into the guide sleeves
and push the head restraint down until it
locks.
Tilting Manual Head Restraints
The front seat head restraints tilt for extra
comfort. To tilt the head restraint, do the
following:
151
Continental (CPL) Canada/United States of America, enUSA, Edition date: 201807, Second-Printing SeatsE138642
Page 157 of 627
Power Rear Head Restraints (If Equipped)
Press the button on the overhead console
to fold the rear outermost head restraints.
Note:
If your vehicle has power rear head
restraints, you cannot remove them. POWER SEATS WARNING: Do not adjust the driver
seat or seat backrest when your vehicle is
moving. This may result in sudden seat
movement, causing the loss of control of
your vehicle. WARNING:
Do not place cargo or
any objects behind the seatback before
returning it to the original position.
The power seat controls are on the door. 30-Way Seat Controls Memory Function.
A
Head Restraints.
B
Upper Seat Backrest.
C
Multi-Contour.
D
Seat Cushion Adjustment.
E
Power Seats.
F
Recline.
G
154
Continental (CPL) Canada/United States of America, enUSA, Edition date: 201807, Second-Printing SeatsE229803 E254492
Page 163 of 627

You can also adjust this feature through the
touchscreen.
Press the Menu Settings icon, then
Vehicle. Choose Multi-Contour
Seats.
When switched on, the system displays
directions for you to adjust the lumbar
settings in your seat or to set the massage
function.
To access and make adjustments to the
lumbar setting:
1. Choose the desired seat to adjust.
2. Press the + or - to adjust the lumbar intensity.
To access and make adjustments to the
massage setting:
1. Press the Menu Settings icon, then Vehicle. Choose Multi-Contour Seats.
2. Choose the desired seat to adjust.
3. Press OFF, Low or High. MEMORY FUNCTION WARNING: Before activating the
memory seat, make sure that the area
immediately surrounding the seat is clear
of obstructions and that all occupants are
clear of moving parts. WARNING:
Do not use the memory
function when your vehicle is moving.
This feature automatically recalls the position
of the following:
• Driver seat.
• Power mirrors.
• Power steering column.
The memory control is on the driver door. Saving a Preset Position
1. Switch the ignition on.
2. Adjust the memory features to your
desired position.
3. Press and hold the desired preset button
until you hear a single tone.
160
Continental (CPL) Canada/United States of America, enUSA, Edition date: 201807, Second-Printing SeatsE142607 E222235