2019 LINCOLN CONTINENTAL instrument cluster
[x] Cancel search: instrument clusterPage 196 of 627
A message will appear in your information
display screen when your vehicle has
entered Stay in Neutral mode.
Note:
During this mode the N button will
flash continuously and your instrument
cluster will display
N as the selected gear.
Exiting Stay in Neutral mode
To disable Stay in Neutral mode select
another gear. See the
Putting the Vehicle
in Gear for instructions on how to do this.
Entering a Carwash
Note: Always put your vehicle in Stay in
Neutral mode when entering an automatic
car wash. Failure to do this could result in
vehicle damage not covered by warranty.
Drive (D)
The normal driving position for the best fuel
economy.
Sport (S)
Putting the vehicle in sport (S): •
Provides additional engine braking and
extends lower gear operation to enhance
performance for uphill climbs, hilly terrain
or mountainous areas. This will increase
engine RPM during engine braking.
• Provides additional lower gear operation
through the automatic transmission shift
strategy.
• Provides gear selection more quickly and
at higher engine speeds.
SelectShift™ Automatic Transmission
Your vehicle is equipped with a SelectShift
Automatic transmission gearshift lever. The
SelectShift Automatic transmission gives you
the ability to change gears up or down as
desired. In order to prevent the engine from running
at too low an RPM, which may cause it to
stall, SelectShift still automatically makes
some downshifts if it has determined that
you have not downshifted in time. Although
SelectShift makes some downshifts for you,
it still allows you to downshift at any time as
long as the SelectShift determines that
damage will not be caused to the engine
from over-revving.
Note:
Engine damage may occur if you
maintain excessive engine revving without
shifting.
SelectShift does not automatically upshift,
even if the engine is approaching the RPM
limit. It must be shifted manually by pressing
the + button. Notice should be taken of the
shift indicator lamp, which alerts the driver
when to shift to ensure the highest level of
efficiency and fuel economy.
Pull the + paddle on the steering wheel to
activate SelectShift.
• Pull the right paddle (+) to upshift.
• Pull the left paddle (–) to downshift.
193
Continental (CPL) Canada/United States of America, enUSA, Edition date: 201807, Second-Printing Transmission
Page 198 of 627
The instrument cluster displays your currently
selected gear. If a gear is requested but not
available due to vehicle conditions (low
speed, too high engine speed for requested
gear selection), the current gear will flash
three times.
Note:
At full accelerator pedal travel the
transmission will auto downshift to ensure
maximum performance.
Brake-Shift Interlock Override WARNING: When doing this
procedure, you need to take the
transmission out of park (P) which means
your vehicle can roll freely. To avoid
unwanted vehicle movement, always fully
apply the parking brake prior to doing this
procedure. Use wheels chocks if
appropriate. WARNING:
Do not drive your vehicle
until you verify that the stoplamps are
working. WARNING:
If the parking brake is
fully released, but the brake warning lamp
remains illuminated, the brakes may not
be working properly. Have your vehicle
checked as soon as possible.
Note: See your authorized dealer as soon
as possible if this procedure is used.
Note: For some markets this feature is not
available.
Note: This feature only operates if your
12-volt battery has power. If the vehicle
battery voltage is not sufficient, use an
external 12 volt power source (for example,
jumper cables, a battery charger or jump
pack) to operate interlock override switch.
Use the brake-shift interlock override to
move your transmission from the park
position in the event of an electrical
malfunction. If your vehicle has a dead
battery, you need to use an external power
source.
1. Apply the parking brake and turn your ignition off before performing this
procedure. 2. Locate your brake-shift interlock access
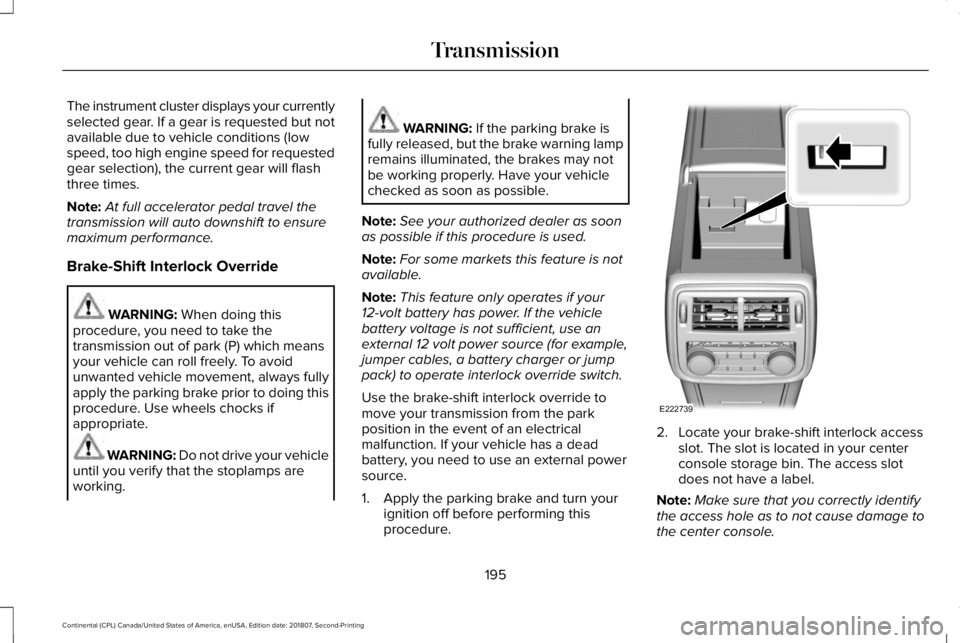
slot. The slot is located in your center
console storage bin. The access slot
does not have a label.
Note: Make sure that you correctly identify
the access hole as to not cause damage to
the center console.
195
Continental (CPL) Canada/United States of America, enUSA, Edition date: 201807, Second-Printing TransmissionE222739
Page 214 of 627
Press the Auto Hold button to switch the
system on and off. The Auto Hold indicator
light illuminates in the Auto Hold button
when the system is on.
Note:
You can only switch Auto Hold on if
you close the door and fasten your seatbelt.
Note: The system remembers the last setting
when you start your vehicle.
Note: When in reverse (R), Auto Hold does
not function.
When Auto Hold is off, your vehicle behaves
the same as a vehicle without Auto Hold.
There is an Auto Hold indicator lamp in the
instrument cluster that has two modes, active
and unavailable. The Auto Hold (ACTIVE) indicator
light illuminates in the information
display when the system holds
your vehicle stationary. When in active mode,
press the brake pedal and the Auto Hold
button to switch Auto Hold off. The Auto Hold (UNAVAILABLE)
indicator light illuminates in the
information display when the
system is on but unavailable to hold your
vehicle (for example, during Active Park
Assist, Stay in Neutral Mode, or when you
do not fasten your seatbelt or close the
door).
Note: Make sure you switch off Auto Hold
or use the Stay in Neutral mode before you
enter a car wash. See Automatic
Transmission (page 191).
Using Auto Hold
1. Bring your vehicle to a stop by pressing the brake pedal. After coming to a stop,
the green Auto Hold (ACTIVE) indicator
lamp illuminates in the information
display.
2. Release the brake pedal. The Auto Hold
(ACTIVE) indicator light remains
illuminated in the information display and
Auto Hold will hold your vehicle at a stop. 3. When you press the accelerator pedal,
Auto Hold releases the brakes and allows
you to drive off. Once you drive off, the
green Auto Hold (ACTIVE) indicator no
longer illuminates in the information
display.
211
Continental (CPL) Canada/United States of America, enUSA, Edition date: 201807, Second-Printing BrakesE197933 E197934
Page 239 of 627
WARNING: Adaptive cruise control
only warns of vehicles detected by the
radar sensor. In some cases there may be
no warning or a delayed warning. You
should always apply the brakes when
necessary. Failure to do so may result in a
crash, serious injury or death.
When a vehicle ahead of you enters the
same lane or a slower vehicle is ahead in the
same lane, the vehicle speed adjusts to
maintain a preset gap distance. A vehicle
graphic illuminates in the instrument cluster.
Note: The brakes may emit noise when
applied by the system.
Note: When you are following a vehicle and
you switch on a direction indicator, adaptive
cruise control may provide a small temporary
acceleration to help you pass. Your vehicle maintains a consistent gap from
the vehicle ahead until:
•
The vehicle in front of you accelerates to
a speed above the set speed.
• The vehicle in front of you moves out of
the lane you are in.
• You set a new gap distance.
The system applies the brakes to slow your
vehicle to maintain a safe gap distance from
the vehicle in front. The system only applies
limited braking. You can override the system
by applying the brakes.
If the system determines that its maximum
braking level is not sufficient, an audible
warning sounds, a message appears in the
information display and an indicator flashes
when the system continues to brake. Take
immediate action.
Following a Vehicle to a Complete Stop
If your vehicle follows a vehicle to a complete
stop and remains stationary for less than
three seconds, your vehicle accelerates from
a stationary position to follow the vehicle
ahead. If your vehicle follows a vehicle to
a complete stop and remains
stationary for more than three
seconds, press to follow the vehicle ahead.
Or press the accelerator pedal.
Setting the Gap Distance
You can decrease or increase the distance
between your vehicle and the vehicle in front
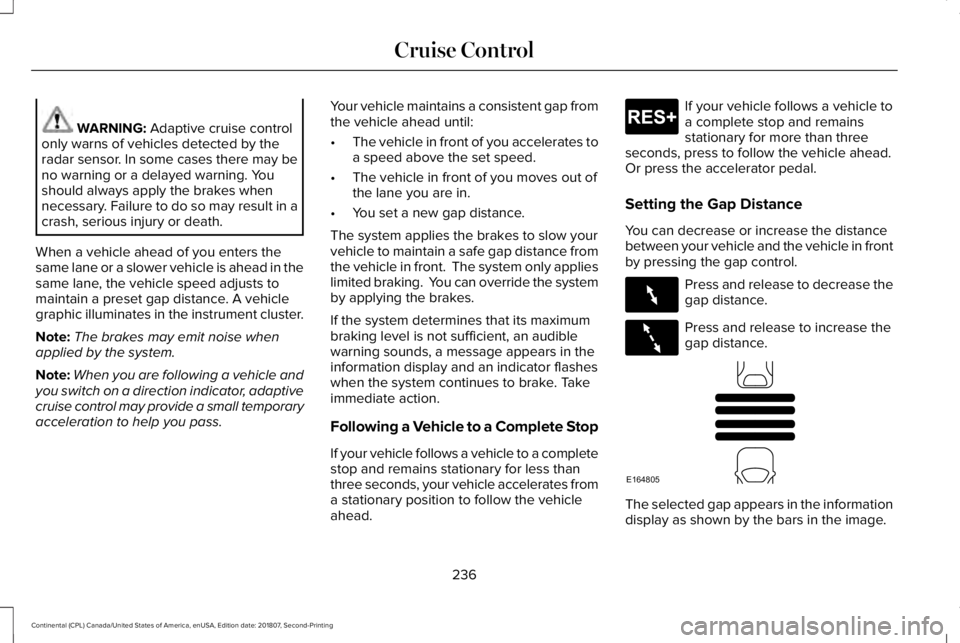
by pressing the gap control. Press and release to decrease the
gap distance.
Press and release to increase the
gap distance.
The selected gap appears in the information
display as shown by the bars in the image.
236
Continental (CPL) Canada/United States of America, enUSA, Edition date: 201807, Second-Printing Cruise ControlE265299 E263697 E263696 E164805
Page 307 of 627
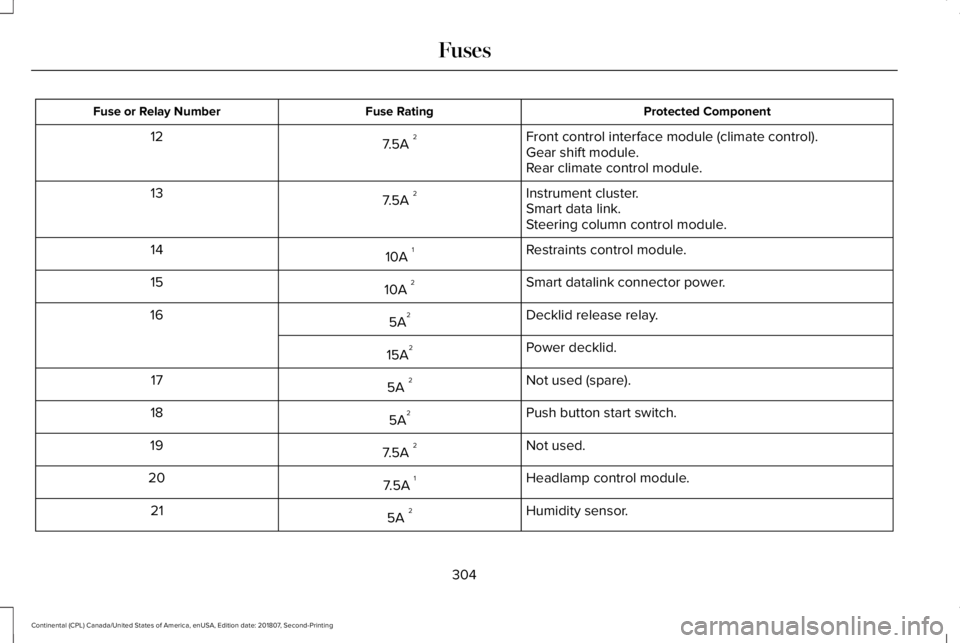
Protected Component
Fuse Rating
Fuse or Relay Number
Front control interface module (climate control).
7.5A 2
12
Gear shift module.
Rear climate control module.
Instrument cluster.
7.5A 2
13
Smart data link.
Steering column control module.
Restraints control module.
10A 1
14
Smart datalink connector power.
10A 2
15
Decklid release relay.
5A 2
16
Power decklid.
15A 2
Not used (spare).
5A 2
17
Push button start switch.
5A 2
18
Not used.
7.5A 2
19
Headlamp control module.
7.5A 1
20
Humidity sensor.
5A 2
21
304
Continental (CPL) Canada/United States of America, enUSA, Edition date: 201807, Second-Printing Fuses
Page 321 of 627
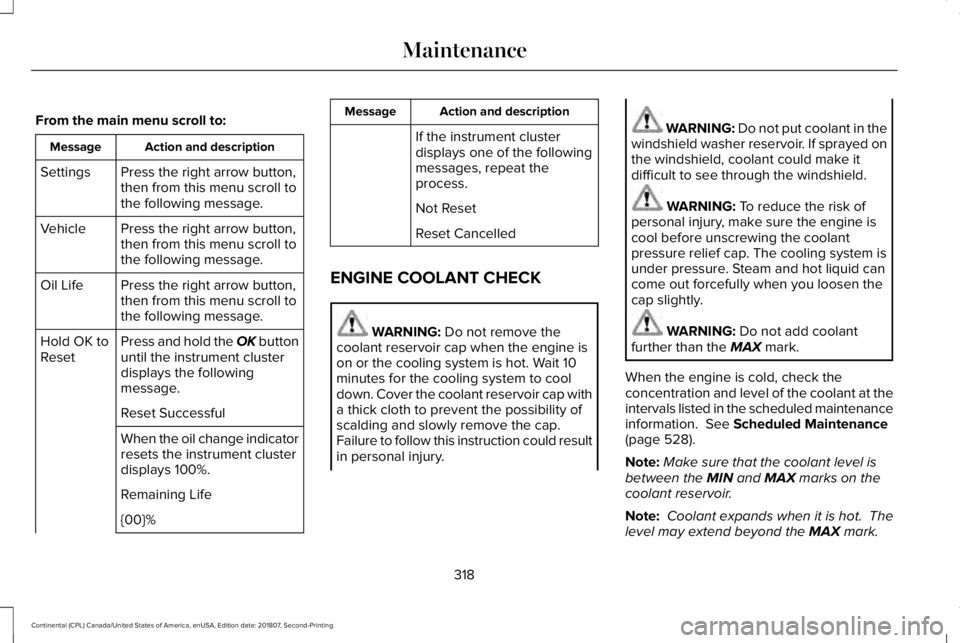
From the main menu scroll to:
Action and description
Message
Press the right arrow button,
then from this menu scroll to
the following message.
Settings
Press the right arrow button,
then from this menu scroll to
the following message.
Vehicle
Press the right arrow button,
then from this menu scroll to
the following message.
Oil Life
Press and hold the OK button
until the instrument cluster
displays the following
message.
Hold OK to
Reset
Reset Successful
When the oil change indicator
resets the instrument cluster
displays 100%.
Remaining Life
{00}% Action and description
Message
If the instrument cluster
displays one of the following
messages, repeat the
process.
Not Reset
Reset Cancelled
ENGINE COOLANT CHECK WARNING: Do not remove the
coolant reservoir cap when the engine is
on or the cooling system is hot. Wait 10
minutes for the cooling system to cool
down. Cover the coolant reservoir cap with
a thick cloth to prevent the possibility of
scalding and slowly remove the cap.
Failure to follow this instruction could result
in personal injury. WARNING:
Do not put coolant in the
windshield washer reservoir. If sprayed on
the windshield, coolant could make it
difficult to see through the windshield. WARNING:
To reduce the risk of
personal injury, make sure the engine is
cool before unscrewing the coolant
pressure relief cap. The cooling system is
under pressure. Steam and hot liquid can
come out forcefully when you loosen the
cap slightly. WARNING:
Do not add coolant
further than the MAX mark.
When the engine is cold, check the
concentration and level of the coolant at the
intervals listed in the scheduled maintenance
information.
See Scheduled Maintenance
(page 528).
Note: Make sure that the coolant level is
between the
MIN and MAX marks on the
coolant reservoir.
Note: Coolant expands when it is hot. The
level may extend beyond the
MAX mark.
318
Continental (CPL) Canada/United States of America, enUSA, Edition date: 201807, Second-Printing Maintenance
Page 341 of 627
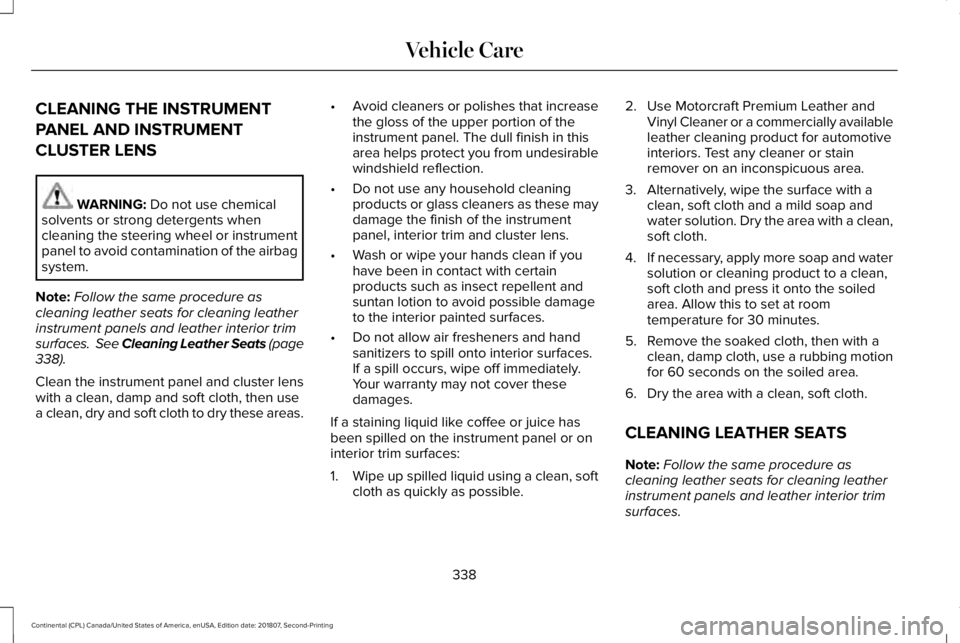
CLEANING THE INSTRUMENT
PANEL AND INSTRUMENT
CLUSTER LENS
WARNING: Do not use chemical
solvents or strong detergents when
cleaning the steering wheel or instrument
panel to avoid contamination of the airbag
system.
Note: Follow the same procedure as
cleaning leather seats for cleaning leather
instrument panels and leather interior trim
surfaces. See Cleaning Leather Seats
(page
338).
Clean the instrument panel and cluster lens
with a clean, damp and soft cloth, then use
a clean, dry and soft cloth to dry these areas. •
Avoid cleaners or polishes that increase
the gloss of the upper portion of the
instrument panel. The dull finish in this
area helps protect you from undesirable
windshield reflection.
• Do not use any household cleaning
products or glass cleaners as these may
damage the finish of the instrument
panel, interior trim and cluster lens.
• Wash or wipe your hands clean if you
have been in contact with certain
products such as insect repellent and
suntan lotion to avoid possible damage
to the interior painted surfaces.
• Do not allow air fresheners and hand
sanitizers to spill onto interior surfaces.
If a spill occurs, wipe off immediately.
Your warranty may not cover these
damages.
If a staining liquid like coffee or juice has
been spilled on the instrument panel or on
interior trim surfaces:
1. Wipe up spilled liquid using a clean, soft
cloth as quickly as possible. 2. Use Motorcraft Premium Leather and
Vinyl Cleaner or a commercially available
leather cleaning product for automotive
interiors. Test any cleaner or stain
remover on an inconspicuous area.
3. Alternatively, wipe the surface with a clean, soft cloth and a mild soap and
water solution. Dry the area with a clean,
soft cloth.
4. If necessary, apply more soap and water
solution or cleaning product to a clean,
soft cloth and press it onto the soiled
area. Allow this to set at room
temperature for 30 minutes.
5. Remove the soaked cloth, then with a clean, damp cloth, use a rubbing motion
for 60 seconds on the soiled area.
6. Dry the area with a clean, soft cloth.
CLEANING LEATHER SEATS
Note: Follow the same procedure as
cleaning leather seats for cleaning leather
instrument panels and leather interior trim
surfaces.
338
Continental (CPL) Canada/United States of America, enUSA, Edition date: 201807, Second-Printing Vehicle Care
Page 524 of 627
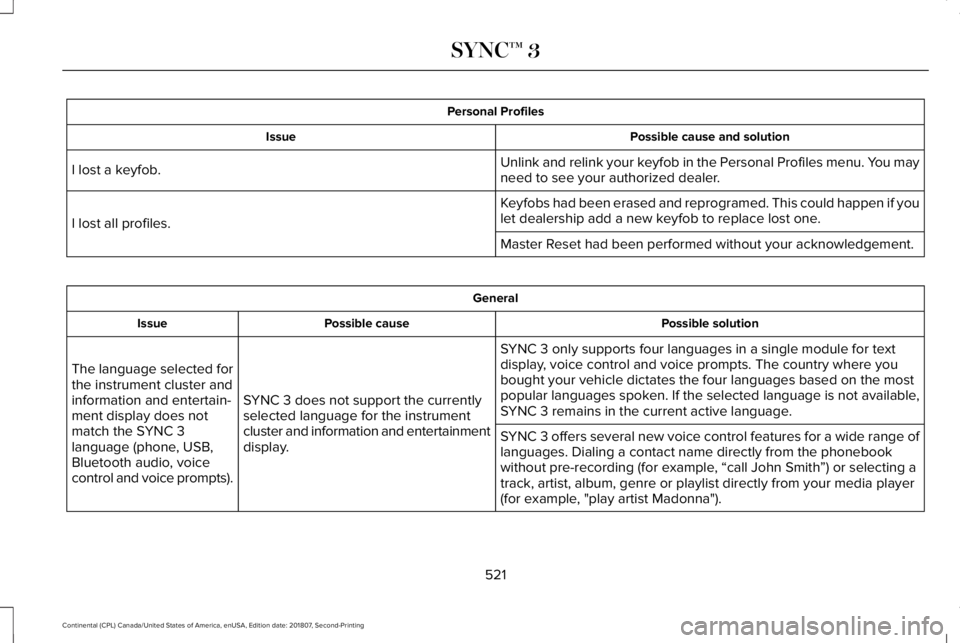
Personal Profiles
Possible cause and solution
Issue
Unlink and relink your keyfob in the Personal Profiles menu. You may
need to see your authorized dealer.
I lost a keyfob.
Keyfobs had been erased and reprogramed. This could happen if you
let dealership add a new keyfob to replace lost one.
I lost all profiles.
Master Reset had been performed without your acknowledgement. General
Possible solution
Possible cause
Issue
SYNC 3 only supports four languages in a single module for text
display, voice control and voice prompts. The country where you
bought your vehicle dictates the four languages based on the most
popular languages spoken. If the selected language is not available,
SYNC 3 remains in the current active language.
SYNC 3 does not support the currently
selected language for the instrument
cluster and information and entertainment
display.
The language selected for
the instrument cluster and
information and entertain-
ment display does not
match the SYNC 3
language (phone, USB,
Bluetooth audio, voice
control and voice prompts).
SYNC 3 offers several new voice control features for a wide range of
languages. Dialing a contact name directly from the phonebook
without pre-recording (for example, “call John Smith
”) or selecting a
track, artist, album, genre or playlist directly from your media player
(for example, "play artist Madonna").
521
Continental (CPL) Canada/United States of America, enUSA, Edition date: 201807, Second-Printing SYNC™ 3