Page 250 of 627

Intensity: This setting affects the intensity of
the steering wheel vibration used for the alert
and alert + aid modes. This setting does not
affect the aid mode.
• Low.
• Normal.
• High.
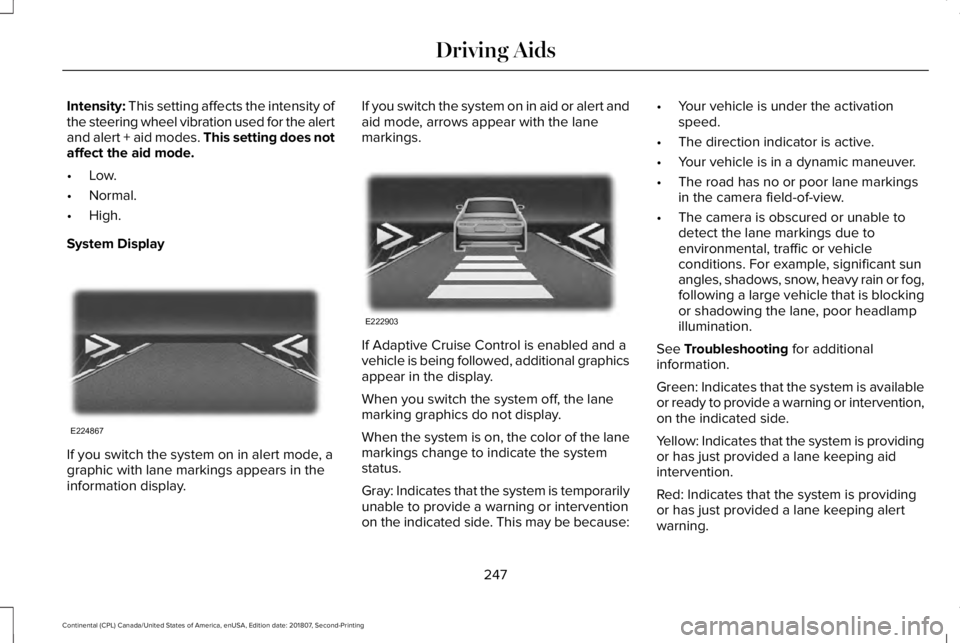
System Display If you switch the system on in alert mode, a
graphic with lane markings appears in the
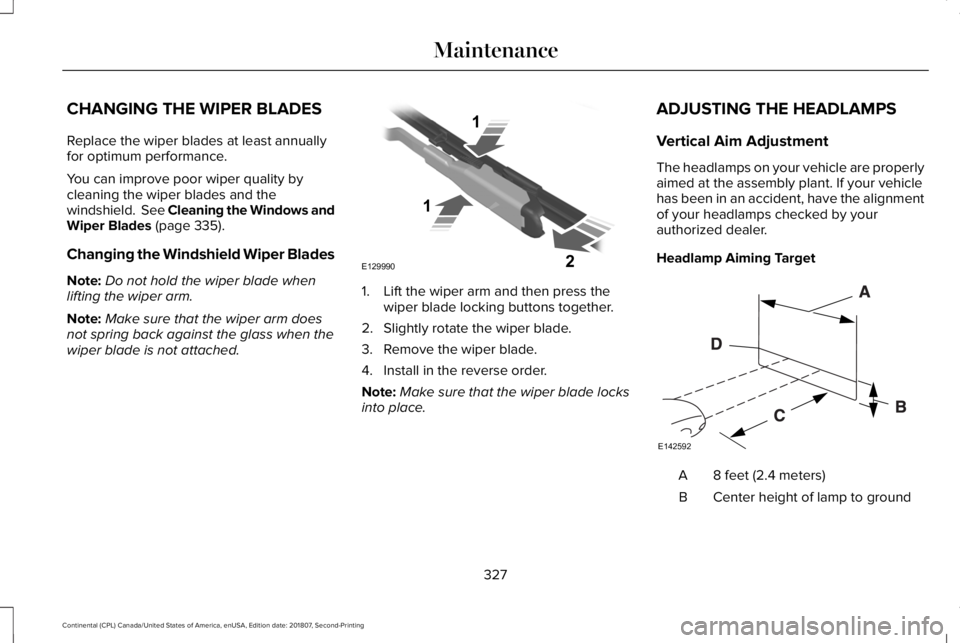
information display. If you switch the system on in aid or alert and
aid mode, arrows appear with the lane
markings.
If Adaptive Cruise Control is enabled and a
vehicle is being followed, additional graphics
appear in the display.
When you switch the system off, the lane
marking graphics do not display.
When the system is on, the color of the lane
markings change to indicate the system
status.
Gray: Indicates that the system is temporarily
unable to provide a warning or intervention
on the indicated side. This may be because:•
Your vehicle is under the activation
speed.
• The direction indicator is active.
• Your vehicle is in a dynamic maneuver.
• The road has no or poor lane markings
in the camera field-of-view.
• The camera is obscured or unable to
detect the lane markings due to
environmental, traffic or vehicle
conditions. For example, significant sun
angles, shadows, snow, heavy rain or fog,
following a large vehicle that is blocking
or shadowing the lane, poor headlamp
illumination.
See
Troubleshooting for additional
information.
Green: Indicates that the system is available
or ready to provide a warning or intervention,
on the indicated side.
Yellow: Indicates that the system is providing
or has just provided a lane keeping aid
intervention.
Red: Indicates that the system is providing
or has just provided a lane keeping alert
warning.
247
Continental (CPL) Canada/United States of America, enUSA, Edition date: 201807, Second-Printing Driving AidsE224867 E222903
Page 304 of 627
Protected Component
Fuse Rating
Fuse or Relay Number
Powertrain control module relay.
10A 1
90
Brake on/off switch.
10A 1
91
Front multi-contour seat module.
15A 1
92
Rear multi-contour seats.
15A 1
93
Right-hand side high intensity discharge
headlamp.
20A 1
94
Left-hand side high intensity discharge
headlamp.
20A 1
95
Wiper park heater.
10A 1
96
Alternator sense line.
10A 1
97
Rain sensor.
5A 1
98
Not used.
—
99
1 Micro fuse.
2 M-type fuse.
3 J-type fuse.
301
Continental (CPL) Canada/United States of America, enUSA, Edition date: 201807, Second-Printing Fuses
Page 307 of 627
Protected Component
Fuse Rating
Fuse or Relay Number
Front control interface module (climate control).
7.5A 2
12
Gear shift module.
Rear climate control module.
Instrument cluster.
7.5A 2
13
Smart data link.
Steering column control module.
Restraints control module.
10A 1
14
Smart datalink connector power.
10A 2
15
Decklid release relay.
5A 2
16
Power decklid.
15A 2
Not used (spare).
5A 2
17
Push button start switch.
5A 2
18
Not used.
7.5A 2
19
Headlamp control module.
7.5A 1
20
Humidity sensor.
5A 2
21
304
Continental (CPL) Canada/United States of America, enUSA, Edition date: 201807, Second-Printing Fuses
Page 330 of 627

CHANGING THE WIPER BLADES
Replace the wiper blades at least annually
for optimum performance.
You can improve poor wiper quality by
cleaning the wiper blades and the
windshield. See Cleaning the Windows and
Wiper Blades (page 335).
Changing the Windshield Wiper Blades
Note: Do not hold the wiper blade when
lifting the wiper arm.
Note: Make sure that the wiper arm does
not spring back against the glass when the
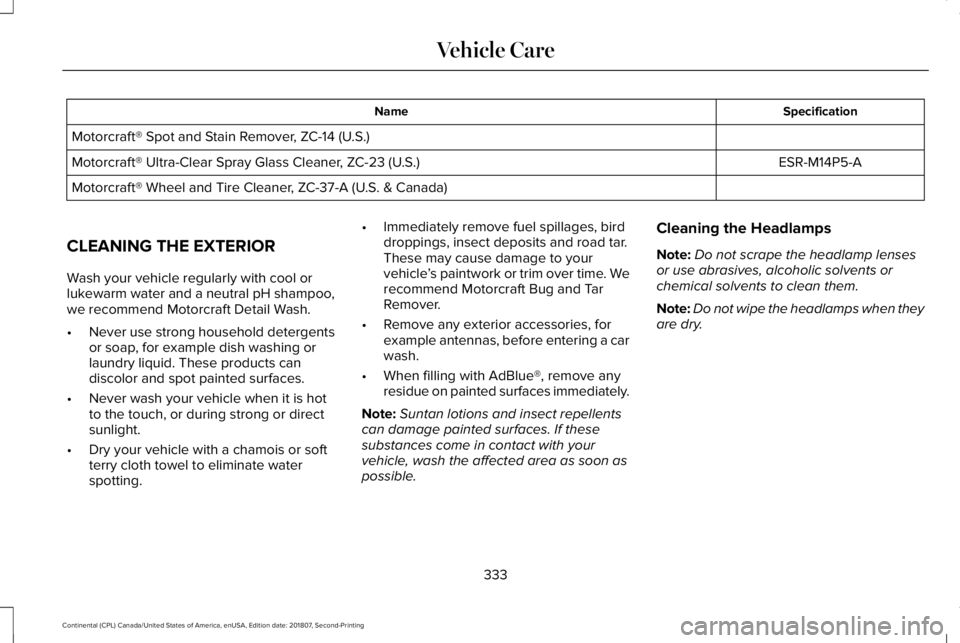
wiper blade is not attached. 1. Lift the wiper arm and then press the
wiper blade locking buttons together.
2. Slightly rotate the wiper blade.
3. Remove the wiper blade.
4. Install in the reverse order.
Note: Make sure that the wiper blade locks
into place. ADJUSTING THE HEADLAMPS
Vertical Aim Adjustment
The headlamps on your vehicle are properly
aimed at the assembly plant. If your vehicle
has been in an accident, have the alignment
of your headlamps checked by your
authorized dealer.
Headlamp Aiming Target
8 feet (2.4 meters)
A
Center height of lamp to ground
B
327
Continental (CPL) Canada/United States of America, enUSA, Edition date: 201807, Second-Printing MaintenanceE129990
1
1 2 E142592
Page 331 of 627

25 feet (7.6 meters)
C
Horizontal reference line
D
Vertical Aim Adjustment
1. Park the vehicle directly in front of a wall
or screen on a level surface,
approximately 25 ft (7.6 m) away.
2. Measure the height from the center of your headlamp indicated by a 3.0
millimeter circle on the lens to the ground
and mark an
8 ft (2.4 m) horizontal
reference line on the vertical wall or
screen at this height (a piece of masking
tape works well).
Note: To see a clearer light pattern for
adjusting, you may want to block the light
from one headlamp while adjusting the
other.
3. Turn on the low beam headlamps to illuminate the wall or screen and open
the hood. Cover one of the headlamps
so no light hits the wall. 4. There is a distinct cut-off (change from
light to dark) in the left portion of the
beam pattern. Position the top edge of
this cut-off
2 in (5 cm) below the
horizontal reference line. 5. Locate the vertical adjuster on each
headlamp. Use a Phillips #2 screwdriver
to turn the adjuster either clockwise or
counterclockwise to adjust the vertical
aim of the headlamp. The horizontal
edge of the brighter light should touch
the horizontal reference line.
6. Repeat Steps 3 through 7 to adjust the other headlamp.
7. Close the hood and turn off the lamps.
Horizontal Aim Adjustment
Horizontal aim is not required for this vehicle
and is not adjustable.
328
Continental (CPL) Canada/United States of America, enUSA, Edition date: 201807, Second-Printing MaintenanceE142465 E277389
Page 332 of 627

CHANGING A BULB
WARNING: Bulbs can become hot.
Let the bulb cool down before removing
it. Failure to do so could result in personal
injury. WARNING:
Switch the lamps and the
ignition off. Failure to follow this warning
could result in serious personal injury.
Use the correct specification bulb. See Bulb
Specification Chart
(page 403).
Install in the reverse order unless otherwise
stated.
High-Intensity Discharge Headlamps
These lamps operate at a high voltage. See
an authorized dealer if they fail. Front Direction Indicator
1. Switch all of the lamps and the ignition
off.
2. Disconnect the electrical connector.
3. Turn the bulb holder counterclockwise and remove it.
4. Remove the bulb by pulling it straight out.
LED Lamps
LED lamps are not serviceable items. See an
authorized dealer if they fail. The following lamps are LED:
•
Front parking lamps.
• Front side marker lamps.
• Side direction indicators.
• Rear side marker lamps.
• Brake and rear lamps.
• Central high mounted brake lamp.
• Rear direction indicators.
• Reversing lamps.
• License plate lamps.
CHANGING THE ENGINE AIR
FILTER - 3.7L WARNING:
To reduce the risk of
vehicle damage and personal burn injuries,
do not start your engine with the air
cleaner removed and do not remove it
while the engine is running.
When changing the air filter element, use
only the air filter element listed.
See
Capacities and Specifications (page 373).
329
Continental (CPL) Canada/United States of America, enUSA, Edition date: 201807, Second-Printing MaintenanceE163826
Page 336 of 627

Specification
Name
Motorcraft® Spot and Stain Remover, ZC-14 (U.S.) ESR-M14P5-A
Motorcraft® Ultra-Clear Spray Glass Cleaner, ZC-23 (U.S.)
Motorcraft® Wheel and Tire Cleaner, ZC-37-A (U.S. & Canada)
CLEANING THE EXTERIOR
Wash your vehicle regularly with cool or
lukewarm water and a neutral pH shampoo,
we recommend Motorcraft Detail Wash.
• Never use strong household detergents
or soap, for example dish washing or
laundry liquid. These products can
discolor and spot painted surfaces.
• Never wash your vehicle when it is hot
to the touch, or during strong or direct
sunlight.
• Dry your vehicle with a chamois or soft
terry cloth towel to eliminate water
spotting. •
Immediately remove fuel spillages, bird
droppings, insect deposits and road tar.
These may cause damage to your
vehicle ’s paintwork or trim over time. We
recommend Motorcraft Bug and Tar
Remover.
• Remove any exterior accessories, for
example antennas, before entering a car
wash.
• When filling with AdBlue®, remove any
residue on painted surfaces immediately.
Note: Suntan lotions and insect repellents
can damage painted surfaces. If these
substances come in contact with your
vehicle, wash the affected area as soon as
possible. Cleaning the Headlamps
Note:
Do not scrape the headlamp lenses
or use abrasives, alcoholic solvents or
chemical solvents to clean them.
Note: Do not wipe the headlamps when they
are dry.
333
Continental (CPL) Canada/United States of America, enUSA, Edition date: 201807, Second-Printing Vehicle Care
Page 406 of 627
BULB SPECIFICATION CHART
The specified replacement bulbs are in the
chart below. Headlamp bulbs have an
authorized D.O.T. (Department of
Transportation) marking for North America
to affirm lamp performance, light brightness
and pattern and safe visibility. The correct
bulbs will not damage the lamp assembly or
void the lamp assembly warranty and will
provide quality bulb burn time. Trade Number
Function
LED.
Headlamp low and high - LED. 1
D3S
Headlamp low and high - HID. 1
LED.
Sidemarker - front. 1
LED.
Park lamp - front. 1
7444NA
Turn lamp - front.
LED.
Signal indicator mirror lamp. 1
LED.
Approach lamp. 1
LED.
Tail and brake lamp. 1
LED.
Turn lamp - rear. 1
403
Continental (CPL) Canada/United States of America, enUSA, Edition date: 201807, Second-Printing Capacities and Specifications