2019 LINCOLN CONTINENTAL maintenance schedule
[x] Cancel search: maintenance schedulePage 321 of 627
From the main menu scroll to:
Action and description
Message
Press the right arrow button,
then from this menu scroll to
the following message.
Settings
Press the right arrow button,
then from this menu scroll to
the following message.
Vehicle
Press the right arrow button,
then from this menu scroll to
the following message.
Oil Life
Press and hold the OK button
until the instrument cluster
displays the following
message.
Hold OK to
Reset
Reset Successful
When the oil change indicator
resets the instrument cluster
displays 100%.
Remaining Life
{00}% Action and description
Message
If the instrument cluster
displays one of the following
messages, repeat the
process.
Not Reset
Reset Cancelled
ENGINE COOLANT CHECK WARNING: Do not remove the
coolant reservoir cap when the engine is
on or the cooling system is hot. Wait 10
minutes for the cooling system to cool
down. Cover the coolant reservoir cap with
a thick cloth to prevent the possibility of
scalding and slowly remove the cap.
Failure to follow this instruction could result
in personal injury. WARNING:
Do not put coolant in the
windshield washer reservoir. If sprayed on
the windshield, coolant could make it
difficult to see through the windshield. WARNING:
To reduce the risk of
personal injury, make sure the engine is
cool before unscrewing the coolant
pressure relief cap. The cooling system is
under pressure. Steam and hot liquid can
come out forcefully when you loosen the
cap slightly. WARNING:
Do not add coolant
further than the MAX mark.
When the engine is cold, check the
concentration and level of the coolant at the
intervals listed in the scheduled maintenance
information.
See Scheduled Maintenance
(page 528).
Note: Make sure that the coolant level is
between the
MIN and MAX marks on the
coolant reservoir.
Note: Coolant expands when it is hot. The
level may extend beyond the
MAX mark.
318
Continental (CPL) Canada/United States of America, enUSA, Edition date: 201807, Second-Printing Maintenance
Page 324 of 627
Coolant Change
At specific mileage intervals, as listed in the
scheduled maintenance information, the
coolant should be changed. Add prediluted
coolant approved to the correct specification.
See Capacities and Specifications (page
373).
Fail-Safe Cooling
Fail-safe cooling allows you to temporarily
drive your vehicle before any incremental
component damage occurs. The fail-safe
distance depends on ambient temperature,
vehicle load and terrain.
How Fail-Safe Cooling Works If the engine begins to overheat,
the coolant temperature gauge
moves toward the red zone:
A warning lamp illuminates and a
message may appear in the
information display. If the engine reaches a preset
over-temperature condition, the engine
automatically switches to alternating cylinder
operation. Each disabled cylinder acts as an
air pump and cools the engine.
When this occurs, your vehicle still operates,
however:
•
Engine power is limited.
• The air conditioning system turns off.
Continued operation increases the engine
temperature, causing the engine to
completely shut down. Your steering and
braking effort increases in this situation.
When the engine temperature cools, you can
re-start the engine. Have your vehicle
checked as soon as possible to minimize
engine damage. When Fail-Safe Mode Is Activated WARNING: Fail-safe mode is for use
during emergencies only. Operate your
vehicle in fail-safe mode only as long as
necessary to bring your vehicle to rest in
a safe location and seek immediate repairs.
When in fail-safe mode, your vehicle will
have limited power, will not be able to
maintain high-speed operation, and may
completely shut down without warning,
potentially losing engine power, power
steering assist, and power brake assist,
which may increase the possibility of a
crash resulting in serious injury. WARNING:
Do not remove the
coolant reservoir cap when the engine is
on or the cooling system is hot. Wait 10
minutes for the cooling system to cool
down. Cover the coolant reservoir cap with
a thick cloth to prevent the possibility of
scalding and slowly remove the cap.
Failure to follow this instruction could result
in personal injury.
321
Continental (CPL) Canada/United States of America, enUSA, Edition date: 201807, Second-Printing Maintenance
Page 327 of 627

To avoid fluid contamination, the reservoir
cap must remain in place and fully tight,
unless you are adding fluid.
Only use fluid that meets Ford specifications.
See Capacities and Specifications (page
373). POWER STEERING FLUID CHECK
Your vehicle is equipped with an electric
power steering (EPS) system. There is no
fluid reservoir to check or fill.
WASHER FLUID CHECK
WARNING:
If you operate your
vehicle in temperatures below 40°F (5°C),
use washer fluid with antifreeze protection.
Failure to use washer fluid with antifreeze
protection in cold weather could result in
impaired windshield vision and increase
the risk of injury or accident.
Add fluid to fill the reservoir if the level is low.
Only use a washer fluid that meets Ford
specifications.
See Capacities and
Specifications (page 373). State or local regulations on volatile organic
compounds may restrict the use of methanol,
a common windshield washer antifreeze
additive. Washer fluids containing
non-methanol antifreeze agents should be
used only if they provide cold weather
protection without damaging the vehicle
’s
paint finish, wiper blades or washer system.
FUEL FILTER - 2.7L/3.7L
Your vehicle has a lifetime fuel filter that is
integrated with the fuel tank, regular
maintenance or replacement is not required.
FUEL FILTER - 3.0L
The fuel filter on your vehicle must be
replaced at the specified service interval.
Refer to your scheduled maintenance
information.
324
Continental (CPL) Canada/United States of America, enUSA, Edition date: 201807, Second-Printing MaintenanceE170684
Page 333 of 627
For turbocharged equipped vehicles: When
servicing the air cleaner, it is important that
no foreign material enter the air induction
system. The engine and turbocharger are
susceptible to damage from even small
particles.
Change the air filter element at the proper
interval. See Scheduled Maintenance (page
528).
Note: Failure to use the correct air filter
element may result in severe engine
damage. The customer warranty may be
void for any damage to the engine if the
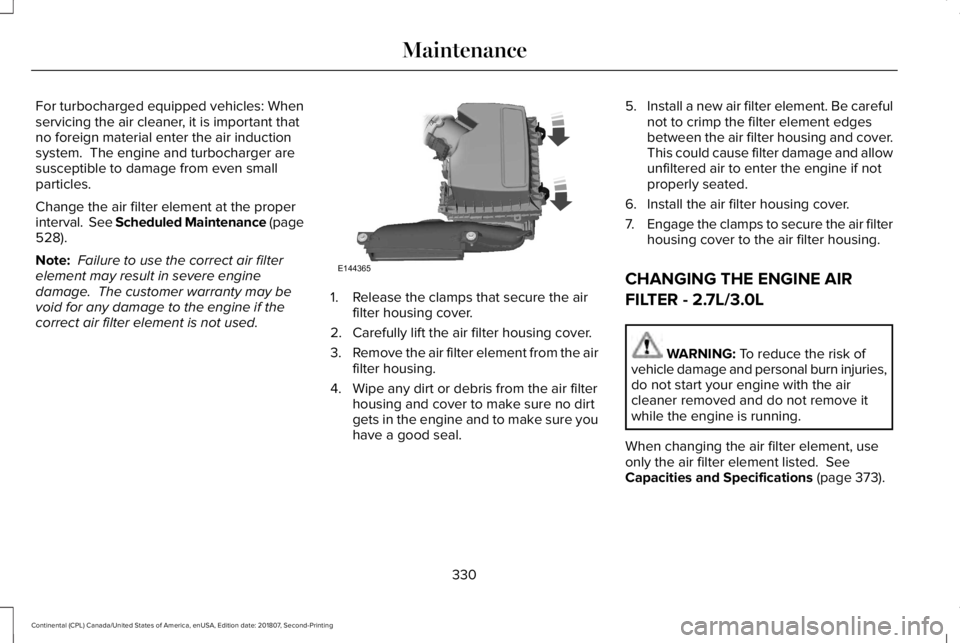
correct air filter element is not used. 1. Release the clamps that secure the air
filter housing cover.
2. Carefully lift the air filter housing cover.
3. Remove the air filter element from the air
filter housing.
4. Wipe any dirt or debris from the air filter housing and cover to make sure no dirt
gets in the engine and to make sure you
have a good seal. 5.
Install a new air filter element. Be careful
not to crimp the filter element edges
between the air filter housing and cover.
This could cause filter damage and allow
unfiltered air to enter the engine if not
properly seated.
6. Install the air filter housing cover.
7. Engage the clamps to secure the air filter
housing cover to the air filter housing.
CHANGING THE ENGINE AIR
FILTER - 2.7L/3.0L WARNING:
To reduce the risk of
vehicle damage and personal burn injuries,
do not start your engine with the air
cleaner removed and do not remove it
while the engine is running.
When changing the air filter element, use
only the air filter element listed.
See
Capacities and Specifications (page 373).
330
Continental (CPL) Canada/United States of America, enUSA, Edition date: 201807, Second-Printing MaintenanceE144365
Page 334 of 627
For Turbocharged equipped vehicles: When
servicing the air cleaner, it is important that
no foreign material enter the air induction
system. The engine and turbocharger are
susceptible to damage from even small
particles.
Change the air filter element at the proper
interval. See Scheduled Maintenance (page
528).
Note: Failure to use the correct air filter
element may result in severe engine
damage. The customer warranty may be
void for any damage to the engine if the
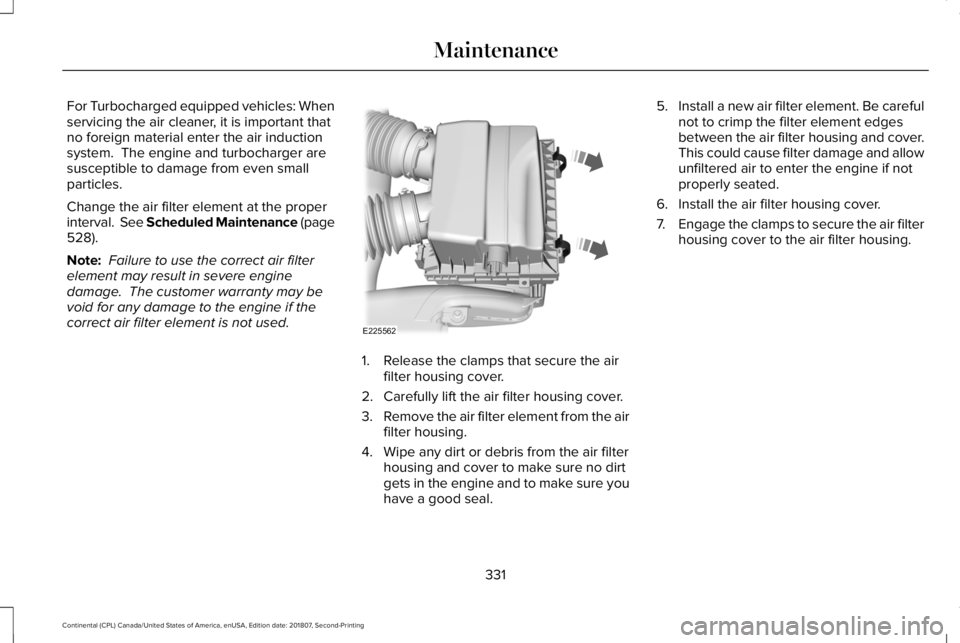
correct air filter element is not used. 1. Release the clamps that secure the air
filter housing cover.
2. Carefully lift the air filter housing cover.
3. Remove the air filter element from the air
filter housing.
4. Wipe any dirt or debris from the air filter housing and cover to make sure no dirt
gets in the engine and to make sure you
have a good seal. 5.
Install a new air filter element. Be careful
not to crimp the filter element edges
between the air filter housing and cover.
This could cause filter damage and allow
unfiltered air to enter the engine if not
properly seated.
6. Install the air filter housing cover.
7. Engage the clamps to secure the air filter
housing cover to the air filter housing.
331
Continental (CPL) Canada/United States of America, enUSA, Edition date: 201807, Second-Printing MaintenanceE225562
Page 358 of 627
Highway Hazards
No matter how carefully you drive there
is always the possibility that you may
eventually have a flat tire on the
highway. Drive slowly to the closest safe
area out of traffic. This may further
damage the flat tire, but your safety is
more important.
If you feel a sudden vibration or ride
disturbance while driving, or you suspect
your tire or vehicle has been damaged,
immediately reduce your speed. Drive
with caution until you can safely pull off
the road. Stop and inspect the tires for
damage. If a tire is under-inflated or
damaged, deflate it, remove the wheel
and replace it with your spare tire and
wheel (if provided). If you cannot detect
a cause, have the vehicle towed to the
nearest repair facility or tire dealer to
have the vehicle inspected.
Tire and Wheel Alignment
A bad jolt from hitting a curb or pothole
can cause the front end of your vehicle
to become misaligned or cause damage
to your tires. If your vehicle seems to
pull to one side when you’re driving, the
wheels may be out of alignment. Have
an authorized dealer check the wheel
alignment periodically.
Wheel misalignment in the front or the
rear can cause uneven and rapid
treadwear of your tires and should be
corrected by an authorized dealer.
Front-wheel drive vehicles and those
with an independent rear suspension (if
equipped) may require alignment of all
four wheels.
The tires should also be balanced
periodically. An unbalanced tire and
wheel assembly may result in irregular
tire wear.Tire Rotation
Note:
If your tires show uneven wear
ask an authorized dealer to check for
and correct any wheel misalignment,
tire imbalance or mechanical problem
involved before tire rotation.
Note: Your vehicle may be equipped
with a dissimilar spare wheel and tire
assembly. A dissimilar spare wheel and
tire assembly is defined as a spare
wheel and tire assembly that is different
in brand, size or appearance from the
road tires and wheels. If you have a
dissimilar spare wheel and tire assembly
it is intended for temporary use only and
should not be used in a tire rotation.
Note: After having your tires rotated,
inflation pressure must be checked and
adjusted to the vehicle requirements.
Rotating your tires at the recommended
interval (as indicated in the Scheduled
Maintenance chapter) will help your tires
wear more evenly, providing better tire
performance and longer tire life.
355
Continental (CPL) Canada/United States of America, enUSA, Edition date: 201807, Second-Printing Wheels and Tires
Page 380 of 627

MOTORCRAFT PARTS - 2.7L
Motorcraft Part number
Component
FA-1912A
Air filter element.
FL-2062
Oil filter.
BAGM-94RH7-800
Battery.
SP-542
Spark plugs.
FP-80
Cabin air filter (combi).
WW-2431 (driver side)
Windshield wiper blade.
WW-2050 (passenger side)
We recommend Motorcraft® replacement
parts available at your authorized dealer or
at fordparts.com for scheduled maintenance.
The parts engineered for your vehicle meet
or exceed our specifications. Use of other
parts may impact vehicle performance,
emissions and durability. Your warranty may
be void for any damage related to use of
other parts. If a Motorcraft® oil filter is not available, use
an oil filter that meets industry performance
specification SAE/USCAR-36.
For spark plug replacement, contact an
authorized dealer. Replace the spark plugs
at the appropriate intervals. See Scheduled
Maintenance Record (page 540).
377
Continental (CPL) Canada/United States of America, enUSA, Edition date: 201807, Second-Printing Capacities and Specifications
Page 381 of 627

MOTORCRAFT PARTS - 3.0L
Motorcraft Part number
Component
FA-1912A
Air filter element.
FL-2062
Oil filter.
BAGM-94RH7-800
Battery.
SP-542
Spark plugs.
FG-1083
Fuel Filter.
FP-80
Cabin air filter (combi).
WW-2431 (driver side)
Windshield wiper blade.
WW-2050 (passenger side)
We recommend Motorcraft® replacement
parts available at your authorized dealer or
at fordparts.com for scheduled maintenance.
The parts engineered for your vehicle meet
or exceed our specifications. Use of other
parts may impact vehicle performance,
emissions and durability. Your warranty may
be void for any damage related to use of
other parts. If a Motorcraft® oil filter is not available, use
an oil filter that meets industry performance
specification SAE/USCAR-36.
For spark plug replacement, contact an
authorized dealer. Replace the spark plugs
at the appropriate intervals. See Scheduled
Maintenance Record (page 540).
378
Continental (CPL) Canada/United States of America, enUSA, Edition date: 201807, Second-Printing Capacities and Specifications