2019 LINCOLN CONTINENTAL buttons
[x] Cancel search: buttonsPage 172 of 627

1. Press the learn button on the garage
door opener motor and then you have
30 seconds to complete the next two
steps.
2. Return to your vehicle. 3. Press and hold the function button you
want to program for 2 seconds, then
release. Repeat this step. Depending on
your brand of garage door opener, you
may need to repeat this sequence a third
time.
Gate Operator / Canadian Programming
Canadian radio-frequency laws require
transmitter signals to “time-out” (or quit) after
several seconds of transmission – which may
not be long enough for HomeLink to pick up
the signal during programming. Similar to
this Canadian law, some U.S. gate operators
are designed to “time-out” in the same
manner.
Note: If programming a garage door opener
or gate operator, it is advised to unplug the
device during the “cycling” process to
prevent possible overheating.
1. Press and release, every two seconds,
your hand-held transmitter until the
HomeLink indicator light changes to a
rapidly blinking or continuously on light.
2. Release the hand-held transmitter button. 3. Continue programing HomeLink. See
In-Vehicle Programming, Step 4
.
Erasing the Function Button Codes
Note: You cannot erase individual buttons. 1. Press and hold the outer two function
buttons simultaneously for approximately
10 seconds until the indicator light above
the buttons flashes rapidly.
2. When the indicator light flashes, release
the buttons. You erased the codes for all
buttons.
169
Continental (CPL) Canada/United States of America, enUSA, Edition date: 201807, Second-Printing Garage Door OpenerE142659 E188212 E188213
Page 194 of 627
AUTOMATIC TRANSMISSION
WARNING: Always fully apply the
parking brake and make sure you shift into
park (P). Failure to follow this instruction
could result in personal injury or death. WARNING:
Do not apply the brake
pedal and accelerator pedal
simultaneously. Applying both pedals
simultaneously for more than a few
seconds will limit engine performance,
which may result in difficulty maintaining
speed in traffic and could lead to serious
injury.
Note: You may not be able to shift out of
park (P) unless the intelligent access key is
inside your vehicle.
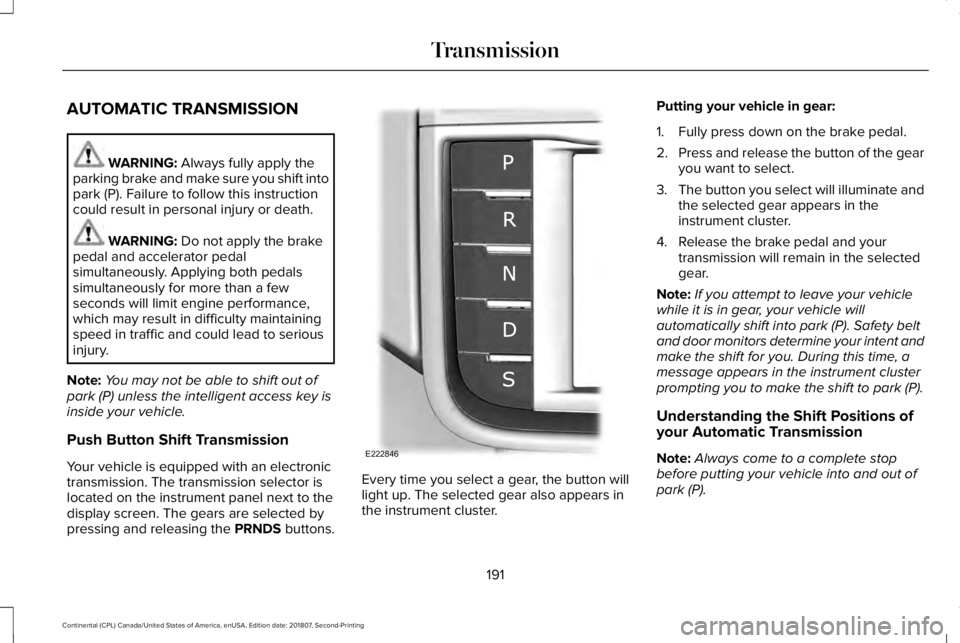
Push Button Shift Transmission
Your vehicle is equipped with an electronic
transmission. The transmission selector is
located on the instrument panel next to the
display screen. The gears are selected by
pressing and releasing the PRNDS buttons. Every time you select a gear, the button will
light up. The selected gear also appears in
the instrument cluster.Putting your vehicle in gear:
1. Fully press down on the brake pedal.
2.
Press and release the button of the gear
you want to select.
3. The button you select will illuminate and
the selected gear appears in the
instrument cluster.
4. Release the brake pedal and your transmission will remain in the selected
gear.
Note: If you attempt to leave your vehicle
while it is in gear, your vehicle will
automatically shift into park (P). Safety belt
and door monitors determine your intent and
make the shift for you. During this time, a
message appears in the instrument cluster
prompting you to make the shift to park (P).
Understanding the Shift Positions of
your Automatic Transmission
Note: Always come to a complete stop
before putting your vehicle into and out of
park (P).
191
Continental (CPL) Canada/United States of America, enUSA, Edition date: 201807, Second-Printing TransmissionE222846
Page 199 of 627
3. Using a tool, press and hold the brake
shift interlock switch. The shift buttons
on the instrument panel will flash when
your vehicle is in override mode.
4. With the override switch still held, press the neutral (N) button to shift from park.
5. Release the override button.
6. Your vehicle will remain in neutral for wrecker towing purposes or can be
shifted to the desired gear and driven (if
possible).
7. Release the parking brake.
Automatic Transmission Adaptive
Learning
This feature increases durability and provides
consistent shift feel over the life of your
vehicle. A new vehicle or transmission may
have firm or soft shifts. This operation will
not affect function or durability of your
transmission and is normal. Over time, the
adaptive learning process will fully update
transmission operation. Additionally, the
strategy must be relearned whenever the
battery is disconnected or a new battery is
installed. If Your Vehicle Gets Stuck In Mud or
Snow
Note:
Do not rock your vehicle if your engine
is not at normal operating temperature or
damage to your transmission may occur.
Note: Do not rock your vehicle for more than
a minute or damage to your transmission
and tires may occur, or your engine may
overheat.
If your vehicle gets stuck in mud or snow,
you can help rock your vehicle out by shifting
between forward and reverse gears,
stopping between shifts in a steady pattern.
Press lightly on the accelerator in each gear.
196
Continental (CPL) Canada/United States of America, enUSA, Edition date: 201807, Second-Printing Transmission
Page 224 of 627
Using Active Park Assist
Selecting an Active Park Assist Mode
Press the button once to activate
parallel parking. Press the button
a second time to activate
perpendicular parking. If you press the
button again the system switches off.
If your vehicle is parked and after you switch
the ignition on, you can use the information
display to toggle through the modes. Press
the button to switch the system on and open
the system menu in the information display.
Note: If your vehicle is parked, the default
mode is parallel park out assist. However, if
you did not use active park assist to parallel
park your vehicle, use the information
display to select park out assist.
Note: You can repeatedly press the active
park assist button to toggle through the
modes only after moving your vehicle
approximately 33 ft (10 m). To toggle through the modes, use the
buttons on the information display to select
the following:
•
Parallel parking.
• Perpendicular parking.
• Parallel park out assist.
• Switch the system off.
Note: There is no time limit for toggling
through the modes.
Parallel Parking
The system detects available parallel parking
spaces and steers your vehicle into the
space. You control the accelerator, gearshift
and brakes. The system visually and audibly
guides you into a parallel parking space. Press the button once to search
for a parking space.
Note: You can also switch the system on
after you have already driven partially or
completely past a parking space. Press the
active park assist button and the system
informs you if you have recently passed a
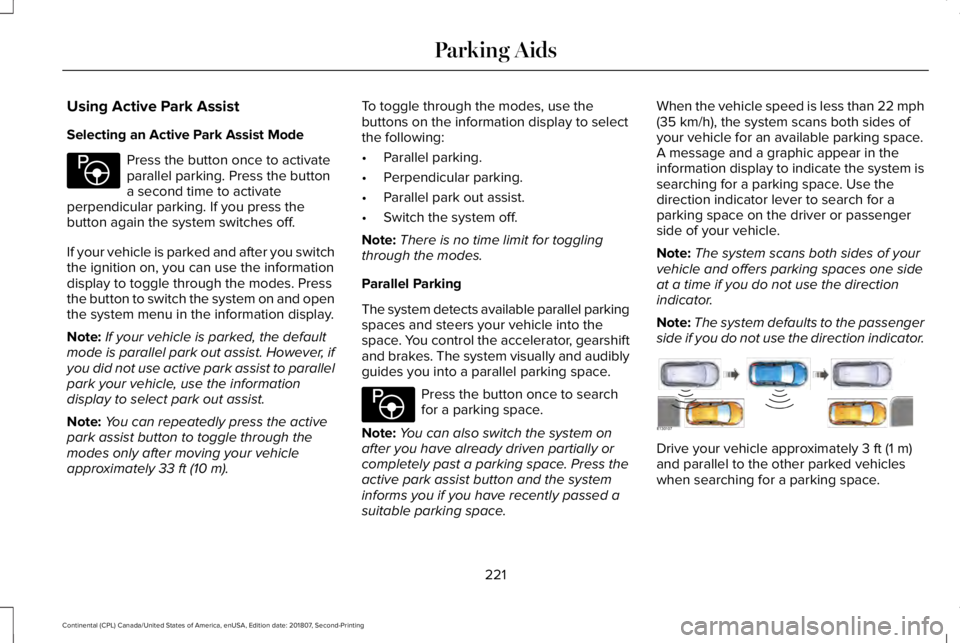
suitable parking space. When the vehicle speed is less than 22 mph
(35 km/h)
, the system scans both sides of
your vehicle for an available parking space.
A message and a graphic appear in the
information display to indicate the system is
searching for a parking space. Use the
direction indicator lever to search for a
parking space on the driver or passenger
side of your vehicle.
Note: The system scans both sides of your
vehicle and offers parking spaces one side
at a time if you do not use the direction
indicator.
Note: The system defaults to the passenger
side if you do not use the direction indicator. Drive your vehicle approximately
3 ft (1 m)
and parallel to the other parked vehicles
when searching for a parking space.
221
Continental (CPL) Canada/United States of America, enUSA, Edition date: 201807, Second-Printing Parking AidsE146186 E146186 E130107
Page 330 of 627
CHANGING THE WIPER BLADES
Replace the wiper blades at least annually
for optimum performance.
You can improve poor wiper quality by
cleaning the wiper blades and the
windshield. See Cleaning the Windows and
Wiper Blades (page 335).
Changing the Windshield Wiper Blades
Note: Do not hold the wiper blade when
lifting the wiper arm.
Note: Make sure that the wiper arm does
not spring back against the glass when the
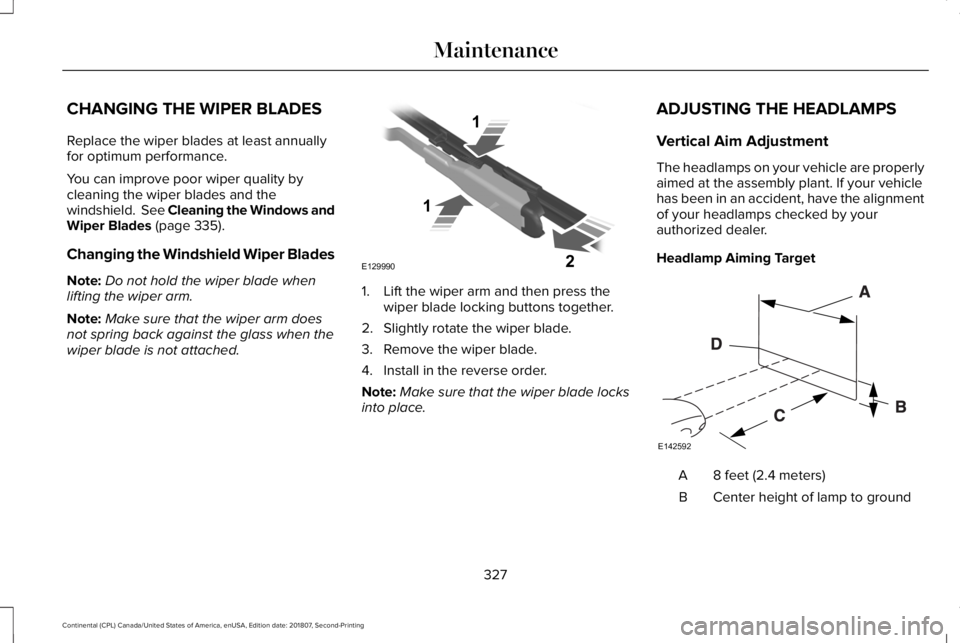
wiper blade is not attached. 1. Lift the wiper arm and then press the
wiper blade locking buttons together.
2. Slightly rotate the wiper blade.
3. Remove the wiper blade.
4. Install in the reverse order.
Note: Make sure that the wiper blade locks
into place. ADJUSTING THE HEADLAMPS
Vertical Aim Adjustment
The headlamps on your vehicle are properly
aimed at the assembly plant. If your vehicle
has been in an accident, have the alignment
of your headlamps checked by your
authorized dealer.
Headlamp Aiming Target
8 feet (2.4 meters)
A
Center height of lamp to ground
B
327
Continental (CPL) Canada/United States of America, enUSA, Edition date: 201807, Second-Printing MaintenanceE129990
1
1 2 E142592
Page 423 of 627

Action and Description
Menu Item
Item
This bar displays icons and messages pertaining to current system activi\
ties including climate
settings, voice commands and phone functions such as text messages.
Status Bar
A
This button is available on the main screens. Pressing it takes you to the home screen view.
Home
B
This shows the current time. You can set the clock manually or have it controlled by the vehicle's
GPS location. See Settings (page 485).
Clock
C
This displays the current outside temperature.
Outside Temperature
D
You can touch any of the buttons on this bar to select a feature.
Feature Bar
E
The touchscreen allows you quick access to
all of your comfort, navigation,
communication and entertainment options.
Using the status and feature bar you can
quickly select the feature you want to use. Note:
Your system is equipped with a feature
that allows you to access and control audio
features for 10 minutes after you switch the
ignition off (and no doors open). The Status Bar
Additional icons also display in the status bar
depending on market, vehicle options and
current operation. If a feature is not active,
the icon does not display. Certain icons may
move to the left or right depending on what
options are active.
420
Continental (CPL) Canada/United States of America, enUSA, Edition date: 201807, Second-Printing SYNC™ 3
Page 428 of 627
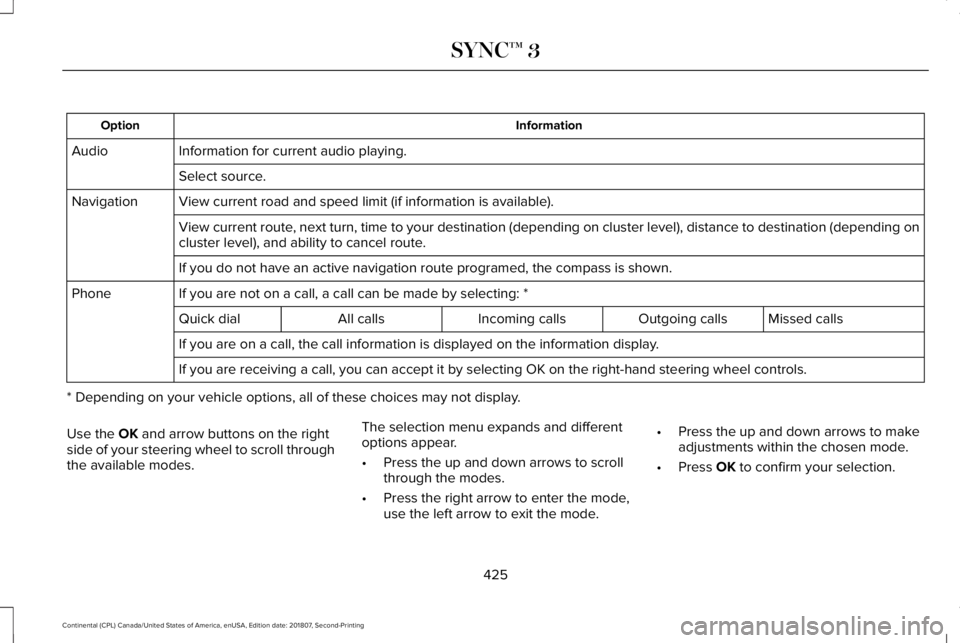
Information
Option
Information for current audio playing.
Audio
Select source.
View current road and speed limit (if information is available).
Navigation
View current route, next turn, time to your destination (depending on cluster level), di\
stance to destination (depending on
cluster level), and ability to cancel route.
If you do not have an active navigation route programed, the compass is \
shown.
If you are not on a call, a call can be made by selecting: *
Phone
Missed calls
Outgoing calls
Incoming calls
All calls
Quick dial
If you are on a call, the call information is displayed on the informati\
on display.
If you are receiving a call, you can accept it by selecting OK on the ri\
ght-hand steering wheel controls.
* Depending on your vehicle options, all of these choices may not displa\
y.
Use the OK and arrow buttons on the right
side of your steering wheel to scroll through
the available modes. The selection menu expands and different
options appear.
•
Press the up and down arrows to scroll
through the modes.
• Press the right arrow to enter the mode,
use the left arrow to exit the mode. •
Press the up and down arrows to make
adjustments within the chosen mode.
• Press
OK to confirm your selection.
425
Continental (CPL) Canada/United States of America, enUSA, Edition date: 201807, Second-Printing SYNC™ 3
Page 430 of 627

•
DISP: Switch the display on or off. You
can also touch the screen to switch the
display back on.
• Temperature, fan and climate control
buttons:
Control the temperature, fan
speed or settings of the climate control
system.
911 Assist WARNING:
Unless the 911 Assist
setting is set on before a crash, the system
will not dial for help which could delay
response time, potentially increasing the
risk of serious injury or death after a crash. WARNING:
Do not wait for 911 Assist
to make an emergency call if you can do
it yourself. Dial emergency services
immediately to avoid delayed response
time which could increase the risk of
serious injury or death after a crash. If you
do not hear 911 Assist within five seconds
of the crash, the system or phone may be
damaged or non-functional. WARNING: Always place your phone
in a secure location in your vehicle so it
does not become a projectile or get
damaged in a crash. Failure to do so may
cause serious injury to someone or
damage the phone which could prevent
911 Assist from working properly.
Note: The SYNC 911 Assist feature must be
set on before the incident.
Note: The SYNC 911 Assist feature only
operates in the U.S., Canada or in a territory
in which 911 is the emergency number.
Note: Before setting this feature on, make
sure that you read the 911 Assist Privacy
Notice later in this section for important
information.
Note: If any user sets 911 Assist to on or off,
that setting applies for all paired phones. If
911 Assist is switched off and the phone is
connected to SYNC, an icon displays on the
status bar. Note:
Every phone operates differently.
While SYNC 911 Assist works with most
cellular phones, some may have trouble
using this feature.
If a crash deploys an airbag (excluding knee
airbags and rear inflatable safety belts [if
equipped]) or activates the fuel pump
shut-off, your SYNC-equipped vehicle may
be able to contact emergency services by
dialing 911 through a paired and connected
Bluetooth enabled phone. You can learn
more about the 911 Assist feature, by visiting: Website
www.owner.lincoln.com
www.syncmyride.ca
www.syncmaroute.ca
For important information about airbag
deployment and the fuel pump shut-off
please see the Supplementary Restrains and
Roadside Emergencies sections of your
owner manual.
To switch 911 Assist on and off please view
the settings information. See Settings (page
485
).
427
Continental (CPL) Canada/United States of America, enUSA, Edition date: 201807, Second-Printing SYNC™ 3