2019 LINCOLN CONTINENTAL ECO mode
[x] Cancel search: ECO modePage 464 of 627
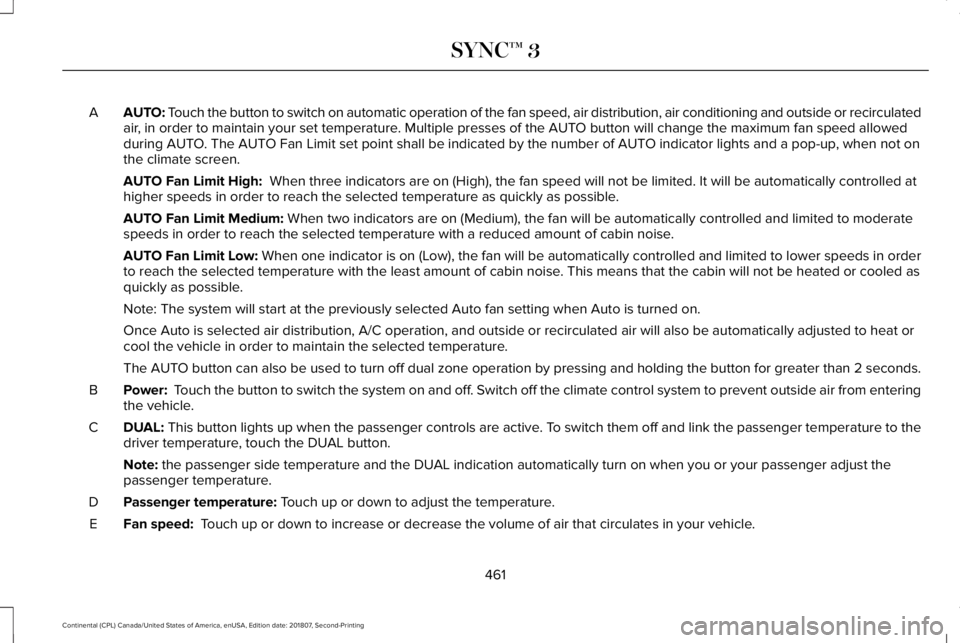
AUTO: Touch the button to switch on automatic operation of the fan speed, air d\
istribution, air conditioning and outside or recirculated
air, in order to maintain your set temperature. Multiple presses of the AUTO button will change the maximum fan speed allowed
during AUTO. The AUTO Fan Limit set point shall be indicated by the number of AUTO indicator lights and a pop-up, when not on
the climate screen.
A
AUTO Fan Limit High: When three indicators are on (High), the fan speed will not be limite\
d. It will be automatically controlled at
higher speeds in order to reach the selected temperature as quickly as p\
ossible.
AUTO Fan Limit Medium:
When two indicators are on (Medium), the fan will be automatically co\
ntrolled and limited to moderate
speeds in order to reach the selected temperature with a reduced amount \
of cabin noise.
AUTO Fan Limit Low: When one indicator is on (Low), the fan will be automatically controlled and limited to lower spee\
ds in order
to reach the selected temperature with the least amount of cabin noise. This means that the cabin will not be heated or cooled as
quickly as possible.
Note: The system will start at the previously selected Auto fan setting \
when Auto is turned on.
Once Auto is selected air distribution, A/C operation, and outside or re\
circulated air will also be automatically adjusted to heat or
cool the vehicle in order to maintain the selected temperature.
The AUTO button can also be used to turn off dual zone operation by pressing an\
d holding the button for greater than 2 seconds.
Power:
Touch the button to switch the system on and off. Switch off the climate control system to prevent outside air from enterin\
g
the vehicle.
B
DUAL:
This button lights up when the passenger controls are active. To switch them off and link the passenger temperature to the
driver temperature, touch the DUAL button.
C
Note:
the passenger side temperature and the DUAL indication automatically turn on when you or your passenger adjust th\
e
passenger temperature.
Passenger temperature:
Touch up or down to adjust the temperature.
D
Fan speed:
Touch up or down to increase or decrease the volume of air that circulate\
s in your vehicle.
E
461
Continental (CPL) Canada/United States of America, enUSA, Edition date: 201807, Second-Printing SYNC™ 3
Page 465 of 627
Note: You cannot adjust the fan speed when the system is set to AUTO or MAX A/C.
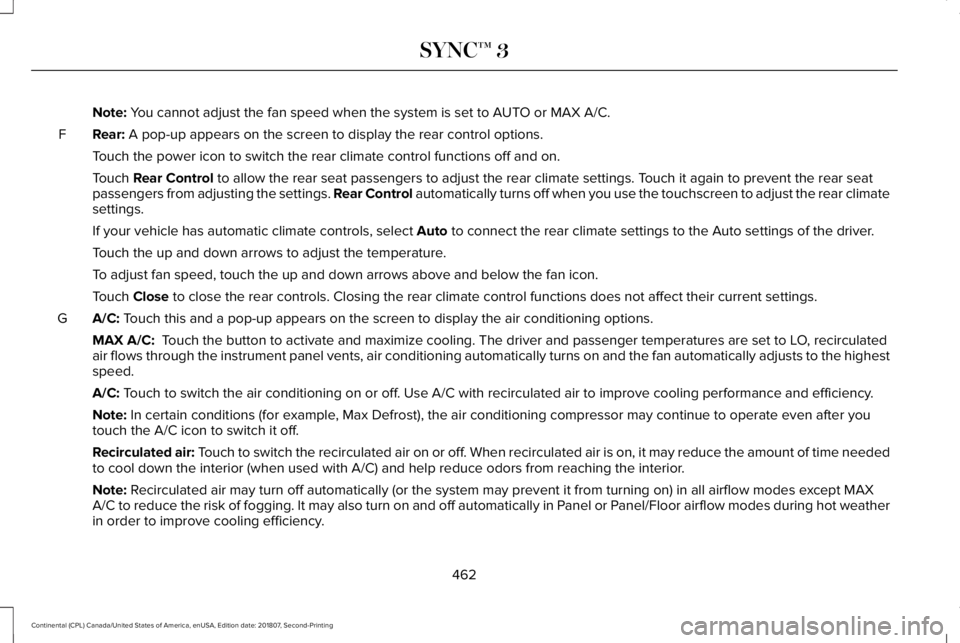
Rear:
A pop-up appears on the screen to display the rear control options.
F
Touch the power icon to switch the rear climate control functions off and\
on.
Touch
Rear Control to allow the rear seat passengers to adjust the rear climate settings. \
Touch it again to prevent the rear seat
passengers from adjusting the settings. Rear Control automatically turns off when you use the touchscreen to adjust the rear\
climate
settings.
If your vehicle has automatic climate controls, select
Auto to connect the rear climate settings to the Auto settings of the driver\
.
Touch the up and down arrows to adjust the temperature.
To adjust fan speed, touch the up and down arrows above and below the fan\
icon.
Touch
Close to close the rear controls. Closing the rear climate control functions \
does not affect their current settings.
A/C:
Touch this and a pop-up appears on the screen to display the air conditio\
ning options.
G
MAX A/C:
Touch the button to activate and maximize cooling. The driver and passeng\
er temperatures are set to LO, recirculated
air flows through the instrument panel vents, air conditioning automatic\
ally turns on and the fan automatically adjusts to the highest
speed.
A/C:
Touch to switch the air conditioning on or off. Use A/C with recirculated air to improve cooling performance and effic\
iency.
Note:
In certain conditions (for example, Max Defrost), the air conditioning compressor may continue to operate\
even after you
touch the A/C icon to switch it off.
Recirculated air:
Touch to switch the recirculated air on or off. When recirculated air is on, it may reduce the amount of time needed
to cool down the interior (when used with A/C) and help reduce odors f\
rom reaching the interior.
Note:
Recirculated air may turn off automatically (or the system may prevent i\
t from turning on) in all airflow modes except MAX
A/C to reduce the risk of fogging. It may also turn on and off automatic\
ally in Panel or Panel/Floor airflow modes during hot weather
in order to improve cooling efficiency.
462
Continental (CPL) Canada/United States of America, enUSA, Edition date: 201807, Second-Printing SYNC™ 3
Page 466 of 627
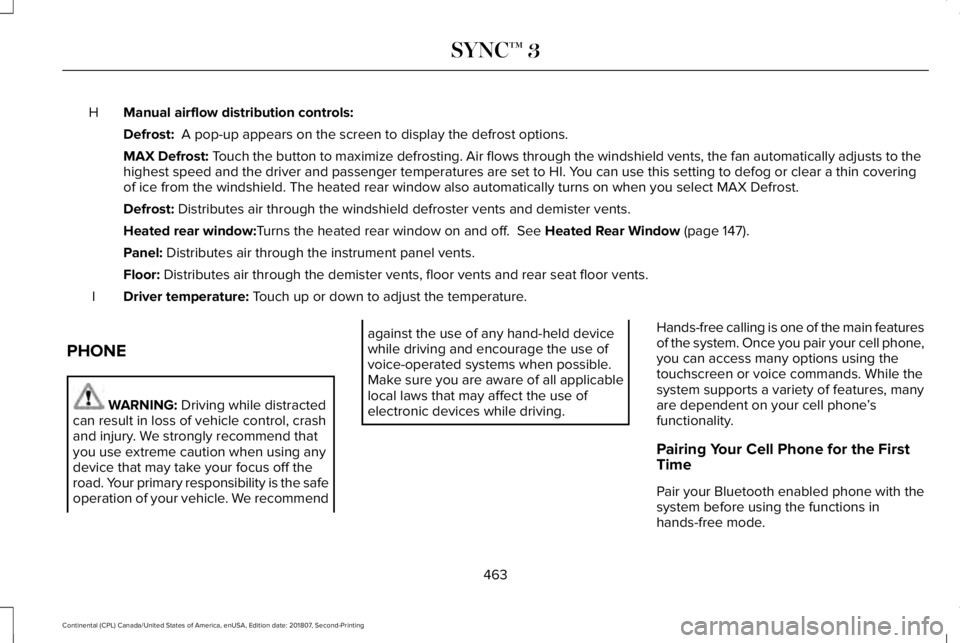
Manual airflow distribution controls:
H
Defrost: A pop-up appears on the screen to display the defrost options.
MAX Defrost: Touch the button to maximize defrosting. Air flows through the windshield\
vents, the fan automatically adjusts to the
highest speed and the driver and passenger temperatures are set to HI. Y\
ou can use this setting to defog or clear a thin covering
of ice from the windshield. The heated rear window also automatically tu\
rns on when you select MAX Defrost.
Defrost:
Distributes air through the windshield defroster vents and demister vent\
s.
Heated rear window:
Turns the heated rear window on and off. See Heated Rear Window (page 147).
Panel:
Distributes air through the instrument panel vents.
Floor:
Distributes air through the demister vents, floor vents and rear seat f\
loor vents.
Driver temperature:
Touch up or down to adjust the temperature.
I
PHONE WARNING:
Driving while distracted
can result in loss of vehicle control, crash
and injury. We strongly recommend that
you use extreme caution when using any
device that may take your focus off the
road. Your primary responsibility is the safe
operation of your vehicle. We recommend against the use of any hand-held device
while driving and encourage the use of
voice-operated systems when possible.
Make sure you are aware of all applicable
local laws that may affect the use of
electronic devices while driving.
Hands-free calling is one of the main features
of the system. Once you pair your cell phone,
you can access many options using the
touchscreen or voice commands. While the
system supports a variety of features, many
are dependent on your cell phone
’s
functionality.
Pairing Your Cell Phone for the First
Time
Pair your Bluetooth enabled phone with the
system before using the functions in
hands-free mode.
463
Continental (CPL) Canada/United States of America, enUSA, Edition date: 201807, Second-Printing SYNC™ 3
Page 467 of 627
Switch on Bluetooth on your device to begin
pairing. See your phone
’s manual if
necessary.
To add a phone, select: Menu Item
Add Phone
1. Follow the on-screen instructions.
2. A prompt alerts you to search for the system on your phone.
3. Select your vehicle's make and model as
it displays on your phone.
4. Confirm that the six-digit number appearing on your phone matches the
six-digit number on the touchscreen.
5. The touchscreen indicates when the pairing is successful.
6. Your phone may prompt you to give the system permission to access information.
To check your phone ’s compatibility, see
your phone ’s manual or visit the website. Alternatively, to add a phone, select: Menu Item
Add Phone
Then select:
Discover Other Bluetooth Devices
1. Follow the on-screen instructions.
2. Select your phone's name when it appears on the touchscreen.
3. Confirm that the six-digit number appearing on your phone matches the
six-digit number on the touchscreen.
4. The touchscreen indicates when the pairing is successful.
5. Your phone may prompt you to give the system permission to access information.
To check your phone ’s compatibility, see
your phone ’s manual or visit the website. At a minimum, most cell phones with
Bluetooth wireless technology support the
following functions:
•
Answering an incoming call.
• Ending a call.
• Dialing a number.
• Call waiting notification.
• Caller identification.
Other features, such as text messaging using
Bluetooth and automatic phonebook
download, are phone-dependent features.
To check your phone ’s compatibility, see
your phone ’s manual or visit the website: Websites
owner.lincoln.com
www.syncmyride.ca
www.syncmaroute.ca
Phone Menu
This menu becomes available after pairing
a phone.
464
Continental (CPL) Canada/United States of America, enUSA, Edition date: 201807, Second-Printing SYNC™ 3
Page 474 of 627

To return to SYNC 3, select the speedometer
icon in the Android Auto menu bar at the
bottom of the touchscreen, and then touch
the option to return to SYNC.
Note:
Contact Google for Android Auto
support.
NAVIGATION (IF EQUIPPED)
Your navigation system is comprised of two
main features, destination mode and map
mode.
Map Mode
Map mode shows advanced viewing
comprised of 2D city maps, 3D landmarks
and 3D city models (when available). 2D city
maps show detailed outlines of buildings,
visible land use, landscape features, and
detailed railroad infrastructure for the most
essential cities around the globe.
3D landmarks appear as clear, visible objects
that are typically recognizable and have a
certain tourism value. 3D city models are complete 3D models of
entire city areas including navigable roads,
parks, rivers and rendered buildings. 3D
landmarks and city models appear in 3D map
mode only. Coverage of these varies and
improves with updated map releases. Select the zoom in icon to see a
closer view of the map.
Select the zoom out icon to see a
farther away view of the map.
You can adjust the view in preset increments.
You can also pinch to zoom in or out of the
map.
The information bar tells you the names of
streets, cities or landmarks as you hover over
them with the crosshair curser.
You can change your view of the map by
tapping on the location indicator icon on the
right hand side of the screen. You can
choose from the following options: Heading up (2D map)
This always
shows the direction of forward
travel to be upward on the screen.
This view is available for map
scales up to
3 mi (5 km). North up (2D map)
always shows
the northern direction to be
upward on the screen. 3D map mode
provides an
elevated perspective of the map.
Adjust this viewing angle and
rotate the map 180 degrees by
touching the map twice, and then dragging
your finger along the shaded bar with arrows
at the bottom of the map. Re-center the map by pressing this
icon whenever you scroll the map
away from your vehicle
’s current
location.
471
Continental (CPL) Canada/United States of America, enUSA, Edition date: 201807, Second-Printing SYNC™ 3E207752 E207753 E207750 E207749 E207748 E207751
Page 475 of 627
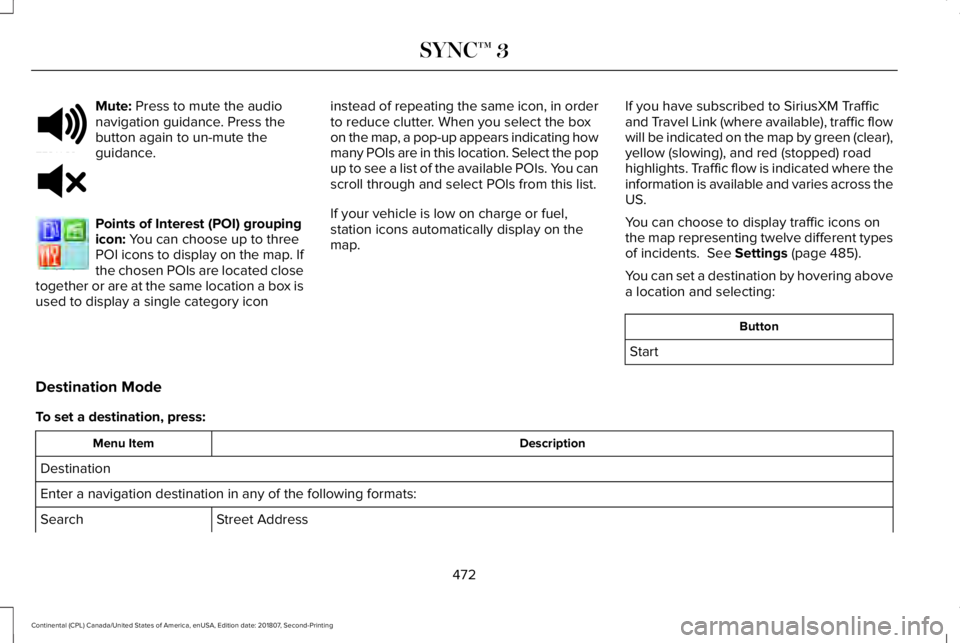
Mute: Press to mute the audio
navigation guidance. Press the
button again to un-mute the
guidance. Points of Interest (POI) grouping
icon:
You can choose up to three
POI icons to display on the map. If
the chosen POIs are located close
together or are at the same location a box is
used to display a single category icon instead of repeating the same icon, in order
to reduce clutter. When you select the box
on the map, a pop-up appears indicating how
many POIs are in this location. Select the pop
up to see a list of the available POIs. You can
scroll through and select POIs from this list.
If your vehicle is low on charge or fuel,
station icons automatically display on the
map.
If you have subscribed to SiriusXM Traffic
and Travel Link (where available), traffic flow
will be indicated on the map by green (clear),
yellow (slowing), and red (stopped) road
highlights. Traffic flow is indicated where the
information is available and varies across the
US.
You can choose to display traffic icons on
the map representing twelve different types
of incidents. See Settings (page 485).
You can set a destination by hovering above
a location and selecting: Button
Start
Destination Mode
To set a destination, press: Description
Menu Item
Destination
Enter a navigation destination in any of the following formats: Street Address
Search
472
Continental (CPL) Canada/United States of America, enUSA, Edition date: 201807, Second-Printing SYNC™ 3E251780 E251779 E207754
Page 479 of 627
Description
Menu Item
Along Route
Near Destination
In a City
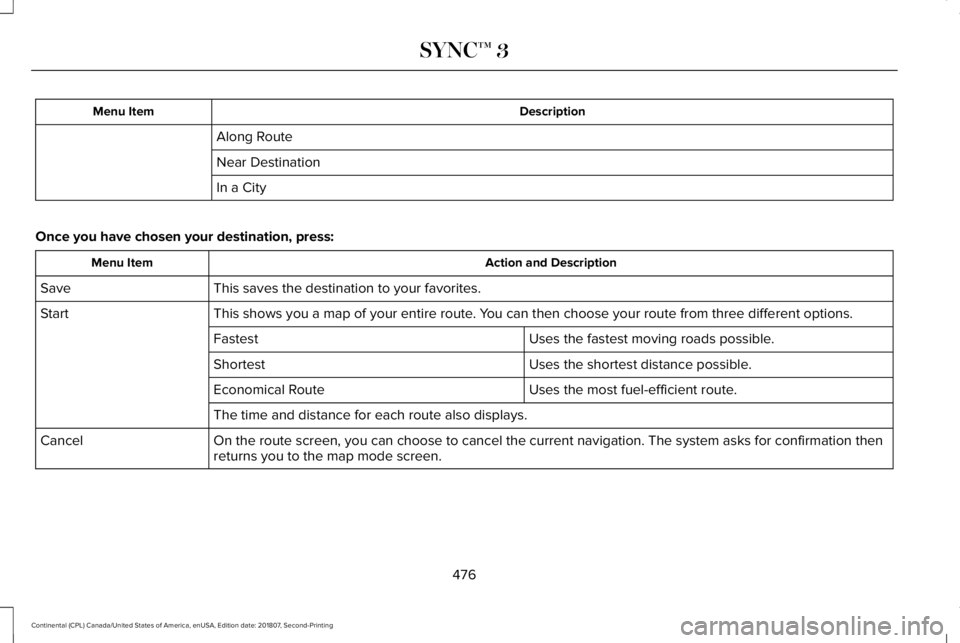
Once you have chosen your destination, press: Action and Description
Menu Item
This saves the destination to your favorites.
Save
This shows you a map of your entire route. You can then choose your route from three different options.
Start
Uses the fastest moving roads possible.
Fastest
Uses the shortest distance possible.
Shortest
Uses the most fuel-efficient route.
Economical Route
The time and distance for each route also displays.
On the route screen, you can choose to cancel the current navigation. Th\
e system asks for confirmation then
returns you to the map mode screen.
Cancel
476
Continental (CPL) Canada/United States of America, enUSA, Edition date: 201807, Second-Printing SYNC™ 3
Page 480 of 627

Once you have chosen your destination, press:
Action and Description
Menu Item
The system uses a variety of screens and prompts to guide you to your de\
stination.
Start
During Route guidance, you can press the maneuver arrow icon on the map if you want the syste\
m to repeat
route guidance instructions. When the system repeats the last guidance i\
nstruction, it updates the distance to
the next guidance instruction, since it detects that the vehicle is movi\
ng.
The navigation map shows your estimated time of arrival, remaining trave\
l time and the distance to your
destination.
SYNC 3 may not always announce vehicle arrival at the exact point of your\
destination and you may have to
cancel a route manually.
Navigation Menu
In map mode and during active navigation
you can access the navigation menu. During active navigation, touch the bottom
of the screen to view the menu and other
buttons.
To access the Navigation menu, press: Button
Menu
You can then select: A full screen map displays during navigation.
Full Map
Screen View
477
Continental (CPL) Canada/United States of America, enUSA, Edition date: 201807, Second-Printing SYNC™ 3