2019 LEXUS UX250H tires
[x] Cancel search: tiresPage 356 of 476

3566-3. Do-it-yourself maintenance
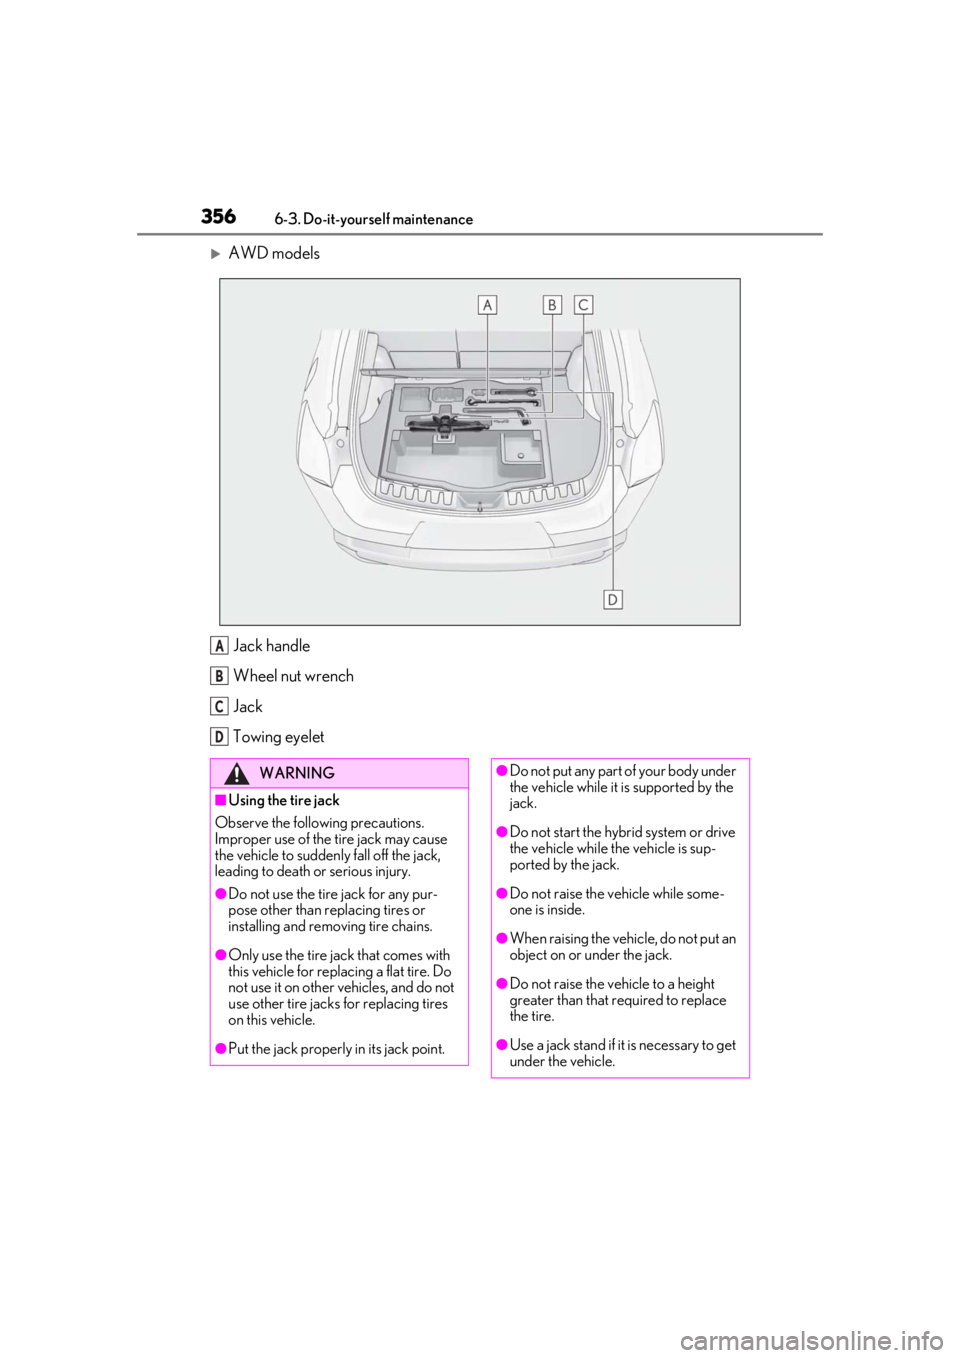
AWD modelsJack handle
Wheel nut wrench
Jack
Towing eyelet
A
B
C
D
WARNING
■Using the tire jack
Observe the following precautions.
Improper use of the tire jack may cause
the vehicle to suddenly fall off the jack,
leading to death or serious injury.
●Do not use the tire jack for any pur-
pose other than replacing tires or
installing and removing tire chains.
●Only use the tire jack that comes with
this vehicle for replacing a flat tire. Do
not use it on other vehicles, and do not
use other tire jacks for replacing tires
on this vehicle.
●Put the jack properly in its jack point.
●Do not put any part of your body under
the vehicle while it is supported by the
jack.
●Do not start the hybrid system or drive
the vehicle while the vehicle is sup-
ported by the jack.
●Do not raise the vehicle while some-
one is inside.
●When raising the vehicle, do not put an
object on or under the jack.
●Do not raise the vehicle to a height
greater than that required to replace
the tire.
●Use a jack stand if it is necessary to get
under the vehicle.
Page 357 of 476

3576-3. Do-it-yourself maintenance
6
Maintenance and care
1Pull the lever upwards and open the
deck board.
2
Unhook the string on the backside
of the deck board.
3
Attach the string to the luggage
cover hook on the back door. 4
Remove the Jack.
1
Unhook the rubber band.
2
Take out the jack.
When stowing the jack, close it by turning
the handle indicated by until it does not
move anymore, place the jack and fix it
with the rubber band.
1Chock the tires.
WARNING
●When lowering the vehicle, make sure
that there is no-one near the vehicle. If
there are people nearby, warn them
vocally before lowering.
Taking out the jack
Removing a tire
TireWheel chock positions
Front left-hand sideBehind the rear right-hand side tire
Front right-hand sideBehind the rear left-hand side tire
A
Page 359 of 476

3596-3. Do-it-yourself maintenance
6
Maintenance and care
1Remove any dirt or foreign matter
from the wheel contact surface.
If foreign matter is on the wheel contact
surface, the wheel nuts may loosen while
the vehicle is in motion, causing the tire to
come off.
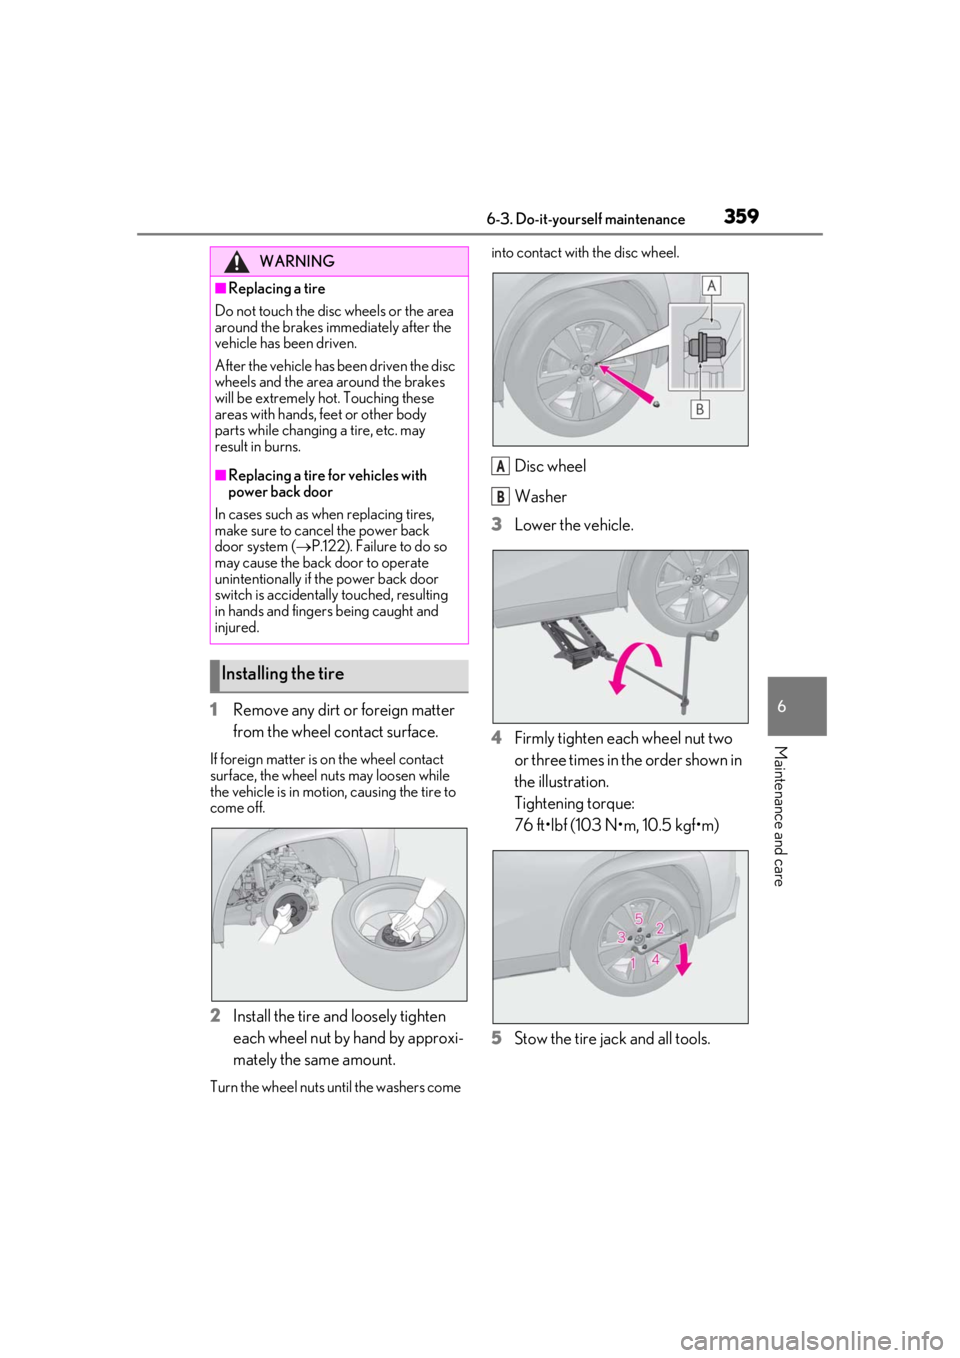
2Install the tire and loosely tighten
each wheel nut by hand by approxi-
mately the same amount.
Turn the wheel nuts until the washers come into contact with the disc wheel.
Disc wheel
Washer
3
Lower the vehicle.
4
Firmly tighten each wheel nut two
or three times in the order shown in
the illustration.
Tightening torque:
76 ft•lbf (103 N•m, 10.5 kgf•m)
5
Stow the tire jack and all tools.
WARNING
■Replacing a tire
Do not touch the disc wheels or the area
around the brakes immediately after the
vehicle has been driven.
After the vehicle has been driven the disc
wheels and the area around the brakes
will be extremely hot. Touching these
areas with hands, feet or other body
parts while changing a tire, etc. may
result in burns.
■Replacing a tire for vehicles with
power back door
In cases such as when replacing tires,
make sure to cancel the power back
door system ( P.122). Failure to do so
may cause the back door to operate
unintentionally if the power back door
switch is accidentally touched, resulting
in hands and fingers being caught and
injured.
Installing the tire
A
B
Page 360 of 476

3606-3. Do-it-yourself maintenance
WARNING
■When installing the tire
Failure to follow these precautions could
cause the wheel nuts to loosen and the
tire to fall off, resulting in death or serious
injury.
●Never use oil or grease on the wheel
bolts or wheel nuts.
Oil and grease may cause the wheel
nuts to be excessively tightened, lead-
ing to bolt or disc wheel damage. In
addition, the oil or grease can cause
the wheel nuts to loosen and the wheel
may fall off, causing a serious accident.
Remove any oil or grease from the
wheel bolts or wheel nuts.
●Have the wheel nuts tightened with a
torque wrench to 76 ft•lbf (103 N•m,
10.5 kgf•m) as soon as possible after
changing wheels.
●Do not attach a heavily damaged
wheel ornament, as it may fly off the
wheel while the vehicle is moving.
●When installing a tire, only use wheel
nuts that have been specifically
designed for that wheel.
●If there are any cracks or deformations
in the bolt screws, nut threads or bolt
holes of the wheel, have the vehicle
inspected by your Lexus dealer.
●Do not attach a heavily damaged
wheel ornament, as it may fly off the
wheel while the vehicle is moving.
■After using the tools and jack (if
equipped)
Before driving, make sure all the tools
and jack are stored securely in place.
Failure to do so may cause injury in case
of a collision or sudden braking.
NOTICE
■Repairing or replac ing tires, wheels,
tire pressure warning valves, trans-
mitters and tire valve caps
P.350
Page 361 of 476

3616-3. Do-it-yourself maintenance
6
Maintenance and care
The recommended cold tire inflation
pressure and tire size are displayed on
the tire and loading information label.
( P.422)
Tire valve Tire pressure gauge
1 Remove the tire valve cap.
2 Press the tip of the tire pressure
gauge onto the tire valve.
3 Read the pressure using the gauge
gradations.
4 If the tire inflation pressure is not at
the recommended level, adjust the
pressure.
If you add too much air, press the
center of the valve to deflate.
5 After completing the tire inflation
pressure measurement and adjust-
ment, apply soapy water to the
valve and check for leakage.
6 Put the tire valve cap back on.
■Tire inflation pressure check interval
You should check tire inflation pressure
every two weeks, or at least once a month.
Do not forget to check the spare.
■Effects of incorrect tire inflation pres-
sure
Driving with incorrect ti re inflation pressure
may result in the following:
●Reduced fuel economy
●Reduced driving comfort and poor han-
dling
●Reduced tire life due to wear
●Reduced safety
●Damage to the drive train
If a tire needs frequent inflating, have it
checked by your Lexus dealer.
■Instructions for checking tire inflation
pressure
When checking tire inflation pressure,
observe the following:
●Check only when the tires are cold.
If your vehicle has been parked for at
least 3 hours or has not been driven for
Tire inflation pressure
Checking the specified tire infla-
tion pressure
Inspection and adjustment pro-
cedure
A
B
Page 362 of 476

3626-3. Do-it-yourself maintenance
more than 1 mile or 1.5 km, you will get an
accurate cold tire inflation pressure read-
ing.
●Always use a tire pressure gauge.
It is difficult to judge if a tire is properly
inflated based only on its appearance.
●It is normal for the tire inflation pressure
to be higher after driving as heat is gen-
erated in the tire. Do not reduce tire infla-
tion pressure after driving.
●Never exceed the vehicle capacity
weight.
Passengers and luggage weight should
be placed so that the vehicle is balanced.
WARNING
■Proper inflation is critical to save tire
performance
Keep your tires properly inflated.
If the tires are not properly inflated, the
following conditions may occur which
could lead to an accident resulting in
death or serious injury:
●Excessive wear
●Uneven wear
●Poor handling
●Possibility of blowouts resulting from
overheated tires
●Air leaking from between tire and
wheel
●Wheel deformation and/or tire dam-
age
●Greater possibility of tire damage
while driving (due to road hazards,
expansion joints, sharp edges in the
road, etc.)
NOTICE
■When inspecting and adjusting tire
inflation pressure
Be sure to put the tire valve caps back on.
If a valve cap is not installed, dirt or mois-
ture may get into the valve and cause an
air leak, resulting in decreased tire infla-
tion pressure.
Page 363 of 476

3636-3. Do-it-yourself maintenance
6
Maintenance and care
When replacing wheels, care should
be taken to ensure that they are equiv-
alent to those removed in load capac-
ity, diameter, rim width and inset
*.
Replacement wheels are available at
your Lexus dealer.
*: Conventionally referred to as offset.
Lexus does not recommend using the
following:
Wheels of different sizes or types
Used wheels
Bent wheels that have been straight-
ened
■When replacing wheels
The wheels of your vehicle are equipped
with tire pressure warning valves and trans-
mitters that allow the tire pressure warning
system to provide advance warning in the
event of a loss in tire inflation pressure.
Whenever wheels are replaced, tire pres-
sure warning valves an d transmitters must
be installed. ( P.350) Use only Lexus wheel nuts and
wrenches designed for use with
your aluminum wheels.
When rotating, repairing or chang-
ing your tires, check that the wheel
nuts are still tight after driving 1000
miles (1600 km).
Be careful not to damage the alumi-
num wheels when using tire chains.
Use only Lexus genuine balance
weights or equivalent and a plastic
or rubber hammer when balancing
your wheels.
Wheels
If a wheel is bent, cracked or heavily
corroded, it should be replaced.
Otherwise, the tire may separate
from the wheel or cause a loss of
handling control.
Wheel selection
WARNING
■When replacing wheels
●Do not use wheels that are a different
size from those recommended in the
Owner’s Manual, as this may result in a
loss of handling control.
●Never use an inner tube in a leaking
wheel which is designed for a tubeless
tire. Doing so may result in an acci-
dent, causing death or serious injury.
■Use of defective wheels prohibited
Do not use cracked or deformed wheels.
Doing so could cause the tire to leak air
during driving, possibly causing an acci-
dent.
NOTICE
■Replacing tire pressure warning
valves and transmitters
●Because tire repair or replacement
may affect the tire pressure warning
valves and transmitters, make sure to
have tires serviced by your Lexus
dealer or other qua lified service shop.
In addition, make sure to purchase
your tire pressure warning valves and
transmitters at your Lexus dealer.
●Ensure that only genuine Lexus wheels
are used on your vehicle.
Tire pressure warning valves and trans-
mitters may not work properly with
non-genuine wheels.
Aluminum wheel precautions
Page 381 of 476

3817-2. Steps to take in an emergency
7
When trouble arises
7-2.Steps to take in an emergency
If your vehicle needs to be
t
owed
If towing is ne cessary, we recom-
mend having your vehicle towed by
your Lexus dealer or commercial
towing service, using a wheel-lift
type truck or flatbed truck.
Use a safety chain system for all
towing, and abide by all state/pro-
vincial and local laws.
2WD models: If towing your vehicle
with a wheel-lift type truck from the
front, the vehicle’s rear wheels and
axles must be in good conditions.
( P.381, 383) If they are dam-
aged, use a towing dolly or flatbed
truck.
AWD models: If towing your vehi-
cle with a wheel-lift type truck, use
a towing dolly. ( P.381, 383)
WARNING
Observe the following precautions.
Failure to do so may result in death or
serious injury.
■When towing the vehicle
2WD models
Be sure to transport the vehicle with the
front wheels raised or with all four wheels
raised off the ground. If the vehicle is
towed with the front wheels contacting
the ground, the drivetrain and related
parts may be damaged or electricity
generated by the operation of the motor
may cause a fire to occur depending on
the nature of the damage or malfunction.
AWD models
Be sure to transport the vehicle with all
four wheels raised off the ground. If the
vehicle is towed with the tires contacting
the ground, the driv etrain or related
parts may be damaged, the vehicle may
fly off the truck, or electricity generated
by the operation of the motor may cause
a fire to occur depending on the nature
of the damage or malfunction.