2019 LEXUS UX250H lights
[x] Cancel search: lightsPage 77 of 476

772-1. Instrument cluster
2
Vehicle status information and indicators
Drive mode indicators
Except F SPORT models
F SPORT models
*1: These lights come on when the power
switch is turned to ON to indicate that a
system check is being performed. They
will go off after the hybrid system is on,
or after a few second s. There may be a
malfunction in a system if the lights do
not come on, or go off. Have the vehicle
inspected by your Lexus dealer.
*2: This light comes on when the system is turned off.
*3: This light illuminates on the multi-infor-mation display.
*4: This light flashes to indicate that the sys- tem is operating.
*5: This light illuminates on the outside rear view mirrors.
*6: Except F SPORT models: This light illu- minates on the multi-information dis-
play.
*7: When the outside temperature is approximately 37°F (3°C) or lower, this
indicator will flash for approximately 10
seconds, then stay on.
*8: This light illuminates on the center panel.
“READY” indicator (
P.162)
EV drive mode indicator
( P.165)
(U.S.A.) Parking brake indicator
(
P.172)
(Canada) Parking brake indicator
(
P.172)
Brake hold standby indicator
*1
( P.175)
Brake hold operated indicator
*1
( P.175)
EV indicator
*6 ( P.63)
Low outside temperature indi-
cator
*3, 7 ( P.78, 82)
Security indicator
*8 ( P.69,
71)
(U.S.A.) “AIR BAG ON/OFF” indica-
tor
*8 (
P.39)
(Canada) “AIR BAG ON/OFF” indica-
tor
*8 (
P.39)
Eco drive mode indicator
( P.255)
Sport mode indicator
( P.255)
Eco drive mode indicator
( P.255)
Sport mode indicator
( P.255)
Page 80 of 476

802-1. Instrument cluster
( P.435)
■Display items
Odometer
Displays the total distance the vehicle has
been driven.
Trip meter A/trip meter B
Displays the distance the vehicle has been
driven since the meter was last reset. Trip
meters A and B can be used to record and display different distances independently.
Distance until next engine oil
change
Displays the distance the vehicle can be
driven until an oil change is necessary.
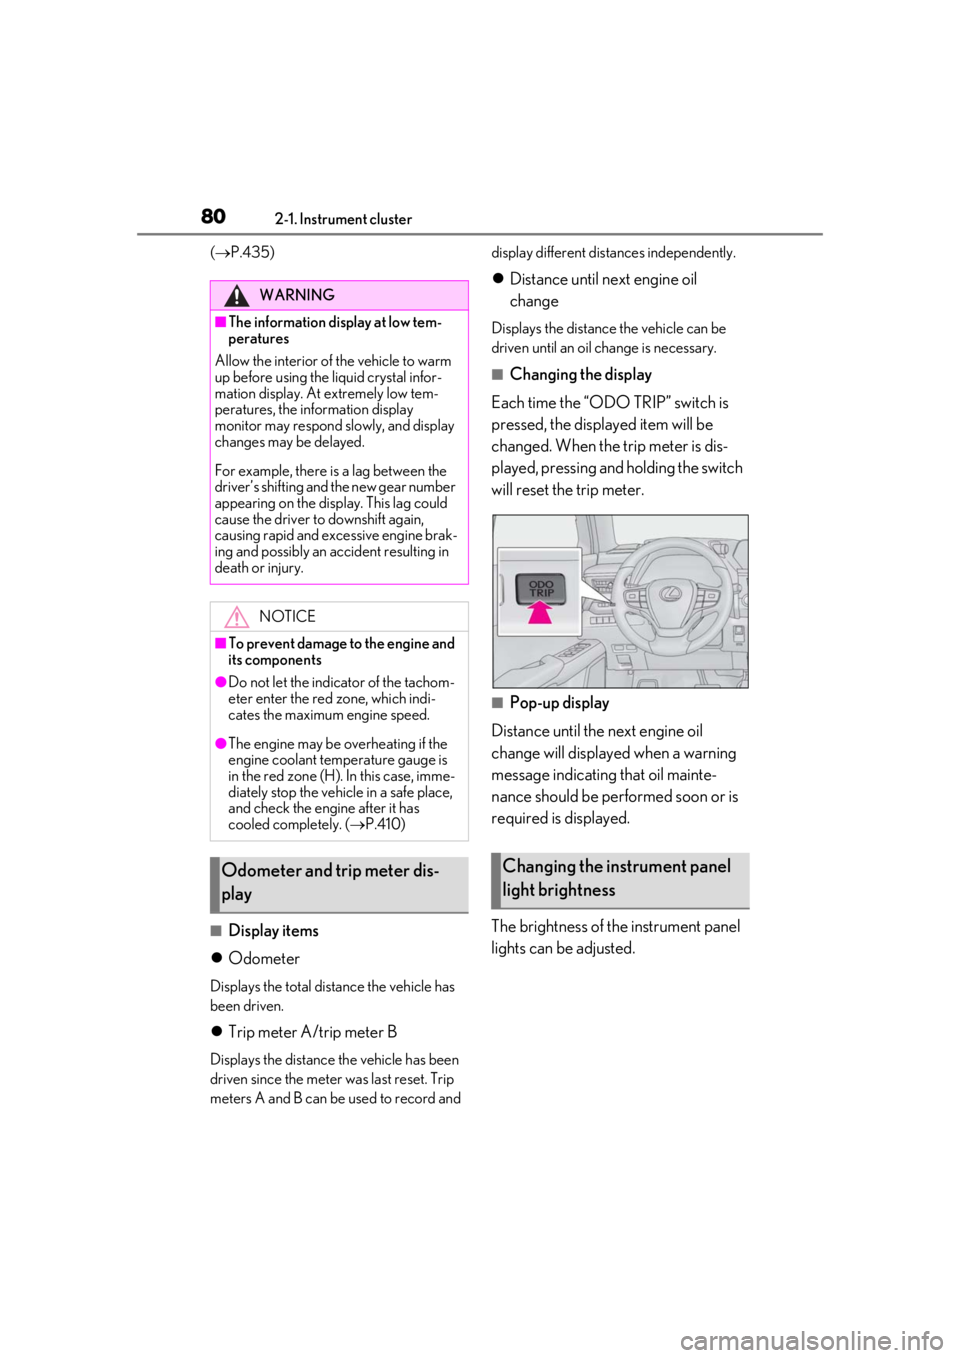
■Changing the display
Each time the “ODO TRIP” switch is
pressed, the displayed item will be
changed. When the trip meter is dis-
played, pressing and holding the switch
will reset the trip meter.
■Pop-up display
Distance until the next engine oil
change will displayed when a warning
message indicating that oil mainte-
nance should be performed soon or is
required is displayed.
The brightness of the instrument panel
lights can be adjusted.
WARNING
■The information display at low tem-
peratures
Allow the interior of the vehicle to warm
up before using the liquid crystal infor-
mation display. At extremely low tem-
peratures, the information display
monitor may respond slowly, and display
changes may be delayed.
For example, there is a lag between the
driver’s shifting and the new gear number
appearing on the display. This lag could
cause the driver to downshift again,
causing rapid and excessive engine brak-
ing and possibly an accident resulting in
death or injury.
NOTICE
■To prevent damage to the engine and
its components
●Do not let the indicator of the tachom-
eter enter the red zone, which indi-
cates the maximum engine speed.
●The engine may be overheating if the
engine coolant temperature gauge is
in the red zone (H). In this case, imme-
diately stop the vehicle in a safe place,
and check the engine after it has
cooled completely. ( P.410)
Odometer and trip meter dis-
playChanging the instrument panel
light brightness
Page 86 of 476

862-1. Instrument cluster
■Display items
Odometer
Displays the total distance the vehicle has
been driven.
Trip meter A/trip meter B
Displays the distance the vehicle has been
driven since the meter was last reset. Trip
meters A and B can be used to record and
display different distances independently.
Distance until next engine oil
change
Displays the distance the vehicle can be
driven until an oil change is necessary.
■Changing the display
Each time the “ODO TRIP” switch is
pressed, the displayed item will be
changed. When the trip meter is dis-
played, pressing and holding the switch
will reset the trip meter.
■Pop-up display
Distance until the next engine oil
change will displayed when a warning
message indicating that oil mainte-
nance should be performed soon or is
required is displayed. The brightness of the instrument panel
lights can be adjusted.
1
Darker
2 Brighter
■Instrument panel brightness adjustment
The instrument panel brightness levels
when the surroundings are bright (daytime
etc.) and dark (nighttime etc.) can be
adjusted individually.
The display can be switched between
the center and side positions.
Odometer and trip meter dis-
playChanging the instrument panel
light brightness
Changing the display
Page 92 of 476

922-1. Instrument cluster
Displays suggestions to the driver in
the following situations. To select a
response to a displayed suggestion,
use the meter control switches.
■Suggestion to enable the power
back door
If the power back door system is dis-
abled on of the multi-information
display ( P.87) and the power back
door switch on the instrument panel is
operated, a suggestion message will be
displayed asking if you wish to enable
the power back door system. To enable
the power back door system, select
“Yes”.
After enabling the power back door
system, press the power back door
switch again to open or close the
power back door.
■Suggestion to turn on the head-
lights
If the headlight switch is in other than
or position, and the vehicle
speed is 3 mph (5 km/h) or higher for
a certain amount of time when the sur-
roundings are dark, a suggestion mes-
sage will be displayed.
■Suggestion to turn off the head-
lights
If the headlights are left on for a certain
amount of time with the headlight
switch in or position after the
power switch has been turned off, a
suggestion message will be displayed
asking if you wish to turn the headlights off.
To turn the headlight
s off, select “Yes”.
If a front door is opened after the power
switch is turned off, this suggestion mes-
sage will not be displayed.
■Customization
Some functions can be customized.
( P.435)
Suggestion function
Page 106 of 476

1063-1. Key information
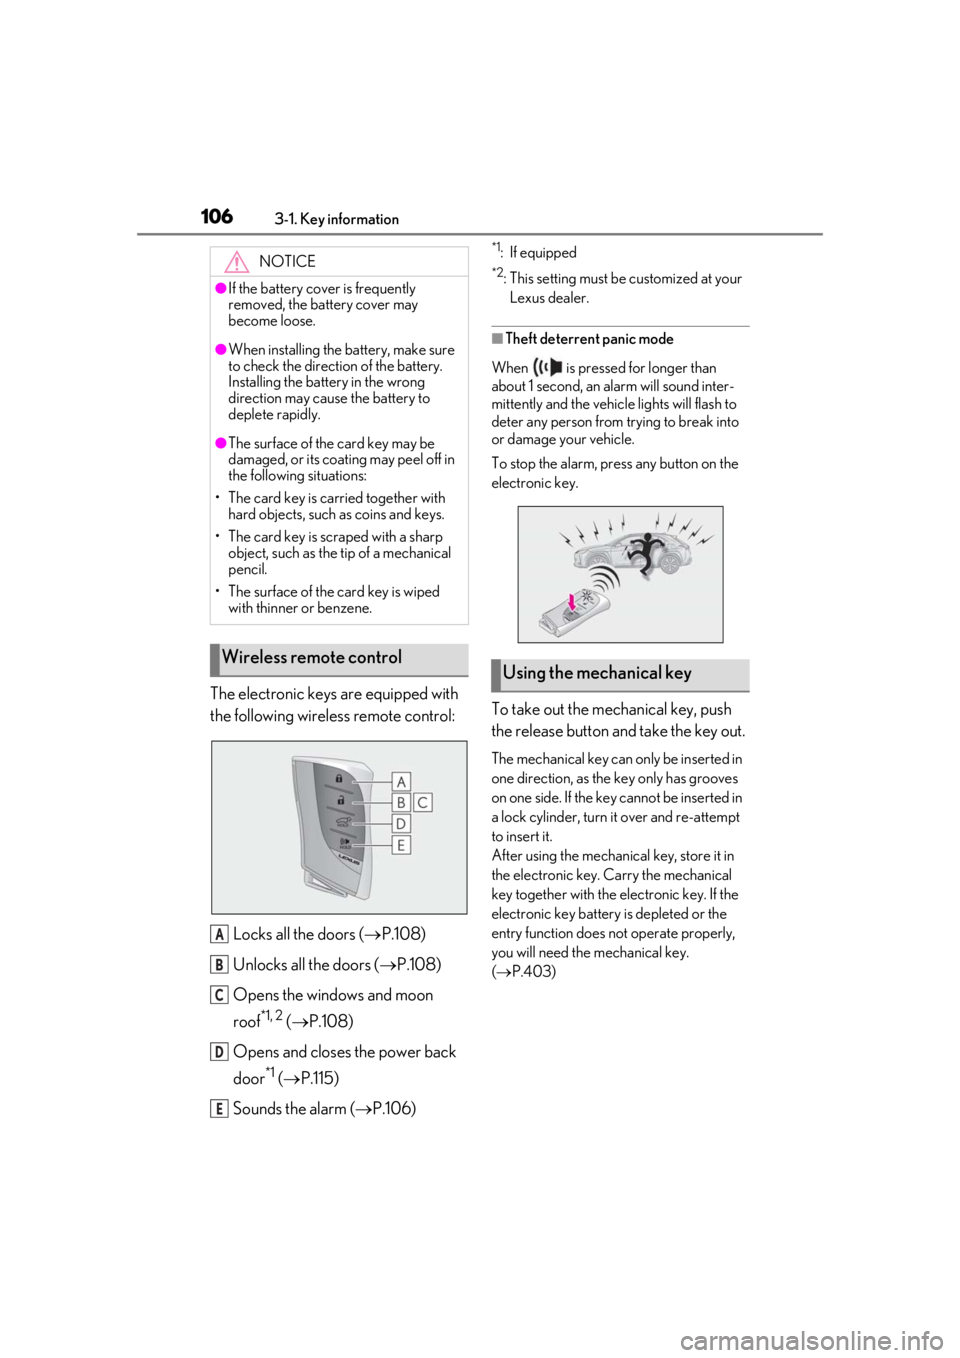
The electronic keys are equipped with
the following wireless remote control:Locks all the doors ( P.108)
Unlocks all the doors ( P.108)
Opens the windows and moon
roof
*1, 2 ( P.108)
Opens and closes the power back
door
*1 ( P.115)
Sounds the alarm ( P.106)
*1: If equipped
*2: This setting must be customized at your
Lexus dealer.
■Theft deterrent panic mode
When is pressed for longer than
about 1 second, an alarm will sound inter-
mittently and the vehicle lights will flash to
deter any person from trying to break into
or damage your vehicle.
To stop the alarm, press any button on the
electronic key.
To take out the mechanical key, push
the release button and take the key out.
The mechanical key can only be inserted in
one direction, as the key only has grooves
on one side. If the key cannot be inserted in
a lock cylinder, turn it over and re-attempt
to insert it.
After using the mechanical key, store it in
the electronic key. Carry the mechanical
key together with the electronic key. If the
electronic key battery is depleted or the
entry function does not operate properly,
you will need the mechanical key.
( P.403)
NOTICE
●If the battery cover is frequently
removed, the battery cover may
become loose.
●When installing the ba
ttery, make sure
to check the direction of the battery.
Installing the battery in the wrong
direction may cause the battery to
deplete rapidly.
●The surface of the card key may be
damaged, or its coating may peel off in
the following situations:
• The card key is carried together with hard objects, such as coins and keys.
• The card key is scraped with a sharp object, such as the tip of a mechanical
pencil.
• The surface of the card key is wiped with thinner or benzene.
Wireless remote control
A
B
C
D
E
Using the mechanical key
Page 140 of 476

1403-4. Adjusting the steering wheel and mirrors
Press on or close to the mark.The height of the rear view mirror can
be adjusted to suit your driving pos-
ture.
Adjust the height of the rear view mir-
ror by moving it up and down.
Manual anti-glare inside rear view
mirror
Reflected light from the headlights of
vehicles behind can be reduced by
operating the lever.
WARNING
■Caution while driving
Do not adjust the steering wheel while
driving.
Doing so may cause the driver to mis-
handle the vehicle and cause an acci-
dent, resulting in death or serious injury.
■After adjusting the steering wheel
(manual type)
Make sure that the steering wheel is
securely locked.
Otherwise, the steering wheel may move
suddenly, possibly causing an accident,
and resulting in death or serious injury.
Sounding the horn
Inside rear view mirror
The rear view mirror’s position can
be adjusted to enable sufficient
confirmation of the rear view.
Adjusting the heig ht of rear view
mirror
WARNING
■Caution while driving
Do not adjust the position of the mirror
while driving.
Doing so may lead to mishandling of the
vehicle and cause an accident, resulting
in death or serious injury.
Anti-glare function
Page 141 of 476

1413-4. Adjusting the steering wheel and mirrors
3
Before driving
Normal position
Anti-glare position
Auto anti-glare inside rear view mir-
ror
Responding to the level of brightness
of the headlights of vehicles behind, the
reflected light is automatically
reduced.
Turn the automatic anti-glare function
mode on/off
When the automatic anti-glare function is
in ON mode, the indicator illuminates.
The function will set to ON mode each
time the power switch is turned to ON.
Pressing the button turns the function to
OFF mode. (The indicator also turns
off.)
■To prevent sensor error (vehicles with
auto anti-glare inside rear view mirror)
To ensure that the sensors operate properly,
do not touch or cover them.
A
B
A
A
Page 151 of 476

151
4
4
Driving
Driving
4-1. Before drivingDriving the vehicle ..................... 152
Cargo and luggage ................... 157
Vehicle load limits ...................... 160
Trailer towing ............................... 160
Dinghy towing .............................. 161
4-2. Driving procedures Power (ignition) switch ............ 162
EV drive mode ............................ 165
Hybrid transmission .................. 167
Turn signal lever........................... 171
Parking brake .............................. 172
Brake Hold.................................... 175
ASC (Active Sound Control) 176
4-3. Operating the lights and wipers Headlight switch ......................... 177
Automatic High Beam ............. 180
Fog light switch ........................... 183
Windshield wipers and washer ......................................................... 184
Rear window wiper and washer ......................................................... 188
4-4. Refueling Opening the fuel tank cap...... 190
4-5. Using the driving support sys- tems
Lexus Safety System+2.0 ....... 192
PCS (Pre-Collision System).. 198
LTA (Lane Tracing Assist)..... 205
RSA (Road Sign Assist) ........... 214Dynamic radar cruise control with
full-speed range....................... 216
BSM (Blind Spot Monitor) .... 226
PKSA (Parking Support Alert) ........................................................ 231
Intuitive parking assist ............. 232
RCTA (Rear Cross Traffic Alert) function....................................... 239
PKSB (Parking Support Brake) ....................................................... 243
Parking Support Brake function (static objects) ......................... 247
Parking Support Brake function (rear-crossing vehicles) ...... 252
Driving mode select switch .. 255
Driving assist systems.............. 256
4-6. Driving tips Hybrid vehicle driving tips ..... 261
Winter driving tips .................... 263
Utility vehicle precautions..... 266