2019 LEXUS UX250H brakes
[x] Cancel search: brakesPage 262 of 476

2624-6. Driving tips
Control and maintain the vehicle at a
constant speed. Before stopping at a
toll booth or similar, allow plenty of
time to release the accelerator and
gently apply the brakes. A greater
amount of electrical energy can be
regenerated when slowing down.
Use the air conditioning only when
necessary. Doing so can help reduce
excessive gasoline consumption.
In summer: When the ambient tem-
perature is high, use the recirculated
air mode. Doing so will help to reduce
the burden on the air conditioning sys-
tem and reduce fuel consumption as
well.
In winter: Because the gasoline engine
will not automatically cut out until it and
the interior of the vehicle are warm, it
will consume fuel. Also, fuel consump-
tion can be improved by avoiding over-
use of the heater.
Make sure to check the tire inflation
pressure frequently. Improper tire infla-
tion pressure can cause poor fuel
economy.
Also, as snow tires can cause large
amounts of friction, their use on dry
roads can lead to poor fuel economy.
Use tires that are appropriate for the
season. Carrying heavy luggage will lead to
poor fuel economy. Avoid carrying
unnecessary luggage.
Installing a large
roof rack will also cause poor fuel
economy.
Since the gasoline engine starts up and
cuts out automatically when cold,
warming up the engine is unnecessary.
Moreover, frequently driving short dis-
tances will cause the engine to repeat-
edly warm up, which can lead to excess
fuel consumption.
Highway driving
Air conditioning
Checking tire inflation pressure
Luggage
Warming up before driving
Page 264 of 476

2644-6. Driving tips
freezing.
To ensure proper operation of the
climate control system fan, remove
any snow that has accumulated on
the air inlet vents in front of the
windshield.
Check for and remove any excess
ice or snow that may have accumu-
lated on the exterior lights, vehicle’s
roof, chassis, around the tires or on
the brakes.
Remove any snow or mud from the
bottom of your shoes before getting
in the vehicle.
Accelerate the vehicle slowly, keep a
safe distance between you and the
vehicle ahead, and drive at a reduced
speed suitable to road conditions.
Park the vehicle and move the shift
lever to P without setting the park-
ing brake. The parking brake may
freeze up, preventing it from being
released. If the vehicle is parked
without setting the parking brake,
make sure to block the wheels.
Failure to do so may be dangerous
because it may cause the vehicle to
move unexpectedly, possibly lead-
ing to an accident.
When the parking brake is in automatic
mode, release the parking brake after shift-
ing the shift lever to P. ( P.172)
If the vehicle is left parked with the brakes damp in cold temperatures,
there is a possibility of the brakes
freezing.
If the vehicle is parked without set-
ting the parking brake, confirm that
the shift lever cannot be moved out
of P
*.
*: The shift lever will be locked if it is
attempted to be shifted from P to any
other position with out depressing the
brake pedal. If the shift lever can be
shifted from P, there may be a problem
with the shift lock system. Have the vehi-
cle inspected by your Lexus dealer
immediately.
Use the correct tire chain size when
mounting the tire chains. Chain size is
regulated for each tire size.
Side chain:
0.12 in. (3 mm) in diameter
0.39 in. (10 mm) in width
When driving the vehicle
When parking the vehicle
WARNING
■When parking the vehicle
When parking the vehicle without apply-
ing the parking brake, make sure to
chock the wheels. If you do not chock the
wheels, the vehicle may move unexpect-
edly, possibly result ing in an accident.
Selecting tire chains
A
B
Page 267 of 476

2674-6. Driving tips
4
Driving
Drive your vehicle only in areas
where off-road vehicles are permit-
ted to travel.
Respect private property. Get
owner’s permission before entering
private property.
Do not enter areas that are closed.
Honor gates, barriers and signs that
restrict travel.
Stay on established roads. When
conditions are we t, driving tech-
niques should be changed or travel
delayed to prevent damage to
roads.
AWD models: Avoid driving on very
steep, slippery roads and other sur-
faces, such as sand, where the tires
are liable to lose traction. Your vehi-
cle may not perform as well as con-
ventional AWD on-road vehicles on
these surfaces.
■Additional informatio n for off-road driv-
ing
For owners in U.S. mainland, Hawaii and
Puerto Rico:
To obtain additional information pertaining
to driving your vehicle off-road, consult the
following organizations.
●State and Local Parks and Recreation
Departments
●State Motor Vehicle Bureau
●Recreational Vehicle Clubs
●U.S. Forest Service and Bureau of Land
Management
WARNING
■Off-road driving precautions
Always observe the following precau-
tions to minimize the risk of death or seri-
ous injury or damage to your vehicle:
●Drive carefully when off the road. Do
not take unnecessary risks by driving in
dangerous places.
●Do not grip the steering wheel spokes
when driving off-road. A bad bump
could jerk the wheel and injure your
hands. Keep both hands and especially
your thumbs on the outside of the rim.
●Always check your brakes for effec-
tiveness immediately after driving in
sand, mud, water or snow.
●After driving through tall grass, mud,
rock, sand, water, et c., check that there
is no grass, bush, paper, rags, stone,
sand, etc. adhering or trapped to the
underbody. Clear of f any such matter
from the underbody. If the vehicle is
used with these materials trapped or
adhering to the underbody, a break-
down or fire could occur.
●When driving off-road or in rugged
terrain, do not drive at excessive
speeds, jump, make sharp turns, strike
objects, etc. This may cause loss of
control or vehicle rollover causing
death or serious injury. You are also
risking expensive damage to your
vehicle’s suspension and chassis.
NOTICE
■To prevent water damage
Take all necessary safety measures to
ensure that water damage to the hybrid
battery (traction battery), hybrid system
or other components does not occur.
●Water entering the engine compart-
ment may cause seve re damage to the
hybrid system. Water entering the inte-
rior may cause the hybrid battery
stowed under the re ar seats to short
circuit.
Page 330 of 476

3306-2. Maintenance
Luggage compartment
ItemsCheck points
12-volt batteryCheck the connections.
( P.342)
Vehicle interior
ItemsCheck points
Accelerator
pedal
• The accelerator pedal
should move smoothly
(without uneven pedal
effort or catching).
Brake pedal
• Does the brake pedal move smoothly?
• Does the brake pedal have appropriate clear-
ance from the floor?
• Does the brake pedal have the correct amount
of free play?
Brakes
•The vehicle should not pull to one side when the
brakes are applied.
• The brakes should work effectively.
• The brake pedal should not feel spongy.
• The brake pedal should not get too close to the
floor when the brakes
are applied.
Head
restraints• Do the head restraints move smoothly and lock
securely?
Hybrid trans-
mission “Park”
mechanism• When parked on a slope and the shift lever is in P,
is the vehicle securely
stopped?
Indica-
tors/buzzers• Do the indicators and buzzers function prop-
erly?
Lights
• Do all the lights come on?
• Are the headlights aimed correctly?
Parking brake
• Does the parking brake switch operate nor-
mally?
• When parked on a slope and the parking brake is
on, is the vehicle
securely stopped?
Seat belts
• Do the seat belts oper-ate smoothly?
• The seat belts should not be damaged.
Seats• Do the seat controls operate properly?
Steering
wheel
• Does the steering wheel rotate smoothly?
• Does the steering wheel have the correct amount
of free play?
• There should not be any strange sounds coming
from the steering wheel.
Vehicle exterior
ItemsCheck points
Doors• Do the doors operate smoothly?
Engine hood
• Does the engine hood lock system work prop-
erly?
ItemsCheck points
Page 359 of 476

3596-3. Do-it-yourself maintenance
6
Maintenance and care
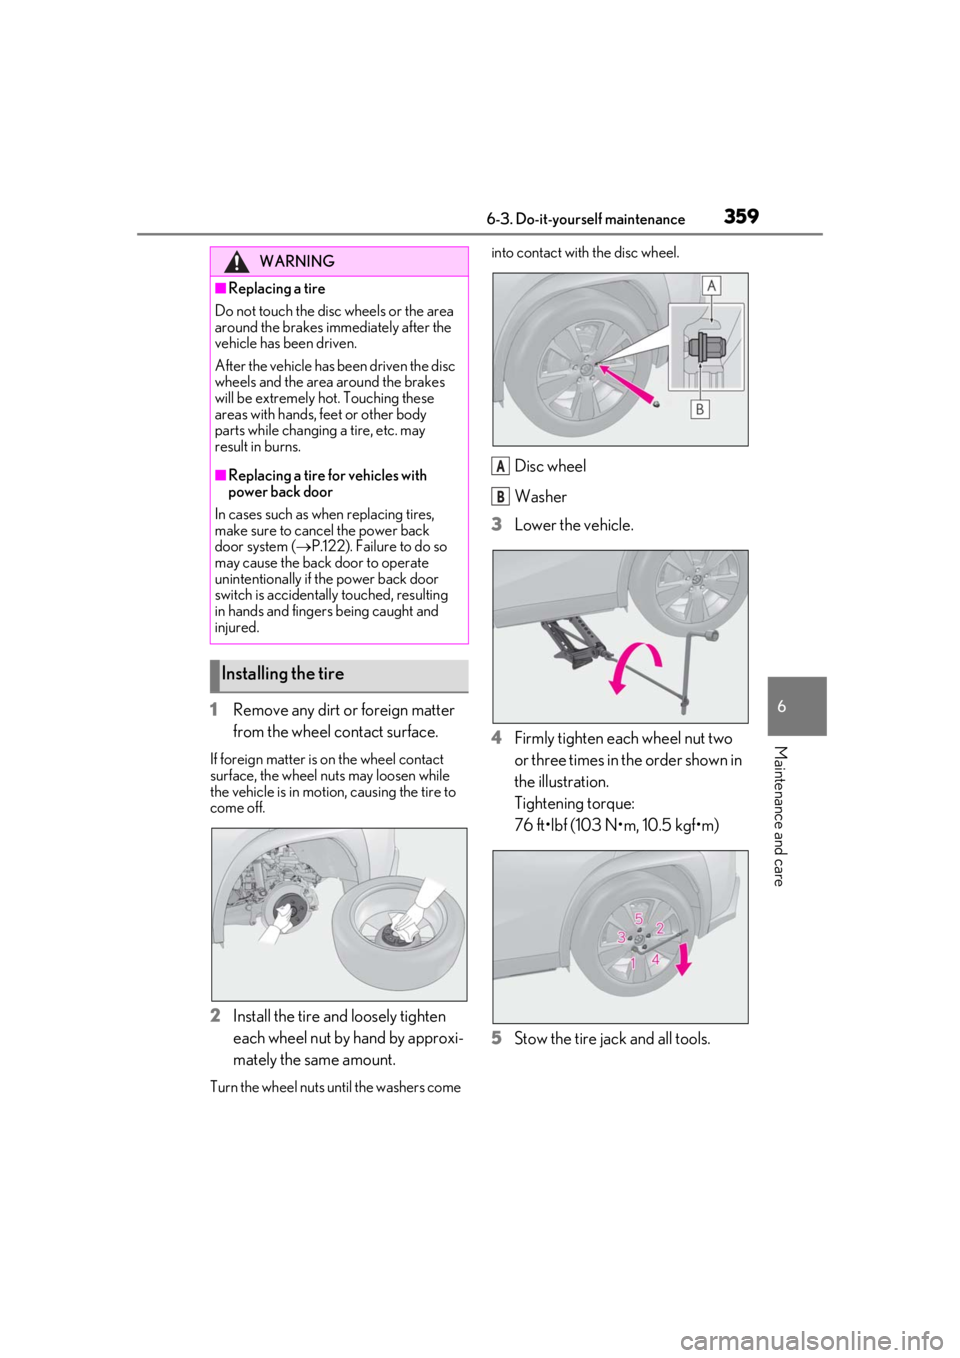
1Remove any dirt or foreign matter
from the wheel contact surface.
If foreign matter is on the wheel contact
surface, the wheel nuts may loosen while
the vehicle is in motion, causing the tire to
come off.
2Install the tire and loosely tighten
each wheel nut by hand by approxi-
mately the same amount.
Turn the wheel nuts until the washers come into contact with the disc wheel.
Disc wheel
Washer
3
Lower the vehicle.
4
Firmly tighten each wheel nut two
or three times in the order shown in
the illustration.
Tightening torque:
76 ft•lbf (103 N•m, 10.5 kgf•m)
5
Stow the tire jack and all tools.
WARNING
■Replacing a tire
Do not touch the disc wheels or the area
around the brakes immediately after the
vehicle has been driven.
After the vehicle has been driven the disc
wheels and the area around the brakes
will be extremely hot. Touching these
areas with hands, feet or other body
parts while changing a tire, etc. may
result in burns.
■Replacing a tire for vehicles with
power back door
In cases such as when replacing tires,
make sure to cancel the power back
door system ( P.122). Failure to do so
may cause the back door to operate
unintentionally if the power back door
switch is accidentally touched, resulting
in hands and fingers being caught and
injured.
Installing the tire
A
B
Page 383 of 476

3837-2. Steps to take in an emergency
7
When trouble arises
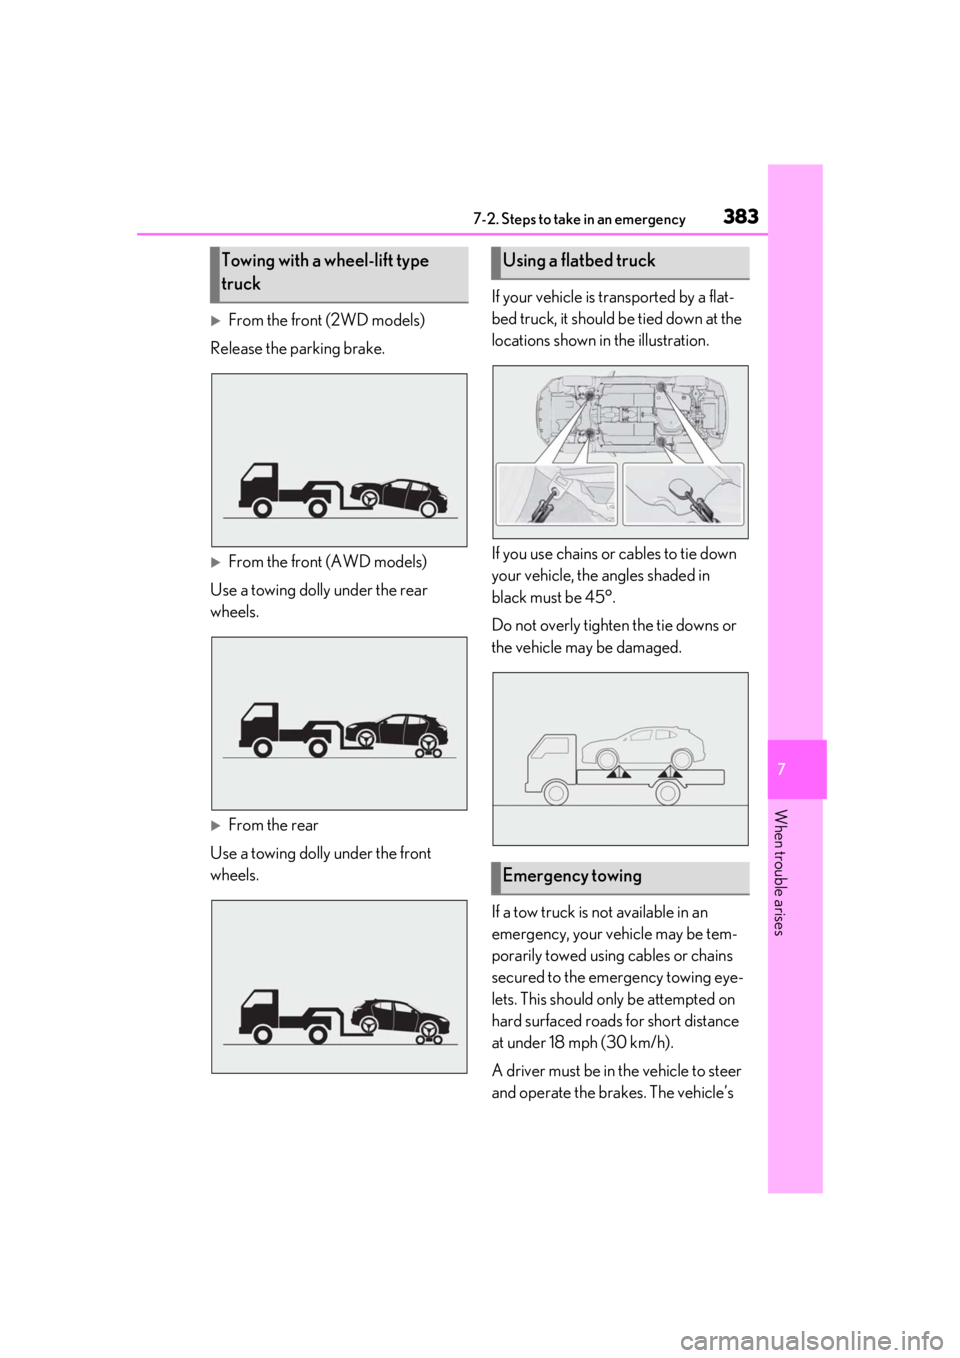
From the front (2WD models)
Release the parking brake.
From the front (AWD models)
Use a towing dolly under the rear
wheels.
From the rear
Use a towing dolly under the front
wheels. If your vehicle is transported by a flat-
bed truck, it should be tied down at the
locations shown in the illustration.
If you use chains or cables to tie down
your vehicle, the angles shaded in
black must be 45°.
Do not overly tighten the tie downs or
the vehicle may be damaged.
If a tow truck is not available in an
emergency, your vehicle may be tem-
porarily towed using cables or chains
secured to the emergency towing eye-
lets. This should only be attempted on
hard surfaced roads for short distance
at under 18 mph (30 km/h).
A driver must be in the vehicle to steer
and operate the brakes. The vehicle’s
Towing with a wheel-lift type
truckUsing a flatbed truck
Emergency towing
Page 384 of 476

3847-2. Steps to take in an emergency
wheels, drivetrain, axles, steering and
brakes must be in good condition.
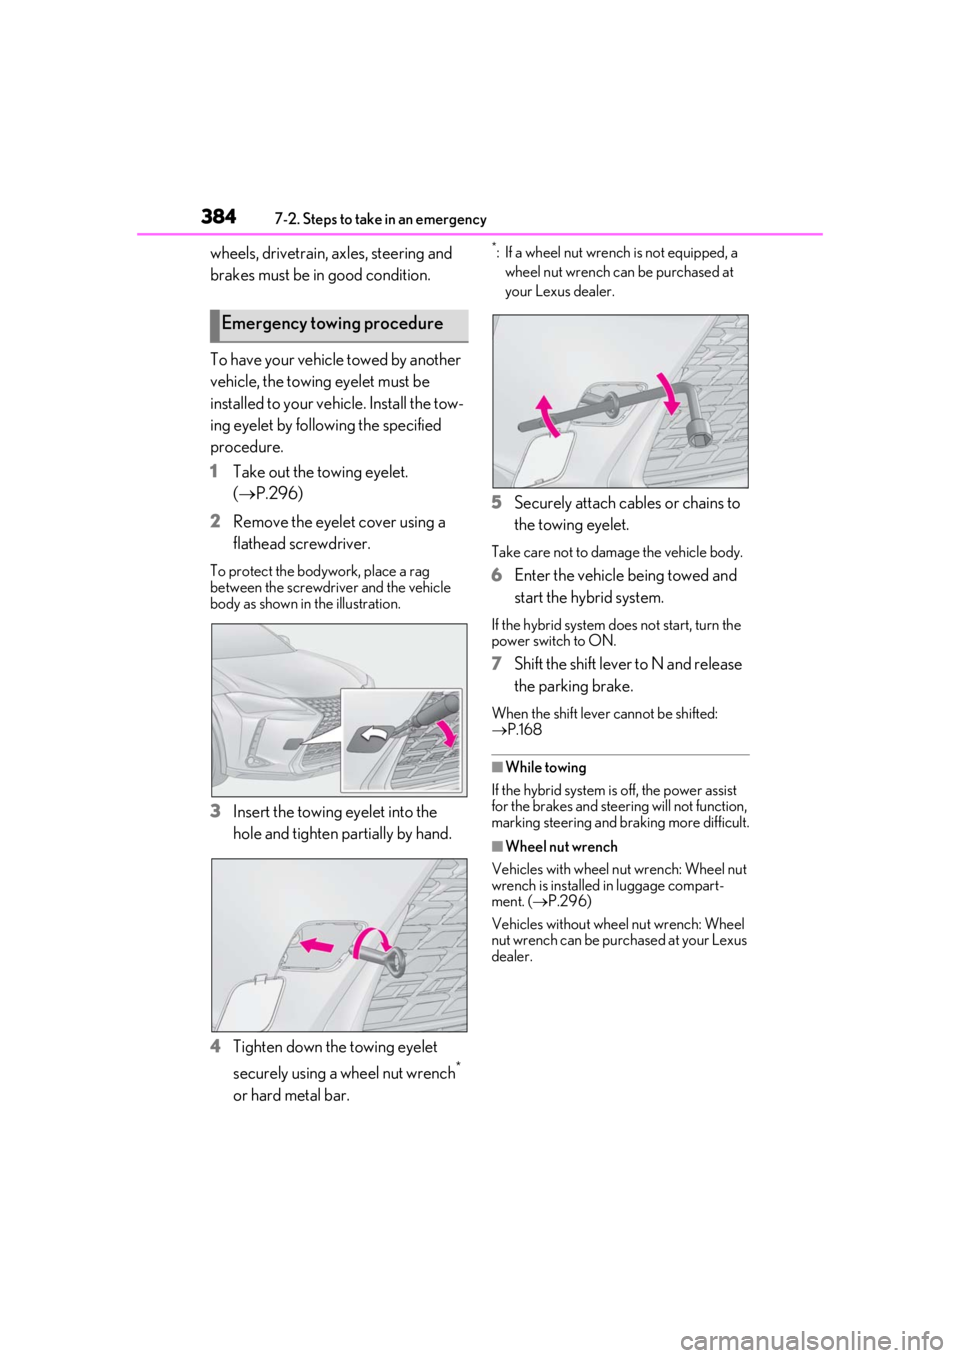
To have your vehicle towed by another
vehicle, the towing eyelet must be
installed to your vehicle. Install the tow-
ing eyelet by following the specified
procedure.
1 Take out the towing eyelet.
(P.296)
2 Remove the eyelet cover using a
flathead screwdriver.
To protect the bodywork, place a rag
between the screwdriver and the vehicle
body as shown in the illustration.
3Insert the towing eyelet into the
hole and tighten partially by hand.
4 Tighten down the towing eyelet
securely using a wheel nut wrench
*
or hard metal bar.
*: If a wheel nut wrench is not equipped, a wheel nut wrench can be purchased at
your Lexus dealer.
5 Securely attach cables or chains to
the towing eyelet.
Take care not to damage the vehicle body.
6Enter the vehicle being towed and
start the hybrid system.
If the hybrid system does not start, turn the
power switch to ON.
7Shift the shift lever to N and release
the parking brake.
When the shift lever cannot be shifted:
P.168
■While towing
If the hybrid system is off, the power assist
for the brakes and steering will not function,
marking steering and braking more difficult.
■Wheel nut wrench
Vehicles with wheel nut wrench: Wheel nut
wrench is installed in luggage compart-
ment. ( P.296)
Vehicles without wheel nut wrench: Wheel
nut wrench can be purchased at your Lexus
dealer.
Emergency towing procedure
Page 394 of 476

3947-2. Steps to take in an emergency
WARNING
●If the tire pressure warning light comes
on even after tire inflation pressure
adjustment, it is probable that you have
a flat tire. Have the flat tire replaced by
the nearest Lexus dealer.
●Avoid abrupt maneuvering and brak-
ing.
If the vehicle tires deteriorate, you
could lose control of the steering
wheel or the brakes.
■If a blowout or sudden air leakage
should occur
The tire pressure warning system may
not activate immediately.
■Maintenance of the tires
Each tire, including the spare (if pro-
vided), should be checked monthly when
cold and inflated to the inflation pressure
recommended by the vehicle manufac-
turer on the vehicle placard or tire infla-
tion pressure label (tire and load
information label). (If your vehicle has
tires of a different size than the size indi-
cated on the vehicle placard or tire infla-
tion pressure label [tire and load
information label], yo u should determine
the proper tire infl ation pressure for
those tires.)
As an added safety feature, your vehicle
has been equipped with a tire pressure
monitoring system (TPMS-tire pressure
warning system) that illuminates a low
tire pressure telltale (tire pressure warn-
ing light) when one or more of your tires
is significantly under-inflated. Accord-
ingly, when the low tire pressure telltale
(tire pressure warnin g light) illuminates,
you should stop and check your tires as
soon as possible, and inflate them to the
proper pressure. Driving on a signifi-
cantly under-inflated tire causes the tire
to overheat and can lead to tire failure.
Under-inflation also reduces fuel effi-
ciency and tire tread life, and may affect
the vehicle’s handling and stopping abil-
ity.
Please note that the TPMS (tire pressure
warning system) is not a substitute for
proper tire maintenance, and it is the
driver’s responsibility to maintain correct
tire pressure, even if under-inflation has
not reached the level to trigger illumina-
tion of the TPMS low tire pressure telltale
(tire pressure warning light).
Your vehicle has also been equipped with
a TPMS (tire pressure warning system)
malfunction indicator to indicate when
the system is not operating properly. The
TPMS (tire pressure warning system)
malfunction indicator is combined with
the low tire pressure telltale (tire pres-
sure warning light) . When the system
detects a malfunction, the telltale will
flash for approximately one minute and
then remain continuously illuminated.
This sequence will continue upon subse-
quent vehicle start-ups as long as the
malfunction exists. When the malfunction
indicator is illuminated, the system may
not be able to detect or signal low tire
pressure as intended.
TPMS (tire pressure warning system)
malfunctions may occur for a variety of
reasons, including the installation of
replacement or alternate tires or wheels
on the vehicle that prevent the TPMS
(tire pressure warning system) from func-
tioning properly. Always check the
TPMS (tire pressure warning system)
malfunction telltale after replacing one
or more tires or wheels on your vehicle to
ensure that the replacement or alternate
tires and wheels allow the TPMS (tire
pressure warning system) to continue to
function properly.
NOTICE
■To ensure the tire pressure warning
system operates properly
Do not install tires with different specifi-
cations or makers, as the tire pressure
warning system may not operate prop-
erly.