2019 LEXUS UX200 flat tire
[x] Cancel search: flat tirePage 373 of 452
3737-2. Steps to take in an emergency
7
When trouble arises
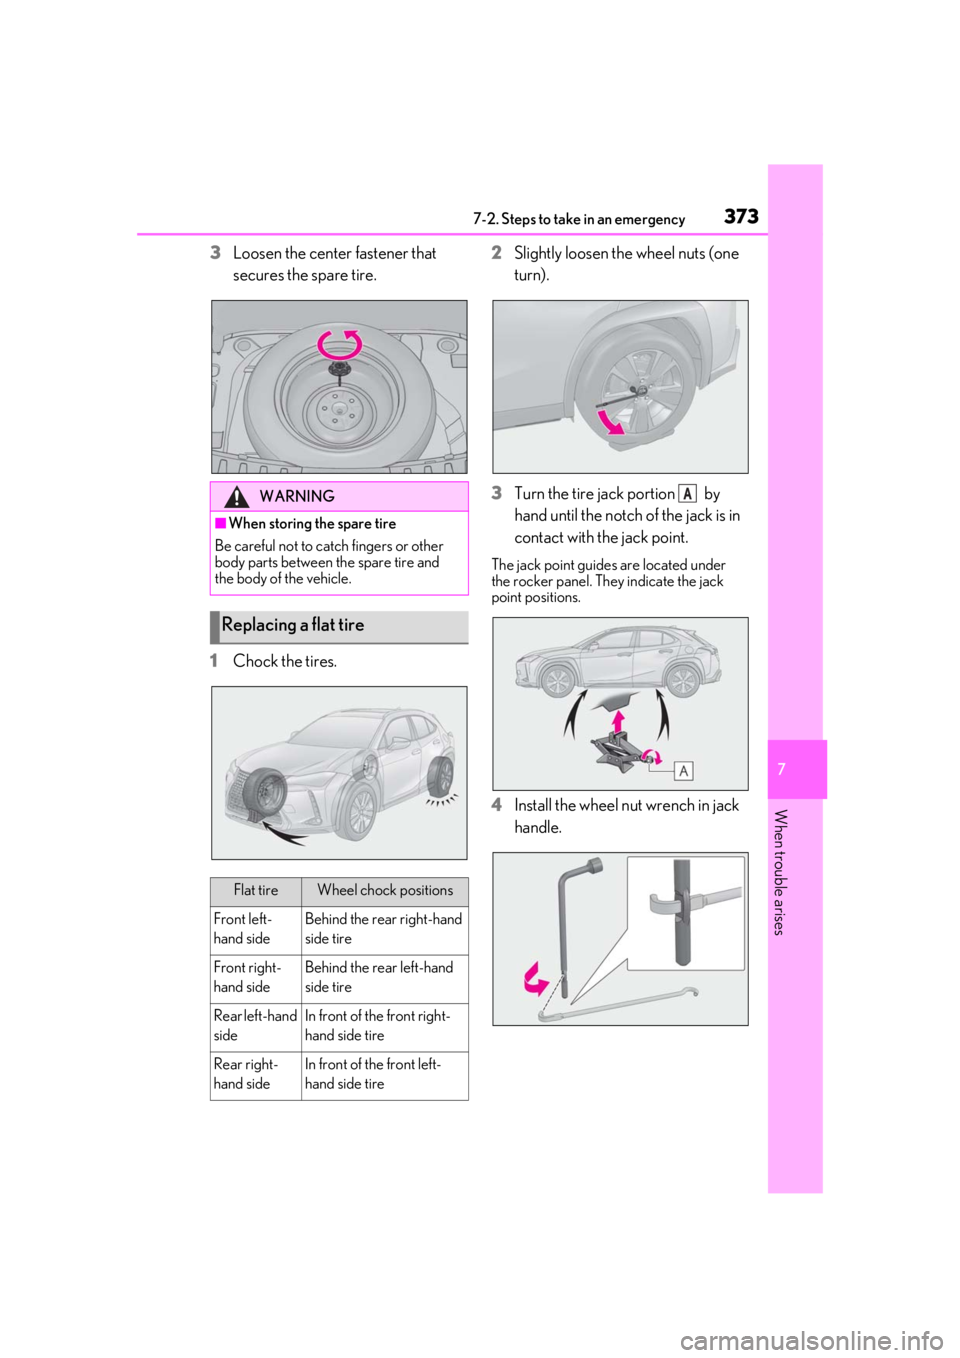
3Loosen the center fastener that
secures the spare tire.
1
Chock the tires. 2
Slightly loosen the wheel nuts (one
turn).
3
Turn the tire jack portion by
hand until the notch of the jack is in
contact with the jack point.
The jack point guides are located under
the rocker panel. They indicate the jack
point positions.
4Install the wheel nut wrench in jack
handle.
WARNING
■When storing the spare tire
Be careful not to catch fingers or other
body parts between the spare tire and
the body of the vehicle.
Replacing a flat tire
Flat tireWheel chock positions
Front left-
hand sideBehind the rear right-hand
side tire
Front right-
hand sideBehind the rear left-hand
side tire
Rear left-hand
sideIn front of the front right-
hand side tire
Rear right-
hand sideIn front of the front left-
hand side tire
A
Page 374 of 452
3747-2. Steps to take in an emergency
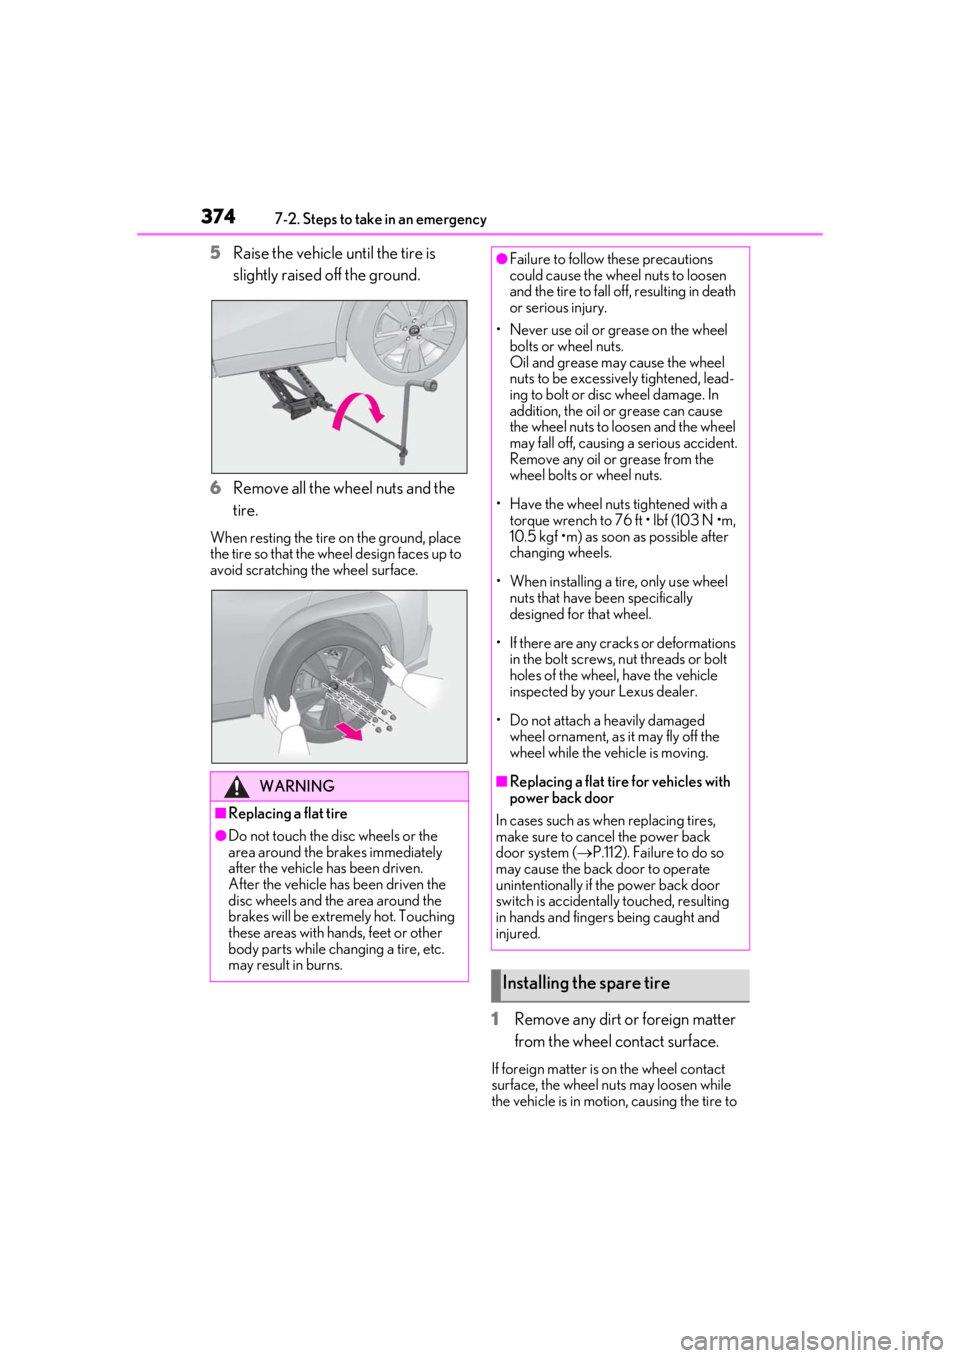
5Raise the vehicle until the tire is
slightly raised off the ground.
6
Remove all the wheel nuts and the
tire.
When resting the tire on the ground, place
the tire so that the wh eel design faces up to
avoid scratching the wheel surface.
1Remove any dirt or foreign matter
from the wheel contact surface.
If foreign matter is on the wheel contact
surface, the wheel nuts may loosen while
the vehicle is in motion, causing the tire to
WARNING
■Replacing a flat tire
●Do not touch the disc wheels or the
area around the brakes immediately
after the vehicle has been driven.
After the vehicle has been driven the
disc wheels and the area around the
brakes will be extremely hot. Touching
these areas with hands, feet or other
body parts while changing a tire, etc.
may result in burns.
●Failure to follow these precautions
could cause the wheel nuts to loosen
and the tire to fall of f, resulting in death
or serious injury.
• Never use oil or grease on the wheel bolts or wheel nuts.
Oil and grease may cause the wheel
nuts to be excessively tightened, lead-
ing to bolt or disc wheel damage. In
addition, the oil or grease can cause
the wheel nuts to loosen and the wheel
may fall off, causing a serious accident.
Remove any oil or grease from the
wheel bolts or wheel nuts.
• Have the wheel nuts tightened with a torque wrench to 76 ft • lbf (103 N •m,
10.5 kgf •m) as soon as possible after
changing wheels.
• When installing a tire, only use wheel nuts that have been specifically
designed for that wheel.
• If there are any cracks or deformations in the bolt screws, nut threads or bolt
holes of the wheel, have the vehicle
inspected by your Lexus dealer.
• Do not attach a heavily damaged wheel ornament, as it may fly off the
wheel while the vehicle is moving.
■Replacing a flat tire for vehicles with
power back door
In cases such as when replacing tires,
make sure to cancel the power back
door system ( P.112). Failure to do so
may cause the back door to operate
unintentionally if the power back door
switch is accidentally touched, resulting
in hands and fingers being caught and
injured.
Installing the spare tire
Page 375 of 452
3757-2. Steps to take in an emergency
7
When trouble arises
come off.
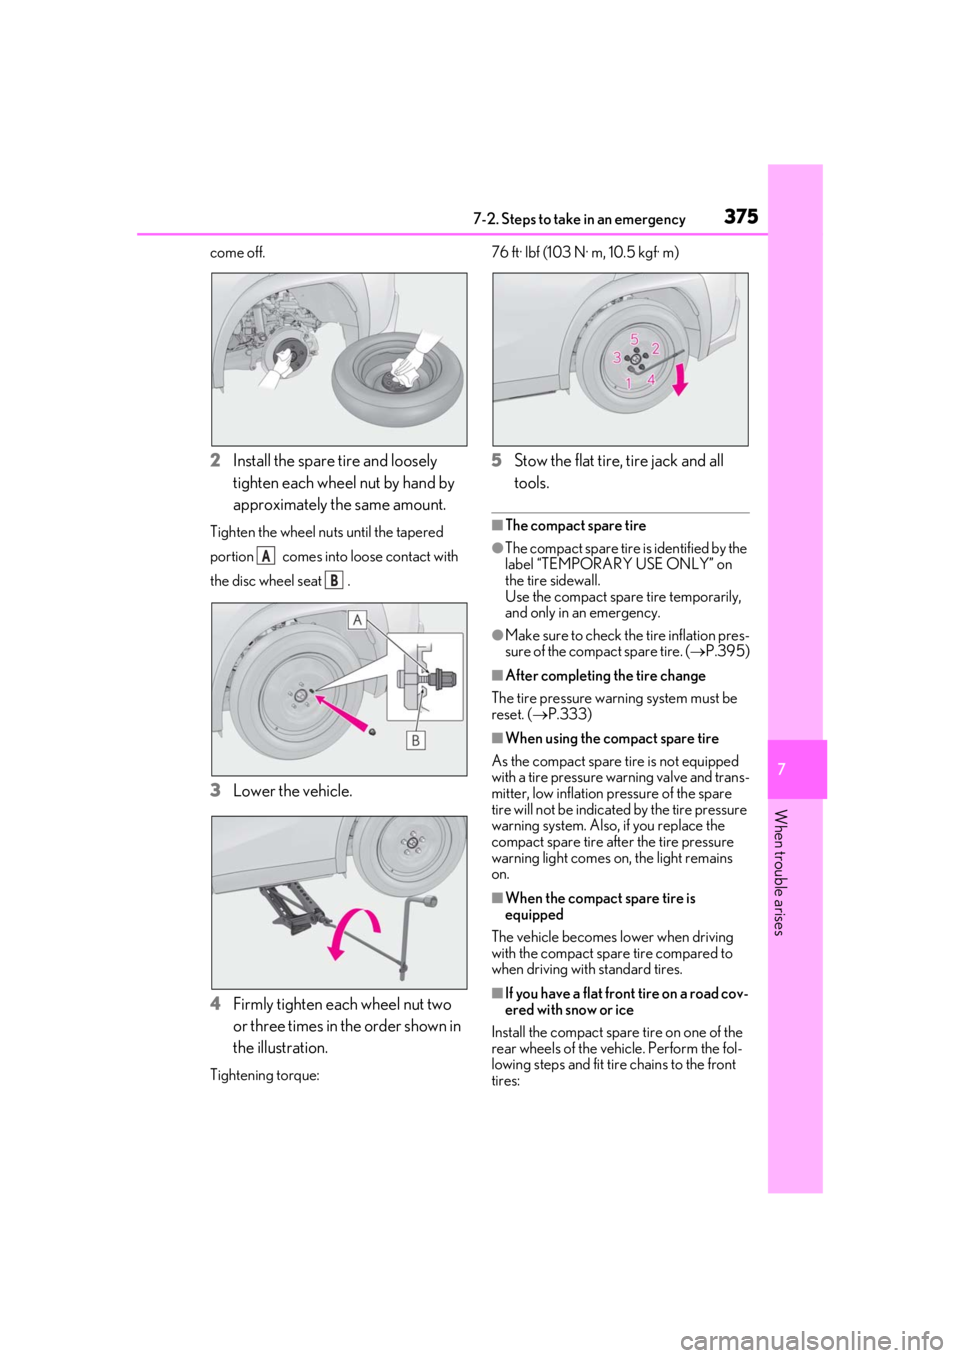
2Install the spare tire and loosely
tighten each wheel nut by hand by
approximately the same amount.
Tighten the wheel nuts until the tapered
portion comes into loose contact with
the disc wheel seat .
3Lower the vehicle.
4 Firmly tighten each wheel nut two
or three times in the order shown in
the illustration.
Tightening torque: 76 ft· lbf (103 N· m, 10.5 kgf· m)
5
Stow the flat tire, tire jack and all
tools.
■The compact spare tire
●The compact spare tire is identified by the
label “TEMPORARY USE ONLY” on
the tire sidewall.
Use the compact spar e tire temporarily,
and only in an emergency.
●Make sure to check the tire inflation pres-
sure of the compact spare tire. ( P.395)
■After completing the tire change
The tire pressure warn ing system must be
reset. ( P.333)
■When using the compact spare tire
As the compact spare tire is not equipped
with a tire pressure warning valve and trans-
mitter, low inflation pressure of the spare
tire will not be indicated by the tire pressure
warning system. Also, if you replace the
compact spare tire afte r the tire pressure
warning light comes on, the light remains
on.
■When the compact spare tire is
equipped
The vehicle becomes lower when driving
with the compact spare tire compared to
when driving with standard tires.
■If you have a flat front tire on a road cov-
ered with snow or ice
Install the compact spare tire on one of the
rear wheels of the vehicle. Perform the fol-
lowing steps and fit tire chains to the front
tires:
A
B
Page 376 of 452
3767-2. Steps to take in an emergency
1Replace a rear tire with the compact
spare tire.
2
Replace the flat front tire with the tire
removed from the rear of the vehicle.
3
Fit tire chains to the front tires.
WARNING
■When using the compact spare tire
●Remember that the spare tire provided
is specifically desi gned for use with
your vehicle. Do not use your spare
tire on another vehicle.
●Do not use more than one spare tire
simultaneously.
●Replace the spare tire with a standard
tire as soon as possible.
●Avoid sudden acceleration, abrupt
steering, sudden braking and shifting
operations that cause sudden engine
braking.
■When the compact spare tire is
attached
The vehicle speed may not be correctly
detected, and the following systems may
not operate correctly:
• ABS & Brake assist
• VSC
• TRAC
• Dynamic radar cruise control with full- speed range
• PCS (Pre-Collision System)
• EPS
• LTA (Lane Tracing Assist)
• Lexus parking assist monitor
• Intuitive parking assist (if equipped)
• Navigation system (if equipped)
• BSM (Blind Spot Monitor) (if equipped)
• Automatic High Beam
■Speed limit when using the compact
spare tire
Do not drive at speeds in excess of 50
mph (80 km/h) when a compact spare
tire is installed on the vehicle.
The compact spare tire is not designed
for driving at high speeds. Failure to
observe this precaution may lead to an
accident causing death or serious injury.
■After using the tools and jack
Before driving, make sure all the tools
and jack are securely in place in their
storage location to reduce the possibility
of personal injury during a collision or
sudden braking.
NOTICE
■Be careful when driving over bumps
with the compact spare tire installed
on the vehicle
The vehicle becomes lower when driving
with the compact spar e tire compared to
when driving with standard tires. Be
careful when driving over uneven road
surfaces.
■Driving with tire chains and the com-
pact spare tire
Do not fit tire chains to the compact
spare tire.
Tire chains may damage the vehicle body
and adversely affect driving perfor-
mance.
■When replacing the tires
When removing or fitting the wheels,
tires or the tire pr essure warning valve
and transmitter, contact your Lexus
dealer as the tire pressure warning valve
and transmitter may be damaged if not
handled correctly.
Page 377 of 452
3777-2. Steps to take in an emergency
7
When trouble arises
Take your vehicle to the nearest Lexus
dealer or authorized tire dealer as
soon as possible if any tire goes flat.
The vehicle can be driven for a maximum
of 100 miles (160 km) at a speed below 50
mph (80 km/h) after the tire pressure
warning light comes on. ( P.359)
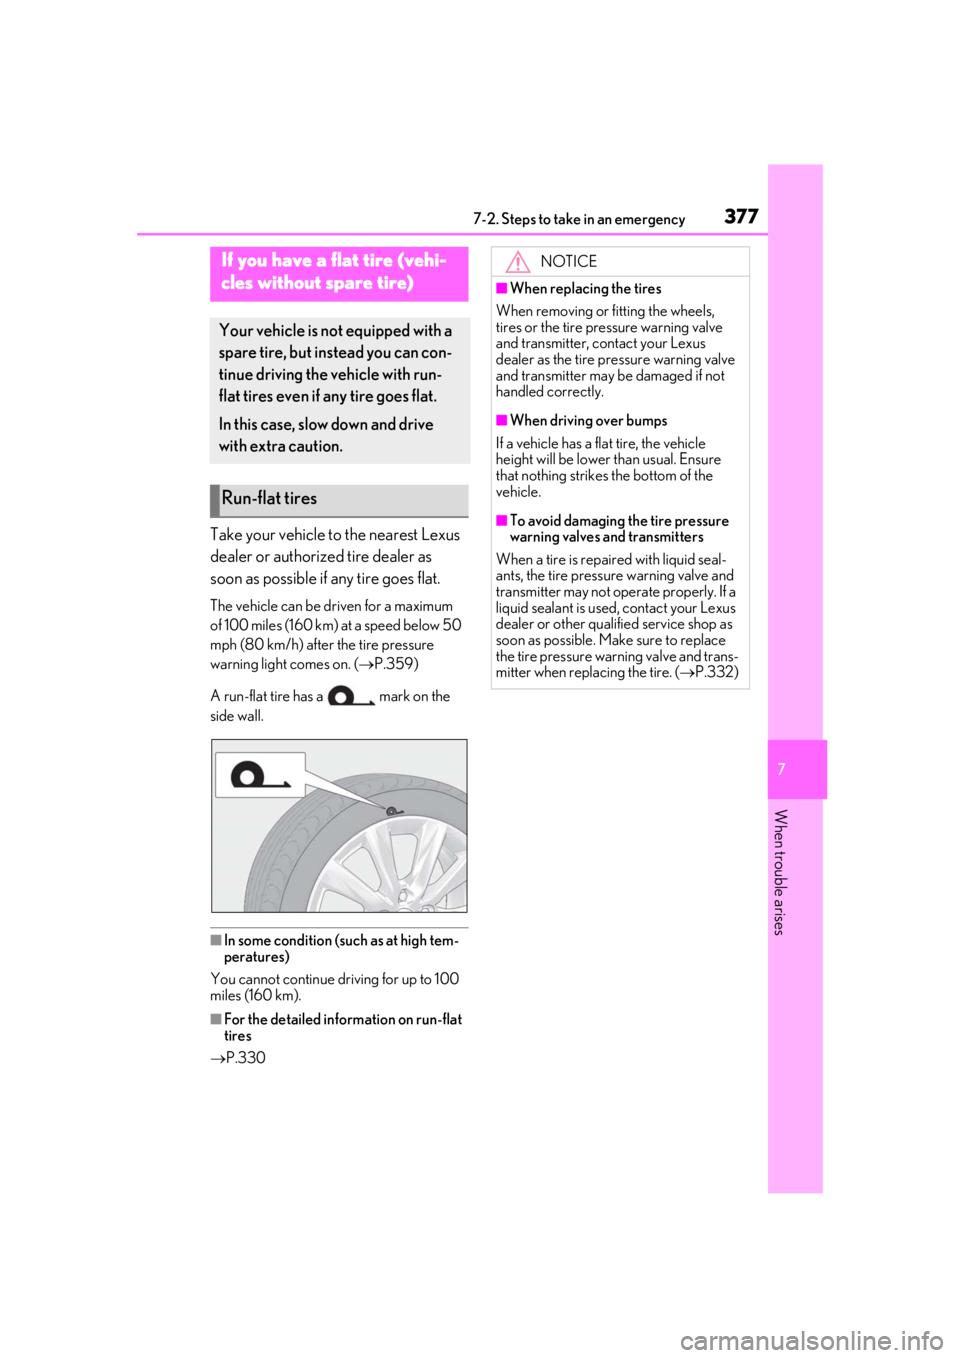
A run-flat tire has a mark on the
side wall.
■In some condition (such as at high tem-
peratures)
You cannot continue driving for up to 100
miles (160 km).
■For the detailed information on run-flat
tires
P.330
If you have a flat tire (vehi-
cles without spare tire)
Your vehicle is not equipped with a
spare tire, but instead you can con-
tinue driving the vehicle with run-
flat tires even if any tire goes flat.
In this case, slow down and drive
with extra caution.
Run-flat tires
NOTICE
■When replacing the tires
When removing or fitting the wheels,
tires or the tire pr essure warning valve
and transmitter, contact your Lexus
dealer as the tire pressure warning valve
and transmitter may be damaged if not
handled correctly.
■When driving over bumps
If a vehicle has a flat tire, the vehicle
height will be lower than usual. Ensure
that nothing strikes the bottom of the
vehicle.
■To avoid damaging the tire pressure
warning valves and transmitters
When a tire is repaired with liquid seal-
ants, the tire pressure warning valve and
transmitter may not operate properly. If a
liquid sealant is used , contact your Lexus
dealer or other qualified service shop as
soon as possible. Make sure to replace
the tire pressure warning valve and trans-
mitter when replacing the tire. ( P.332)
Page 395 of 452
3958-1. Specifications
8
Vehicle specifications
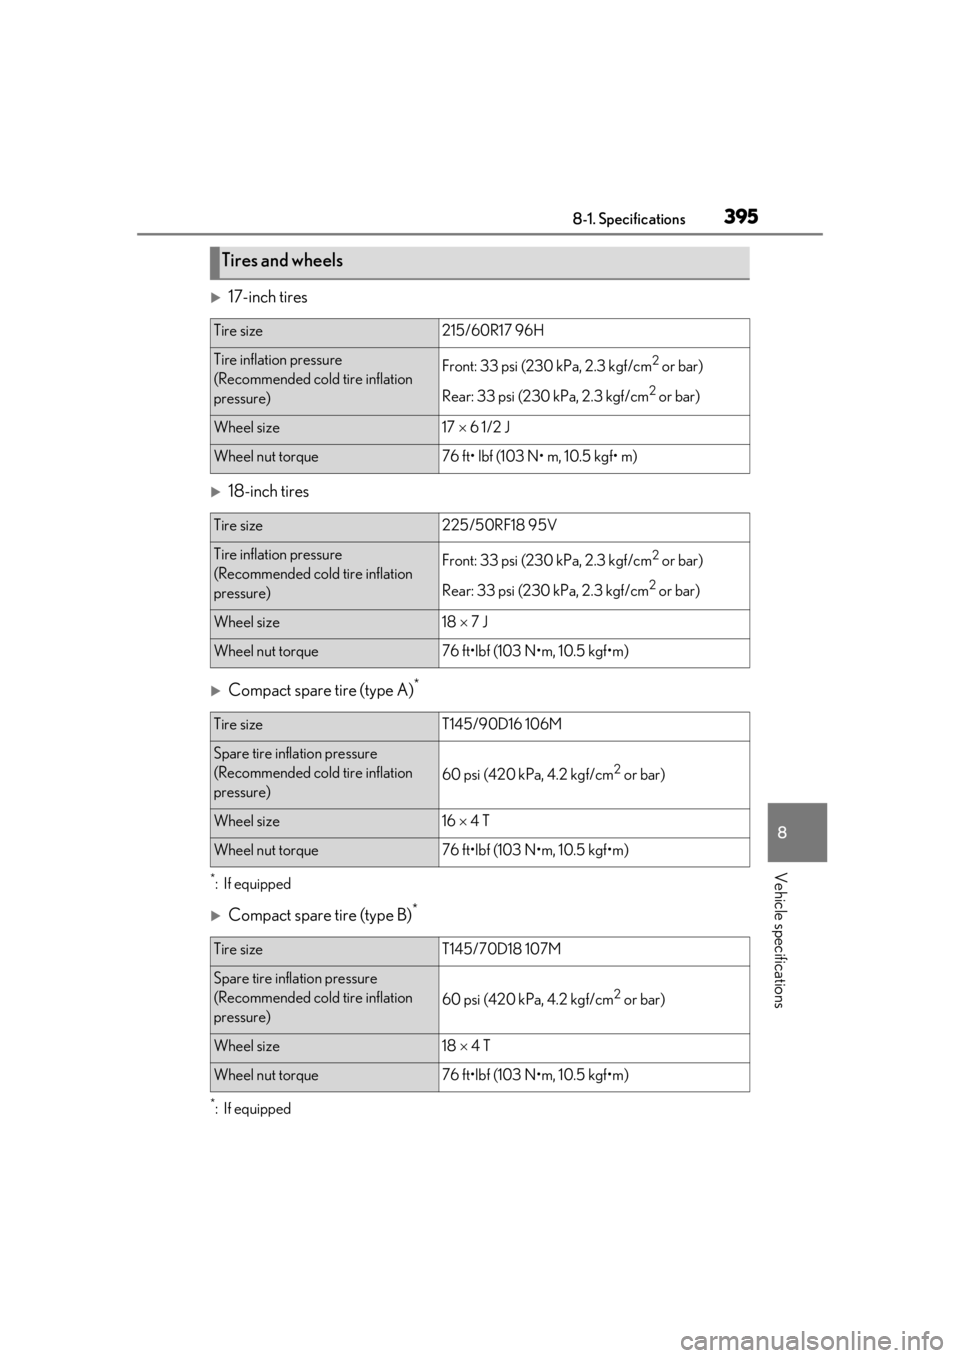
17-inch tires
18-inch tires
Compact spare tire (type A)*
*:If equipped
Compact spare tire (type B)*
*:If equipped
Tires and wheels
Tire size215/60R17 96H
Tire inflation pressure
(Recommended cold tire inflation
pressure)Front: 33 psi (230 kPa, 2.3 kgf/cm2 or bar)
Rear: 33 psi (230 kPa, 2.3 kgf/cm
2 or bar)
Wheel size17 6 1/2 J
Wheel nut torque76 ft• lbf (103 N• m, 10.5 kgf• m)
Tire size225/50RF18 95V
Tire inflation pressure
(Recommended cold tire inflation
pressure)Front: 33 psi (230 kPa, 2.3 kgf/cm2 or bar)
Rear: 33 psi (230 kPa, 2.3 kgf/cm
2 or bar)
Wheel size18 7 J
Wheel nut torque76 ft•lbf (103 N•m, 10.5 kgf•m)
Tire sizeT145/90D16 106M
Spare tire inflation pressure
(Recommended cold tire inflation
pressure)
60 psi (420 kPa, 4.2 kgf/cm2 or bar)
Wheel size16 4 T
Wheel nut torque76 ft•lbf (103 N•m, 10.5 kgf•m)
Tire sizeT145/70D18 107M
Spare tire inflation pressure
(Recommended cold tire inflation
pressure)
60 psi (420 kPa, 4.2 kgf/cm2 or bar)
Wheel size18 4 T
Wheel nut torque76 ft•lbf (103 N•m, 10.5 kgf•m)
Page 399 of 452
3998-1. Specifications
8
Vehicle specifications
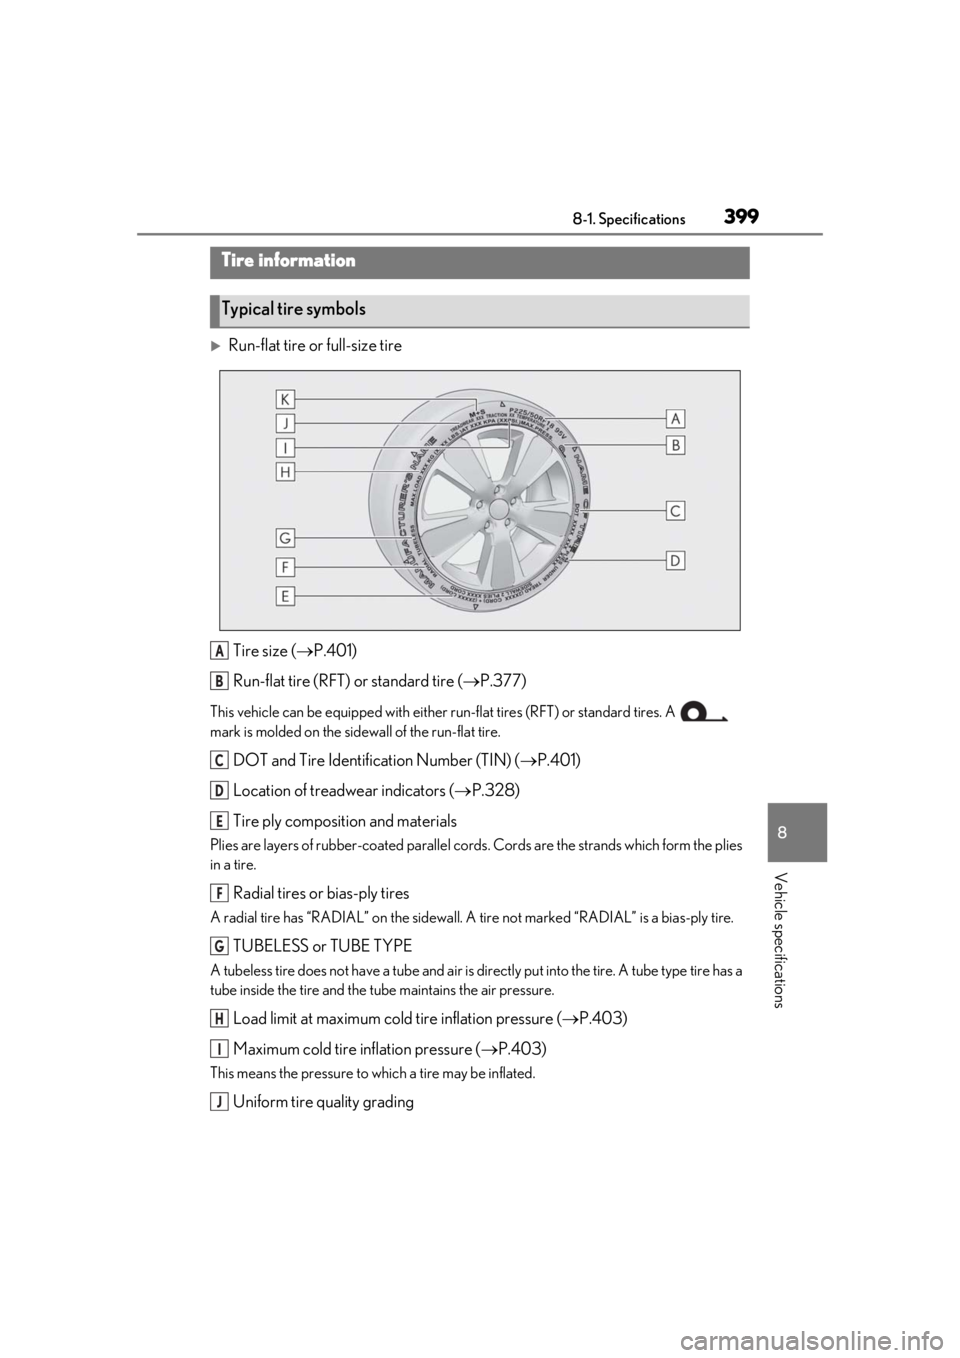
Run-flat tire or full-size tireTire size ( P.401)
Run-flat tire (RFT) or standard tire ( P.377)
This vehicle can be equipped with either run-flat tires (RFT) or standard tires. A
mark is molded on the sidewall of the run-flat tire.
DOT and Tire Identification Number (TIN) ( P.401)
Location of treadwear indicators ( P.328)
Tire ply composition and materials
Plies are layers of rubber-coated parallel cords. Cords are the strands which form the plies
in a tire.
Radial tires or bias-ply tires
A radial tire has “RADIAL” on the sidewall. A tire not marked “RADIAL” is a bias-ply tire.
TUBELESS or TUBE TYPE
A tubeless tire does not have a tube and air is directly put into the tire. A tube type tire has a
tube inside the tire and the tube maintains the air pressure.
Load limit at maximum cold tire inflation pressure ( P.403)
Maximum cold tire inflation pressure ( P.403)
This means the pressure to which a tire may be inflated.
Uniform tire quality grading
Tire information
Typical tire symbols
A
B
C
D
E
F
G
H
I
J
Page 400 of 452
4008-1. Specifications
For details, see “Uniform Tire Quality Grading” that follows.
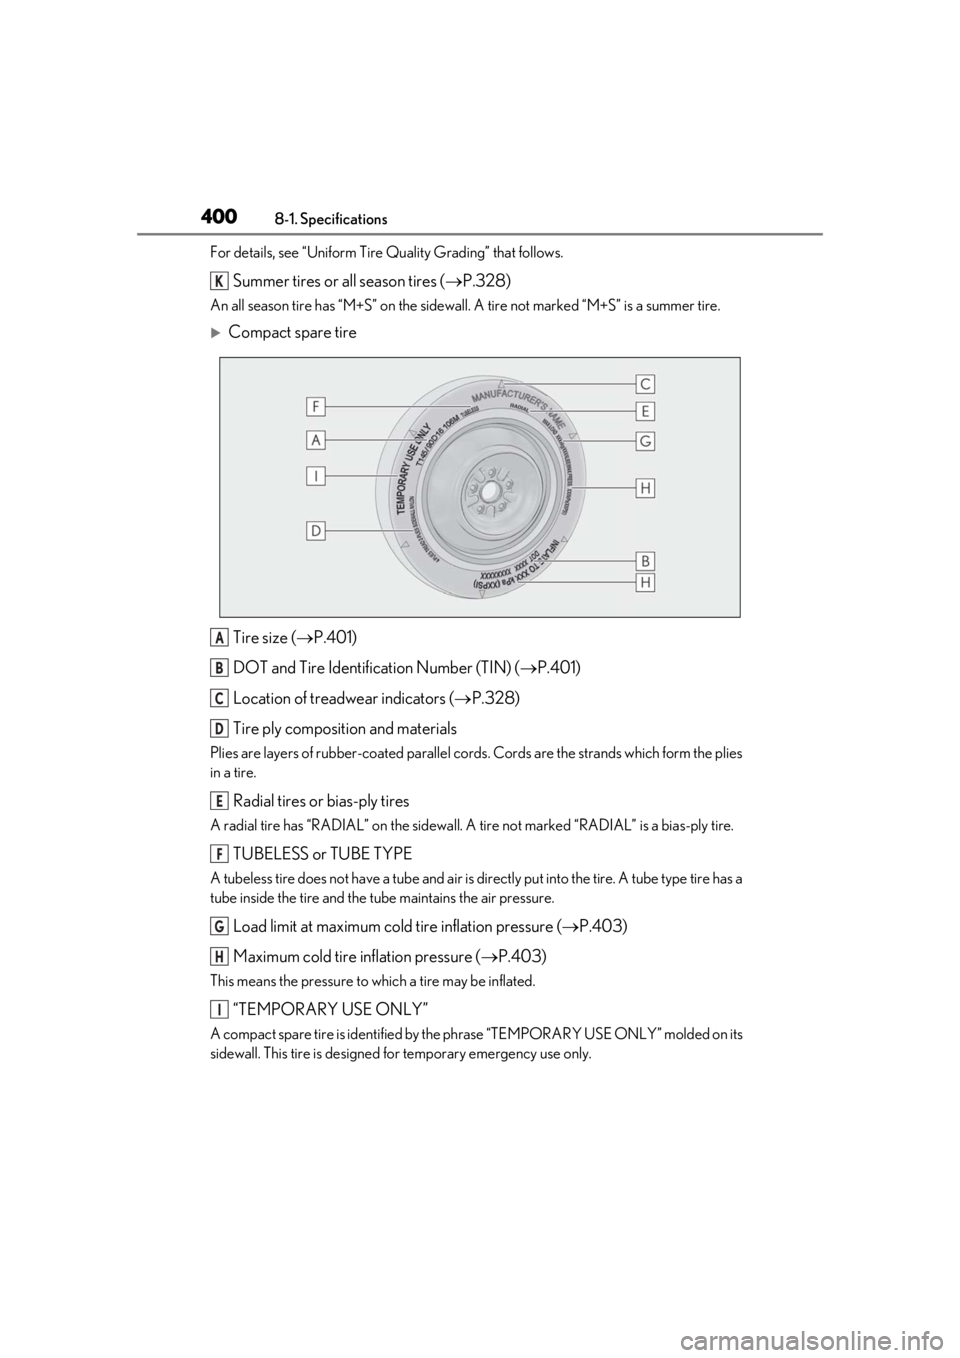
Summer tires or all season tires (P.328)
An all season tire has “M+S” on the sidewall. A tire not marked “M+S” is a summer tire.
Compact spare tire
Tire size ( P.401)
DOT and Tire Identification Number (TIN) ( P.401)
Location of treadwear indicators ( P.328)
Tire ply composition and materials
Plies are layers of rubber-coated parallel cords. Cords are the strands which form the plies
in a tire.
Radial tires or bias-ply tires
A radial tire has “RADIAL” on the sidewall. A tire not marked “RADIAL” is a bias-ply tire.
TUBELESS or TUBE TYPE
A tubeless tire does not have a tube and air is directly put into the tire. A tube type tire has a
tube inside the tire and the tube maintains the air pressure.
Load limit at maximum cold tire inflation pressure ( P.403)
Maximum cold tire inflation pressure ( P.403)
This means the pressure to which a tire may be inflated.
“TEMPORARY USE ONLY”
A compact spare tire is identified by the phrase “TEMPORARY USE ONLY” molded on its
sidewall. This tire is designed for temporary emergency use only.
K
A
B
C
D
E
F
G
H
I