2019 LEXUS UX200 rear view mirror
[x] Cancel search: rear view mirrorPage 263 of 452

2635-3. Using the air conditioning system and defogger
5
Interior features
Right-hand side temperature control switch
■Adjusting the temperature setting
Operate the temperature control
switch upwards to increase the tem-
perature and downwards to decrease
the temperature.
■Adjusting the fan speed setting
Operate the fan speed control switch
upwards to increase the fan speed and
downwards to decrease the fan speed.
Press the off switch to turn the fan off.
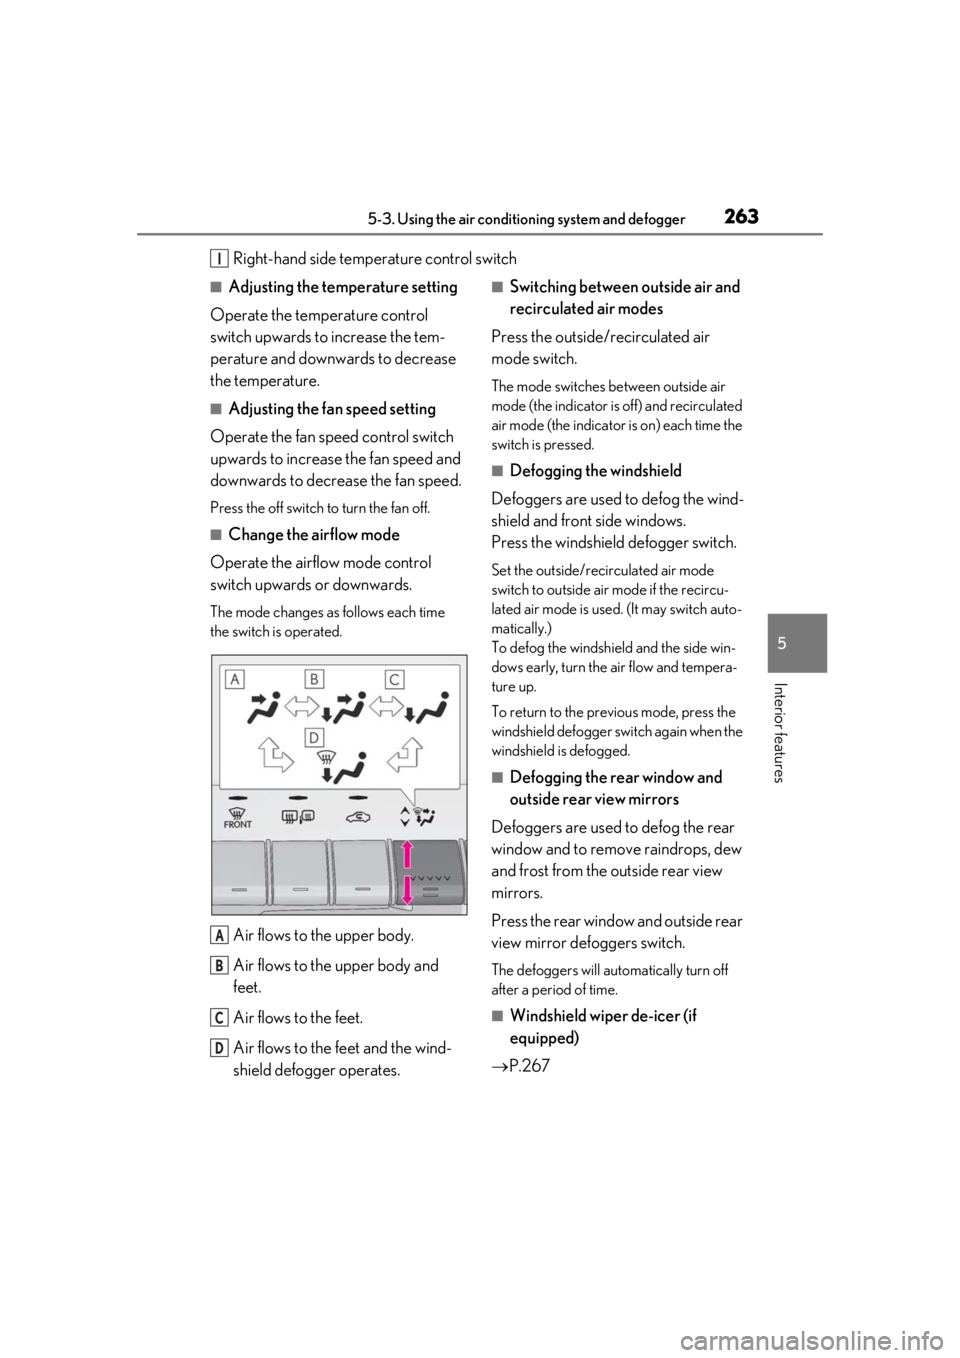
■Change the airflow mode
Operate the airflow mode control
switch upwards or downwards.
The mode changes as follows each time
the switch is operated.
Air flows to the upper body.
Air flows to the upper body and
feet.
Air flows to the feet.
Air flows to the feet and the wind-
shield defogger operates.
■Switching between outside air and
recirculated air modes
Press the outside/recirculated air
mode switch.
The mode switches between outside air
mode (the indicator is off) and recirculated
air mode (the indicator is on) each time the
switch is pressed.
■Defogging the windshield
Defoggers are used to defog the wind-
shield and front side windows.
Press the windshield defogger switch.
Set the outside/recirculated air mode
switch to outside air mode if the recircu-
lated air mode is used. (It may switch auto-
matically.)
To defog the windshield and the side win-
dows early, turn the air flow and tempera-
ture up.
To return to the previous mode, press the
windshield defogger sw itch again when the
windshield is defogged.
■Defogging the rear window and
outside rear view mirrors
Defoggers are used to defog the rear
window and to remove raindrops, dew
and frost from the outside rear view
mirrors.
Press the rear window and outside rear
view mirror defoggers switch.
The defoggers will automatically turn off
after a period of time.
■Windshield wiper de-icer (if
equipped)
P.267
I
A
B
C
D
Page 265 of 452

2655-3. Using the air conditioning system and defogger
5
Interior features
diately after the air conditioning system is
started in automatic mode.
■Air conditioning filter
P.340
■Customization
Settings (e.g. A/C automatic mode switch
operation) can be changed.
(Customizable features: P.416)
■Main control screen
Using the touchpad of the Remote
Touch, select the button on the screen.
to can be adjusted by perform-
ing the following operations.
Flick operation: Move the pointer to
the desired item and flick the touchpad
up or down.
The item can be adjusted by one level.
Trace operation: After selecting the
desired item, slide your finger up or
down.
The item can be adjusted by the amount
that you trace.
Trace operation cannot be used while driv-
ing.
Sub menu
Selecting the sub menu item to switch the
main screen.
: Display the air conditioning control
screen
: Display the heated steering
wheel/seat heater/sea t ventilator control
screen (if equipped)
: Display the Lexus Climate Con-
cierge control screen
: Display the option control screen
Adjust the left-hand side tempera-
ture setting
Adjust the fan speed setting
Select the air flow mode
: Air flows to the upper body
: Air flows to the upper body and feet
WARNING
■To prevent the windshield from fog-
ging up
Do not use the windshield defogger
switch during cool air operation in
extremely humid weather. The difference
between the temperature of the outside
air and that of the windshield can cause
the outer surface of the windshield to fog
up, blocking your vision.
■When the outside rear view mirror
defoggers are operating
Do not touch the outside rear view mir-
ror surfaces, as they can become very
hot and burn you.
NOTICE
■To prevent battery discharge
Do not leave the air conditioning system
on longer than necessary when the
engine is off.
Air conditioning control screen
BE
A
B
C
D
Page 285 of 452

2855-6. Using the other interior features
5
Interior features
5-6.Using the other interior features
1To set the visor in the forward posi-
tion, flip it down.
2
To set the visor in the side position,
flip down, unhook, and swing it to
the side.
3
To use the side extender, place the
visor in the side position, then slide
it backward.
■When adjusting the inside rear view mir-
ror
Adjust the inside rear view mirror to enable
sufficient confirmation of the rear view with-
out interfering with the sun visor.
Slide the cover to open.
The light turns on when the cover is
opened.
■Vanity lights
If the vanity lights remain on when the
engine switch is turned off, the lights will go
off automatically after 20 minutes.
The GPS clock’s time is automatically
adjusted by utilizing GPS time infor-
mation.
For details, refer to the “NAVIGA-
TION AND MULTIMEDIA SYSTEM
OWNER’S MANUAL”.
Other interior features
Sun visors
NOTICE
■To prevent damage to the sun visors
When using the side extender, do not
swing the visor to the front.
Vanity mirrors
NOTICE
■To prevent battery discharge
Do not leave the vanity lights on for
extended periods while the engine is off.
Clock
Page 297 of 452

2975-6. Using the other interior features
5
Interior features
that garage doors, gates, or other
devices may operate. For this rea-
son, make sure that people and
objects are clear of the garage door
or other devices to prevent injury or
other potential harm.
It is recommended that a new bat-
tery be placed in the remote control
transmitter for more accurate pro-
gramming.
Garage door opener motors manu-
factured after 1995 may be
equipped with rolling code protec-
tion. If this is the case, you may need
a stepladder or other sturdy, safe
device to reach the “Learn” or
“Smart” button on the garage door
opener motor.
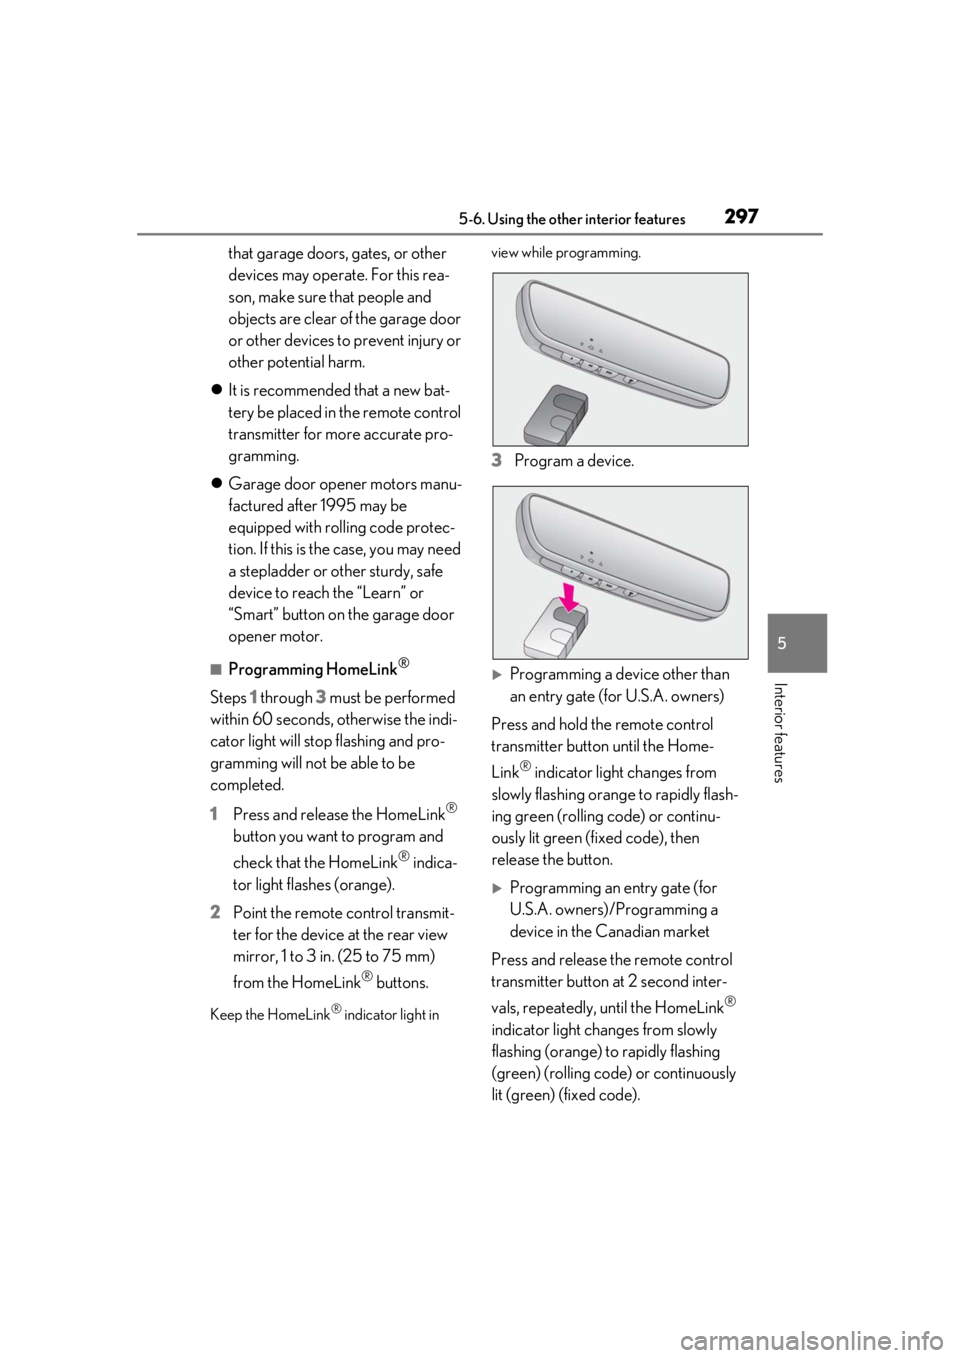
■Programming HomeLink®
Steps 1 through 3 must be performed
within 60 seconds, otherwise the indi-
cator light will stop flashing and pro-
gramming will not be able to be
completed.
1 Press and release the HomeLink
®
button you want to program and
check that the HomeLink
® indica-
tor light flashes (orange).
2 Point the remote control transmit-
ter for the device at the rear view
mirror, 1 to 3 in. (25 to 75 mm)
from the HomeLink
® buttons.
Keep the HomeLink® indicator light in view while programming.
3
Program a device.
Programming a device other than
an entry gate (for U.S.A. owners)
Press and hold the remote control
transmitter button until the Home-
Link
® indicator light changes from
slowly flashing orange to rapidly flash-
ing green (rolling code) or continu-
ously lit green (fixed code), then
release the button.
Programming an entry gate (for
U.S.A. owners)/Programming a
device in the Canadian market
Press and release the remote control
transmitter button at 2 second inter-
vals, repeatedly, until the HomeLink
®
indicator light changes from slowly
flashing (orange) to rapidly flashing
(green) (rolling code) or continuously
lit (green) (fixed code).
Page 301 of 452

3015-6. Using the other interior features
5
Interior features
*: If equipped
To turn the compass on or off, press the
button for more than 3 seconds.
Directions are displayed as follows:
■Conditions unfavorable to correct
operation
The compass may not show the correct
direction in the following conditions:
●The vehicle is stopped immediately after
turning.
●The vehicle is on an inclined surface.
●The vehicle is in a place where the earth’s
magnetic field is subject to interference
by artificial magnetic fields (under-
ground car park/parking lot, under a
steel tower, between buildings, roof car
park/parking lot, near an intersection,
near a large vehicle, etc.).
●The vehicle has become magnetized.
(There is a magnet or metal object near
the inside rear view mirror.)
●The battery has been disconnected.
●A door is open.
Compass*
The compass on the inside rear
view mirror indicates the direction
in which the vehicle is heading.
Operation and displays
DisplayDirection
“N”North
“NE”Northeast
“E”East
“SE”Southeast
“S”South
“SW”Southwest
“W”West
“NW”Northwest
WARNING
■While driving the vehicle
Do not adjust the display. Adjust the dis-
play only when the vehicle is stopped.
NOTICE
■To avoid compass malfunctions
Do not place magnets or any metal
objects near the inside rear view mirror.
Doing this may cause the compass sen-
sor to malfunction.
■To ensure normal operation of the
compass
●Do not perform a circling calibration of
the compass in a place where the
earth’s magnetic field is subject to
interference by artificial magnetic
fields.
●During calibration, do not operate
electric systems (moon roof, power
windows, etc.) as they may interfere
with the calibration.
Page 413 of 452

4138-2. Customization
8
Vehicle specifications
■Driving position memory* ( P.123)
*:If equipped
■Outside rear view mirrors ( P.132)
*:If equipped
■Power windows, and moon roof* ( P.135, 137)
*:If equipped
■Automatic light control system ( P.165)
FunctionDefault settingCustomized setting
Selecting doors linked to the
memory recall functionDriver’s doorAll doorsO
Driver’s seat slide movement
when exiting the vehicleFullOffOOPartial
Steering wheel movementTilt only
Off
OOTelescopic only
Tilt and telescopic
FunctionDefault settingCustomized setting
Automatic mirror folding and
extending operation
*
Linked to the
locking/unlock- ing of the doorsOff
OLinked to operation of the engine switch
FunctionDefault settingCustomized setting
Mechanical key linked opera-
tionOffOnO
Wireless remote control
linked operationOffOn (open only)O
Wireless remote control
linked operation signal
(buzzer)
OnOffO
FunctionDefault settingCustomized setting
Light sensor sensitivityStandard-2 to 2OO
ABC
ABC
ABC
ABC
Page 415 of 452

4158-2. Customization
8
Vehicle specifications
■LTA (Lane Tracing Assist) (P.193)
■RSA (Road Sign Assist)* ( P.202)
*:If equipped
■BSM (Blind Spot Monitor)* ( P.214)
FunctionDefault settingCustomized setting
Lane centering functionOnOffO
Steering assist functionOnOffO
Alert typeSteering wheel
vibrationBuzzerO
Alert sensitivityHighStandardO
Vehicle sway warning func-
tionOnOffO
Vehicle sway warning sensi-
tivityStandardHighOLow
FunctionDefault settingCustomized setting
RSA (Road Sign Assist)OnOffO
Excess speed notification
methodNo notificationDisplay onlyODisplay and buzzer
Excess speed notification
level1 mph (2 km/h)5 mph (10 km/h)O3 mph (5 km/h)
Other notifications method
(No-entry notification)Display onlyNo notificationODisplay and buzzer
FunctionDefault settingCustomized setting
BSM (Blind Spot Monitor)OnOffO
Outside rear view mirror indi-
cator brightnessBrightDimO
Alert timing for presence of
approaching vehicle (sensitiv-
ity)
Intermediate
Early
OLate
Only when vehicle
detected in blind spot
ABC
ABC
ABC
Page 438 of 452

438Alphabetical Index
C
Card key ............................................................ 94
CareAluminum wheels ......................................306
Exterior ...........................................................306
Interior .............................................................309
Seat belts........................................................309
Cargo capacity............................................... 147
Cargo hooks .................................................280
Center Display ............................................. 256
Chains ................................................................251
Child-protectors............................................. 101
Child restraint system................................... 44 Fixed with a LATCH system .................. 52
Fixed with a seat belt................................... 48
Front passenger occupant classification system ............................................................. 39
Points to remember .................................... 44
Riding with children ..................................... 44
Types of child restraint system installation method ........................................................... 46
Using an anchor bracket .......................... 54
Child safety ....................................................... 44 Airbag precautions...................................... 35
Back door precautions.............................102
Battery precautions ..................... 326, 385
Child restraint system................................. 44
Heated steering wheel and seat heater precautions.................................................. 271
How your child should wear the seat belt .............................................................................27
Moon roof precautions ............................139
Power window lock switch.....................136
Power window precautions ...................136
Rear door child-protectors ..................... 101
Removed key battery precautions ... 342
Seat belt extender precautions ..............27
Seat belt precautions .................................. 52
Cleaning.............................................. 306, 309 Aluminum wheels ......................................306
Exterior ...........................................................306 Interior ............................................................ 309
Radar sensor ...................................... 180, 215
Seat belts ....................................................... 309
Clock ................................................72, 75, 285
Coat hooks..................................................... 294
Compass .......................................................... 301
Condenser ..................................................... 324
Console box .................................................. 278
Consumption screen .................................... 90
Continuously variable transmission...... 155
Coolant Capacity .........................................................393
Checking ....................................................... 323
Preparing and checking before winter.......................................................................... 249
Cooling system............................................. 323 Engine overheating.................................. 386
Cornering lights ............................................. 167 Replacing light bulbs ................................346
Cruise control Dynamic radar cruise control with full-
speed range ..............................................204
Cup holders ................................................... 278
Current fuel consumption ............................81
Curtain shield airbags .................................. 30
Customizable features ..............................408
D
Daytime running light system ...................165
Deck board ......................................................281
Deck under tray ...........................................280
Defogger Outside rear view mirrors.....................263
Rear window ................................................263
Windshield ....................................................263
Dimension ...................................................... 390
Dinghy towing.................................................. 151
Display BSM (Blind Spot Monitor)......................214
Dynamic radar cruise control with full-
speed range ..............................................204
Head-up display............................................86