Page 314 of 452

3146-2. Maintenance
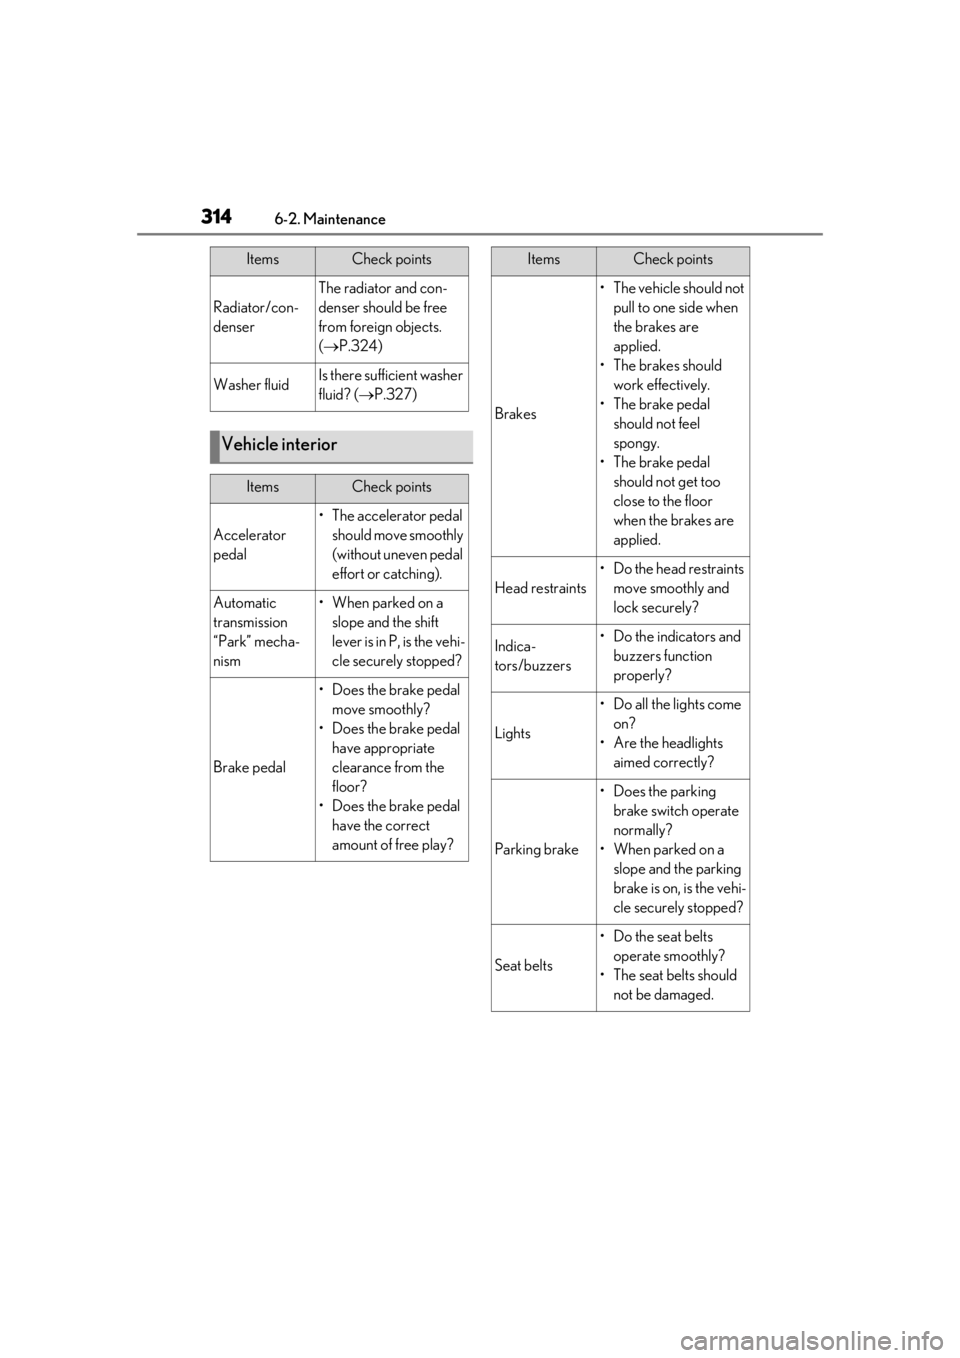
Radiator/con-
denser
The radiator and con-
denser should be free
from foreign objects.
( P.324)
Washer fluidIs there sufficient washer
fluid? ( P.327)
Vehicle interior
ItemsCheck points
Accelerator
pedal
• The accelerator pedal
should move smoothly
(without uneven pedal
effort or catching).
Automatic
transmission
“Park” mecha-
nism•When parked on a slope and the shift
lever is in P, is the vehi-
cle securely stopped?
Brake pedal
• Does the brake pedal move smoothly?
• Does the brake pedal have appropriate
clearance from the
floor?
• Does the brake pedal have the correct
amount of free play?
ItemsCheck points
Brakes
• The vehicle should not pull to one side when
the brakes are
applied.
• The brakes should work effectively.
• The brake pedal should not feel
spongy.
• The brake pedal should not get too
close to the floor
when the brakes are
applied.
Head restraints
•Do the head restraints move smoothly and
lock securely?
Indica-
tors/buzzers• Do the indicators and buzzers function
properly?
Lights
• Do all the lights come on?
• Are the headlights aimed correctly?
Parking brake
• Does the parking brake switch operate
normally?
• When parked on a slope and the parking
brake is on, is the vehi-
cle securely stopped?
Seat belts
•Do the seat belts operate smoothly?
• The seat belts should not be damaged.
ItemsCheck points
Page 345 of 452
3456-3. Do-it-yourself maintenance
6
Maintenance and care
Single-beam headlightsAdjustment bolt A
Adjustment bolt B
Triple-beam headlightsAdjustment bolt A
Adjustment bolt B
Make sure the vehicle has a full tank
of gasoline and the area around the
headlight is not deformed.
Park the vehicle on level ground.
Make sure the tire inflation pressure is at the specified level.
Have someone sit in the driver’s
seat.
Bounce the vehicle several times.
1 Using a Phillips-head screwdriver,
turn bolt A in either direction.
Remember the turning direction
and the number of turns.
Single-beam headlights
Triple-beam headlights
2 Turn bolt B the same number of
turns and in the same direction as
step 1.
If the headlight cannot be adjusted using
this procedure, take the vehicle to your
Lexus dealer to adjust the headlight aim.
Headlight aim
Vertical movement adjusting
bolts
Before checking the headlight
aim
A
B
A
B
Adjusting the headlight aim
Page 346 of 452
3466-3. Do-it-yourself maintenance
Single-beam headlights
Triple-beam headlightsFront turn signal light (vehicles with
single-beam headlights)
■Bulbs that need to be replaced by
your Lexus dealer
Headlights
Parking lights and daytime running
lights (if equipped)
Front turn signal lights (vehicles with
triple-beam headlights)
Front fog lights (if equipped)
Cornering lights (if equipped)
Side turn signal lights
Light bulbs
You may replace the following bulb
by yourself. Before replacing,
check the wattage of the light bulb
to be replaced. As there is a danger
that components may be damaged,
we recommend that replacement is
carried out by your Lexus dealer.
Bulb location
A
Page 347 of 452

3476-3. Do-it-yourself maintenance
6
Maintenance and care
Tail lights
Stop lights
Tail lights/stop lights
Rear turn signal lights
Back-up lights
High mounted stoplight
License plate lights
■LED lights
Vehicles with single-beam headlights:
The lights other than the front turn signal
light each consist of a number of LEDs. If
any of the LEDs burn out, take your vehicle
to your Lexus dealer to have the light
replaced.
Vehicles with triple-beam headlights:
The lights consist of a number of LEDs. If
any of the LEDs burn out, take your vehicle
to your Lexus dealer to have the light
replaced.
■Condensation build-up on the inside of
the lens
Temporary condensation build-up on the
inside of the headlight lens does not indi-
cate a malfunction. Contact your Lexus
dealer for more information in the following
situations:
●Large drops of water ha ve built up on the
inside of the lens.
●Water has built up inside the headlight.
■When replacing light bulbs
P.344
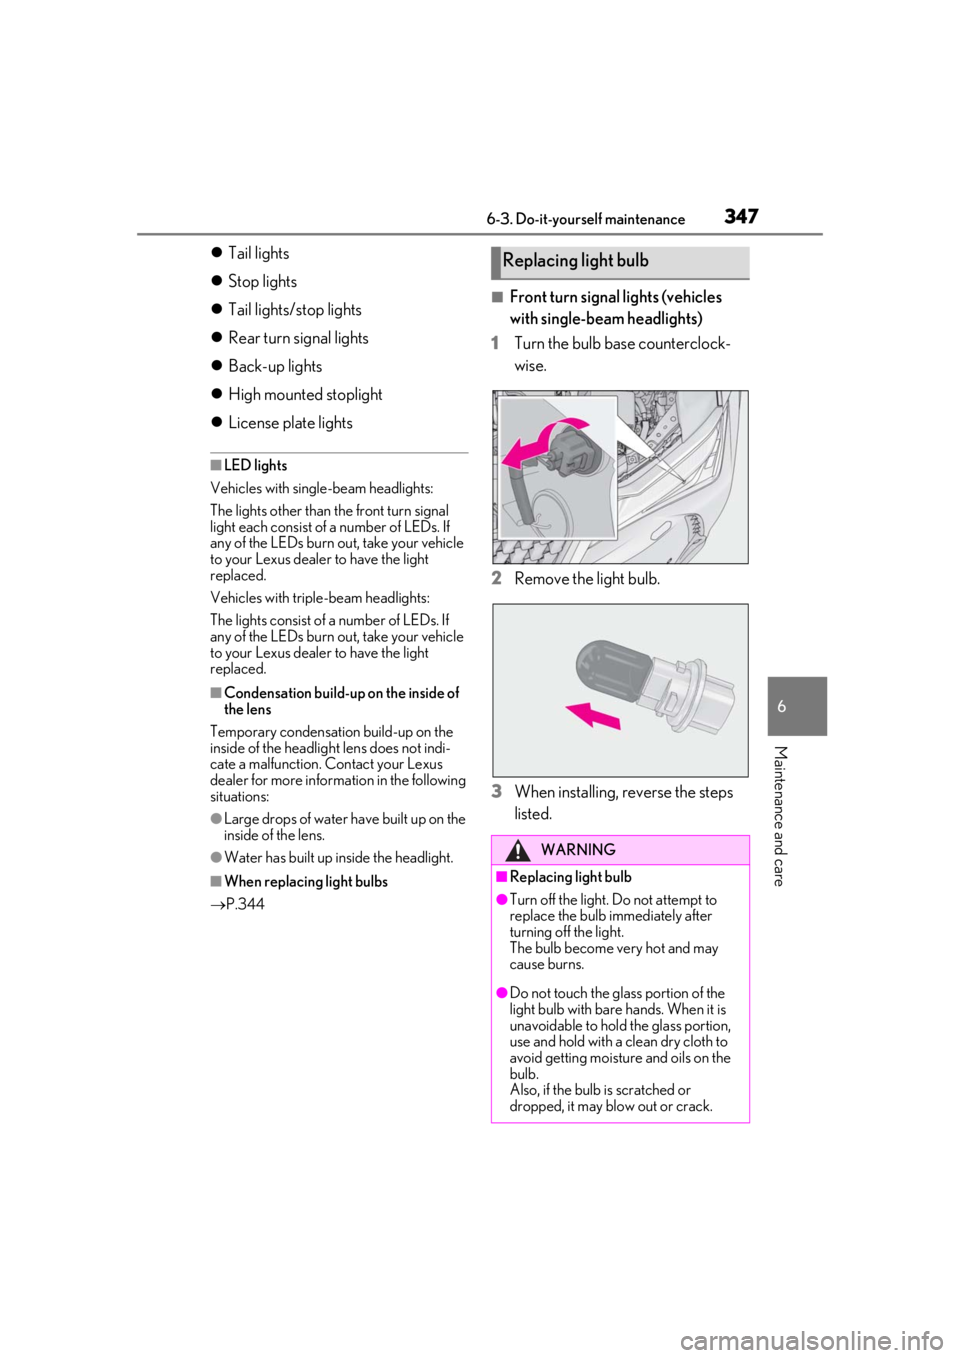
■Front turn signal lights (vehicles
with single-beam headlights)
1
Turn the bulb base counterclock-
wise.
2
Remove the light bulb.
3
When installing, reverse the steps
listed.
Replacing light bulb
WARNING
■Replacing light bulb
●Turn off the light. Do not attempt to
replace the bulb immediately after
turning off the light.
The bulb become very hot and may
cause burns.
●Do not touch the glass portion of the
light bulb with bare hands. When it is
unavoidable to hold the glass portion,
use and hold with a clean dry cloth to
avoid getting moisture and oils on the
bulb.
Also, if the bulb is scratched or
dropped, it may blow out or crack.
Page 378 of 452

3787-2. Steps to take in an emergency
One of the following may be the cause
of the problem:
There may not be sufficient fuel in
the vehicle’s tank.
Refuel the vehicle.
The engine may be flooded.
Try to restart the engine again fol-
lowing correct starting proce-
dures.( P.152)
There may be a malfunction in the
engine immobilizer system.
( P.62)
One of the following may be the cause
of the problem:
The battery terminal connections
may be loose or corroded.
The battery may be discharged.
( P.382) The engine starting system may be
malfunctioning due to an electrical
problem such as electronic key battery
depletion or a blown fuse. However, an
interim measure is available to start the
engine. (
P.378)
One of the following may be the cause
of the problem:
One or both of the battery terminals
may be disconnected.
The battery may be discharged.
( P.382)
There may be a malfunction in the
steering lock system.
Contact your Lexus dealer if the problem
cannot be repaired, or if repair procedures
are unknown.
When the engine does not start, the
following steps can be used as an
interim measure to start the engine if
the engine switch is functioning nor-
mally:
1 Press the parking brake switch to
check that the parking brake is set.
(P.160)
Parking brake indicator will come on.
If the engine will not start
If the engine will not start even
though correct starting procedures
are being followed ( P.152), con-
sider each of the following points:
The engine will not start even
though the starter motor oper-
ates normally.
The starter motor turns over
slowly, the interior lights and
headlights are dim, or the horn
does not sound or sounds at a low
volume.
The starter motor does not turn
over
The starter motor does not turn
over, the interior lights and head-
lights do not turn on, or the horn
does not sound.
Starting the engine in an emer-
gency
Page 384 of 452

3847-2. Steps to take in an emergency
6Open and close any of the doors of
your vehicle with the engine switch
OFF.
7 Maintain the engine speed of the
second vehicle and start the engine
of your vehicle by turning the
engine switch to ON.
8 Once the vehicle’s engine has
started, remove the jumper cables
in the exact reverse order from
which they were connected.
Once the engine starts, have the vehi-
cle inspected at your Lexus dealer as
soon as possible.■Starting the engine when the battery is
discharged
The engine cannot be started by push-start-
ing.
■To prevent battery discharge
●Turn off the headlights, the air condition-
ing system, the audio system, etc. while
the engine is off.
●Turn off any unnecessary electrical com-
ponents when the vehicle is running at a
low speed for an extended period, such
as in heavy traffic.
■Charging the battery
The electricity stored in the battery will dis-
charge gradually even when the vehicle is
not in use, due to natural discharge and the
draining effects of certain electrical appli-
ances. If the vehicle is left for a long time,
the battery may discharge, and the engine
may be unable to start. (The battery
recharges automatically during driving.)
■When the battery is removed or dis-
charged
●Information stored in the ECU is cleared.
When the battery is depleted, have the
vehicle inspected at your Lexus dealer.
●In some cases, it may not be possible to
unlock the doors using the smart access
system with push-button start when the
battery is discharged. Use the wireless
remote control or the mechanical key to
lock or unlock the doors.
●The engine may not start on the first
attempt after the battery has recharged
but will start normally after the second
attempt. This is not a malfunction.
●The engine switch mode is memorized by
the vehicle. When the battery is recon-
nected, the system will return to the
mode it was in before the battery was dis-
charged. Before disconnecting the bat-
tery, turn the engine switch off.
If you are unsure wh at mode the engine
switch was in before the battery dis-
charged, be especially careful when
reconnecting the battery.
●The power back door must be initialized.
( P.109)
Page 393 of 452
3938-1. Specifications
8
Vehicle specifications
*: The coolant capacity is a reference quantity.If replacement is necessary, contact your Lexus dealer.
■Spark plug
■Battery
Cooling system
Capacity*6.8 qt. (6.4 L, 5.6 Imp.qt.)
Coolant type
Use either of the following:
• “Toyota Super Long Life Coolant”
• Similar high-quality ethylene glycol-based non-silicate, non-
amine, non-nitrite, and non-borate coolant with long-life hybrid
organic acid technology
Do not use plain water alone.
Ignition system
MakeDENSO FC20HR-Q8
Gap0.031 in. (0.8 mm)
NOTICE
■Iridium-tipped spark plugs
Use only iridium-tipped spark plugs. Do not adjust the spark plug gap.
Electrical system
Open voltage at 68°F (20°C):12.3 V or higher
If the voltage is lower than the standard value,
charge the battery.
(After charging the battery, turn on the high beam
headlights for 30 seconds with the engine switch
OFF, and turn the headlights off.)
Charging rates:
Quick charge
Slow charge
15 A max.
5 A max.
Page 396 of 452
3968-1. Specifications
A: Wedge base bulbs (amber)
B: Wedge base bulbs (clear)
Light bulbs
Light bulbsBulb No.WType
ExteriorFront turn signal lights (vehicles
with single-beam headlights)WY21W21A
InteriorVanity lights8B