Page 367 of 452

3677-2. Steps to take in an emergency
7
When trouble arises
WARNING
TPMS (tire pressure warning system)
malfunctions may occur for a variety of
reasons, including the installation of
replacement or alternate tires or wheels
on the vehicle that prevent the TPMS
(tire pressure warning system) from func-
tioning properly. Always check the
TPMS (tire pressure warning system)
malfunction telltale after replacing one
or more tires or wheels on your vehicle to
ensure that the replacement or alternate
tires and wheels allow the TPMS (tire
pressure warning system) to continue to
function properly.
NOTICE
■To ensure the tire pressure warning
system operates properly
Do not install tires wi th different specifi-
cations or makers, as the tire pressure
warning system may not operate prop-
erly.
If a warning message is dis-
played
The multi-information display
shows warnings of system malfunc-
tions, incorrectly performed opera-
tions, and messages that indicate a
need for maintenance. When a
message is shown, perform the cor-
rection procedure appropriate to
the message.
Multi-information display
Follow the instructions of the message
on the multi-information display.
If any of the warning messages are
shown again after the following actions
have been performed, contact your
Lexus dealer.
A
Page 368 of 452

3687-2. Steps to take in an emergency
The warning lights and warning buzzers operate as follows depending on the con-
tent of the message. If a message indicates the need for inspection by a dealer, have
the vehicle inspected by your Lexus dealer immediately.
*: A buzzer sounds the first time a message is shown on the multi-information display.
■Warning messages
The warning messages explained below
may differ from the actual messages
according to operation conditions and vehi-
cle specifications.
■Warning buzzer
In some cases, the bu zzer may not be heard
due to being in a noisy location or audio
sound.
■If “Engine Oil Level Low Add or
Replace” is displayed
The engine oil level is low. Check the level
of the engine oil, and add if necessary.
This message may appear if the vehicle is
stopped on a slope. Move the vehicle to a
level surface and check to see if the mes-
sage disappears.
■If “Engine Stopped Steering Power
Low” is displayed
This message is displayed if the engine is
stopped while driving.
When steering wheel operations are
heavier than usual, gr ip the steering wheel
firmly and operate it using more force than
usual.
■If “Auto Power Off to Conserve Battery”
is displayed
Power was turned off due to the automatic
power off function. Next time when starting
the engine, increase the engine speed
slightly and maintain that level for approxi-
mately 5 minutes to recharge the battery.
■If “High Power Cons umption Power to
Climate Temporarily Limited” is dis-
played
Turn off unnecessary electronic equipment
to reduce power consumption.
Messages and warnings
Warning lightWarning buzzer*Warning
Sounds
• Indicates an important situation, such as when a system related to drivin g is malfunctioning or
that danger may result if the correction proce-
dure is not performed
• Indicates a situation, such as when damage to the vehicle or danger may result
Comes onor flashesSounds
Indicates an important situation, such as when the
systems shown on the multi-information display
may be malfunctioning
Does not sound
• Indicates a condition, such as malfunction of electrical components, th eir condition, or indi-
cates the need for maintenance
• Indicates a situation, such as when an operation has been performed incorrectly, or indicates
how to perform an operation correctly
Page 370 of 452

3707-2. Steps to take in an emergency
●If “Access System with Elec. Key Malfunc-
tion” is shown on the multi-information
display, it may indicate a malfunction.
Have the vehicle inspected by your Lexus
dealer immediately.
●If any of the following messages are
shown on the multi-information display, it
may indicate a malfunction. Immediately
stop the vehicle and contact your Lexus
dealer.
• “Braking Power Low”
• “Charging System Malfunction”
• “Oil Pressure Low”
Stop the vehicle in a safe place on a
hard, flat surface.
Set the parking brake.
Shift the shift lever to P.
Stop the engine.
Turn on the emergency flashers.
( P.350)
NOTICE
■If “High Power Consumption Power
to Climate Temporarily Limited” is
displayed frequently
There is a possible malfunction relating
to the charging system or the battery
may be deteriorating. Have the vehicle
inspected by your Lexus dealer.
If you have a flat tire (vehi-
cles with spare tire)
Your vehicle is equipped with a
spare tire. The flat tire can be
replaced with the spare tire.
For details about tires: P.328
WARNING
■If you have a flat tire
Do not continue driving with a flat tire.
Driving even a short distance with a flat
tire can damage the tire and the wheel
beyond repair, which could result in an
accident.
Before jacking up the vehicle
Page 371 of 452

3717-2. Steps to take in an emergency
7
When trouble arises
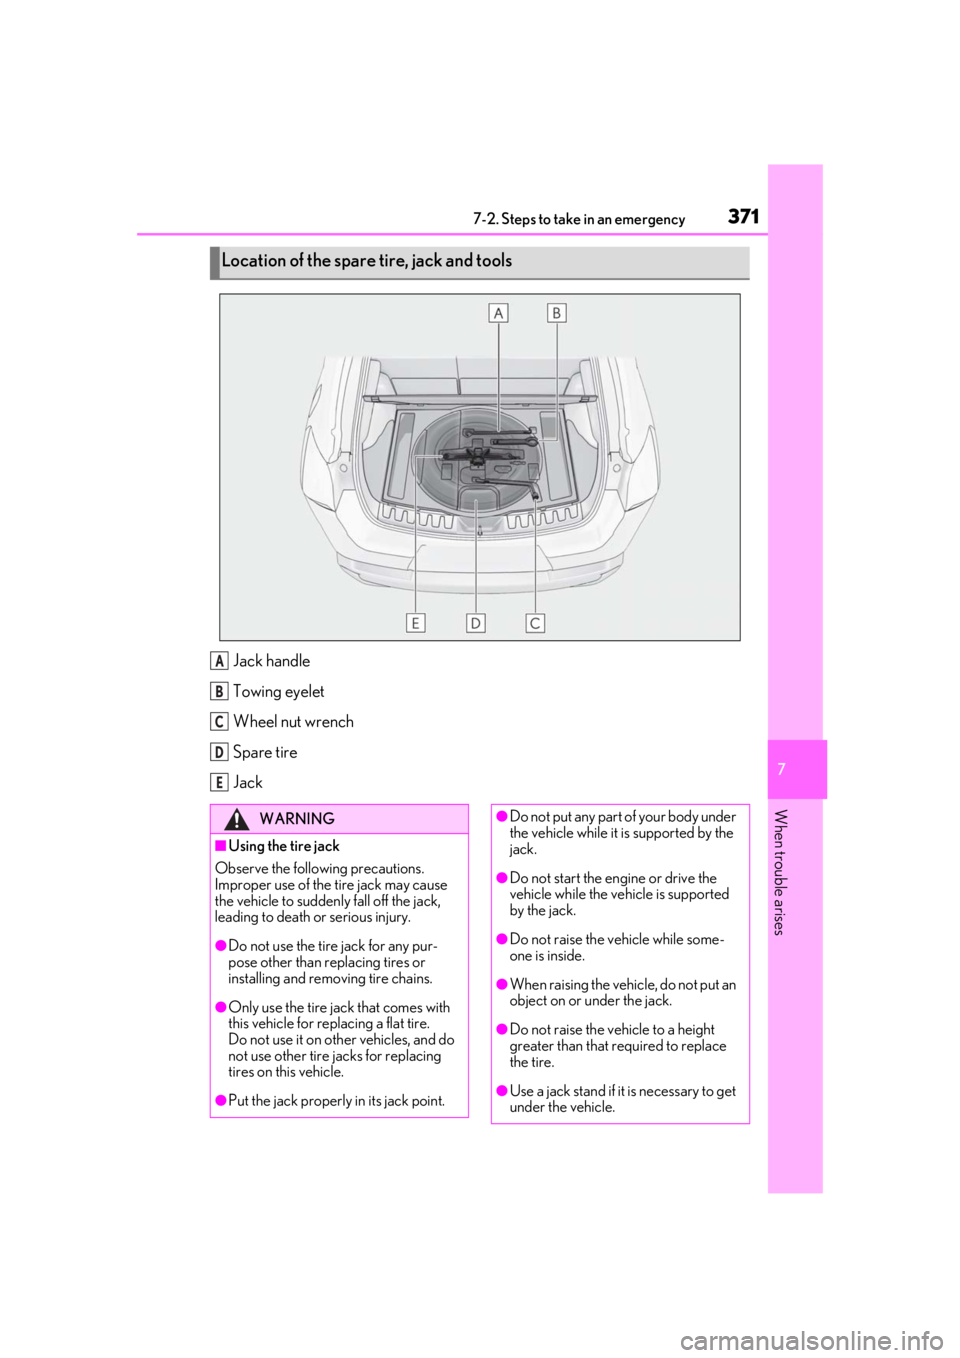
Jack handle
Towing eyelet
Wheel nut wrench
Spare tire
Jack
Location of the spare tire, jack and tools
A
B
C
D
E
WARNING
■Using the tire jack
Observe the following precautions.
Improper use of the tire jack may cause
the vehicle to suddenly fall off the jack,
leading to death or serious injury.
●Do not use the tire jack for any pur-
pose other than replacing tires or
installing and removing tire chains.
●Only use the tire jack that comes with
this vehicle for replacing a flat tire.
Do not use it on other vehicles, and do
not use other tire jacks for replacing
tires on this vehicle.
●Put the jack properly in its jack point.
●Do not put any part of your body under
the vehicle while it is supported by the
jack.
●Do not start the engine or drive the
vehicle while the vehicle is supported
by the jack.
●Do not raise the vehicle while some-
one is inside.
●When raising the vehicle, do not put an
object on or under the jack.
●Do not raise the vehicle to a height
greater than that required to replace
the tire.
●Use a jack stand if it is necessary to get
under the vehicle.
Page 372 of 452
3727-2. Steps to take in an emergency
1Pull the lever upwards and open the
deck board.
2
Remove the deck board. 3
Remove the Jack.
1
Unhook the rubber band.
2
Take out the jack.
When stowing the jack, close it by turning
the handle indicated by until it does not
move anymore, place the jack and fix it
with the rubber band.
1Remove the side deck boards.
( P.281)
2
Remove the deck under tray.
WARNING
●When lowering the vehicle, make sure
that there is no-one near the vehicle. If
there are people nearby, warn them
vocally before lowering.
Taking out the jack
Taking out the spare tire
A
Page 373 of 452
3737-2. Steps to take in an emergency
7
When trouble arises
3Loosen the center fastener that
secures the spare tire.
1
Chock the tires. 2
Slightly loosen the wheel nuts (one
turn).
3
Turn the tire jack portion by
hand until the notch of the jack is in
contact with the jack point.
The jack point guides are located under
the rocker panel. They indicate the jack
point positions.
4Install the wheel nut wrench in jack
handle.
WARNING
■When storing the spare tire
Be careful not to catch fingers or other
body parts between the spare tire and
the body of the vehicle.
Replacing a flat tire
Flat tireWheel chock positions
Front left-
hand sideBehind the rear right-hand
side tire
Front right-
hand sideBehind the rear left-hand
side tire
Rear left-hand
sideIn front of the front right-
hand side tire
Rear right-
hand sideIn front of the front left-
hand side tire
A
Page 374 of 452

3747-2. Steps to take in an emergency
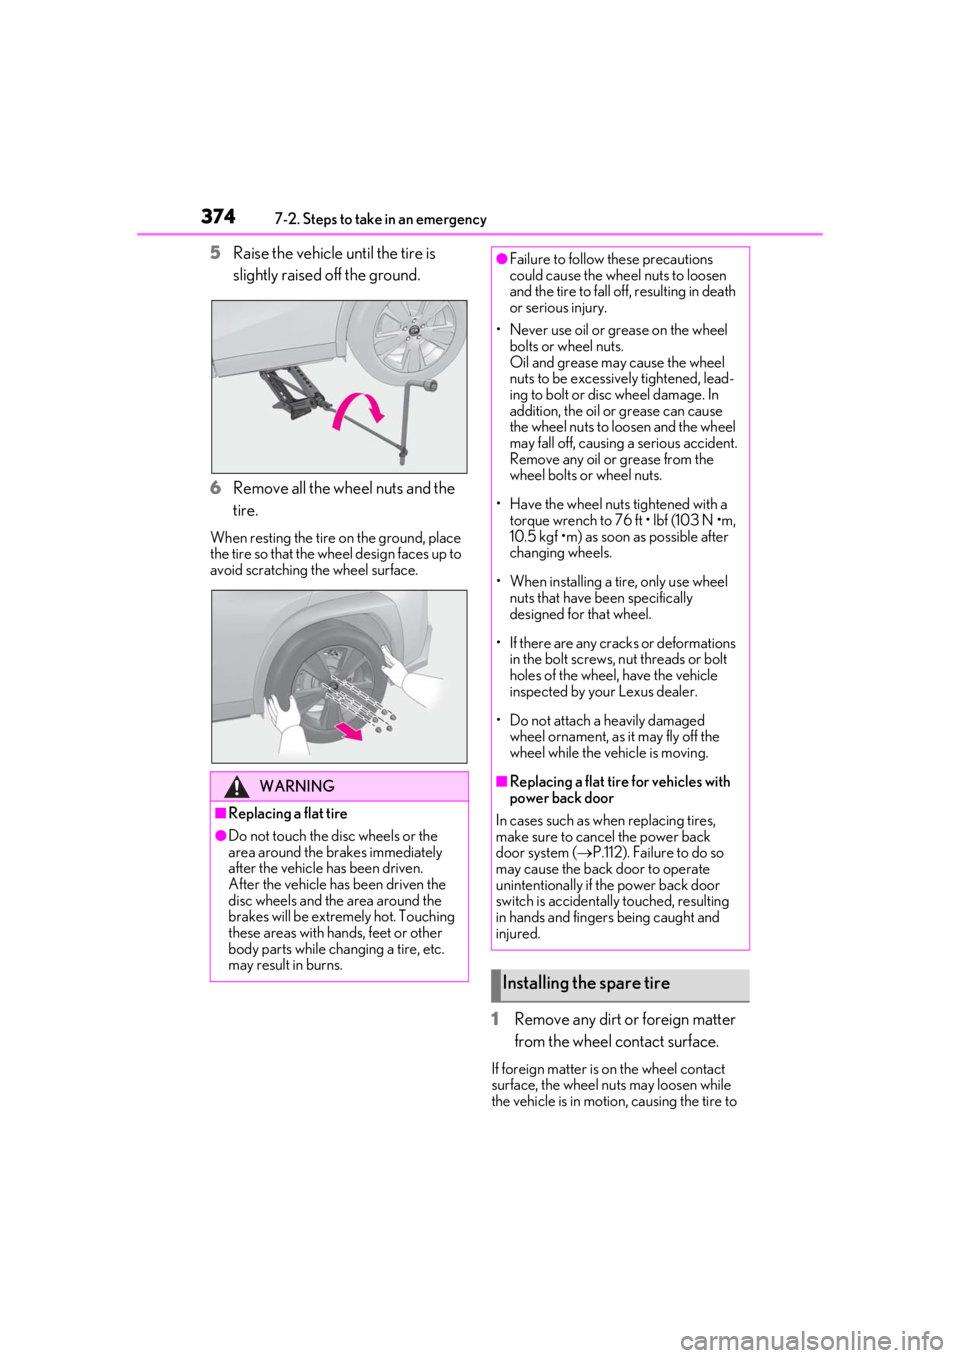
5Raise the vehicle until the tire is
slightly raised off the ground.
6
Remove all the wheel nuts and the
tire.
When resting the tire on the ground, place
the tire so that the wh eel design faces up to
avoid scratching the wheel surface.
1Remove any dirt or foreign matter
from the wheel contact surface.
If foreign matter is on the wheel contact
surface, the wheel nuts may loosen while
the vehicle is in motion, causing the tire to
WARNING
■Replacing a flat tire
●Do not touch the disc wheels or the
area around the brakes immediately
after the vehicle has been driven.
After the vehicle has been driven the
disc wheels and the area around the
brakes will be extremely hot. Touching
these areas with hands, feet or other
body parts while changing a tire, etc.
may result in burns.
●Failure to follow these precautions
could cause the wheel nuts to loosen
and the tire to fall of f, resulting in death
or serious injury.
• Never use oil or grease on the wheel bolts or wheel nuts.
Oil and grease may cause the wheel
nuts to be excessively tightened, lead-
ing to bolt or disc wheel damage. In
addition, the oil or grease can cause
the wheel nuts to loosen and the wheel
may fall off, causing a serious accident.
Remove any oil or grease from the
wheel bolts or wheel nuts.
• Have the wheel nuts tightened with a torque wrench to 76 ft • lbf (103 N •m,
10.5 kgf •m) as soon as possible after
changing wheels.
• When installing a tire, only use wheel nuts that have been specifically
designed for that wheel.
• If there are any cracks or deformations in the bolt screws, nut threads or bolt
holes of the wheel, have the vehicle
inspected by your Lexus dealer.
• Do not attach a heavily damaged wheel ornament, as it may fly off the
wheel while the vehicle is moving.
■Replacing a flat tire for vehicles with
power back door
In cases such as when replacing tires,
make sure to cancel the power back
door system ( P.112). Failure to do so
may cause the back door to operate
unintentionally if the power back door
switch is accidentally touched, resulting
in hands and fingers being caught and
injured.
Installing the spare tire
Page 375 of 452

3757-2. Steps to take in an emergency
7
When trouble arises
come off.
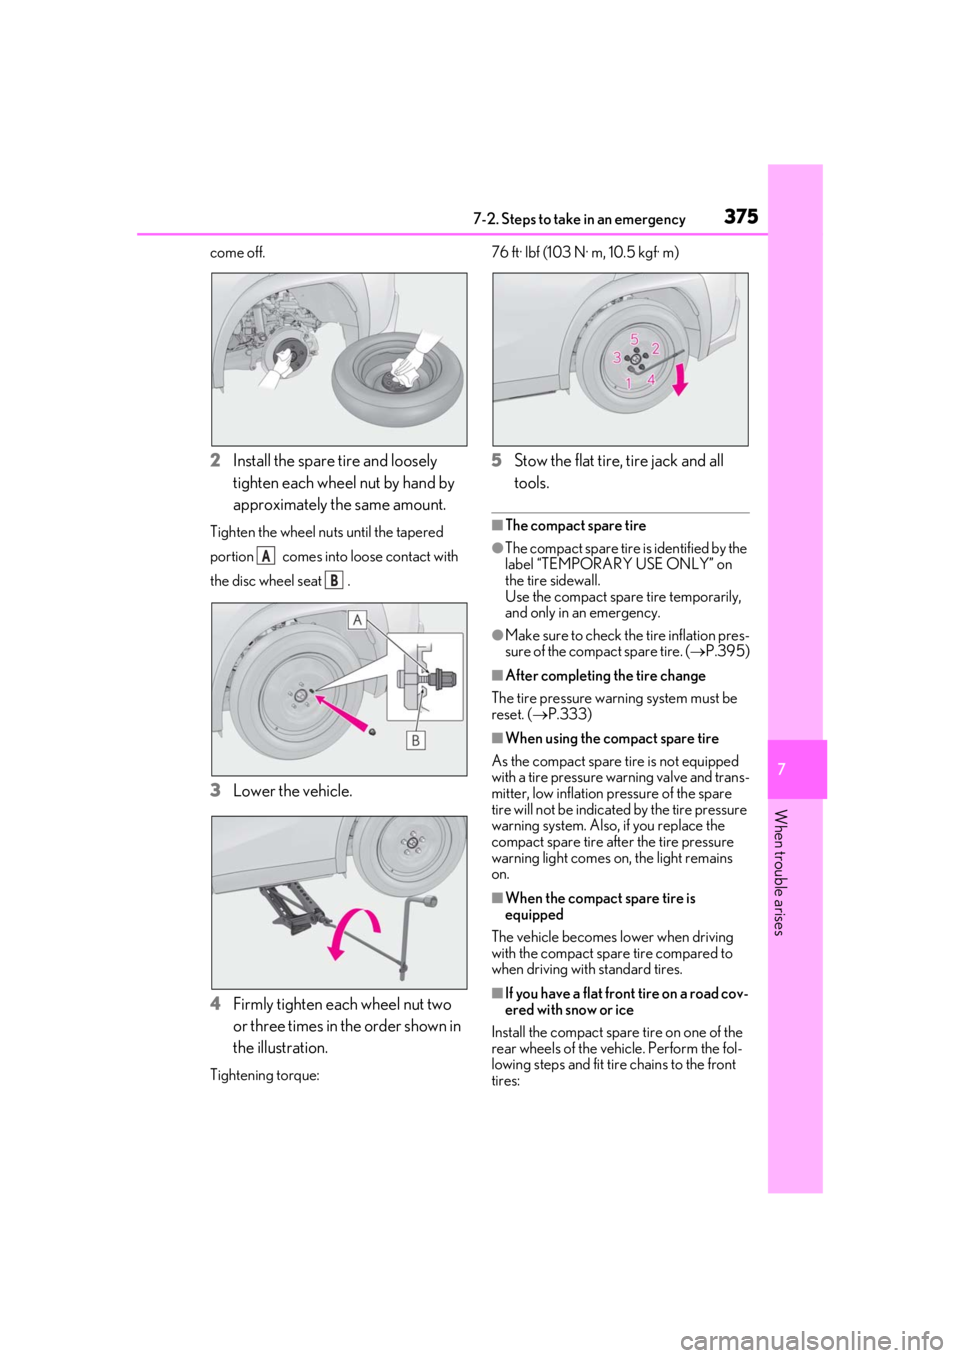
2Install the spare tire and loosely
tighten each wheel nut by hand by
approximately the same amount.
Tighten the wheel nuts until the tapered
portion comes into loose contact with
the disc wheel seat .
3Lower the vehicle.
4 Firmly tighten each wheel nut two
or three times in the order shown in
the illustration.
Tightening torque: 76 ft· lbf (103 N· m, 10.5 kgf· m)
5
Stow the flat tire, tire jack and all
tools.
■The compact spare tire
●The compact spare tire is identified by the
label “TEMPORARY USE ONLY” on
the tire sidewall.
Use the compact spar e tire temporarily,
and only in an emergency.
●Make sure to check the tire inflation pres-
sure of the compact spare tire. ( P.395)
■After completing the tire change
The tire pressure warn ing system must be
reset. ( P.333)
■When using the compact spare tire
As the compact spare tire is not equipped
with a tire pressure warning valve and trans-
mitter, low inflation pressure of the spare
tire will not be indicated by the tire pressure
warning system. Also, if you replace the
compact spare tire afte r the tire pressure
warning light comes on, the light remains
on.
■When the compact spare tire is
equipped
The vehicle becomes lower when driving
with the compact spare tire compared to
when driving with standard tires.
■If you have a flat front tire on a road cov-
ered with snow or ice
Install the compact spare tire on one of the
rear wheels of the vehicle. Perform the fol-
lowing steps and fit tire chains to the front
tires:
A
B